Belated Birthday
 Ron and I have been just returned from a touring holiday up to Karumba, across to the coast and back home. We travelled over 5,000klms and visited many towns. One highlight was watching the sun set over the Gulf of Carpentaria, those of you who live on the east coast of Australia as I do will know that we only get to see the sun rise, so it was a real treat to see the magnificent sunset over the Gulf.
Anyway while we were away I missed a milestone birthday for a lovely lady friend of ours. So it was one of the first things I created once I returned home.  I actually CASED this card I found on Pinterest by Jen at Ladybug Designs. I embossed Whisper White card using the new Fluttering Embossing Folder. I don’t know if you have noticed but this Embossing Folder and the Brick Wall Embossing Folder are 15.2cm square (6″) which makes it so easy to emboss card stock in any direction, either portrait or landscape. Fantastic! Once I embossed the Whisper White card I attached it to scored and folded Wisteria Wonder card. I stamped the greeting from the Petite Pairs stamp set onto the bottom left hand corner of a smaller piece of Whisper White card using Elegant Eggplant ink, attached it to Wisteria Wonder card and then the card front using dimensionals.
  To create the butterfly I used the gorgeous new stamp set Watercolour Wings. How wonderful is this set!! You can create butterflies in two sizes, which just happen to match the Butterflies Thinlits Dies – and not only that there is another new co-ordinating Framelit set called Bold Butterfly Framelits. What does this mean, well now you can cut the solid butterfly and then cut the matching butterfly with the intricate detail cuts. What did I do, well I stamped the outline of the large butterfly wing onto Wisteria Wonder card using Wisteria Wonder ink and then I stamped the centre details of the butterfly using Elegant Eggplant ink. I cut out one solid butterfly and one detail butterfly. The solid butterfly is attached to the small greeting panel and then I stamped the antennae using Elegant Eggplant ink. I attached the detail butterfly over the top using glue dots in the centre only, so the wings could have some lift. I added Basic Rhinestones down the centre of the butterfly instead of stamping the body. Gorgeous isn’t it.
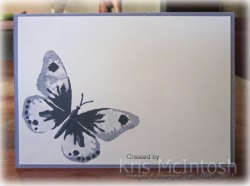 To decorate the inside I stamped the large solid butterfly using Wisteria Wonder ink which I had stamped off onto scrap paper first onto the lower left hand corner of Whisper White card. I stamped the outline of the wings over the top using Wisteria Wonder ink and then the centre detail using Elegant Eggplant. I also stamped the body and the antennae using Elegant Eggplant ink.
I love this card, and I hope it will make my friend forgive me for being late with her birthday wishes.
What do you think? Don’t you just love this set? Want one of your own, well click on the link below to take you to my store so that you can purchase it.
Bye for now,
Kris
Product Used:


Beautiful!!! ~Sophia
LikeLike
Thanks Sophia.
LikeLike