Quick Tags
Sounds like a broken record but I really have been busy and haven’t had time to share with you all as much as I would like. This week I have my last class at the Retirement Village for the year and also my annual get together/Christmas Party with my customers and downline, so I have had lots of organising, cooking and also creating to get done. Another exciting thing is happening today – we are picking up our new caravan. Yay! Can’t wait to have the time to take it away.
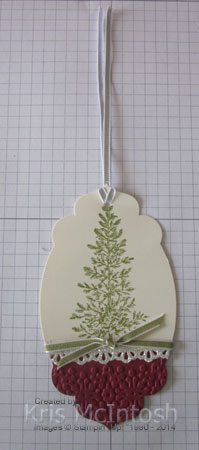 Ok so today I am going to share with you a couple of tags we made at the Retirement Village last week. The first tag was inspired by one on Pinterest, I changed up the product to replace the retired items. Unfortunately, now I can’t find the link to share the original with you. I started by cutting Very Vanilla card using the large Apothecary Accents Framelit. I stamped the tree from the Lovely as a Tree stamp set using Old Olive ink. I cut a piece of Cherry Cobbler card using the same Apothecary Accents Framelit, to create a small layer for the base of the die. I embossed this piece with a Delicate Designs Embossing Folder and attached it to the stamped tag. I cut a strip of Silver Glimmer Paper in half using the fancy Finishing Touches Edgelit. I attached the decorative edge on top of the Cherry Cobbler card. I wrapped the tag with Old Olive 1/8″ Taffeta Ribbon and tied a knot. I stamped “to/from” (from the Cheerful Tags stamp set) onto the back of the tag using Old Olive ink. I used the Crop-A-Dile to punch a hole in the top of the tag and added a length of Silver 1/8″ Ribbon.
For the second tag I cut a strip of Crumb Cake card 5cm wide and punched one short end using the Scallop Tag Topper Punch. I used the other half of the Silver Glimmer Paper I cut with the decorative edge, attached it behind a piece of Under the Tree Designer Series Paper before attaching it to the bottom of the tag. I stamped the tree image from Festival of Trees onto Very Vanilla card using Garden Green ink and punched it with the matching Tree Punch. I stamped “merry & bright” from the Good Greetings stamp set (unfortunately this set is no longer available – hopefully you got it while it was available) onto Very Vanilla card using Early Expresso ink. I cut the greeting using the Bitty Banner Framelit and gave it a little curl with my fingers. I attached it to the bottom of the tag using dimensionals in the middle and Glue Dots on the ends. I stamped “to/from” (Cheerful Tags stamp set) onto the back of the tag using Early Expresso ink. Lastly I tied a length of Cherry Cobbler 1/2″ Seam Binding through the top of the tag.
I love these tags and will, of course, be making good use of them when I finally get around to wrapping my gifts.
Bye for now,
Kris
Product Used:


