Daintree
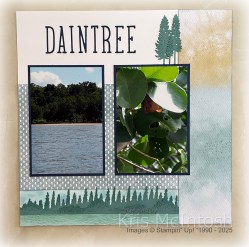
Today’s page shows off some photos of our first trip to the Daintree. Ron and I had such a great time working our way up the coast and back again. I created this layout using the 1, 2, 3 Layout we used in October’s class. You can find these layouts by Noreen Smith on You Tube. I cut a piece of Everyday Happiness 12″ x 12″ Designer Series Paper to create the pages. I did add a little Night of Navy ink to the edges of all the Designer Series Paper pieces.

I added Night of Navy mats to the two photos on the left page and the 4″ x 4″ photo on the right page. I used a Blending Brush to add a little Balmy Blue ink across the bottom of the left hand page. I cut the trees from Lost Lagoon card using the Scenic Adventure Dies. I cut the grassy piece from Lost Lagoon card using another of the Scenic Adventure Dies. For each of these pieces I used a Blending Brush to add Lost Lagoon over the tops of the die cuts. I also cut a piece of Pool Party card using another of the Scenic Adventure Dies. I used a blending brush to add Pool Party ink to the top of this piece of card.

I layered the die cuts across the blended panel on the left hand page. I also added Balmy Blue ink using a Blending Brush to the upper right hand corner of the right hand page. I die cut Lost Lagoon card using the tree die from the Scenic Adventure Dies and added a little Lost Lagoon ink before atttaching the trees to the right hand page. I printed my journaling onto Basic White card which I cut into strips. I dipped the edges of the strips into the Night of Navy ink pad to give them a little more dimension before attaching them to the right hand page. My title is cut from Night of Navy card using the Alphabet A La Mode Dies. I die cut Lost Lagoon card using the tree dies from the Scenic Adventure Dies and layered them beside the title. I love how these pages are enhanced by the beautiful Designer Series Paper, don’t you.
Bye for now,
Kris
Product Used: