Deck The Halls
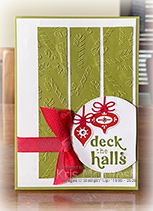
Today I have a card to share with you created using the Festive Cheer Bundle which was released as part of the July Online exclusive product. I began by embossing three strips of Old Olive card using one of the folders from the Seasonal Cheer Mini Embossing Folders. I attached the embossed panels to the right hand side of Basic White card. I wrapped the panel using Real Red Shiny Ribbon (Retired). I die cut Basic White card using the 2nd largest circle from the Stylish Shapes Dies. I stamped “deck the halls” from the Festive Cheer stamp set across the bottom of the circle using Old Olive ink.
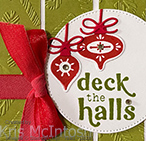
I stamped the baubles from the Festive Cheer stamp set onto scrap Basic White card using Real Red ink. I cut out the baubles using the co-ordinating Festive Cheer Dies. I die cut the bauble topper, bow and strings from Real Red card using the Festive Cheer Dies. I attached the toppers to the baubles before attaching them to the stamped Basic White circle making sure that I could tuck the strings underneath. The bows are attached to the bauble toppers. The circle is attached to the Basic White panel using dimensionals before I trimmed off the right hand edge. I tied a bow in the Real Red Shiny Ribbon (retired) and attached it beside the image panel using Glue Dots.
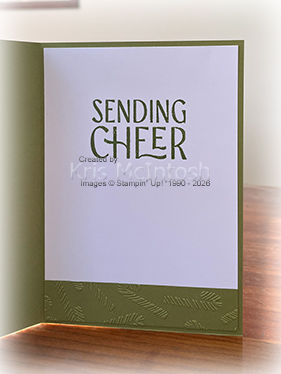
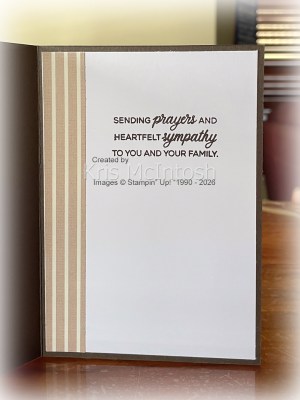
The whole panel is attached to Old Olive card before adding three Basic Rhinestones to the image panel. To decorate the inside of the card I stamped “sending cheer” from the Festive Cheer stamp set onto Basic White card using Old Olive ink. I embossed a strip of Old Olive card using the same pattern from the Seasonal Cheer Mini Embossing Folders. The embossed Old Olive card is attached across the bottom of the Basic White stamped panel. I have had to think hard creating my cards using the Festive Cheer Bundle as I do not have any Christmassy Paper yet. The Seasonal Cheer Mini Embossing Folders have been a life saver for me.
Bye for now,
Kris
Product Used:


Thinking of You

Today I have a simple card which really focuses on the gorgeous Brushed with Beauty 12″ x 12″ Designer Series Paper. A Paper I must admit I have slightly overlooked ! I stamped the greeting from the Phrases and Frames stamp set onto the lower right hand corner of Basic White card using Early Espresso ink. I attached a piece of the striped pattern paper from the Brushed with Beauty Designer Series Paper onto the left hand side of the stamped panel.
The whole panel is attached to scored and folded Early Espresso card. I cut another pattern from the Brushed with Beauty Designer Series Paper, one which I had overlooked as being too dark. The Designer Series Paper is attached it to Crumb Cake card. The whole panel is attached to the card front using dimensionals.
Lastly I added three Basic Rhinestones to the card front. To decorate the inside of the card, I attached a narrow strip of the striped Brushed with Beauty Designer Series Paper to the left hand side of Basic White card. I stamped the greeting from the Phrases and Frames stamp set onto the Basic White card using Early Espresso ink. So simple but really pretty don’t you think?
Bye for now,
Kris
Product Used:


Celebrate
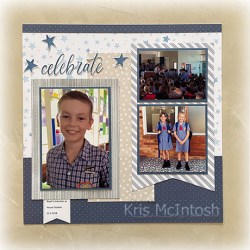
My page today shows off a couple of photos from the day that my grandson became a House Captain for his school. I stamped the star image from the Balloon Festoon stamp set across the top of White Willow 12″ x 12″ card using Misty Moonlight ink. I did stamp onto scrap paper before stamping onto the page. I cut three different paper patterns from the Paper Medley 12″ x 12″ Designer Series Paper to attach to my page. I stamped the “celebrate” from the retired Wildflower Celebrations stamp set onto Basic White card using Misty Moonlight ink and cut it out. I stamped the star image from the retired With You in Mind stamp set onto Basic White card three times using Misty Moonlight ink. I cut out the stars and attached them around the title. I printed my journaling onto Basic White card and used one of the banners from the Nested Essential Dies to cut it out. I love how quickly this page came together. I did follow one of the layout guides from the Creative Design Teams 12″ x 12″ Sketch Book Volume 1.
Bye for now,
Kris
Product Used:


Relaxing Waterside
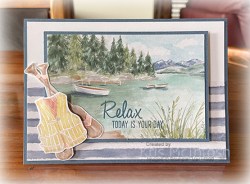
Today I have another card for you using the beautiful Waterside Retreat 12″ x 12″ Designer Series Paper. I cut a piece of Designer Series Paper and attached it across the bottom of Basic White card. The whole panel is attached to Misty Moonlight card. I used one of the card panels from the Designer Series Paper and attached it to Misty Moonlight card.
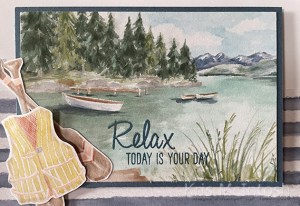
I did however trim down the card panel a little. I stamped “relax” and “today is your day” from the Relaxing Waterside stamp set onto the card panel using Misty Moonlight ink. The image panel is attached to the card front using dimensionals. I cut a pair of oars and a life jacket from the Waterside Retreat Designer Series Paper and attached them to the left hand side of the card front using dimensionals where necessary.
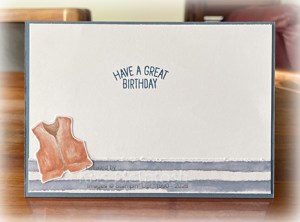
To decorate the inside of the card I attached a narrow strip of Waterside Retreat Designer Series Paper across the bottom of Basic White card. I stamped the greeting from the Relaxing Waterside stamp set onto the Basic White card using Misty Moonlight ink. I cut another life jacket from the Designer Series Paper and attached it to the lower left hand corner of the Basic White card. This is beautiful paper and has so many options to create cards and memory keeping pages.
Bye for now,
Kris
Product Used:


A Fabulous Day
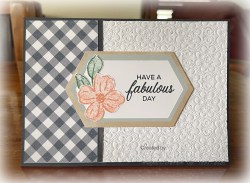
Today I have another card to share with you using up some more of the left over pieces from the 2026 Virtual Album Retreat. For this card I used the Impressions Mat and the Eyelet Blooms Die to emboss Basic White card. I attached a strip of Night of Navy card to the back of one edge of a piece of the left over Designer Series Paper from the Retreat. The Designer Series Paper is attached to the left hand edge of the embossed Basic White card before being attached to a Night of Navy card base.
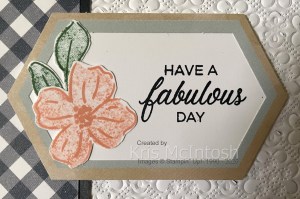
I used one of the frames left over from the Album Retreat and attached a piece of Basic White behind it. I stamped the greeting from the Phrases & Frames stamp set onto the right hand side of the panel before attaching it to the card front using dimensionals. I stamped the outline flower from the Happiness is Here 1 Stamp set onto Basic White card using Crisp Cantaloupe ink. I stramped the solid floral image from the Happineess is Here 2 stamp set over the top of the outlined flower making sure to stamp onto scrap paper first.
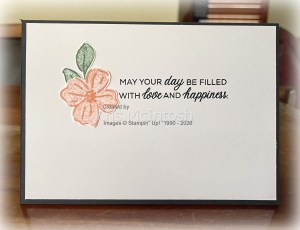
I stamped the outline leaf image from the Happiness is Here 1 stamp set onto Basic White card using Peaceful Pine ink and stamped the solid leaf image from the Happiness is Here 2 stamp set over the top using Peaceful Pine ink which I stamped onto scrap paper first. I cut out the flower and the leaf and attached them to the left hand side of the greeting panel. To decorate the inside of the card I stamped another greeting from the Phrases & Frames stamp set onto Basic White card using Night of Navy ink. I created another flower and leaf the same way as I did for the card front and attached them beside the greeting. I have the left overs from the Virtual Album Retreat sitting on my desk so that they inspire me to create something. It’s a fun way to use up scraps!
Bye for now,
Kris
Product Used:
You can view the 2026 Virtual Album Retreat here in my online store. This Retreat is on the Clearance Rack so may be gone by now. The Happiness is Here 1 & 2 stamp sets are part of the product in the Virtual Album Retreat


Flooding Rain
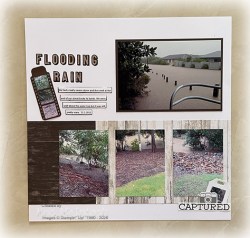
Way back in January 2011 we had enough rain to bring localised flooding. Luckily for us we were well and truly above the rising flood waters from the creek at the end of our street. So today’s page shares some photos from that day. I used a 1, 2, 3 scrapbook layout from Noreen Smith to cut a piece of Country Woods Designer Series Paper. The paper is attached to White Willow 12″ x 12″ card. I created my title using the Happiness is Here Alphabet 1 and 2. I used Early Espresso ink for the title with the fill stamped off onto scrap paper first.
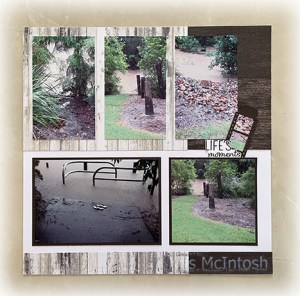
These two stamp sets were part of the 2026 Virtual Album Retreat which is on the Last Chance list. I die cut the photo strips from Early Espresso card using the Capturing Smiles Dies and added some of the scrap pieces from my photos behind them before attaching one to each page. I stamped “Lifes” “moments” from the Capturing Smiles stamp set onto Basic White card and fussy cut it before attaching it to the right hand page. I stamped “captured” from the Capturing Smiles stamp set onto Basic White card using Early Espresso ink and trimmed it.
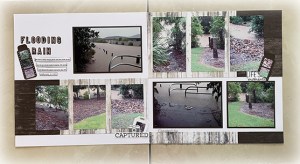
I cut Basic White card using the tag die from the Capturing Smiles Dies and added a photo panel cut using the Capturing Smiles Die. I stamped the small camera from the Capturing Smiles stamp set onto Basic White card using Smoky Slate ink. I cut out the camera image using the co-ordinating Capturing Smiles Die. I layered the tag, camera and “captured” onto the lower right hand corner of the left hand page. I printed my journaling onto Basic White card, trimmed it into strips, then dipped the edges in Early Espresso ink and attached the strips the left hand page. I love how these pages turned out, bringing to life memories from a scary day.
Bye for now,
Kris
Product Used:


Sending Love

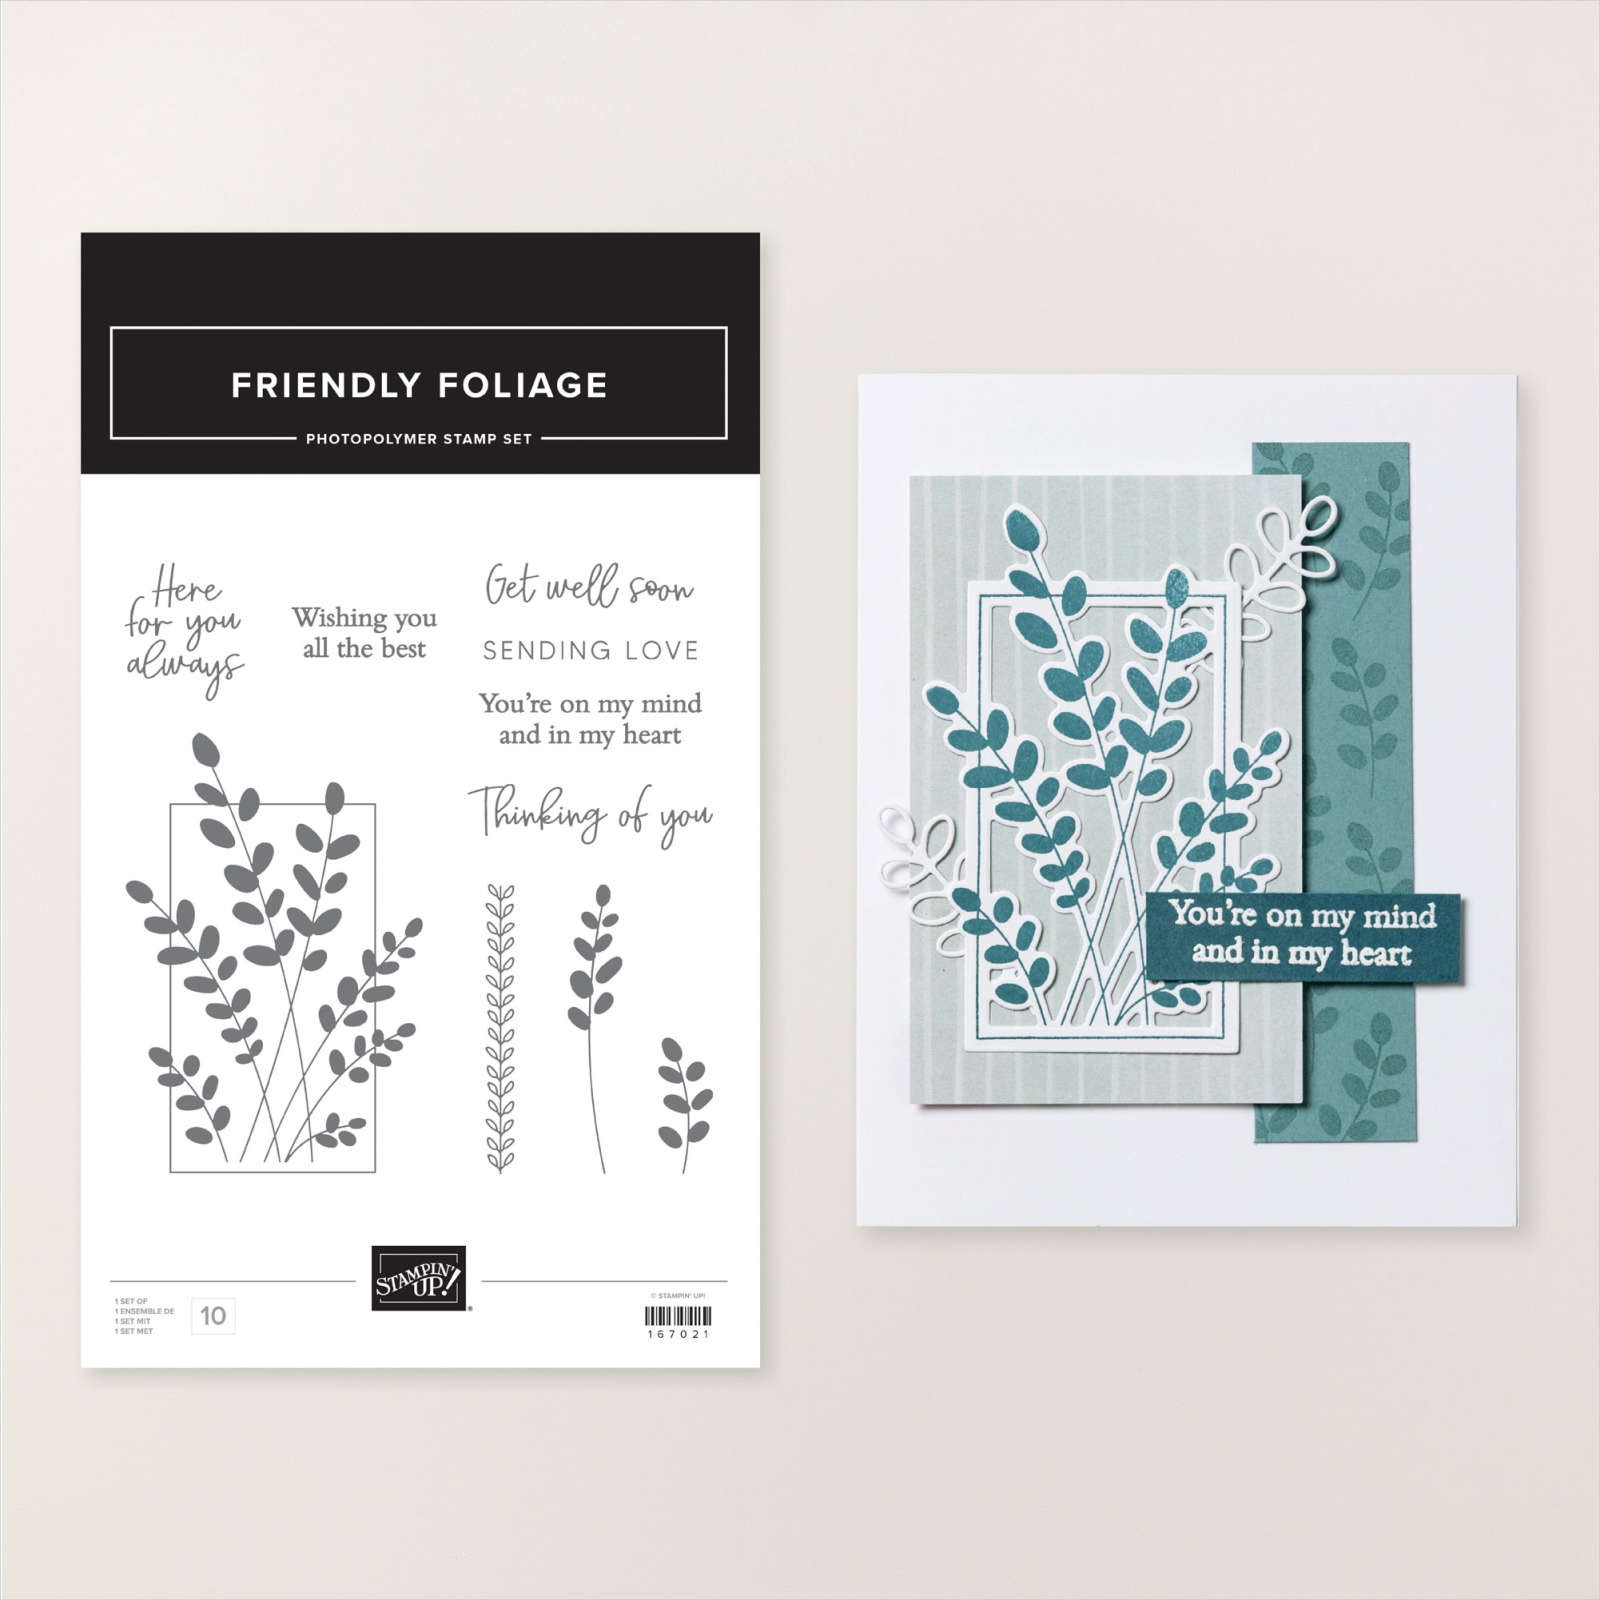
For today’s card I cut two pieces of Nature Walk 12″ x 12″ Designer Series Paper and attached them to Basic White card. The whole panel is attached to scored and folded Pretty Peacock ink. I stamped the large leafy image from the Friendly Foliage stamp set onto Basic White card using Pretty Peacock ink. I cut out the image using the co-ordinating Friendly Foliage Die.

The image is attached to the card front using dimensionals. I stamped “sending love” from the Friendly Foliage stamp set onto Basic White card using Pretty Peacock ink. I punched out the greeting using the Three Banners Punch.

I trimmed the left hand edge and used the Dark Pretty Peacock Stampin’ Blend to colour the edges of the banner before attaching it to the card front using dimensionals where necessary. To decorate the inside of the card I stamped “get well soon” from the Friendly Foliage stamp set onto Basic White card using Pretty Peacock ink. I stamped the two smaller leaf images from the Friendly Foliage stamp set beside the greeting using Pretty Peacock ink. Simple but pretty card, don’t you think?
Bye for now,
Kris
Product Used:


Relax

Today I have a card to share with using the Relaxing Waterside Bundle. I began by embossing a Basic White panel using the Lovely Stripes 3D Embossing Folder. The embossed panel is attached to scored and folded Night of Navy card. I die cut Basic White card using the largest circle from the Stylish Shapes Dies. I stamped the chair from the Relaxing Waterside stamp set onto Basic White card using Night of Navy ink. I stamped the cup image from the Relaxing Waterside stamp set onto Basic White card using Balmy Blue ink. I stamped the large grass image from the Relaxing Waterside stamp set onto Basic White card using Mossy Meadow ink.

I die cut the images using the co-ordinating Relaxing Waterside Dies. I attached the chair to the die cut circle. I attached the cup onto the arm of the chair using a dimensional. I attached the grass image over the chair before attaching the whole panel to the card front using dimensionals.

I stamped “relax” and “today is your day” from the Relaxing Waterside stamp set onto a strip of Basic White card using Night of Navy ink. I attached the greeting panel to Night of Navy card and then the card front using dimensionals. I stamped the large grass image from the Relaxing Waterside stamp set onto the lower left hand corner of Basic White card using Mossy Meadow ink. I stamped “have a great birthday” from the Relaxing Waterside stamp set onto the Basic White card using Night of Navy ink. I love this bundle so much because it is relaxing and fun. What do you think? Is this one of your favourite bundles?
Bye for now,
Kris
Product Used:


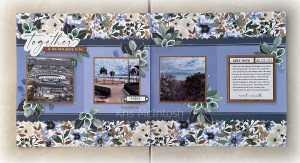
Together

is the best place to be. Today I have another layout from the 2026 Virtual Album Retreat – Layout 3. The photos I have attached to this page were taken when we were on a road trip with our friends. We were staying at Rollingstone and took a drive into Townsville. Unfortunately it was not a super sunny day but still it was nice to take in the scenery from Castle Hill and along the waterfront. We also managed to fit in lunch at the Cowboys Club!
I didn’t change anything about this layout it was just perfect. Lots of colouring techniques on this page along with flip flaps to add extra photos and details. I wasn’t sure that my photos would fit with this beautiful patterned paper but I love how it turned out.
I truly loved this retreat and cannot wait for the next one. This Retreat is now on the clearance rack, however, if you purchase it before it disappears you will still have access to the exclusive Facebook Page and all of the videos and examples shared.
Bye for now,
Kris
Product Used:
The 2026 Virtual Album Retreat is on the Clearance Rack, however, if it is still available you can view it here in my online store.
Have your heard
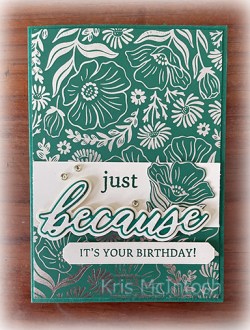
about Stampin’ Up!s new Hot Foil System. Boy is it amazing. You can watch this video from Stampin’ Up! to see how to use this system. I decided to CASE one of the examples in the flyer which you can download to view the available products for this new Hot Foil System. I used Shaded Spruce Two Tone Paper and the Garden Silhouette Hot Foil Die to add Silver Foil. I cut down the foiled Shaded Spruce paper to fit a card front and attached it to a Shaded Spruce card base.
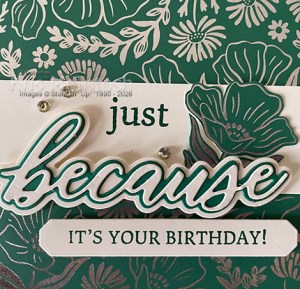
I attached a piece of Very Vanilla card across the foiled panel and stamped “just” from the Words of Beauty stamp set using Shaded Spruce ink. I added Silver Foil to another piece of Shaded Spruce Two Tone paper using the Garden Silhouette Hot Foil Die and cut out one flower. I attached the flower onto the card front.
I die cut Very Vanilla and Shaded Spruce card using the Words of Beauty Dies to create “because”. I attached “because” across the bottom of the Very Vanilla card panel using dimensionals. I stamped “it’s your birthday!” from the Words of Beauty stamp set onto Very Vanilla card using Shaded Spruce ink. I cut out the greeting using one of the banners in the Words of Beauty Dies. The banner is attached to the card front using dimensionals. Lastly I added three Basic Rhinestones to the card front.
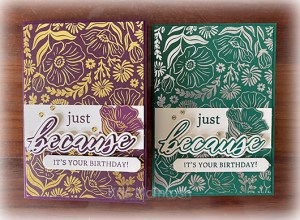
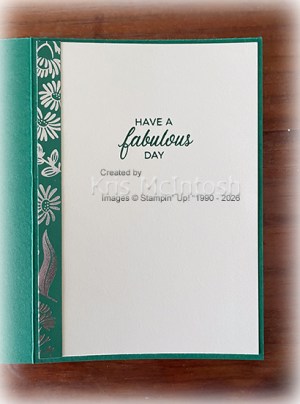
To decorate the card front I added a narrow strip of Shaded Spruce paper (which was left over from the trimmed pieces for the card front) to the left hand side of Very Vanilla card. I stamped the greeting from the Phrases and Frames stamp set onto the Very Vanilla card using Shaded Spruce ink. I loved how pretty this card turned out so I created another one, exactly the same, except I used Blackberry Bliss card and ink as well as Gold Foil. Which one do you like the best? I am not sure, I think they are both equally lovely. Some of the things about the new system to note are that it only works with Stampin’ Up!’s Cut ‘n Emboss Machine. The foiling works better on two-tone paper or White Willow card rather than our usual coloured A4 card. Although you can still use the A4 card, it will just have a little less definition. The brochure lists all of the product available to use with the Hot Foil System and don’t forget to add Foil to your order or you won’t be able to “play”. Stampin’ Up! will release more dies and foils that will be compatible with the Hot Foil System over the coming months. Product will be included in the catalogues released from next year. Another exciting addition to purchasing the Hot Foil System is that if you purchase it before the 4th January 2027 you will have access to a free Metallic Magic Class. Customer Sales begin at Midnight tonight. This is so exciting and takes your cards into a whole new dimension which is why I am posting today so that can get your hands on this “Hot” new product now
Bye for now,
Kris
Product Used:


