Remembering

A couple of weeks ago I shared a page I created using a photo of my Grandfather in his uniform during WWII. I wanted to record what he did and where he served for my Grandchildren, so this page has no photos. I began by stamping one of the images from the Gallery Grunge stamp set onto a Mossy Meadow A4 sheet of card using Mossy Meadow ink. I also sponged the edges of the card using the same ink.  I used an old distressing tool to rough up the edges of the paper before attaching it to a 12″ x 12″ Whisper White page. I created the journaling on my computer and printed it onto Whisper White card before attaching it to Basic Black card. I attached the panel to the left hand side of the page. I cut the solid poppy from Poppy Parade card twice using the Poppy Moments Dies. I cut the detailed poppy overlays from Real Red card using the same dies. I cut the flower centres from Basic Black card and the leaves from Old Olive card using the Poppy Moments Dies. I attached the detailed flower to the solid flower before attaching the flower centres. I attached the leaves to the back of the flowers before attaching them to the upper right hand side of the page.
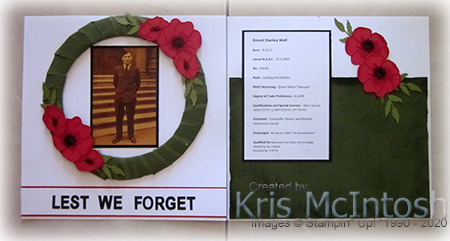 It’s a very simple page but I think they look great together.
Bye for now,
Kris
Product Used:


Beautiful Day

Today’s card shows off one of the designs I created for my Facebook Live this week. We followed a tutorial by Lisa Curcio which you can find here. She used a rectangle of designer series paper to create a different kind of focal point for your card. I loved the idea and share it with my followers on Facebook. Of course, I wanted to make it very user friendly for my customers, so I created a 6″ x 6″ template that they could use. This creates two card fronts with enough pieces to decorate the inside panel. To begin my card, I cut my designer series paper pieces from the beautiful Perennial Essence Designer Series Paper and used them as a guide as to where I would put my greeting. I stamped the greeting from the Floral Essence stamp set onto Whisper White card using Blackberry Bliss ink.  After stamping the greeting, I embossed the card using the Subtle 3D Embossing Folder. Once I embossed the Whisper White card, I attached the designer series paper pieces before attaching the whole panel to scored and folded Blackberry Bliss card. I stamped one large and two small flowers from the Floral Essence stamp set onto scrap Whisper White card using Blackberry Bliss ink and cut them out. I also stamped the leaf image from the Floral Essence stamp set three times onto scrap Whisper White card using Old Olive ink and punched them out using the Leaf Punch.
 I attached one small flower to the centre of the large flower using dimensionals. I attached the leaves to the back of the flowers before attaching them to the card front. I used dimensionals to attach the single small flower. Lastly I added Clear Faceted Gems (unfortunately no longer available) to the centres of the flowers.
To decorate the inside of the card, I attached a narrow strip of Blackberry Bliss card behind one long edge of a strip of the Perennial Essence Designer Series Paper before attaching it to the bottom of Whisper White card. I stamped the large flower from the Floral Essence stamp set onto scrap Whisper White card using Blackberry Bliss ink and stamped the flower centre using Crushed Curry ink. I cut out the flower and attached it just above the Designer Series Paper.
This card is really gorgeous when you see it in person, I’m not sure if it looks so pretty in the photos. I really would love to hear what you think.
Bye for now,
Kris
Product Used:


Magnolia Fancy Fold
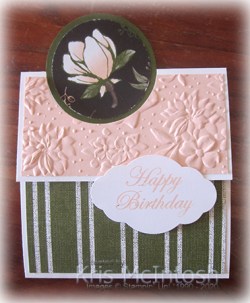
I don’t really know what you call this kind of fancy fold card but I thought it was fun and wanted to create one. I have been getting very inventive with the cards I create for the card kits I am mailing out to my ladies. It has made me look closer at some of our Designer Series Paper and today I am sharing my creation using the Magnolia Lane Designer Series Paper. I cut my card base from Whisper White card and attached Petal Pink card which I embossed using the Country Floral 3D Embossing Folder (so sad this one is retiring) to the top panel of the card front. I punched the panel using the 2-1/4″ Circle Punch. I attached another piece of Magnolia Lane Designer Series Paper to the bottom front panel. I cut the small flower from the Magnolia Lane Designer Series Paper and attached it to Whisper White card which I attached to the inside panel of the card base. I punched a 2-1/4″ Circle from Mossy Meadow card and attached it into the punched section of the card base. I punched the large flower from the Magnolia Lane Designer Series Paper using the 2″ Circle Punch and attached it to the Mossy Meadow 2-1/4″ Circle. To hold the card closed I stamped “happy birthday” from the Magnolia Blooms stamp set using Petal Pink ink and punched it out using the Pretty Label Punch. The greeting is attached to the lower panel using dimensionals so that the upper panel will be held in place.
I love the way this card turned out and I love the opportunity to use up some of this gorgeous Designer Series Paper. Let me know what you think.
Bye for now,
Kris
Product Used:


Magnolia Birthday

Today I am sharing another card created using the Magnolia Lane Designer Series Paper. The card also uses the Gold Foil Edge cards and envelopes which unfortunately will be retiring with the end of this current Annual Catalogue. I cut the Magnolia Lane Designer Series Paper to fit inside the foil edge on the cards and then coloured the flowers using the Dark Poppy Parade Stampin Blend. I cut Gold Foil cardusing the Detailed Bands Dies (I love these dies and I am so glad they are carrying over to the next Annual Catalogue) and attached the die to the coloured Designer Series Paper. I trimmed off any of the die that overhang the edges of the Designer Series Paper. The panel is attached to the Gold Foil Edge Card. I stamped the greeting from the Peaceful Moments stamp set onto Whisper White card using Poppy Parade ink and used the Detailed Bands Die to cut out the greeting. The greeting is attached to the centre of the Gold Foil die cut.
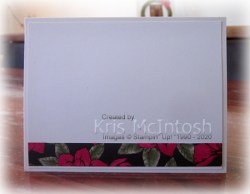
To decorate the inside of the card I attached a narrow strip of the Magnolia Lane Designer Series Paper which I coloured using the Dark Poppy Parade Stampin’ Blend, across the bottom of Whisper White card.
I loved how this card turned out, so I made several more using Dark Mango Melody, Dark Daffodil Delight, Dark Flirty Flamingo, Dark Highland Heather and Dark Pool Party Stampin’ Blends. Some of the cards are attached to Silver Foil Edge cards instead of Gold and use Silver Foil card to match where necessary.
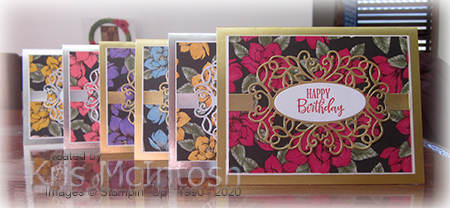
They look so pretty, don’t you think?
Bye for now,
Kris
Product Used:


Floral Case
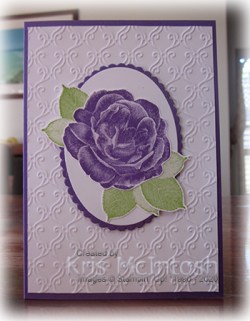
I saw a card on Pinterest by Lisa Foster which I really loved and decided that I needed to CASE it. I began by embossing Whisper White card using the Stylish Scrolls Embossing Folder (unfortunately retiring with the end of the current Annual Catalogue). The embossed panel is attached to scored and folded Gorgeous Grape card. I stamped the flower from the Healing Hugs stamp set onto Whisper White card using Gorgeous Grape ink and cut it out.  I stamped the leaf image from the Healing Hugs stamp set onto Whisper White card three times using Granny Apple Green ink and cut them out. I cut Whisper White card using one of the Layering Ovals Dies.
 I used the same dies to cut a scalloped oval from Gorgeous Grape card. I attached the Whisper White oval to the Gorgeous Grape scalloped oval and then the card front using dimensionals. I attached the leaves to the back of the flower before attaching the whole piece to the card front.
To decorate the inside of the card, I attached a narrow strip of Gorgeous Grape card behind one long edge of Whisper White card embossed using the Stylish Scroll Embossing Folder. The panel is attached to the bottom of Whisper White card.
I loved the card so much I created it three more times using Lovely Lipstick, Mango Melody and Melon Mambo inks and card. I think they look great, don’t you?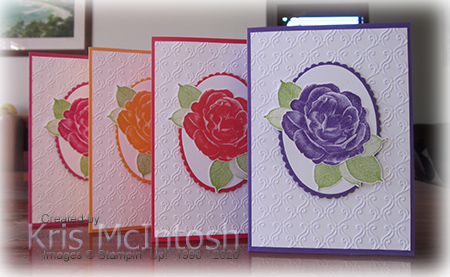
Thank you Lisa for the inspiration.
Bye for now,
Kris
Product Used:


Share Sunshine
Today I am sharing the first card I made using the Share Sunshine download. I love this image and greetings that go with it. I embossed Petal Pink card using the Parisian Flourish 3D Embossing Folder and attached it to Whisper White card. I wrapped the top of the embossing using the Black Twine from the Country Club Twin Combo Pack. The panel is attached to scored and folded Basic Black card. I printed the page containing the image I wanted to use onto Whisper White card. I cut out the image using one of the Layering Circle Dies.  I coloured the image using Petal Pink, Old Olive and Real Red Stampin’ Blends. I attached the image to a Basic Black scalloped oval cut using the Layering Circle Dies before attaching it to the card front using dimensionals. I cut out the greeting using the Stitched Rectangle Dies and attached it to the card front using dimensionals where necessary.
To decorate the inside of the card, I embossed a narrow strip of Petal Pink card using the Parisian Flourish 3D Embossing Folder and attached it to Whisper White card.  I wrapped the top of the embossing with the Country Club Basic Black Twine before attaching the panel to the inside of the card. I cut the greeting using the Stitched Rectangle Dies and attached it to the inside of the card.
This is such a fun product and although, hopefully, the social isolation will soon end, the greetings and images will always be useful.
This downloadable PDF file called Share Sunshine has 15 pages of printable images and greetings with special significance to us all during this Coronavirus Pandemic. The cost of this product is $12.00 (US) and once you have downloaded it and saved it to your computer you can print and use the images and sayings as many times as you wish. As well as the images and greetings you get information regarding co-ordinating colours and dies that can be used with the download. The best thing is that you can download it immediately and start creating. This is a give-back product and all proceeds will be going to two charities that are helping during COVID-19 – The World Health Organization’s COVID-Solidarity Response Fund and United Way Worldwide’s COVID-19 Community Response and Recovery Fund.
Click on the image below to download your copy.
 I’d love to know what you are creating using this fun product.
Bye for now,
Kris
Product Used:


Happy Birthday Ava

I love memory keeping but sometimes I am stumped as to how to get started. I found this amazing sketch on Pinterest by Club Scrap which not only gives you the layout but the cutting dimensions to create the panels. I cut one of the patterned papers from the now retired Golden Honey Specialty Designer Series Paper to create the large panels on each page. I used Smoky Slate and Basic Gray A4 card to create the additional panels for the pages (Panels B & C on the diagram). I embossed the Smoky Slate panels using the Basket Weave 3D Embossing Folder. (You need to place the folder on your die cutting machine with the fold to one side. You simply emboss the first section and then you can line up the pattern and keep embossing across the whole panel.  You do need to be careful to make sure that the top plate doesn’t extend beyond the end of the folder onto the un-embossed area! Hope that makes sense.) I attached the panels as shown on the layout. I cut Basic Black card to create the photo mounts which is Panel D on the diagram. To decorate the page, I stamped the cake image from the now retired Happy Birthday To you stamp set onto Whisper White card three times. I coloured the images using Lovely Lipstick, Smoky Slate, Light Old Olive and Dark Daffodil Delight Stampin’ Blends. I used the co-ordinating Birthday Dies (also retired) to cut out the images. I placed the full image onto the left hand page, the three flower image onto the right hand page and just one photo onto the small photo mount. I used the Well Written Dies to cut “happy” and “Birthday” from Basic Black card and attached the greeting to the left hand page. I cut the letters for “AVA” from Basic Black card using the retired Large Letters Dies.
I love how these pages turned out. They are clean and simple but pretty as well, don’t you think?
Bye for now,
Kris
Product Used:


Thank You
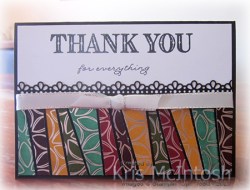
Today I am sharing a card with you that I made using the scrappy technique shared on You Tube by Bruno Bertucci. You can watch the video here. I had lots of little pieces left over from the Sale-a-bration Flowering Foils Specialty Designer Series Paper and thought it would be a fun way to use them up. Firstly I sponged some colour onto the paper using Cherry Cobbler, Blackberry Bliss, Shaded Spruce and Crushed Curry ink. I cut the pieces as shown in the video and attached them to Basic Black card.  I cut the border from Basic Black card using the Ornate Borders Dies and attached it across the back of the designer series paper panel. I attached the whole piece to Whisper White card and wrapped it with Silver 3/8″ Metallic Edge Ribbon and tied a knot.
 I stamped the greetings from the Ornate Thanks stamp set using Memento Tuxedo Black ink.
To decorate the inside of the card, I had a little strip which I trimmed from the Designer Series Paper Panel. I attached another border cut from Basic Black card using the Ornate Border Dies before attaching the panel to the bottom of Whisper White card.
What a fun technique! AND you don’t have to use Designer Series Paper, you can just use up those little strips of card that get left over from every project. If you haven’t tried this you really should. Thanks Bruno for sharing your fun technique.
Bye for now,
Kris
Product Used:


Happy Birthday Jenny
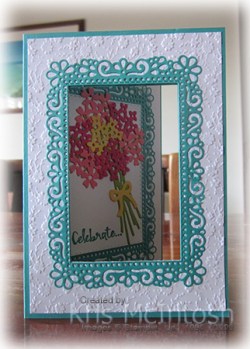
My sister celebrated her 60th birthday last week. As she lives in WA and the rest of the family lives either in Queensland or New South Wales we are unable to celebrate this special milestone until the travel restrictions in Australia are lifted. We are saving our celebration until she can come over, but I did want to send her a card. I cut Bermuda Bay card using one of the Ornate Layers Dies. I attached the die cut to Whisper White card using repositional Glue and cut a window through both layers using one of the Stitched Rectangle Dies. I removed the Bermuda Bay die cut and attached the Whisper White card to scored and folded Bermuda Bay card. I die cut the Bermuda Bay panel using the same Stitched Rectangle Die. I embossed the Whisper White card using the Ornate Floral 3D Embossing Folder before re-attaching the Bermuda Bay frame. The whole piece is attached to the die cut scored and folded Bermuda Bay card.  I cut another frame from Bermuda Bay card using the Ornate Layers Die and attached it to scored and folded Whisper White card. I cut a rectangle (the same size as the front) from Whisper White card using the Stitched Rectangle Dies and attached it to the centre of the Bermuda Bay frame. The Whisper White panel is attached inside the Bermuda Bay card base with the fold on the right hand side. I die cut Flirty Flamingo Melon Mambo, Daffodil Delight and Granny Apple Green using the Bouquet Bunch Dies. I attached the die cut pieces to the Whisper White rectangle to create a floral bouquet. I also stamped “celebrate” from the Beautiful You stamp set onto the Whisper White card using Bermuda Bay ink.
 To decorate the inside of the Whisper White panel I cut Bermuda Bay card using the Well Written Dies. I actually cut “birthday” twice and just snipped out the “th” to add to my numbers. The numbers are cut from Bermuda Bay card using some old Sizzix Dies in my stash. I attached the greeting die cuts to the right hand side of the opened Whisper White card, leaving the middle panel to write my message.
I hope she has a wonderful day, despite the difficult times we are all going through at the moment. I am sure she will find a way to enjoy a chat and a drink or two with some of her friends and family.
Just a reminder that today is the last day you can purchase the Ornate Garden Product Suite until the next Annual Catalogue goes live in June. So if you need these products now (like me) then place your order today.
Bye for now,
Kris
Product Used:


One Sheet Wonder

I saw a card by Robbie Rubala recently which I loved and it fitted perfectly with a One Sheet Wonder design that I shared on my Facebook Live a couple of weeks ago. In the end I was inspired by her card to create three! I embossed Whisper White card using the Tufted 3D Embossing Folder. I attached a strip of the Peaceful Poppies Designer Series Paper to Blackberry Bliss card. The panel is attached across the bottom of the embossed Whisper White card before attaching the whole piece to scored and folded Blackberry Bliss card.  I cut Whisper White card and Blackberry Bliss card using the 2nd largest square from the Stitched Shapes Dies. I attached the two squares together before attaching to the card front. I stamped the outline flower from the Painted Poppies stamp set onto Whisper White card using Memento Tuxedo Black ink. I stamped the flower fill image from the same stamp set using Blackberry Bliss ink. I did stamp the image onto scrap paper first to give a lighter shade. I cut out the flower using the Painted Labels Dies.
  I cut the leaf images from Mossy Meadow card and Old Olive card using the Poppy Moments Dies. I attached the two leaf dies together before attaching them to the back of the flower. The whole piece is attached across the stitched squares.
To decorate the inside of the card, I attached a narrow strip of Blackberry Bliss card behind one long edge of a strip of Whisper White card using the Tufted 3D Embossing Folder. The panel is attached to the bottom of Whisper White card.
Since I had used the One Sheet Wonder Template to cut my 6″ x 6″ piece of Peaceful Poppies Designer Series Paper, I created two more cards using the same basic steps. 
Thank you for the inspiration Robbie, I finally used a bit more of this lovely Designer Series Paper and I think the cards turned out great. Don’t you?
This is the template I used to cut my Designer Series Paper. I hope it helps you use some of your neglected pretty papers.
Bye for now,
Kris
Product Used:


