Something a little different

Today is the last day of Sale-a-Bration and I can honestly say I am really going to miss the Happy Birthday To You stamp set. If you haven’t received this stamp set for FREE yet, you need to place a qualifying order today or it will be gone forever! Don’t forget to add the co-ordinating Birthday Dies to your order and you are well on the road to earning this stamp set for FREE.  The card I made to share today is just a little different to the usual card, the front flap on this card is cut almost in half! I used Highland Heather for the card base and added a layer of Whisper White to the front which I embossed using the Coastal Weave 3D Embossing Folder.
  I attach a Whisper White panel to the inside of the card and stamped the greeting from the Happy Birthday To You stamp set using Highland Heather ink. I stamped the cake image from the Happy Birthday To You stamp set onto Whisper White card three times using Memento Tuxedo Black ink.
  I coloured the flowers and leaves using Highland Heather and Granny Apple Green Stampin’ Blends. I cut out the flowers using the co-ordinatingand Birthday Die and trimmed away the single flower. I attached two double flowers and one single flower across the top of the shortened front panel. I added one additional single flowers on top to add more dimension before I added a Basic Rhinestone to the flower centres. I also added one single flower onto the lower left hand corner of the inside Whisper White panel.
I think this is a fun card don’t you?
Bye for now,
Kris


Kerchief Card Kit

One of the often overlooked things in any catalogue are card kits. The Kerchief Card Kit is one of the things you can earn for FREE during Sale-a-bration (only two days to go) with a qualifying order. I have had this kit for a while and I have decided that I am going to share it with some friends of mine who are not stampers as such but who do enjoy making the occasional card.  You get enough product in the kit to create four cards each of two different designs with co-ordinating envelopes. I created one each of the cards as per the instructions in the kit and then I had a play with one of the cards. I actually cut the blue card from the kit in half and then I cut the patterned front panel with one of the Stitched Rectangle Dies.
  I stamped the cake from the Happy Birthday To You stamp set onto Whisper White card using Memento Tuxedo Black ink. I coloured the image using Light Petal Pink, Dark Daffodil Delight, Poppy Parade and Old Olive Stampin’ Blends.
  I attached the stamped panel behind the rectangle frame I created before attaching it to scored and folded Night of Navy card. Lastly I attached one of the pre-stamped greetings to the card front using dimensionals.
For the second card, I embossed Whisper White card using the Coastal Weave 3D Embossing Folder and attached it to the back panel of the card I cut in half. The whole piece is attached to scored and folded Night of Navy card. I attached the rectangle I cut from the card front and also the gold embossed Vellum from the card kit. I used the twine provided to attach to the back of the die cut Night of Navy oval. I attached some leaves to the flower die cut (all from the kit) before attaching it to the Night of Navy oval and then the card front using dimensionals.

It’s kind of fun to play with card kits and use the pieces in a way other than the intended. I haven’t created anything to decorate the inside of the cards yet but I will. Remember you only have a couple of days to get your order in to receive this Kerchief Card Kit for Free.
Bye for now,
Kris
Product Used:


Emma
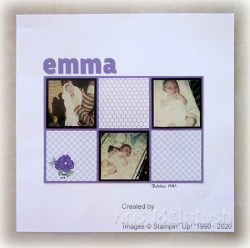
Today’s page shares photos of my youngest daughter taken not long after she was born. We lived in Dubbo at the time but moved to the mid north coast of New South Wales when she was just five months old. These photos had been pulled from an old album and were sitting in a box with lots of other photos. I am glad to be able to get them out of the box and onto a page. It’s a simple page but as you know that’s my style. I attached the photos to Basic Black card before attaching them to a piece of Highland Heather card. I cut squares of the Golden Honey Specialty Designer Series Paper where are also attached to the Highland Heather card. Don’t forget this gorgeous Specialty Designer Series Paper is available FREE with a qualifying order until the end of the month. The whole panel is attached to a 12″ x 12″ Whisper White page.
 I cut the heading from Highland Heather card using the Layering Alphabet Dies. These dies do not cut out the letters fully but it is a relatively easy task to finish cutting them out completely. I had been using the Happy Birthday To You stamp set to create a card and had one flower left over which had been coloured using the Highland Heather, Granny Apple Green and Dark Daffodil Delight Stampin’ Blends. I attached the flower to the lower left hand piece of the Golden Honey Specialty Designer Series Paper. I used the 0.5 Journaling Pen to add the place and year. It doesn’t seem so long ago that Emma was that cute little baby and now she is all grown up with a family of her own!
Bye for now,
Kris
Product Used:


Birthday Cake
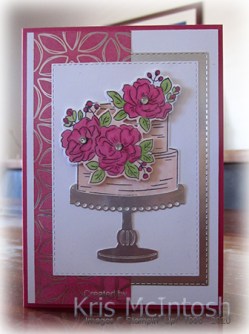
Today’s card is one I made for a dear friend who recently celebrated her birthday. I cut Silver Foil card using the Stitched Rectangle Dies and attached it to the right hand side of Whisper White card. I used a Sponge Brayer to add Lovely Lipstick ink to a piece of Flowering Foils Specialty Designer Series Paper and attached it to the left hand side of the Whisper White card. The whole panel is attached to scored and folded Lovely Lipstick card. I stamped the birthday cake image from the Happy Birthday To You stamp set onto Whisper White card using Memento Tuxedo Black ink. I coloured the cake using the Dark Petal Pink Stampin’ Blend.  I cut out the image using the co-ordinating Birthday Die and trimmed off the cake stand. I cut Silver Foil card using the cake stand die from the Birthday Dies. I cut Whisper White card using the Stitched Rectangle Dies and attached the cake and cake stand before attaching the panel to the card front. I stamped the cake image once more onto Whisper White card. This time I coloured the flowers and leaves using Lovely Lipstick and Granny Apple Green Stampin’ Blends. I used the Dark Petal Pink Stampin’ Blend to colour the cake image just around the edges of leaves and flowers.
  I cut out the flowers using the co-ordinating Birthday Die and attached the die cut over the top of the cake image using dimensionals. I also added a medium Basic Rhinestone to the centre of each flower.
To decorate the inside of the card, I coloured a piece of the Flowering Foils Specialty Designer Series Paper using a Sponge Brayer and Lovely Lipstick ink. I attached an off cut from when I cut out the Silver Foil rectangle for the card front behind one long edge of the Designer Series Paper so that I had a little stitched edge showing. The panel is attached to the bottom of Whisper White card. I stamped and coloured the single flower from the birthday cake and cut it out using the co-ordinating Birthday Die. The flower is attached to the lower left hand corner of the Whisper White card just above the Designer Series Paper panel.
The Flowering Foils Specialty Designer Series Paper makes it so easy to create beautiful cards, quickly and easily. You only have a few days left to make sure you don’t miss out on this Free product with your qualifying order.
Bye for now,
Kris
Product Used:


Waterfall Gift Card Holder
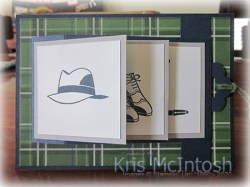
Today’s card is another I created using the tutorial which I purchased from Elizabeth Shannon. I love creating Fancy Folds and I am being a lot more adventurous because I have the tutorial. I decided to create this card using the Well Dressed stamp set which is one of the stamp sets which have been added to the range of Freebies during Sale-A-Bration. I love the images in this stamp set because they lend themselves to many different creations.  I attached a piece of Country Club Designer Series Paper to scored and folded Night of Navy card. I created the mechanism from Night of Navy card. The pull piece is a separate piece of Night of Navy card and I have punched the end using the Scallop Tag Topper Punch. I used a piece of the same Designer Series Paper to create the pocket for my gift card and punched the top edge using the 1″ Circle Punch.
  I stamped the hat from the Well Dressed stamp set onto Whisper White card using Night of Navy ink, attached it to Smoky Slate card and then the pull mechanism. I stamped the shoe image onto Whisper White card using Night of Navy ink, covered it with a post-it-note mask and stamped it again to give me a pair of shoes. The image panel is attached to Smoky Slate card and then the mechanism.
 For the last panel I stamped the watch and the pen images from the Well Dressed stamp set onto Whisper White card using Night of Navy ink. Once more the image panel is attached to Smoky Slate card and then the mechanism. I used a length of Garden Green Twine from the Country Club Twine Combo Pack to make it easier to pull the waterfall.
To decorate the inside of the card, I stamped the greeting from the So Sentimental stamp set onto Whisper White card using Night of Navy ink.
Cute isn’t it. I can’t wait to use this fancy fold at Christmastime.
Bye for now,
Kris
Product Used:


Birthday Blooms
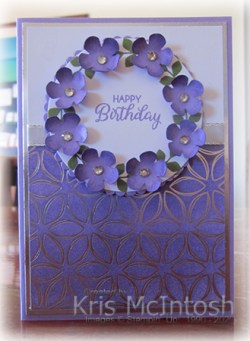
I made the card I am sharing with you today for a friend who recently celebrated her birthday. I love the Flowering Foils Specialty Designer Series Paper and couldn’t resist using it on this card. I used a sponge brayer to colour the paper using Highland Heather ink. I attached the paper to Whisper White card and wrapped the top of the Designer Series Paper with 5/8″ Silver Metallic Edge Ribbon. The panel is attached to Silver Foil card and then scored and folded Highland Heather card. I used the Stamparatus to stamp the leaf image from the Thoughtful Blooms stamp set in a circle onto Whisper White card using Old Olive ink. I stamped the greeting from the Beautiful Bouquet stamp set in the centre using Highland Heather ink.  I cut out the stamped images using the largest circle from the Layering Circle Dies. The panel is attached to a Highland Heather scalloped circle cut using the same Dies. I punched eight flowers from Highland Heather card using the Punch. I sponged Highland heather ink onto the edges of the flowers and used my bone folder to give them a bit of a curl. The flowers are attached between the stamped leaves using Mini Glue Dots.
  I added a large Basic Rhinestone to the centre of each of the flowers before attaching the whole panel to the card front using dimensionals.
To decorate the inside of the card, I stamped the greeting from the Perennial Birthday stamp set onto Whisper White card using Highland Heather ink. I used the sponge brayer to add Highland Heather ink onto a narrow strip of the Flowering Foils Specialty Designer Series Paper and attached it to the bottom of the stamped Whisper White card. I wrapped the top of the Designer Series Paper using 5/8″ Silver Metallic Edge Ribbon.
Doesn’t this look pretty. I love how you can add colour to the Flowering Foils Specialty Designer Series Paper to co-ordinate with any colour scheme. This paper will be gone soon, so don’t forget to place an order and earn it for FREE until the end of the month.
Bye for now,
Kris
Product Used:


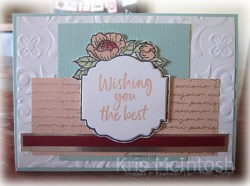
More Wishing You The Best
The cards I am sharing with you today are also inspired by some note card designs in a tutorial I purchased from Connie and Mary. I embossed Whisper White card using the Parisian 3D Embossing Folder and attached it to scored and folded Petal Pink card. I attached a piece of Parisian Blossoms Specialty Designer Series Paper to the left hand side of the card front. I embossed Petal Pink card using the Subtle 3D Embossing Folder and attached it to the card front. I also attached a strip of Silver Foil and Cherry Cobbler card. I stamped the tag from the Tags in Bloom stamp set onto scrap Whisper White card using Memento Tuxedo Black ink.  I stamped the fill images for the flowers and leaves using Pool Party, Soft Sea Foam and Cherry Cobbler ink. The Cherry Cobbler ink was stamped onto scrap paper first to give a lighter image. I cut out the image and attached it to the card front using dimensionals.
 I stamped the greeting from the Tags in Bloom stamp set onto Whisper White card using Pool Party ink. I punched out the greeting using the Label Me Lovely Punch and attached it to the stamped image using dimensionals.
To decorate the inside of the card I embossed a strip of Whisper White card using the Parisian Flourish 3D Embossing Folder. I attached a narrow strip of Cherry Cobbler card behind one long edge before attaching to the bottom of Whisper White card.

The second card uses the Tags in Bloom stamp set and the same embossing folders. I used a different pattern from the Parisian Blossoms Specialty Designer Series Paper and also used Petal Pink ink. The base card is Pool Party as is the panel embossed using the Subtle 3D Embossing Folder.

I really love all of these cards. Don’t you think they look really pretty?
Bye for now,


Great Grandparents
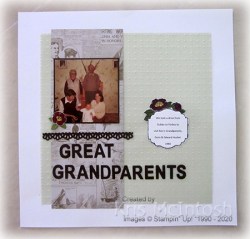
Today’s page shares a photo taken when my daughter was about 6 months old. We lived in Dubbo in those days and Ron’s Grandparents lived at Forbes which was about a 2 2-1/2 hour drive. We often took a drive to visit them and this photo was taken on one of those visits. Ron’s grandfather lived to be 93 years old and worked on the land his whole life. His grandmother lived to be 83. So long life runs in his family. I began by attaching a square of the Soft Sea Foam vellum from the So Very Vellum Specialty Designer Series Paper to a 12″ x 12″ Whisper White page. This vellum comes in three colours and is already embossed – so pretty. This Vellum is one of the new additions to the products you can earn for FREE with a qualifying order. I attached a piece of the Come Sail Away Designer Series Paper to the left hand side of of the vellum. I love this design it reminds me of old newspaper or journals. I attached my photo to Early Espresso card and then to the Designer Series Paper. I punched a strip of Early Espresso card using the Decorative Ribbon Border Punch and attached it below the photo. I stamped the single flower from the Tags in Bloom stamp set onto Whisper White card using Memento Tuxedo Black ink. I stamped the flower fill image using Cherry Cobbler ink and the flower centre fill using Daffodil Delight ink. I cut Mossy Meadow card using the die from the Birthday Dies. I attached the flower to the leaves and then to the lower left hand corner of the photo.
  The title is cut from Early Espresso card using the retired Little Letters Dies. I stamped the tag image from the Tags in Bloom stamp set onto Whisper White card using Memento Tuxedo Black ink. I stamped the flower fill images using Cherry Cobbler ink and Daffodil Delight ink and the leaf fill images using Mossy Meadow ink. I cut out the image and attached it to the right hand side of the Vellum. I created the journaling on my computer, printed it onto Whisper White card and punched it out using the Label Me Lovely Punch. The journaling is attached to the centre of the stamped tag. In case you are wondering how I attached the Vellum, well, I only used adhesive underneath the Designer Series Paper and also the tag element. This is sufficient to hold it in place without having adhesive show through it. My grandchildren looked at this photo and thought I was their Mum. You know, Nan could never have been young!
Bye for now,
Kris
Product Used:


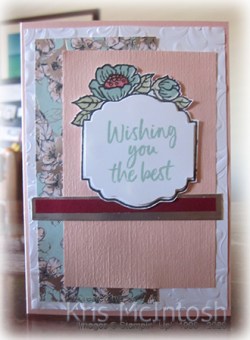
Wishing You The Best
I bought a tutorial recently from Connie and Mary which showcased the Tags in Bloom stamp set. One of the items in the tutorial was a set of note cards. I decided that I liked the layouts on the note cards but wanted to create full sized cards, so I altered the dimensions and added another layer to create the cards I am sharing with you today. The cards are the same but use different colours and patterns of designer series paper. I embossed Whisper White card using the Parisian Flourish 3D Embossing Folder and attached it to scored and folded Pool Party card. I embossed a piece of Pool Party card using the Subtle 3D Embossing Folder and attached it to the card front.  I cut a piece of the Parisian Blossoms Specialty Designer Series Paper and attached it to the card front, partially covering the embossed Pool Party card. I also added strips of Silver Foil and Cherry Cobbler card. I stamped the tag image from the Tags in Bloom stamp set onto scrap Whisper White card. I coloured the image using Petal Pink, Soft Sea Foam and Cherry Cobbler ink. The Cherry Cobbler ink was stamped onto scrap paper first to give a lighter image. I cut out the image and attached it to the card front using dimensionals. I stamped the greeting from the Tags in Bloom stamp set onto scrap Whisper White card and punched out the greeting using the Label Me Lovely Punch.
  I attached the greeting to the centre of the tag using dimensionals.
To decorate the inside of the card, I embossed a strip of Whisper White card using the Parisian Flourish 3D Embossing Folder. I attached a strip of Pool Party card behind one long edge before attaching it to the bottom of Whisper White card.
The second card uses Petal Pink card for the card base. I also embossed Petal Pink card using the Subtle 3D Embossing Folder and a different design from the Parisian Blossoms Specialty Designer Series Paper. The flowers are coloured with Pool Party ink and the greeting is stamped in the same ink.
These cards are so pretty, don’t you think? I was a little hesitant to begin with about this stamp set but I really love it and I know that I am going to miss it when Sale-A-Bration ends.
Bye for now,
Kris
Product Used:
Pull Tab & Front Flip

This is another fancy fold card from the tutorial I purchased from Elizabeth Shannon. The name sounds complicated but once you create it, it really isn’t. My card base is Thick Whisper White card and I have added a layer of Night of Navy card. The designer series paper is from the Country Club Designer Series Paper pack. I have used the Scalloped Tag Topper to create the pull part of the card front. To decorate the pull panel I stamped the hat image from the Well Dressed stamp set using Night of Navy ink. I added the greeting from the Perennial Birthday stamp set using Night of Navy ink.  I wrapped the stamped Whisper White card with Night of Navy Twine from the Country Club Twine Combo Pack. I used the same twine to add to the pull mechanism. The panel is attached to Night of Navy card using dimensionals before being attached to the mechanism.
  To decorate the inside of the mechanism, I stamped another of the greetings from the Perennial Birthday stamp set using Night of Navy ink. The greeting panel is attached to Night of Navy card and then the mechanism.
To decorate the inside of the card, I stamped the greeting from the Perennial Birthday stamp set using Night of Navy ink. I stamped the shoe image from the Well Dressed stamp set onto the lower left hand corner using Night of Navy ink, covered it with a post-it-note mask and stamped it again to give me a pair of shoes!
Simple but I really love this card.
Bye for now,
Kris
Product Used:


