Good Luck

Today’s card is my version of one that can be found on page 14 of the Sale-a-Bration catalogue. I stamped the tree image from the Power of Hope stamp set onto Petal Pink card using Versamark ink. I sprinkled the images with White Embossing Powder and heat set it. I attached the stamped card to scored and folded Smoky Slate card. I cut Whisper White card using the die from the Painted Labels Dies and stamped the image from the Power of Hope stamp set using Memento Tuxedo Black ink. I stamped the same image onto a piece of the Lily Impressions Designer Series Paper using Memento Tuxedo Black ink. I cut out the kimono part of the image and attached it to the stamped image.  I also used Bronze and Ivory Stampin’ Blends to colour the hair and the skin of the stamped image. I attached the Whisper White die to a piece of Silver Foil card and then the card front using dimensionals. I stamped “good luck” from the Power of Hope stamp set onto Shaded Spruce card using Versamark ink. I sprinkled the greeting with White Embossing Powder and heat set it.
  I trimmed around the greeting and attached it to the card front.
To decorate the inside of the card I stamped the greeting from the Power of Hope stamp set onto Whisper White card using Memento Tuxedo Black ink. I stamped the lantern from the same stamp set three times around the greeting. I used the Light Shaded Spruce Stampin’ Blend to colour the lanterns.
I really love the way this card turned out, although I think I need to invest in new White Embossing Powder! Such a lovely stamp set and it comes with a beautiful Stone 3D Embossing Folder as part of the deal AND its FREE with a qualifying order during Sale-A-Bration.
I’d love to hear what you think.
Bye for now,
Kris
Product Used:


With Sympathy

I needed to make a card for a fellow team member who recently suffered the loss of her brother. I had seen a card made using the Painted Poppies stamp set and the Spotlight technique. This is a kind of subtle technique and perfect for this type of card. I stamped the greeting from the Flourishing Phrases stamp set onto the lower right hand corner of Whisper White card using Highland Heather ink. I stamped the poppy image from the Painted Poppies stamp set across a narrower panel of Whisper White card using Memento Tuxedo Black ink.  I attached the stamped card to Highland Heather card. I coloured a length of Whisper White Crinkled Ribbon using the Light Highland Heather Stampin’ Blend, tied a knot in the end and wrapped the bottom of the stamped images. I cut three of the border pieces from Highland Heather card using the Painted Labels Dies. I attached the dies across the bottom of the stamped panel before attaching to the stamped Whisper White card. The whole panel is attached to scored and folded Highland Heather card. I stamped the poppy image once more onto scrap Whisper White card using Memento Tuxedo Black ink and coloured the flowers using the light Highland Heather Stampin’ Blend.
 I cut out the flowers using one of the Layering Circles Dies and attached it to a 1-1/2″ Circle punched from Highland Heather card. The coloured image is attached over the stamped poppy image.
To decorate the inside of the card, I stamped the poppy image across the bottom of Whisper White card using Memento Tuxedo Black ink.
Simple but pretty and a fitting card for the occasion, don’t you agree?
Bye for now,
Kris
Product Used:


Nanny Mac

Ron’s Mum was always called Nanny Mac by her grandchildren and then her great grandchildren. I found some photos that were taken in 1980 of a visit to Evans Head in 1980 to see her. Ron, Sarah and Ron’s sister Rhonda painted Mum’s dividing fence. These photos were taken after the painting. I kept the page simple (as ususal). I embossed Coastal Cabana card using the Absolutely Argyle 3D Embossing Folder and attached it down the length of a 12″ x 12″ Whisper White page. I attached the photos across the page and added my journalling which I created on the computer.  I also created the title by printing onto Whisper White paper using the computer and then fussy cutting the title. A little tip for you, I don’t keep 12″ x 12″ card in every colour, so when I want to do something like this, I make sure that I can cut the A4 card and use something to hide the small gap. In this case the main picture!
This page is truly super simple but I am glad to have these photos in an album. My grandchildren really love looking through the pages and finding out about their relatives, it gives them a broader view of their family. They are really lucky to still have my Mum and Dad (their Great Grandparents) around to tell them stories as well .
I hope you are going through your photo stash, whether it be on the computer, on dvd’s or simply tucked away in a cupboard and creating simple pages for everyone to enjoy. They really do not have to be complicated and it is so amazing how many memories can be invoked by one photo!
Bye for now,
Kris
Product Used:


Tropical Oasis Birthday
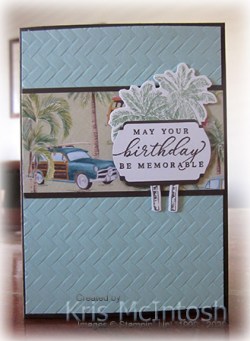
Today’s card was inspired by one in the 2020 Handmade For You Mini Catalogue. Of course mine probably doesn’t look a bit like the one in the catty but it did inspire me. I embossed Pool Party card using the Coastal Weave 3D Embossing Folder and attached it to scored and folded Early Espresso card. I attached a piece of the Tropical Oasis Designer Series Paper to Early Espresso card and then the card front. I inked the palm tree image from the Timeless Tropical stamp set onto scrap Whisper White card using Early Espresso and Garden Green Stampin’ Write Markers. I cut out the image using the co-ordinating In The Tropics Die. The palm trees are attached to the card front using dimensionals.  I stamped the greeting from the Timeless Tropical stamp set onto Whisper White card using Early Espresso ink. I used the Timeless Label Punch to punch out the greeting. I punched Early Espresso card using the same punch and cut it in half.
  I attached one half to the back of the top of the punched greeting and the other half to the back of the bottom of the punched greeting. I did trim a little excess away on the sides as well. The greeting is attached over the palm trees using dimensionals where necessary.
To decorate the inside of the card, I stamped the palm tree image from the Timeless Tropical stamp set onto Whisper White card, again, inking the image with Early Espresso and Garden Green Stampin’ Write Markers. I also stamped the greeting from the same stamp set beside the trees using Early Espresso ink. I embossed a narrow strip of Pool Party card using the Coastal Weave 3D Embossing Folder and attached a narrow strip of Early Espresso card behind one long edge. The panel is attached to the bottom of the stamped Whisper White card, covering the bottom of the palm tree stems.
What a fun card! If you are like me and get a little stuck for ideas occasionally, using the catalogue as inspiration seems to work every time.
Bye for now,
Kris
Product Used:


Floating Panel Card
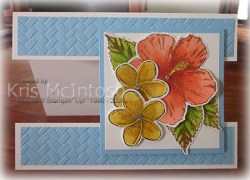
Today’s card is another that I made using a tutorial I purchased from Elizabeth Shannon. I believe that this is only available for demonstrators to purchase but please check with Elizabeth. This week has all been about the Tropical Oasis Product Suite, so I wanted today’s card to use some of those products. I cut my card base from Thick Very Vanilla card and added Balmy Blue card which I embossed using the Coastal Weave 3d Embossing Folder. I cut my “floating” panel from Balmy Blue card with a layer of Very Vanilla card. Before attaching the panel to the card front using dimensionals, I stamped the greeting from the Timeless Tropical stamp set onto the inside of the card using Stazon Saddle Brown ink. To create the flowers and leaves, I stamped the images from the Timeless Tropical stamp set onto Shimmery White card using Stazon Saddle Brown ink.
  I used an Aqua Painter and Poppy Parade, Daffodil Delight and Granny Apple Green ink to colour the flowers and leaves. It takes a while for these to dry and you need to be patient (or you could use your heat gun to hurry the process). I actually left mine overnight to make sure they were completely dry. I cut out all the images using the co-ordinating In The Tropics Dies before attaching the flowers and leaves to the “floating” panel using dimensionals under the last frangipani flower. I also added a small Basic Rhinestone to the centre of each of the flowers.
This style of card is actually very simple to make. You don’t need a lot of product or card and just about any stamp set would work.
Bye for now,
Kris
Product Used:


Tropical Birthday

I had so much fun creating my first card using the Tropical Oasis Memories and More cards, I decided to CASE this one from the 2020 Handmade For You Mini Catalogue. I trimmed a little from one of the 4″ x 6″ Tropical Oasis Memories and More card and attached it to scored and folded Thick Very Vanilla card. I cut the pineapple from Daffodil Delight card using the In The Tropices Dies. I sponged some Daffodil Delight ink all over it to add some definition. I cut the pineapple leaves from Old Olive card using the In The Tropics Dies, sponged over some Old Olive ink and curled the pieces that stand up. I stamped the greeting from the Timeless Tropical stamp set onto a rectangle of Very Vanilla card using Soft Suede ink.  I frayed the ends of a length of 5/16″ Braided Burlap Trim before attaching it to the back of the greeting using Mini Glue Dots. and attached the piece to the card front using dimensionals. I stamped the frangipani flower three times onto Fluid Watercolour Paper using Saddle Brown Stazon ink. I used an Aqua Painter to add Crumb Cake and Terracotta Tile ink to the flowers to colour them. I cut the flowers out using the In The Tropics Dies and attached them to the card front using dimensionals. Lastly I added Clear Faceted Gems to the centres of the flowers.
To decorate the inside of the card, I stamped, coloured and cut out one frangipani flower as before. I also stamped one single leaf using the Saddle Brown Stazon ink and coloured it using Old Olive ink. I cut out the leaf using the co-ordinating In The Tropics Die and attached it to the back of the frangipani before attaching the piece to the lower left hand corner of the inside of the card.
My card doesn’t actually look like the one in the catalogue (it’s on page 40), but I love the way it turned out. The Tropical Oasis Memories and More cards make it so easy to create quick and beautiful cards. AND what about the Saddle Brown Stazon ink isn’t it amazing. It seems to let the colour of the flowers shine more than if you use Black Stazon ink. Have you tried this amazing ink yet? If not, well, maybe you should.
I hope I am inspiring you to take another look at the Tropical Oasis Product Suite including the Tropical Oasis Memories and More cards. I’d love to know what you think.
Bye for now,
Kris
Product Used:


Tropical Oasis

I finally decided to open my Tropical Oasis Memories and More card pack to create a card today and boy are they lovely designs. I embossed a strip of Terracotta Tile card using the Coastal Weave 3D Embossing Folder and attached it to Whisper White card. The whole piece is attached to scored and folded Pretty Peacock card. Then I simply attached one of the 3″ x 4″ Tropical Oasis Memories and More cards to the card front. Simple! – and yet so much detail.
 To decorate the inside of the card I stamped the greeting from the Timeless Tropical stamp set using Terracotta Tile ink. I also stamped the palm trees from the same stamp set using Pretty Peacock ink.
 This card was so simple to make and would be perfect for beginner crafters. You could use one of the 4″ x 6″ Memories and More cards cut in half to create the panel on the front in place of the embossed card. The possibilities are endless!
The Tropical Oasis Memories and More Card Pack comes with two of each card design in both the 4″ x 6″ and 3″ x 4″ card sizes (50 cards altogether). It also has two sheets each of two different designs of stickers which contain images and labels for you to use on your creations. Of course these cards are also awesome to use in your Memory Keeping. Why not use one of each to create cards and keep the other one for Memory Keeping.
If you haven’t had a good look at these Tropical Oasis Memories and More cards yet, then check out this video by Stampin’ Up!
I hope this inspired you to take a second look at these cards.
Bye for now,
Kris
Product Used:
Mum

This is a photo of my mother with my grandmother (her mother-in-law) at her sister’s wedding around about 1955. To be honest it is the nicest photo I have ever seen of my grandmother. She just never seemed to smile in any photo! Anyway to create my page I attached different designs of paper from the Parisian Blossoms Specialty Designer Series Paper to a 12″ x 12″ Whisper White page. I cut the Designer Series Paper into card front size first and then trimmed off a 3″ x 4″ piece to use on this page.  The rest of the piece can be used on a card front. My photo is attached to Basic Black card and then to the page over the Designer Series Paper. I created my journaling on the computer and printed onto Whisper White card. The journaling is attached to Basic Black card and then the page. I stamped the flower image from the Forever Blossoms stamp set onto Whisper White card using the Stamparatus to get a reverse image and Memento Tuxedo Black ink. I coloured the image using Cherry Cobbler and Old Olive Stampin’ Blends. I cut out the image and attached it to the page.
You know me simple is my style, but I love how this has turned out. Let me know what you think.
Bye for now,
Kris
Product Used:


One More
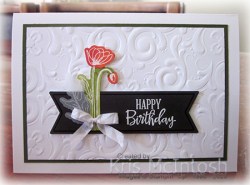
card using the Peaceful Poppies Elements for a while anyway. I truly am loving using these dies and I am working on a class which will include a half packet of the Peaceful Poppies Elements. I am sure that my ladies will love it. Now onto today’s card. Once more I embossed Whisper White card using the Parisian Flourish 3D Embossing Folder and attached it to Basic Black card. The panel is attached to scored and folded Thick Whisper White card.  I stamped “happy birthday” from the Peaceful Moments stamp set onto the banner from the Peaceful Poppies Elements using Versamark ink. I sprinkled the greeting with White Embossing Powder and heat set it. I coloured the poppy which is already embossed onto Watercolour paper using Poppy Parade and Mossy Meadow re-inkers and an Aqua Painter. Once the image was dry I attached it to the stamped banner. I also punched out one of the leaves which is already embossed onto Vellum card.
  I tied a bow in a length of the Whisper White 1/4″ Crinkled Seam Binding and attached it over the ends of the leaf and flower. The whole banner is attached to the card front using dimensionals.
To decorate the inside of the card, I stamped the greeting from the Peaceful Moments stamp set using Memento Tuxedo Black ink. I coloured another flower and leaf from the Peaceful Poppies Elements which were already embossed onto watercolour paper as before using the Aqua Painter and re-inkers.
This might be the last card made using these for a while, but I have lots more ideas for using these fabulous die cuts so I will be back with more ideas for you all.
Bye for now,
Kris
Product Used:


Elemental Easel Card
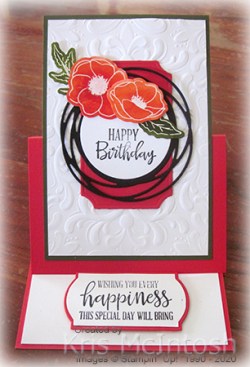
Well I am on a roll using the beautiful Peaceful Poppy Elements, so today’s easel card is created using more of these gorgeous die cuts. For this card, I used two of the flowers which are already embossed onto Watercolour paper and coloured them using an Aqua Painter and Poppy Parade re-inker. I also coloured two of the leaves which again are already embossed onto Watercolour paper using an Aqua Painter and Mossy Meadow re-inker. To do this I placed a drop of the re-inker in each colour onto a clear block, so that I could use my Aqua Painter to mix the re-inker with water and add to the flowers and leaves. Anyway, I set the flowers and leaves aside to dry while I created the rest of the card. I embossed a piece of Whisper White card using the Parisian Flourish 3D Embossing Folder and attached it to a piece of Mossy Meadow card. I cut Poppy Parade card using on the dies from the Painted Labels Dies and attached it to the card front. I cut Basic Black card using another of the Painted Labels Dies and attached it over the Poppy Parade die cut.  I stamped “Happy Birthday” from the Peaceful Moments stamp set onto Whisper White card using Memento Tuxedo Black ink and cut it out using one of the circles from the Layering Circles Dies. The greeting is attached to the centre of the Basic Black die cut. I attached the flowers and leaves to the card front using dimensionals under the smallest flower. I cut Poppy Parade card (10.5cm x length of the A4 sheet, scored along the longest side at 7.4 and 14.8cm).
  I used my bone folder on the score lines to give nice folds and attached the image panel to the centre of the section below the 7.4cm score line. (Gosh I hope that makes sense.)
To decorate the inside of the card, I attached a piece of Whisper White card which gives me somewhere to write a message. I stamped the greeting from the Peaceful Moments stamp set onto Whisper White card and cut it out using the label die from the Painted Labels Dies. There is a score line on this die and I cut along the score line to reduce the size of the label. I cut Poppy Parade using the same die and attached the greeting. As you can see by trimming the Whisper White label, the greeting now has a Poppy Parade border. The greeting is attached to the Whisper White card using dimensionals so that my easel will sit up nicely. However, if folds flat to go into a standard sized envelope. Yay!
I really am loving using these dies and I hope that you are enjoying my creations using them.
Bye for now,
Kris
Product Used:


