Just Because

This week in my Facebook Live I shared some cards I created with the Heart Shaped Bundle which is one of the products you can earn for FREE during Sale-A-Bration. For this card I embossed Bubble Bath card using the Starstruck Embossing Folder which is also available to earn for FREE during Sale-A-Bration. I attached the embossed panel to Basic Gray card and then Thick Basic White card. I cut Basic White card using one of the circles from the Stylish Shapes Dies. I cut Bubble Bath card using the heart shaped die from the Heart Shaped Dies and attached it to the Basic White circle.

I die cut three flowers from Fresh Freesia card using the Heart Shaped Die and attached them to the left hand side of the Bubble Bath heart using dimensionals. I die cut Lost Lagoon card twice with the double leaf die from the Heart Shaped Dies and attached them around the flowers. The whole panel is attached to the left hand side of the card front. I stamped the greeting from the Heart Shaped stamp set onto Basic White card using Basic Gray ink and cut it out using the banner die from the Hearth Shaped Dies.
The greeting is attached to the card front using dimensionals. Lastly I added a small Basic Rhinestone to the centre of each flower. To decorate the inside of the card I die cut one flower from Fresh Freesia card using the Heart Shaped Die and attached it to the lower left hand corner of Basic White card. I cut Lost Lagoon card using the double leaf die from the Heart Shaped Dies and attached them around the flower. The Basic White panel is attached to Basic Gray card and then the inside of the Thick Basic White card base.
Bye for now,
Kris
Product Used:
You can view the Starstruck Embossing Folder here in my online store.


So Thankful

for you. Today’s card uses another of the stamp sets that you can earn for free during Sale-A-Bration if you spend $200.00 on any current Stampin’ Up! product. I stamped one of the corner images from the Corner in Bloom stamp set onto the top left and bottom right hand corners of Basic White card using Memento Tuxedo Black ink. I used the Dark Fresh Freesia and the Dark Summer Splash Stampin’ Blends to colour the image.
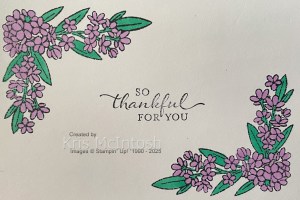
I stamped the greeting from the So Sincere stamp set onto the middle of the Basic White card using Memento Tuxedo Black ink. The whole panel is attached to scored and folded Fresh Freesia card. To decorate the inside of the card I stamped another greeting from the So Sincere stamp set onto Basic White card using Memento Tuxedo Black ink. I stamped the small floral bouquet from the Corner in Bloom stamp set beside the greeting using the same ink.

The image is again coloured using the Dark Fresh Freesia and Dark Summer Splash Stampin’ Blends. This stamp set has so many possibilities and so many different floral images to create beautiful cards and I am sure it will also be a great addition to my memory keeping. Don’t forget Sale-A-Bration ends on the 28th February 2025 and is a fabulous time to stock up on some of the items on your wish list and earn something for free.
Bye for now,
Kris
Product Used:


Bowen

Todays page shows off some photos from our first visit to Bowen back in 2010. Bowen is such a peaceful relaxing place to visit and the waterfront is absolutely amazing. I created this page for my Memory Keeping class today. This class is a bit different in that everyone brings their own supplies and together we learn a new way to cut our paper to create a double page layout. I used the Take to the Sky 12″ x 12″ Designer Series Paper and Basic White 12″ x 12″ card to create my pages. I sponged all of the edges of the Designer Series Paper pieces using Smoky Slate ink. I added some extra layers of Smoky Slate and Night of Navy card. The title is cut from Night of Navy card using Mini Alphabet Dies.

The landscape photos are all matted onto Night of Navy card before being attached to the page. I used some of the tags from the Take to the Sky Designer Series Paper and created two tags from Basic White card. I stamped one Basic White tag with a greeting from the Snow Day stamp set using Night of Navy ink. I stamped the second tag three times with the greeting also from the Snow Day stamp set using Night of Navy ink. The edges of the stamped tags are also sponged with Smoky Slate ink. I used my Crop-a-dile to punch a hole through all of the tags and threaded them with some of the Blue thread from the Natural Tones Linen Thread. I used scrap pieces of Take to the Sky Designer Series Paper and Basic White card to create the banners on the right hand page.

The edges of the banners are all sponged with Smoky Slate ink as well. I stamped “memories” from the Love This Moment stamp set using Night of Navy ink. My journaling is printed onto Basic White card and cut into strips. I sponged the edges of the journaling strips with Smoky Slate ink before attaching them to the left hand page. These classes are a new addition to my schedule and so far the ladies are enjoying leaning a few new tricks.
Bye for now,
Kris
Product Used:


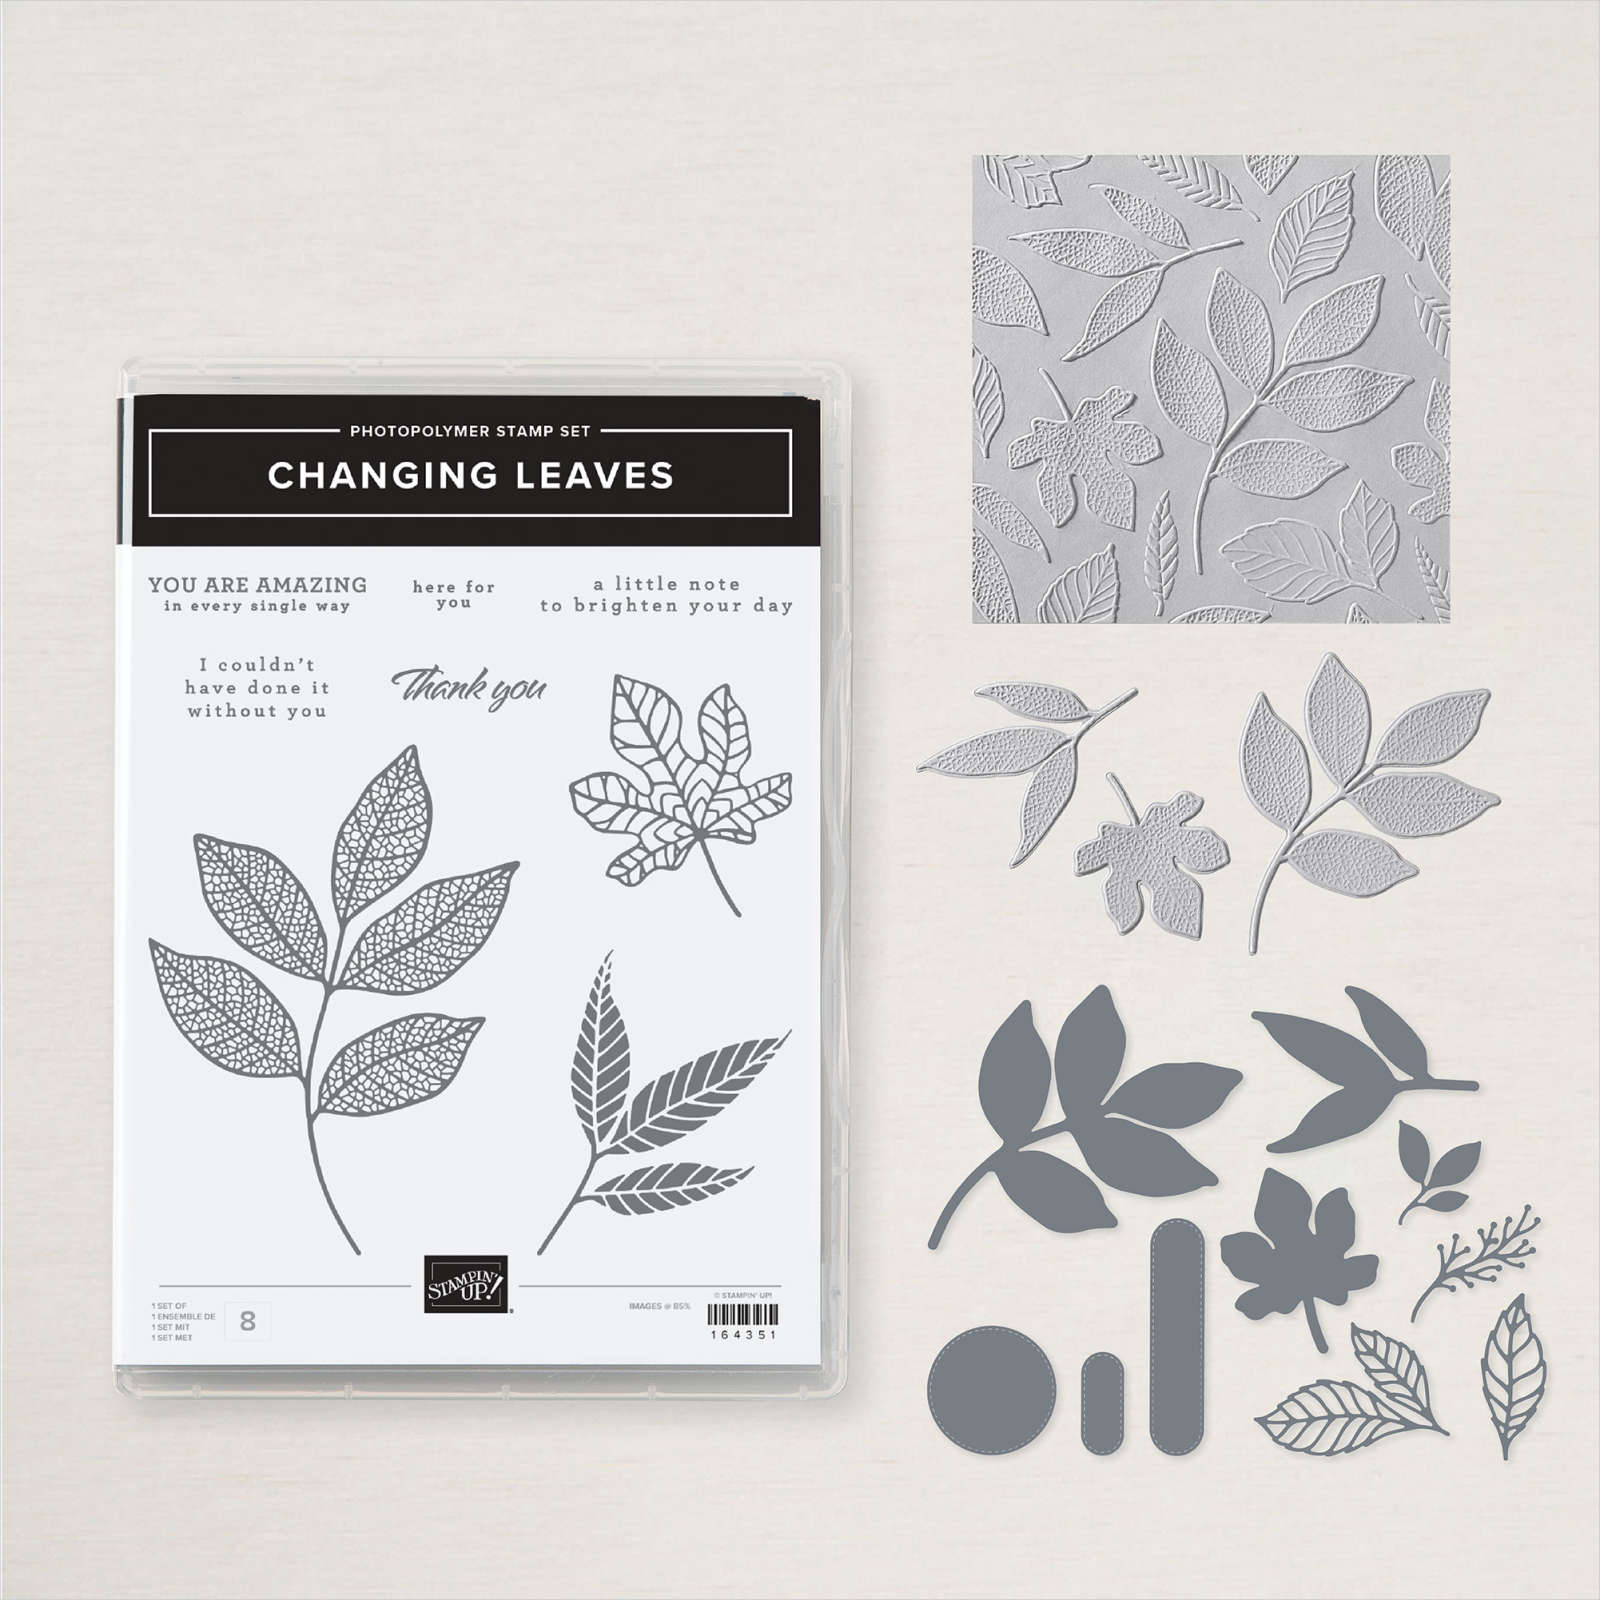
A Little Note

This week in my Facebook Live I shared some cards I created using the Changing Leaves Bundle and today I have another card using this same bundle. I embossed Basic White card using the Changing Leaves Hybrid Embossing Folder and attached it to scored and folded Pretty Peacock card. I spritzed a piece of Fluid 100 paper with water and used a Water Painter to add Lost Lagoon, Shaded Spruce and Pretty Peacock ink. Once I had added the colour, I spritzed the Fluid 100 paper with more water and left it to dry.

I embossed and cut the three large leaves from the Fluid 100 paper using the Changing Leaves Hybrid Embossing Folder and the co-ordinating leaf die. I also used the single and double open leaf dies to cut two double and two single leaves from the Fluid 100 paper. I stamped the greeting from the Changing Leaves stamp set onto Basic White card using Pretty Peacock ink and cut it out using the larger banner die from the Changing Leaves Hybrid Embossing Folder.

I layered the leaves onto the card front using dimensionals under the solid leaves before attaching the open leaves flat to the embossed card. I attached the greeting across the leaves using dimensionals where necessary. Lastly I added a few Basic Rhinestones around the leaves. To decorate the inside of the card I cut the small solid leaf image from the Changing Leaves Hybrid Embossing Folder from the Fluid 100 paper. I attached the leaf to Basic White card before stamping another greeting from the Changing Leaves stamp set using Pretty Peacock ink. I had a lot of fun playing with this Bundle and I am sure I will find more ways to use it in the future.
Bye for now,
Kris
Product Used:


Friendly Seagulls
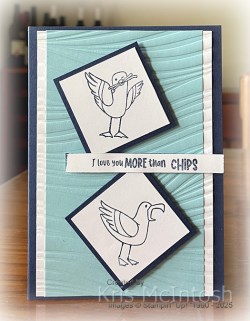
Today’s card uses one of the stamp sets you can earn for free during Sale-A-Bration when you spend $100.00. Sale-A-bration runs from today the 7th January to the 28th February and you can qualify by purchasing any current product from either the Annual Catalogue, January to April Mini Catalogue or from the Online Store. Today I used Template 22 from the Annual Catalogue to create my card. I attached Balmy Blue card to Basic White card before embossing the panel using the Soft Waves 3D Embossing Folder (new in the January Mini Catalogue).

The whole panel is attached to scored and folded Night of Navy card. I stamped two different seagull images from the Friendly Seagulls stamp set onto Basic White card using Night of Navy ink. Each Seagull is attached to Night of Navy card and then the card front using dimensionals.
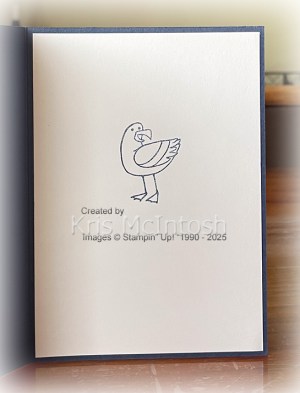
I stamped the greetings from the Friendly Seagulls stamp set onto Basic White card using Night of Navy ink and inked the edges using the same ink. The greeting is attached to the card front using dimensionals. To decorate the inside of the card I stamped another seagull image from the Friendly Seagulls stamp set onto Basic White card using Night of Navy ink. Such a fun stamp set and I love that the stamp set includes the words “chips” and “french fries” so it will fit with whatever country you come from.
Bye for now,
Kris
Product Used:

The Bluff

I recently started holding Memory Keeping classes with a twist. I do not supply any of the products for these classes, everyone brings their own supplies from their stash. We craft along together learning how to cut one piece of Designer Series paper to create a double page layout. I shared a couple of different versions so that everyone can see how using different paper and photos gives a totally different look. For this page I have some photos of a walk we did when we were at Yeppoon. I used a piece of Country Woods 12″ x 12″ Designer Series Paper for my page.

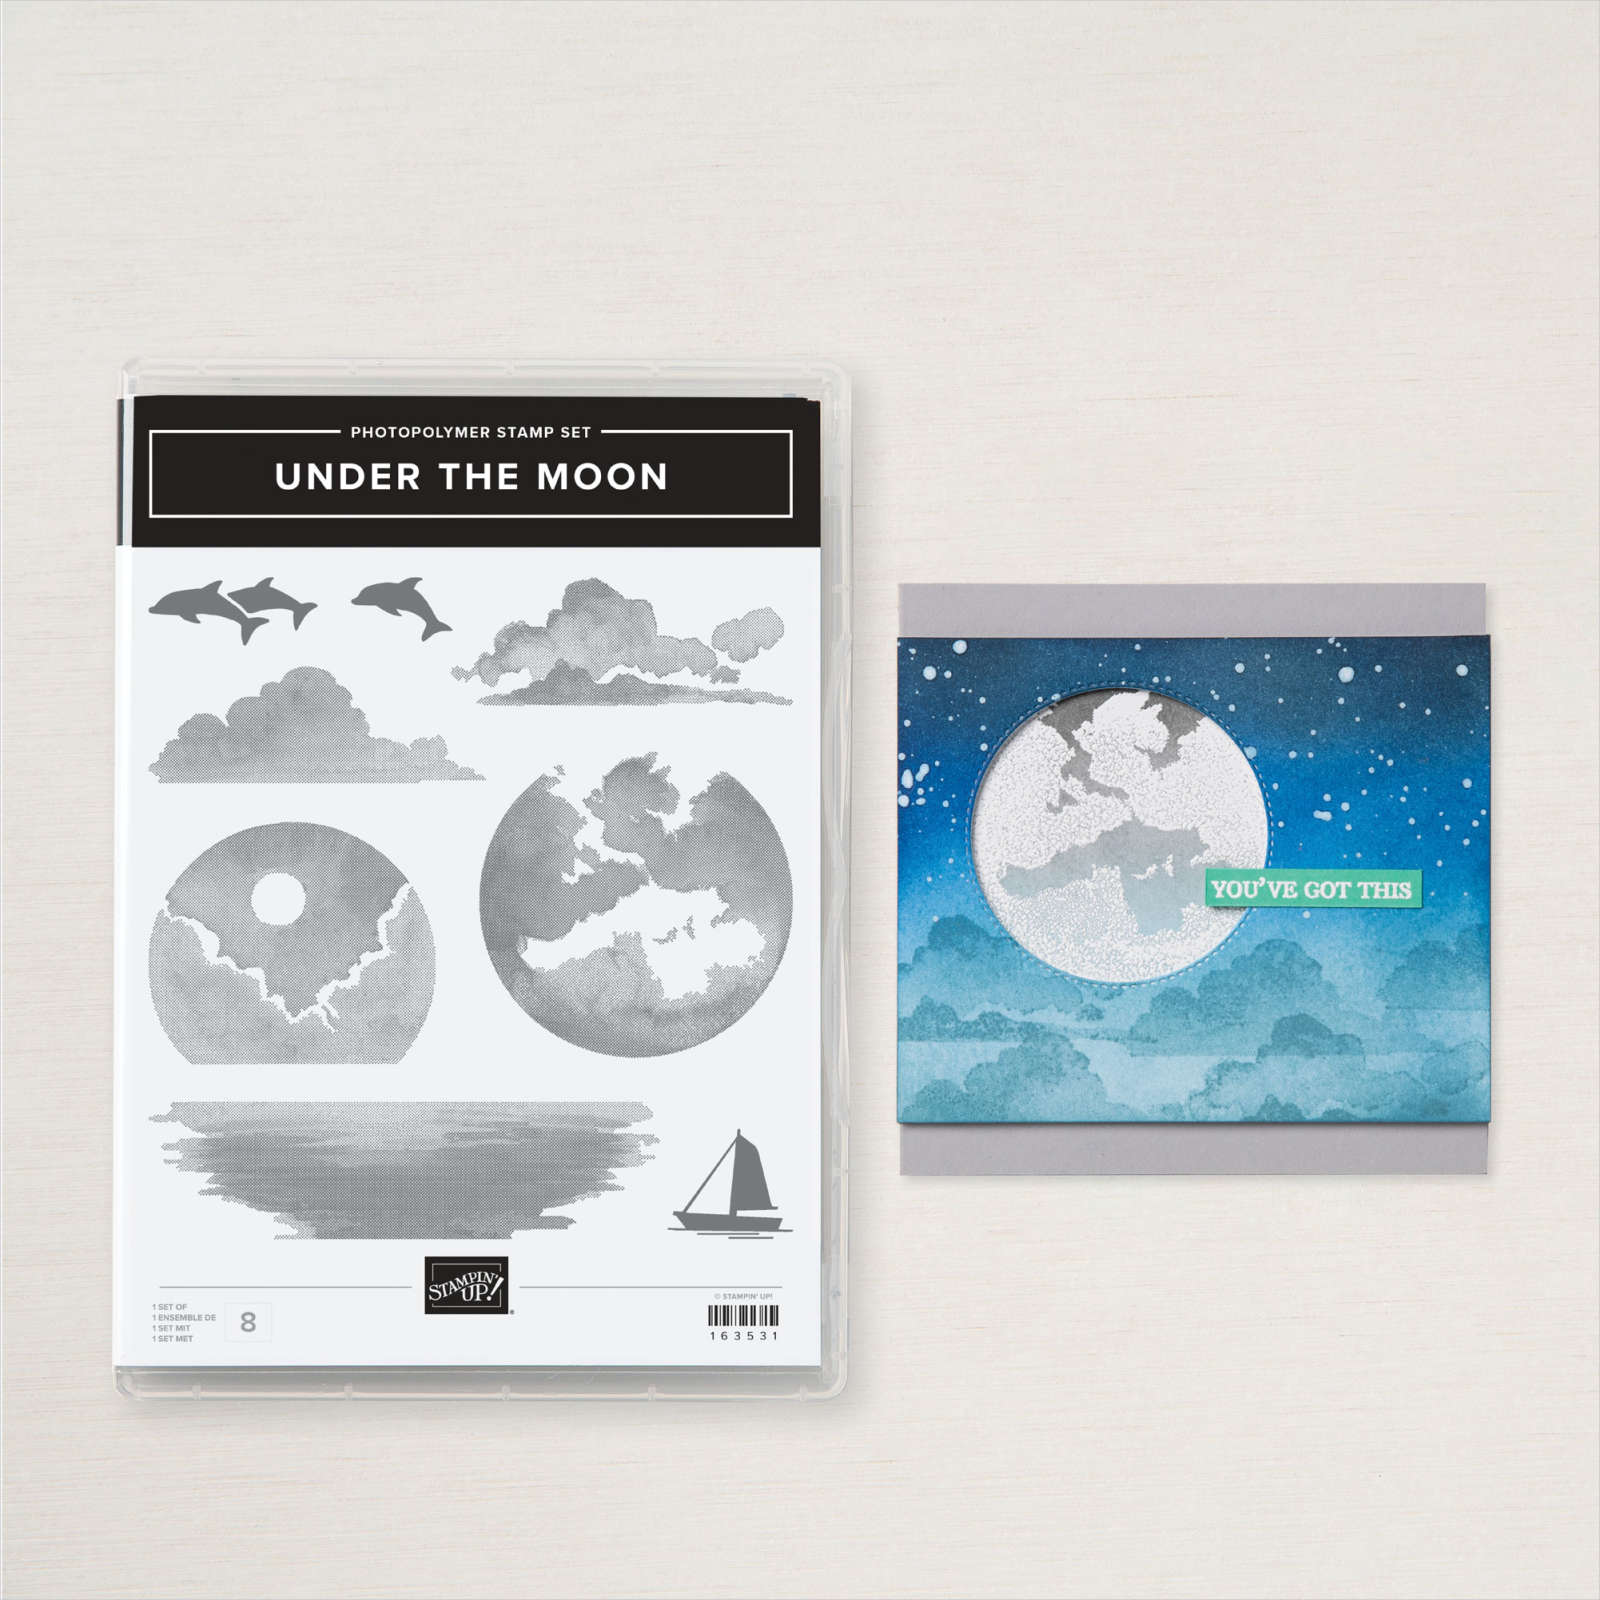
I sponged the edges of my Designer Series Paper as well as my Basic White 12″ x 12″ card bases using Misty Moonlight ink. Before I attached all of the pieces to the right hand page, I did a little sponging with Balmy Blue ink in the title area. I stamped one of the dophin image from the Under the Moon stamp set using Smoky Slate ink. I also stamped one of the clouds from the Under the Moon stamp set a couple of times using Smoky Slate ink which I stamped onto scrap paper first. The title is cut from Misty Moonlight card using the Alphabet A La Mode Dies. I printed my journaling onto Basic White card, making sure to leave room at the top for my stamping. I punched a 1-3/4″ Circle from a post it note and attached it to the top of the journaling panel. I sponged the panel using Balmy Blue ink.
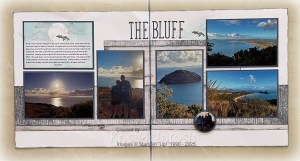
After removing the mask, I stamped the dolphin image from the Under the Moon stamp set again using Smoky Slate ink. I also stamped several clouds from the same stamp set using Smoky Slate ink which I stamped onto scrap paper first. All of the photos and the journaling panel are attached to Misty Moonlight card before being attached to the pages. I love how these page turned out and I also love that everyone was able to create their own gorgeous pages using supplies from their own stash. I am hoping this is going to be a regular class with us all learning how to use what we have in lots of different ways.
Bye for now,
Kris
Product Used:


So Sorry
I am so sorry that my posts have been a little “all over the shop” at the moment but we have been busy moving my Dad into the same nursing home as my Mum on Christmas Eve and since then we have been emptying out their duplex in the retirement village so that we can get it on the market ASAP. So I haven’t been posting like I should and my Facebook Lives have not been happening either. My hope is that by next week everything should be done and I will be able to get back to posting regularly and sharing all the exciting new things coming from Stampin’ Up! in January. So a little late but Happy New Year and wishing you all a better 2025.
Bye for now,
Kris
Tags & Labels Christmas
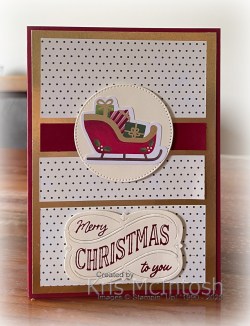
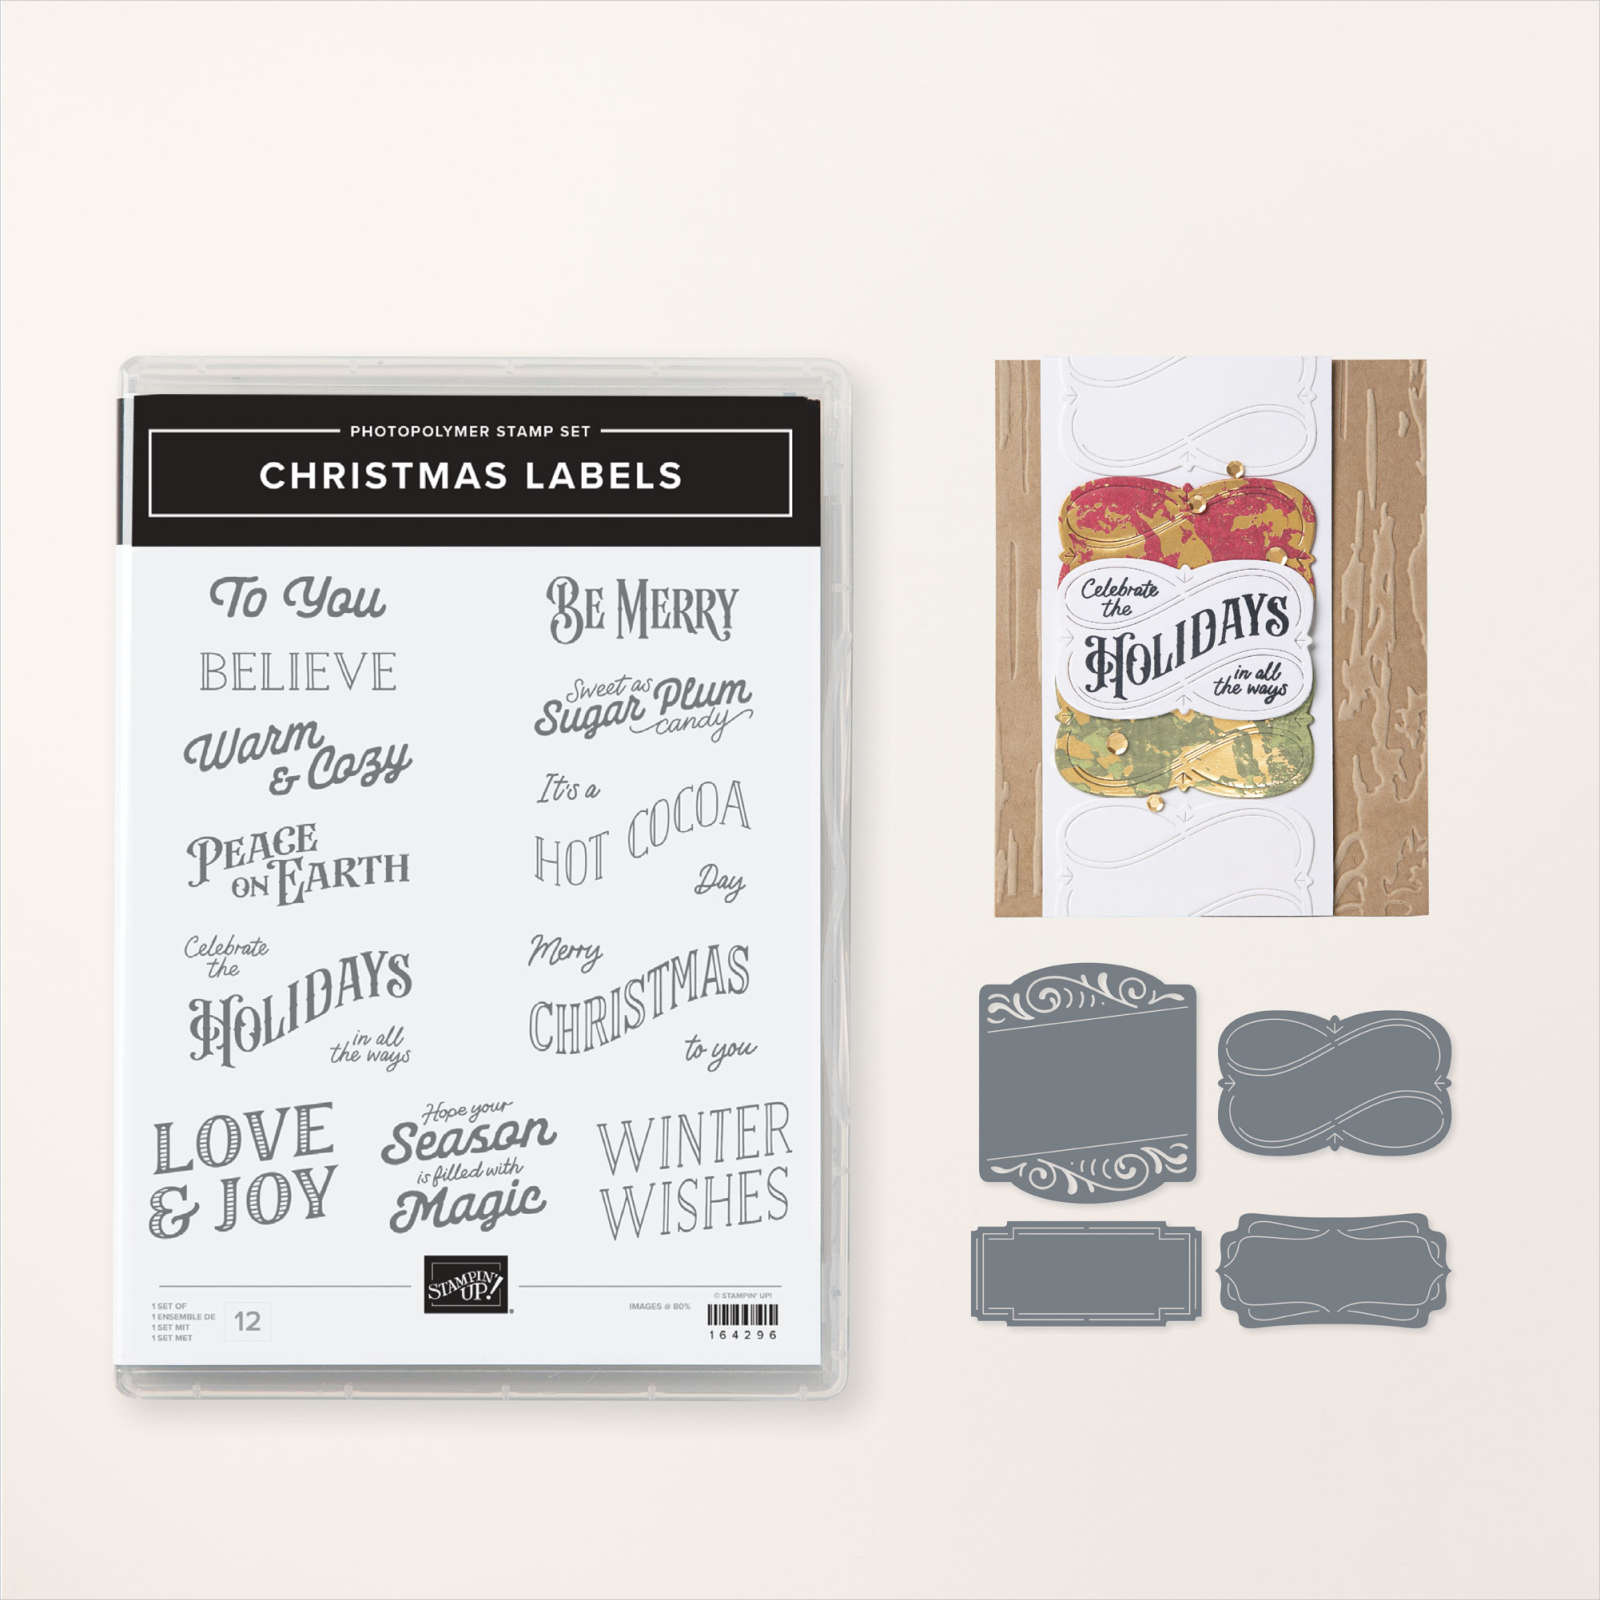
I know that Christmas is over but I wanted to share this card with you, which, once again, uses the Joyful Images Mix & Match Ephemera Pack. For this card I cut pieces of the Season of Green & Gold 12″ x 12″ Specialty Designer Series Paper and attached them to Gold Foil card. I also attached a narrow strip of Cherry Cobbler card to the Gold Foil card. The whole panel is attached to scored and folded Cherry Cobbler card. I cut Very Vanilla card using one of the Stylish Shapes Dies and attached it to the card front using dimensionals.
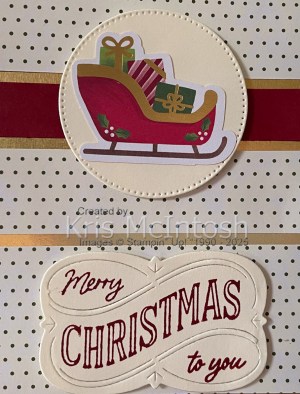
I attached one of the images from the Joyful Images Mix & Match Ephemera Pack to the circle. I stamped the greeting from the Christmas Labels stamp set onto Very Vanilla card using Cherry Cobbler ink.
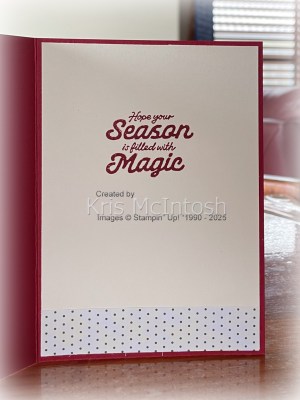
I cut out the greeting using the co-ordinating Christmas Labels Die and attached it to the bottom panel of Designer Series Paper using dimensionals. To decorate the inside of the card, I attached a narrow strip of the same Designer Series paper across the bottom of Very Vanilla card. I also stamped another greeting from the Christmas Labels stamp set using Cherry Cobbler card. I love how easy this card was to create using Template Eighteen from the Annual Catalogue and the Ephemera Pack.
Bye for now,
Kris
Product Used:


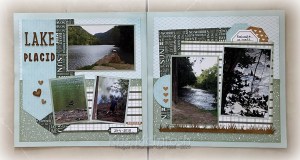
Lake Placid
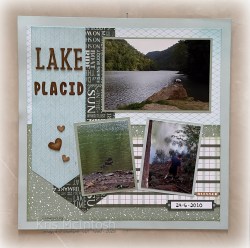
This is the third page I created using the Lake Life Scrapbooking Workshop Kit which is on sale while stocks last. This one fitted some photos from the very first long road trip Ron and I did in our van. We had such a lovely time while staying at the caravan park near Lake Placid. The location is close to the Kuranda Rail & Sky Rail and the Barron Falls and so peacful.

Once more I followed the instructions pretty much as they were. The only thing I changed was the title – I used the letters from the wood die cuts for “Lake” and cut the letters for “Placid” from Pecan Pie card using the Mini Alphabet Dies. All of the letters were sponged with Pecan Pie ink to add more depth to the colour. I didn’t add much journaling as I didn’t feel it was necessary, the photos remind me of such a happy time. I have a few bits and pieces left over from the Workshop Kit and I will use them to create some cards.
I can’t wait to try some techniques using the Two-Tone paper which means you get a darker and a lighter side to the paper which will be great for adding more depth and texture. The Two-Tone paper also has a white core, so there are some really great techniques I need to try. Hope you have enjoyed seeing some of the pages created using the Workshop Kits. There will be more of these type of Kits released with the next mini catalogue in January. Can’t wait.
Bye for now,
Kris
Product Used;
You can find the Lake Life Scrapbooking Kit here if it is still available.

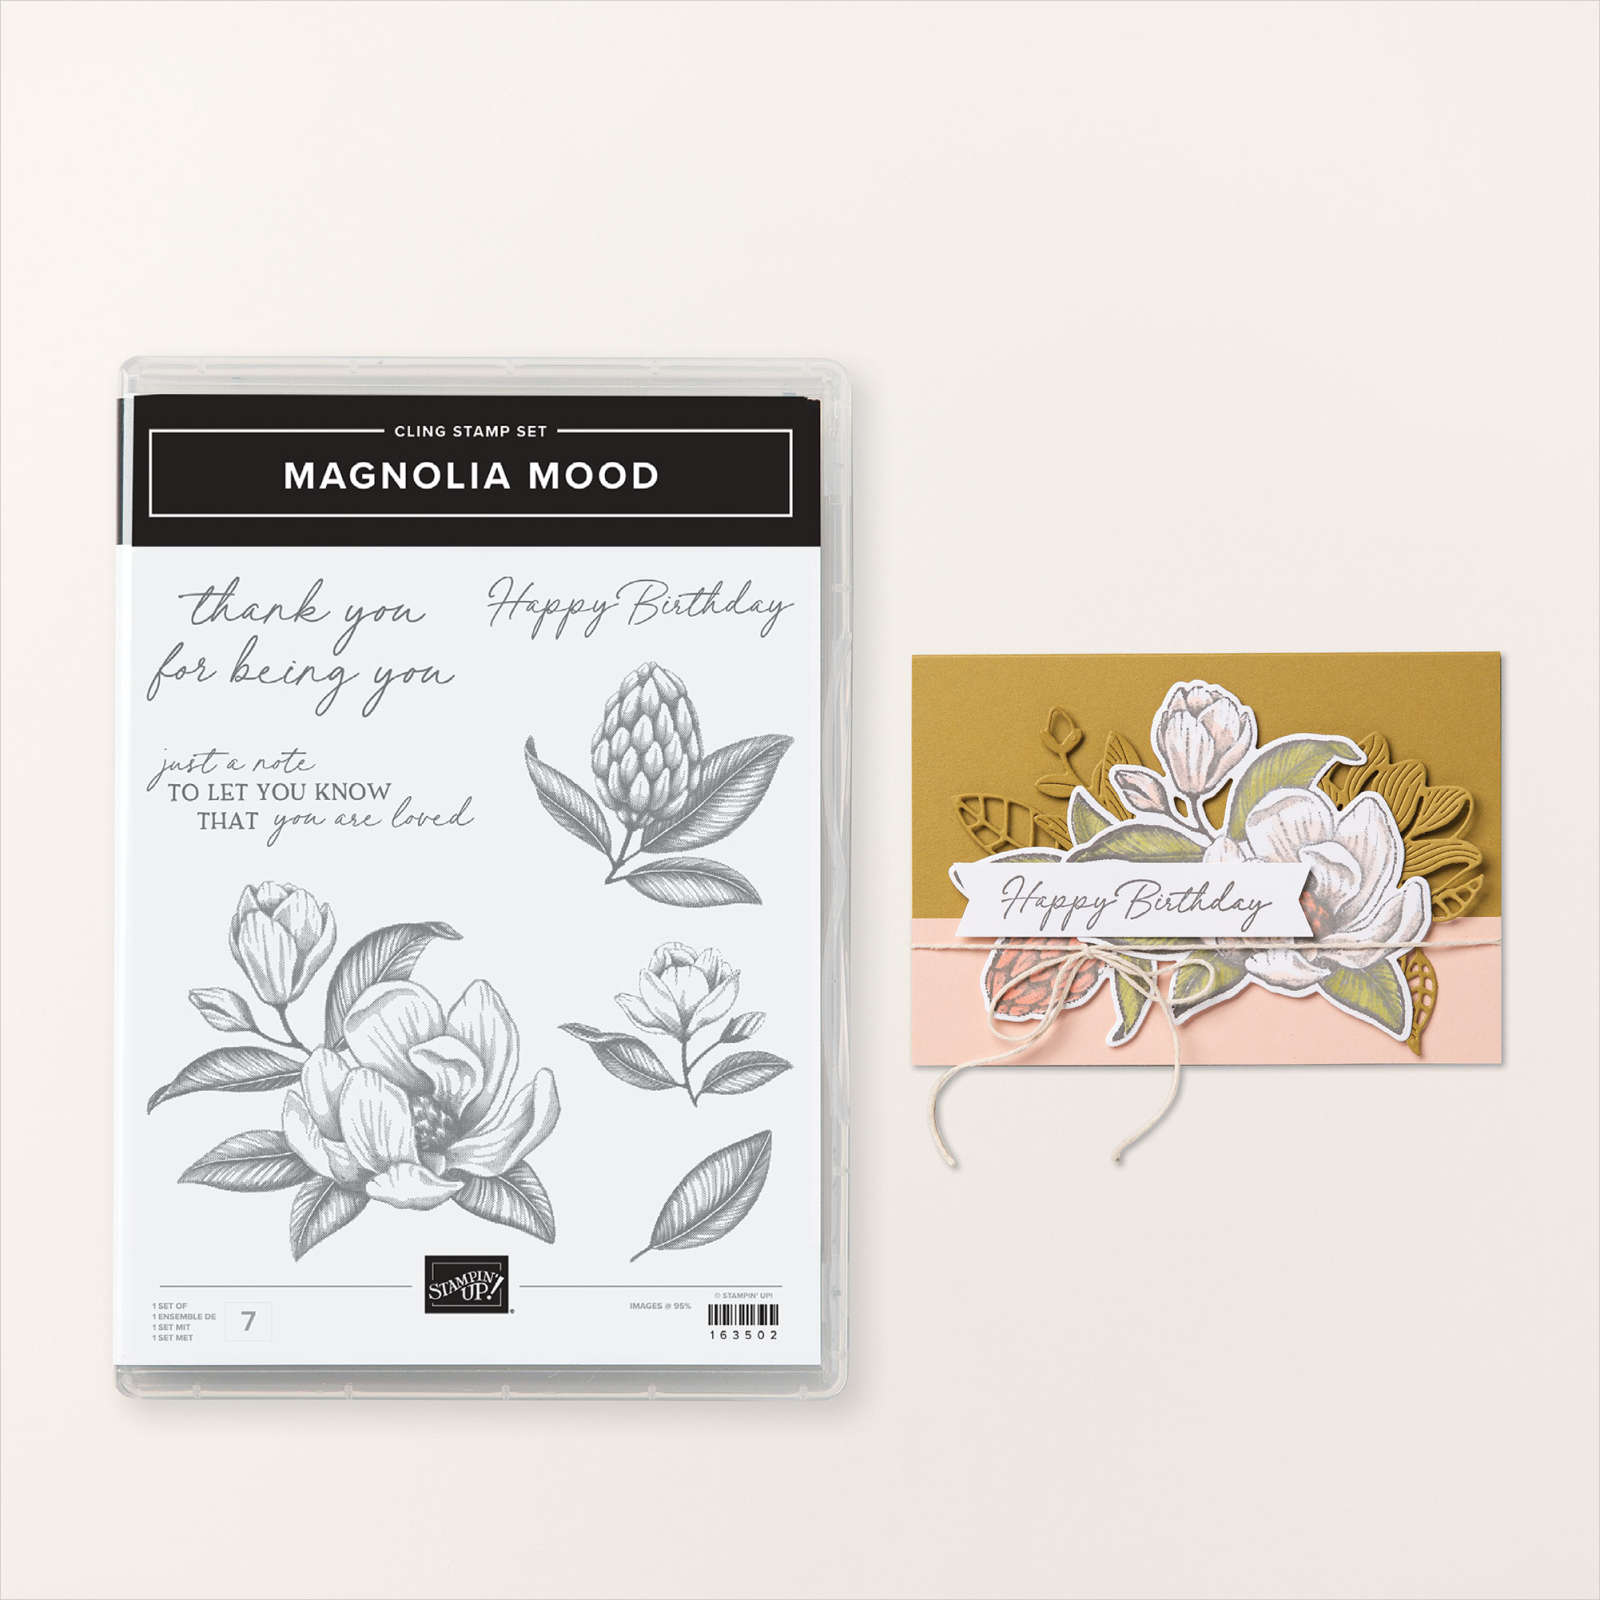
Golden Birthday

I made today’s card to send to a friend whose birthday slipped past before I knew it. I embossed a piece of Fresh Freesia card using the Layered Florals 3D Embossing Folder and attached it to scored and folded Thick Basic White card. I stamped the large flower from the Magnolia Mood stamp set onto Basic White card using Veramark ink. I sprinkled the image with Gold Embossing Powder from the Metallics Wow Embossing Powder and used the Heat Tool to heat set it. I used a sponge dauber to add Fresh Freesia, Granny Apple Green and Daffodil Delight ink to the image. I cut out the image using the co-ordinating Magnolia Mood Die.

I cut a circle from Basic White card using the Deckled Circle Dies. I attached the floral image to the die before attaching the whole panel to the card front using dimensionals. I stamped “happy birthday” from the Simply Said stamp set onto Basic White card using Versamark ink.

I sprinkled it with Gold Embossing Powder from the Metallics Wow Embossing Powder and used my Heat Tool to heat set it. I cut out the greeting using one of the banners from the Stylish Shapes Dies. I did have to cut half the die out and then moved it and cut again to get the whole greeting into the shape. The greeting is attached over the floral panel using dimensionals where necessary. To decorate the inside of the card I stamped the greeting from the Something Fancy stamp set using Fresh Freesia ink. I hope my friend forgives me for being so late.
Bye for now,
Kris
Product Used: