Catalogue Case
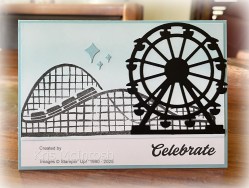
I have been having fun playing the Boardwalk Fun Bundle and decided to CASE one of the cards on page 47 of the January to April 2026 Mini Catalogue. I used a Blending Brush to add Balmy Blue ink to Basic White card trying to make the top of the panel darker than the bottom of the panel. I stamped the roller coaster image from the Boardwalk Fun stamp set across the bottom of the coloured Basic White panel using Memento Tuxedo Black ink.

I attached the panel to Basic White card and stamped “celebrate” from the Boardwalk Fun stamp set below the image panel using Memento Tuxedo Black ink. The whole panel is attached to scored and folded Balmy Blue card. I die cut Basic Black card using the ferris wheel image from the Boardwalk Fun Dies and attached to the right hand side of the card front. I die cut Balmy Blue card using the “starry” dies from the Boardwalk Fun Dies and attached them to the stamped panel.
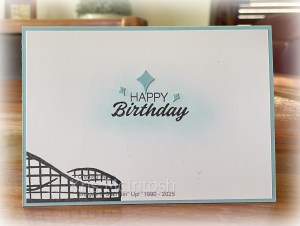
To decorate the inside of the card I used a Blending Brush to add a little Balmy Blue ink to the centre of Basic White card. I stamped the greeting from the Boardwalk Fun stamp set over the sponged area using Memento Tuxedo Black ink. I also stamped a portion of the roller coaster image onto the lower left hand corner of the Basic White panel. I die cut Balmy Blue card using the “starry” dies from the Boardwalk fun dies and attached them around the greeting. I love the finished card, so thank you Stampin’ Up! for the inspiration.
Bye for now,
Kris
Product Used:


Clermont
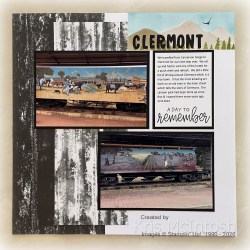
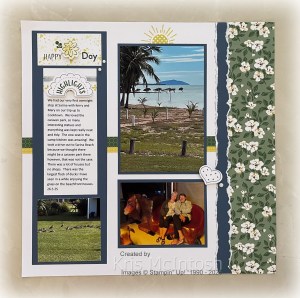
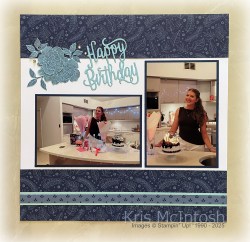
Today’s pages show off some photos from we visited Clermont with our friends back in 2024. I added two different patterned papers from the Botanical Textures 12″ x 12″ Designer Series Paper (retired) to the outside of my White Willow card bases. I used the retired Scenic Adventure Dies to create masks so that I could add the “mountains” across the top of each of the pages. I added Crumb Cake, Balmy Blue & Old Olive ink using Blending Brushes. I stamped the birds which are from the retired Sunrise Sailing stamp set using Memento Tuxedo Black ink.
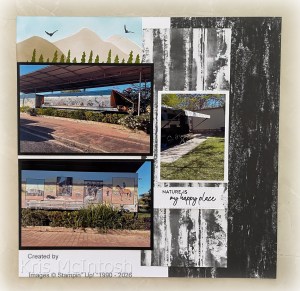
I attached my photos to Basic Black card except for the smaller photo which is attached to Basic White card. I stamped the greeting from the Exploring Nature stamp set onto Basic White card using Memento Tuxedo Black ink. I cut out the greeting using one of the banners from the Stylish Shapes Dies and attached it to the right hand page.
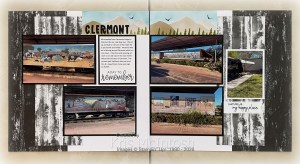
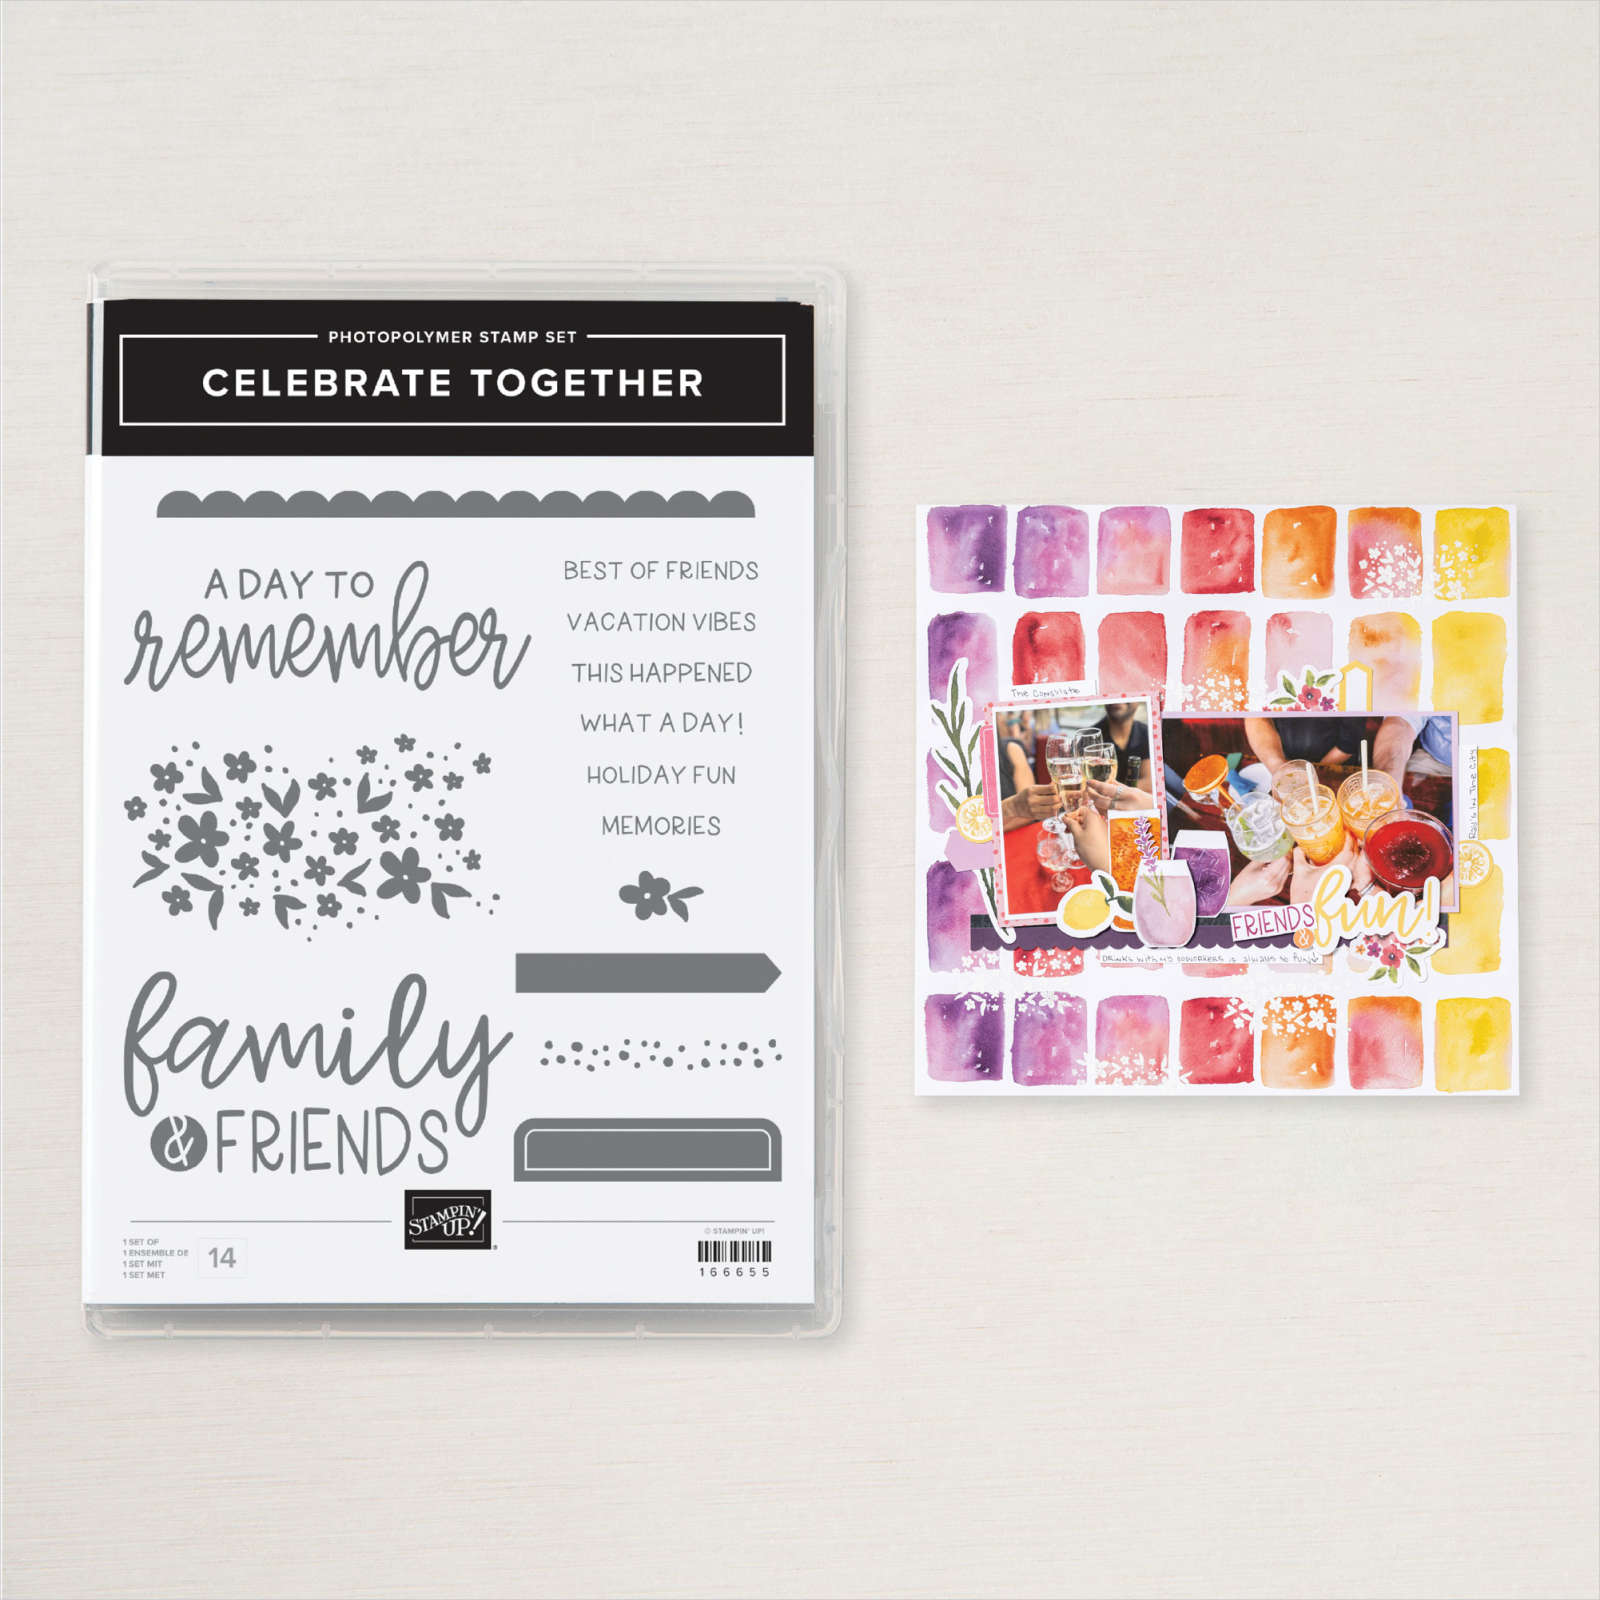
I cut the title from Basic Black card using the Mini Alphabet Dies. I printed my journaling onto Basic White card and added the greeting from the Celebrate Together stamp set using Memento Tuxedo Black ink. The journaling panel is also attached to Basic Black card before being attached to the page. I am really happy with the way these pages turned out and love that I am getting more photos onto pages and off the computer! I’d love to know what you think.
Bye for now,
Kris
Product Used:


Birthday Gears

Today’s card is one I created using the Gears & Textures Bundle. I used the circle/dotted die from the Gears & Textures stamp set and Gray Granite ink to stamp twice onto Basic White card. I used the dotted image to stamp onto the Basic White card twice full strength and twice second generation. I also added the solid splash image from the Gears & Textures stamp set twice onto the card using Night of Navy ink. I attached the stamped panel to Night of Navy card. I stamped “happy birthday” from the With You in Mind stamp set onto Basic White card using Night of Navy ink.

The greeting is cut out using one of the Nested Essential Dies. I dipped the edges of the die into the Night of Navy ink pad and attached the greeting to the stamped Basic White card using dimensionals. I used one of the dies from the Gears & Textures Dies to cut Night of Navy card and attached it to the card front using dimensionals where necessary. I used the Dark Night of Navy Stampin’ Blend to tap some light splatter onto the whole panel before attaching it to scored and folded Thick Basic White card. I used the circle image from the Gears & Textures Dies to stamp twice onto Basic White card using Gray Granite ink.

I made sure to stamp onto scrap paper first each time. I stamped the greeting from the Simply Said stamp set over the top of the stamped circles using Night of Navy ink. I used the Dark Night of Navy Stampin’ Blend to tap some light splatter across the greeting. I dipped the edges of the stamped Basic White panel into the Night of Navy ink pad before attaching the panel inside the card base. I had a lot of fun playing with this card and stepping outside my comfort zone to add the splatter to this card. I’d love to know what you think.
Bye for now,
Kris
Product Used:


More Friendly Foliage
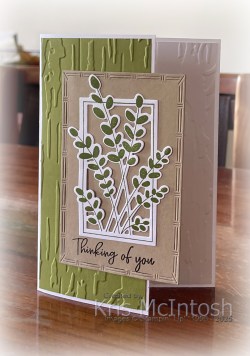
Here is another card using the fabulous Friendly Foliage Bundle. I cut my card base from Thick Basic White card, making sure to trim the card front. I embossed a piece of Old Olive card using the Birch 3D Embossing Folder and attached it to the card front. I cut Crumb Cake card using one of the Textured Notes Dies and stamped the greeting from the Friendly Foliage stamp set onto the bottom using Early Espresso ink before attaching it to the card front. I stamped the large leafy image from the Friendly Foliage stamp set onto Basic White card using Old Olive ink. I cut out the image using the dies from the Friendly Foliage Dies.
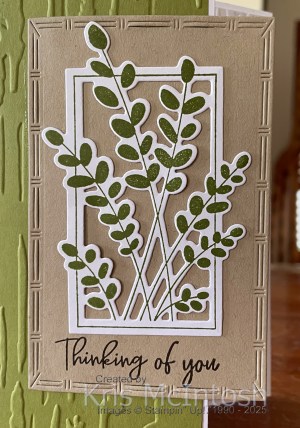
The image is attached to the Crumb Cake panel on the card front. I embossed a strip of Basic White card using the Birch 3D Embossing Folder and attached it to the right hand side of Basic White card.

I stamped both the single leaf images from the Friendly Foliage stamp set onto the un-embossed Basic White card using Old Olive ink. I stamped the greeting from the Friendly Foliage stamp set beside the leaves using Early Espresso ink. The whole panel is attached to the inside of the Thick Basic White card base with the embossed section showing when the card is closed. Another lovely card using this beautiful Friendly Foliage Bundle.
Bye for now,
Kris
Product Used:


Sarina
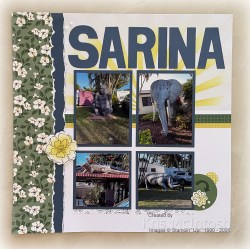
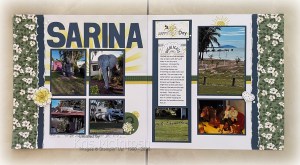
Today’s page shows off some photos from our stopover at Sarina on our way to Cooktown. We had heard good reviews of the Caravan Park and we were not disappointed. The park was lovely and clean with good amenities and great statues of many different animals throughout the park. I used the May layout from the 2025 Virtual Album Retreat. I did change up the way each page looks but used everything according to the instructions.
Of course I did not add the title from the Retreat instead my title is cut from Misty Moonlight card using the Party Alphabet Dies. It is so good to have these layouts ready to go when I know when photos I want to add.
Unfortunately the 2025 Virtual Album Retreat is now on the last chance list so if you want to create 12 ready to go double page layouts, I highly recommend this kit. If you purchase the kit you will still have access to watch the videos on You Tube.
Bye for now
Kris
Product Used:
You can view the Virtual Album Retreat here in my online store.


Virtual Birthday

This week in my Facebook Live I shared some cards I created using the 2026 Virtual Card Making Retreat stamp set. This stamp set is only available if you purchase the 2026 Virtual Card Making Retreat. For today’s card I embossed Petunia Pop card using the Beautiful Pattern Embossing Folder. I attached the embossed panel to scored and folded Thick Basic White card. I stamped the large floral image from the Virtual Card Making Retreat stamp set onto Basic White card using Memento Tuxedo Black ink. I coloured the image using Petunia Pop, Summer Splash, Dark Daffodil Delight and Light Pretty in Pink Stampin’ Blends.
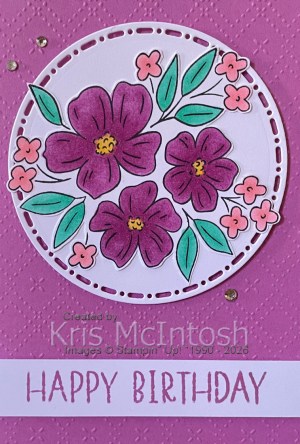
I cut out the image and attached it to a Basic White circle cut using one of the Spotlight on Nature Dies. The image panel is attached to the card front using dimensionals. I stamped “happy birthday” from the same stamp set onto Basic White card using Petunia Pop ink. The greeting panel is attached to the card front also using dimensionals. Lastly I added three Basic Rhinestones to the card front.

To decorate the inside of the card I stamped “let’s celebrate” from the Simply Said stamp set onto Basic White card using Summer Splash ink. I stamped the small flower from the Card Making Retreat stamp set beside the greeting using Memento Tuxedo Black ink. I coloured the image using Petunia Pop & Dark Daffodil Delight Stampin’ Blends before masking the image and stamping the three leaf image from the same stamp set using Memento Tuxedo Black ink. I removed the mask and coloured the leaves using Summer Splash Stampin’ Blends. I stamped the striped border image from the Card Making Retreat stamp set onto Basic White card using Summer Splash ink. I attached the stamped panel to Summer Splash card before attaching the panel across the bottom of the stamped Basic White card. I have had a lot of fun using this stamp set and absolutely loved attending the Card Making Retreat.
Bye for now,
Kris
Product Used:
You can view the 2026 Virtual Card Making Retreat here in my online store.


Petal Birthday
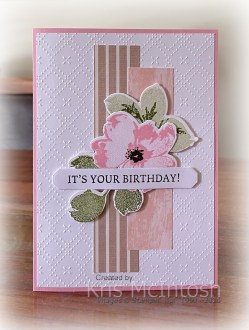
Today I have a couple of cards to share with, both the same design but just slightly different colours. I began by embossing Basic White card using the Beautiful Pattern Embossing Folder. The embossed card is attached to scored and folded Pretty in Pink card. I attached two strips of Brushed with Beauty Designer Series Paper. I stamped the large outline flower from the Petals of Beauty stamp set onto Basic White card using Pretty in Pink ink. I stamped the large solid flower over the top using Pretty in Pink ink which I stamped onto scrap paper first.
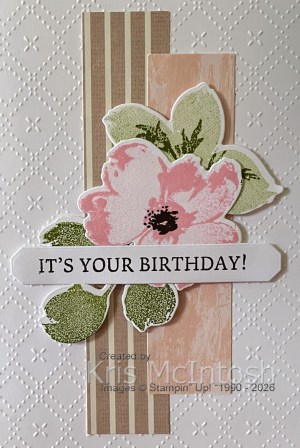
I stamped the flower centre from the Petals of Beauty stamp set using Early Espresso ink. I stamped the small three leaf image from the Petals of Beauty stamp set onto Basic White card using Old Olive ink, making sure to stamp onto scrap paper first. I stamped the detailed small three leaf image over the top using Old Olive ink.
I stamped the large three leaf image from the Petals of Beauty stamp set onto Basic White card using Old Olive ink. I cut out all of the images using the co-ordinating Petals of Beauty Dies. The images are all attached to the card front using dimensionals. I stamped the greeting from the Words of Beauty stamp set onto Basic White card using Early Espresso ink. I cut out the greeting using one of the banners from the Words of Beauty Dies.
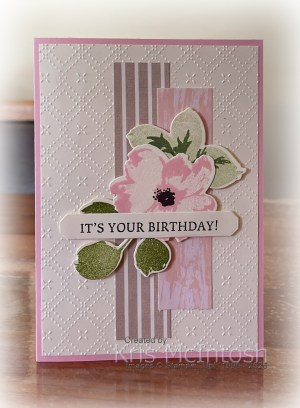
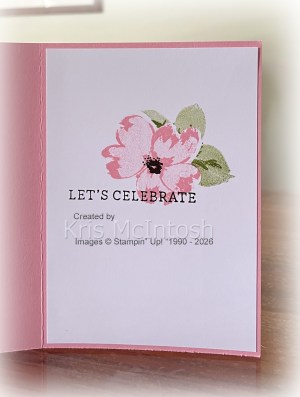
The greeting is attached across the card front using dimensionals where necessary. To decorate the inside of the card I stamped the large floral image from the Petals of Beauty onto Basic White card using Pretty in Pink ink, stamping off the solid image onto scrap paper first.
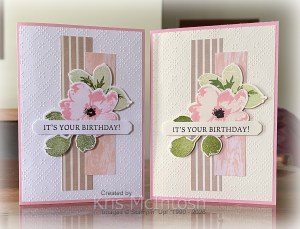
I masked the flower and stamped the small three leaf image using Old Olive ink, again making sure to stamp off the solid image onto scrap paper first. I removed the mask and stamped the flower centre using Early Espresso ink. I stamped the greeting from the Simply Said stamp set over the floral image using Early Espresso ink. I loved this card and decided to create it again using the same Designer Series Paper and inks except I used Very Vanilla card not Basic White card. I love both of these cards, but maybe the Basic White one a little more. I’d love to know what you think.
Bye for now,
Kris
Product Used:
You can view Very Vanilla card here in my online store.


Happy 21st
My eldest granddaughter recently celebrated her 21st birthday. She is an amazing young lady and it is a pleasure and priviledge to be part of her life. Of course I had to memory keep this event! I used the 1, 2, 3 Layout from January’s Class to create the page. The paper is from the True Blue Florals 12″ x 12″ Designer Series Paper which was the Product of the Month for December 2025. The product of the month is only available while stocks last for a cost of $9.00 and only if you spend a minimum $125.00 (AUS), so I am not sure that this product will still be available now, however, there will be a new Product of the Month available in February.
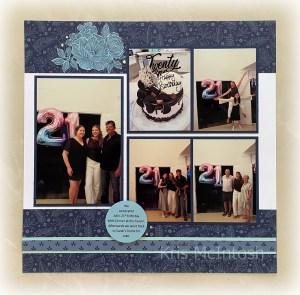
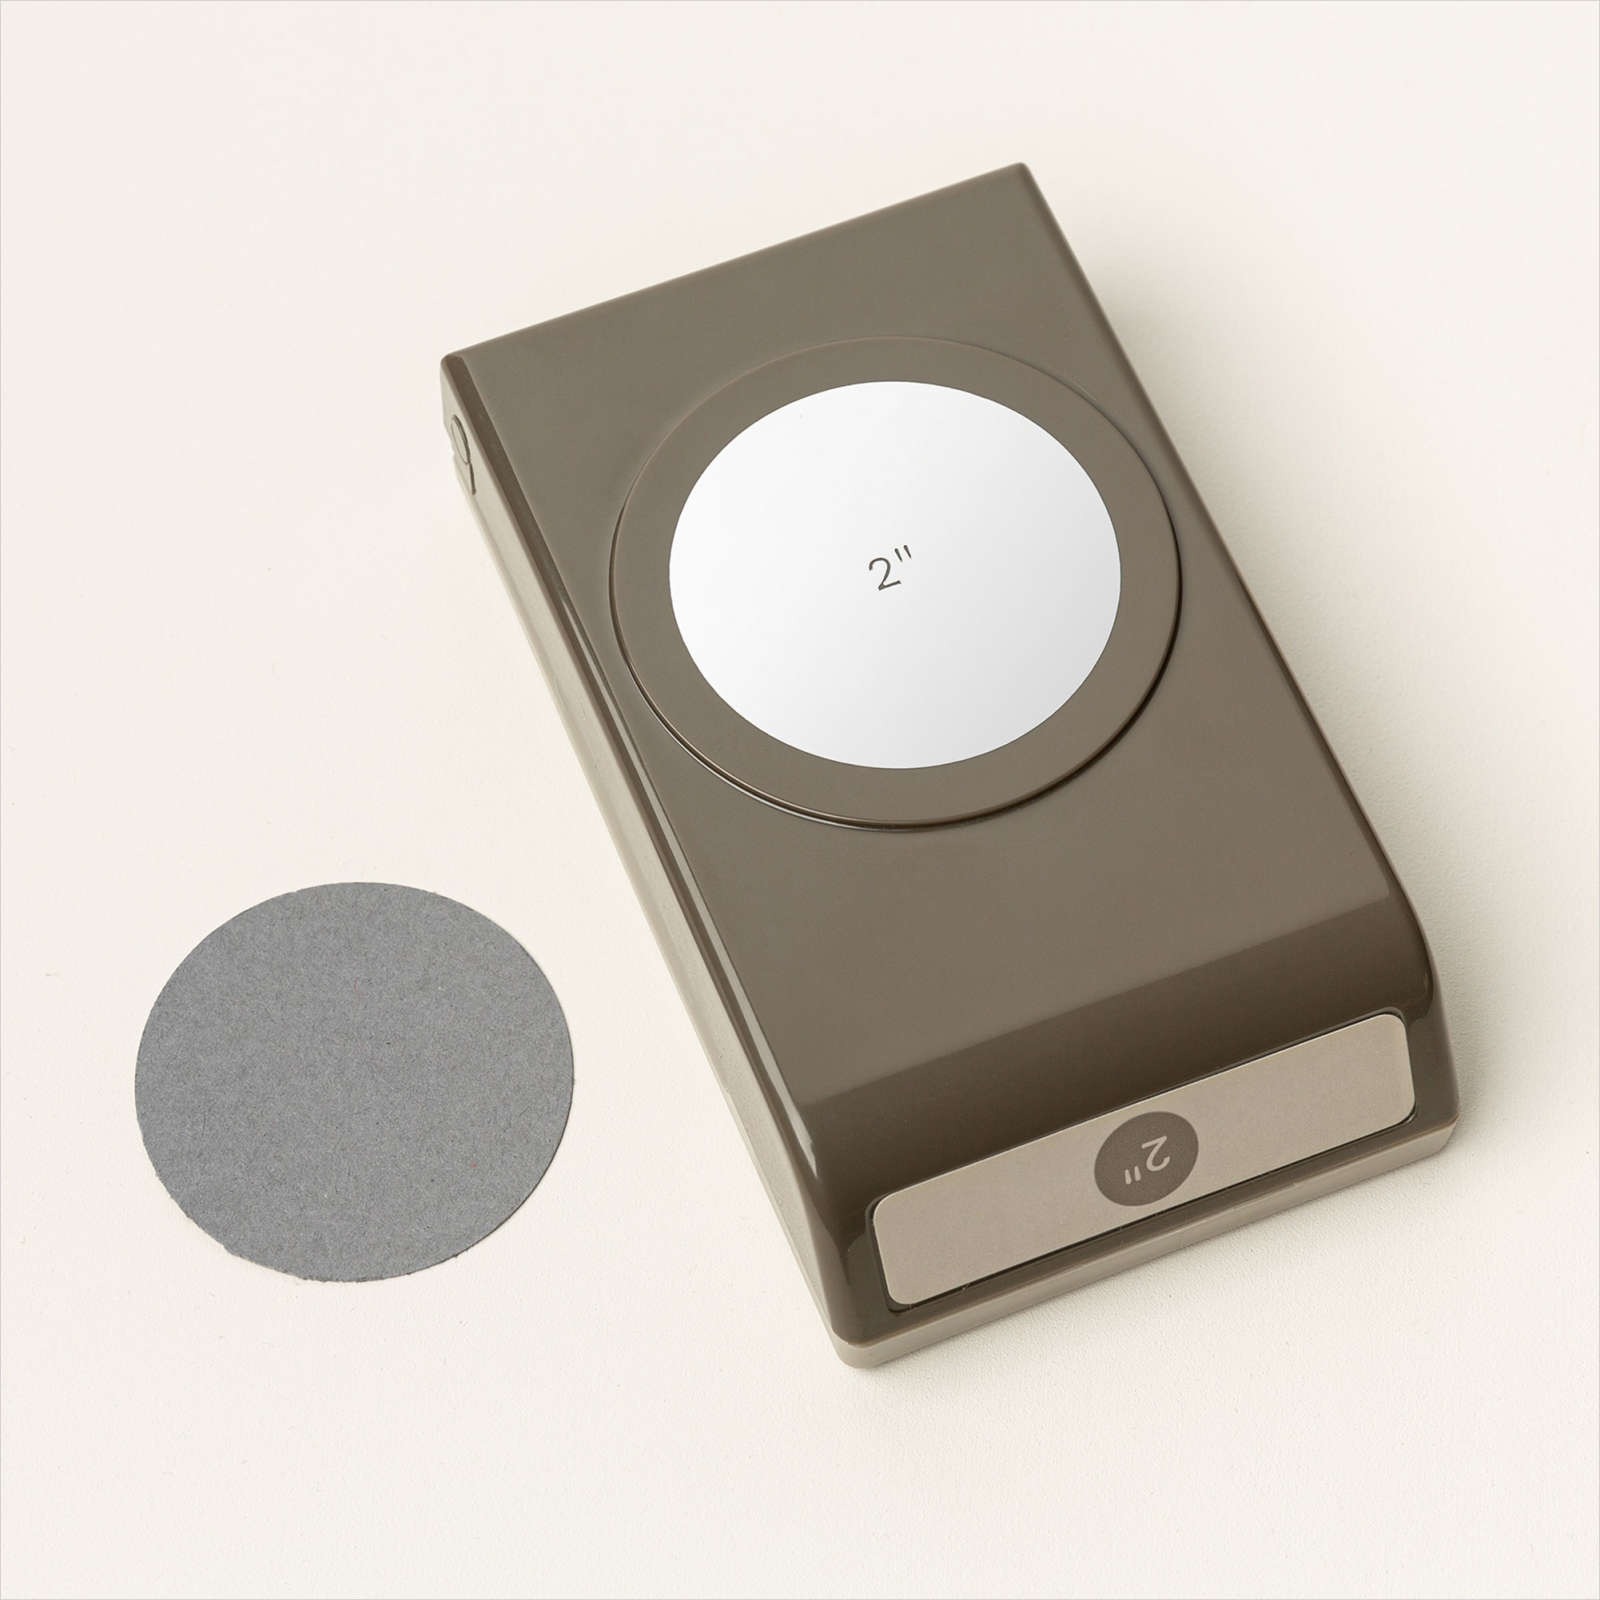
My floral clusters were created by cutting the flowers from one of the papers in this Designer Series Paper. I printed my journaling onto Balmy Blue card and punched it out using the 2″ Circle Punch. I created the title is cut from Balmy Blue card using the long retired Happy Birthday Thinlet Die.
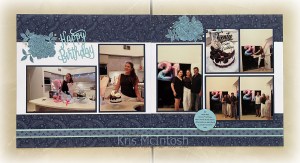
I did attach my photos to Night of Navy card to add some definition and replaced two of the landscape photos with four smaller portrait photos. I love how this turned out and I loved celebrating with my granddaughter and family. If you love this layout you can find more 1, 2, 3 Layouts on You Tube. They are created by Noreen Smith a Creative Memories consultant. I have been having so much fun using these layouts in my classes. I get to create at least four layouts each month and my ladies get to bring along paper from their stash and learn how to create a double page layout quickly and easily.
Bye for now,
Kris
Product Used:

Seaside Thank You
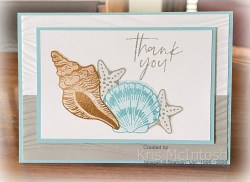
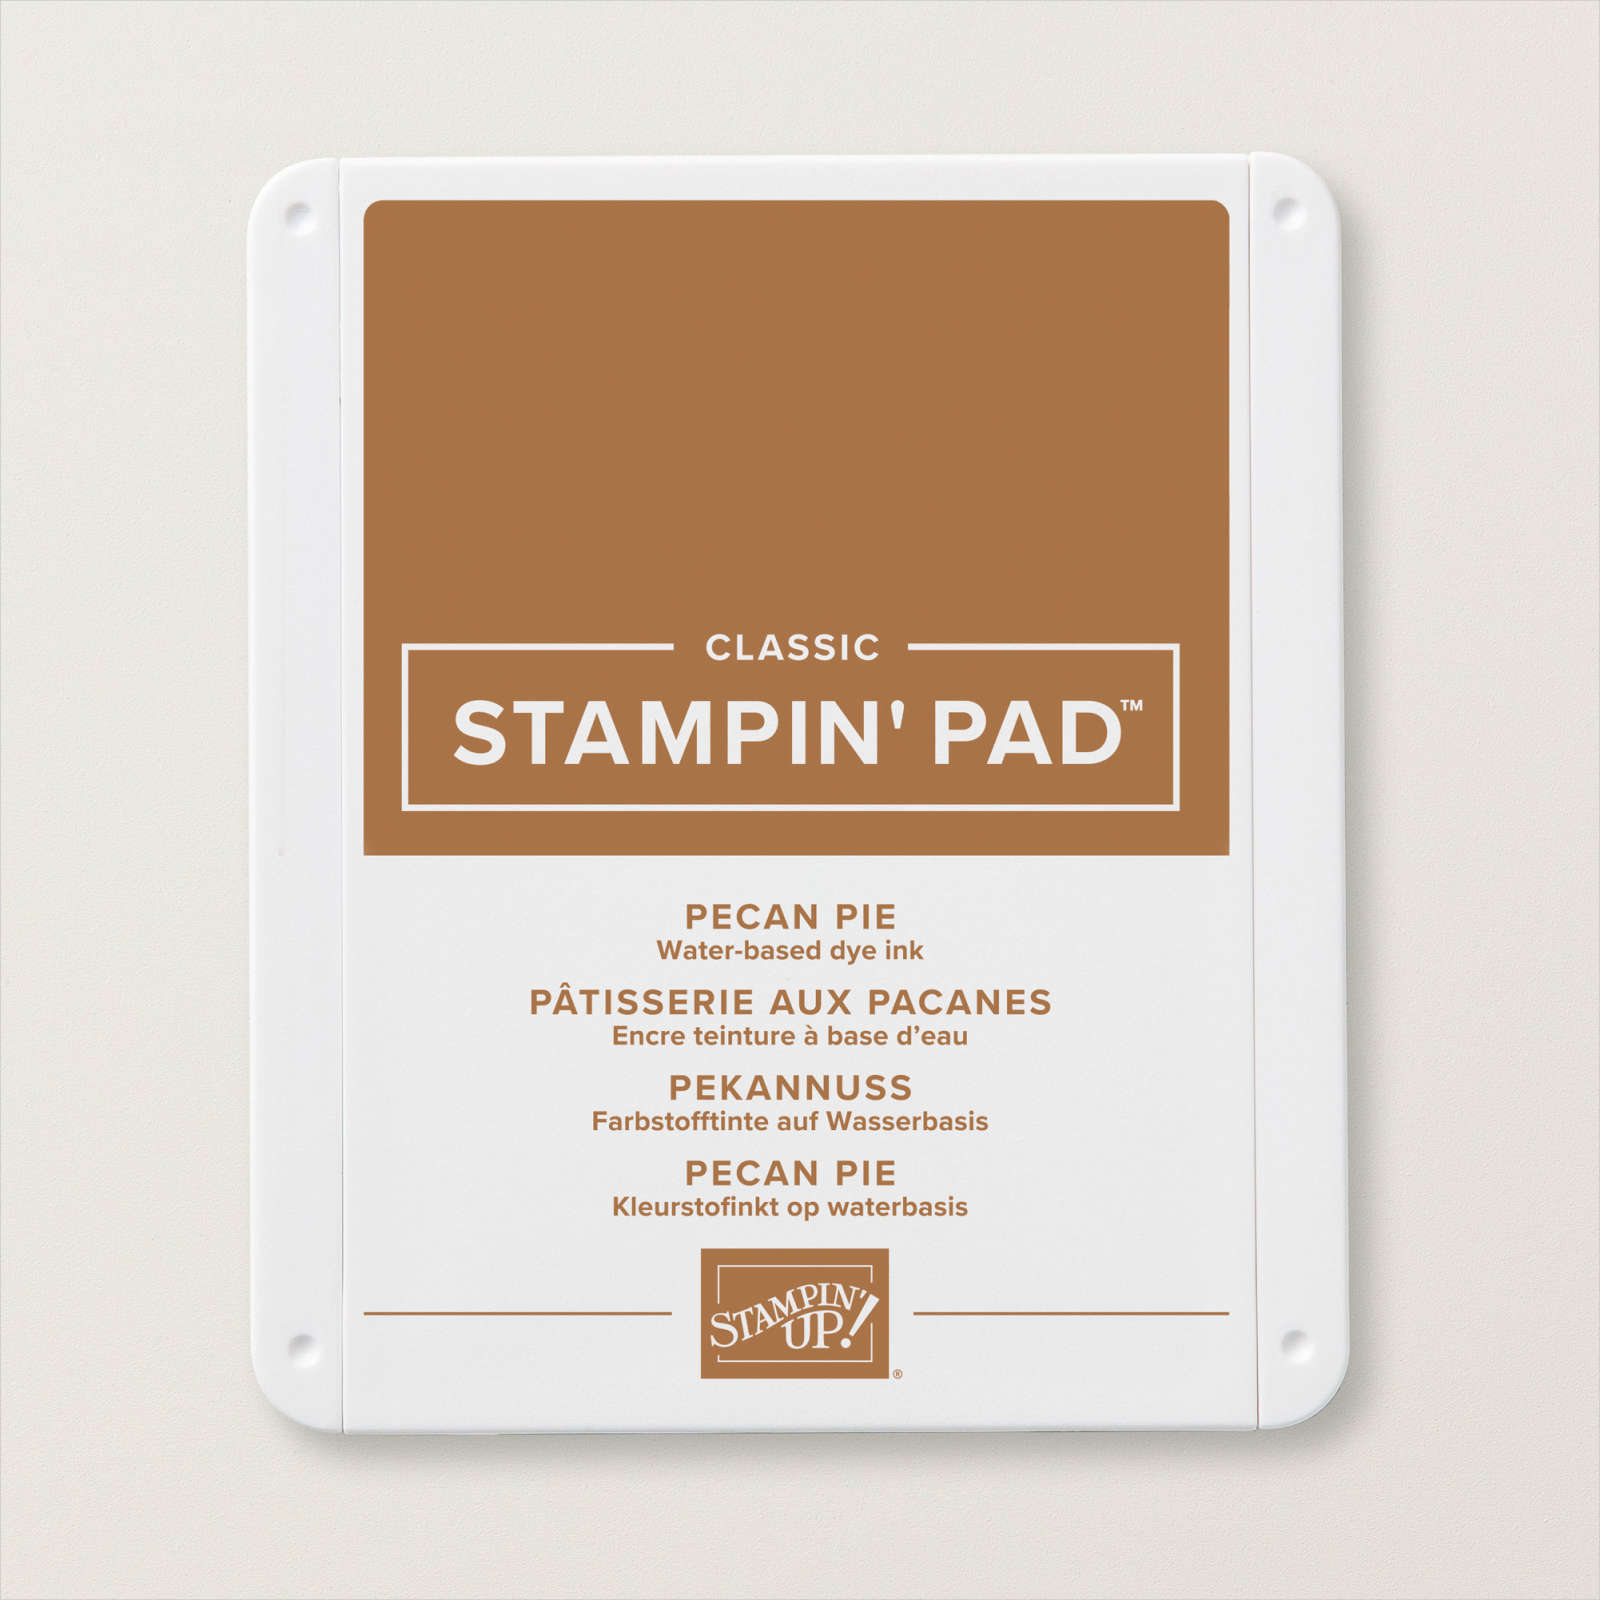
This week in my Facebook Live I shared some cards I created using the Shell Collecting stamp set along with the Fabulous Sayings stamp set which is January’s Product of the Month. For this card I attached piece of Smoky Slate card across the bottom of Basic White card. I embossed the panel using the Soft Waves 3D Embossing Folder before attaching it to scored and folded Balmy Blue card. I stamped the large solid shell from the Shell Collecting stamp set onto Basic White card using Pecan Pie ink which I stamped onto scrap paper first.
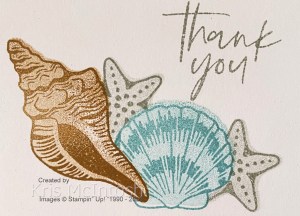
I stamped the detailed image over the top using Pecan Pie ink. I masked the image and stamped the solid smaller shell image using Balmy Blue ink which I stamped onto scrap paper first. I stamped the detailed smaller shell image over the top using Balmy Blue ink. I masked the smaller shell as well and stamped the solid star fish image twice using Smoky Slate ink which I stamped onto scrap paper first. I stamped the detailed star fish image over the top using Smoky Slate ink.
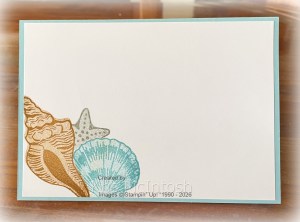
I removed the masks and stamped “thank you” from the Fabulous Sayings stamp set using Smoky Slate ink. The stamped panel is attached to Balmy Blue card and then the card front using dimensionals. To decorate the inside of the card I stamped the large shell, medium shell and star fish images as I did on the front, stamping off for the solid images and covering the large and medium shell with masks. I really love this stamp set and I know that its going to get lots of use.
Bye for now,
Kris
Product Used:


Birthday Time
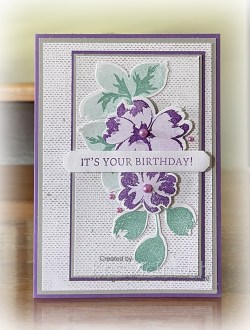
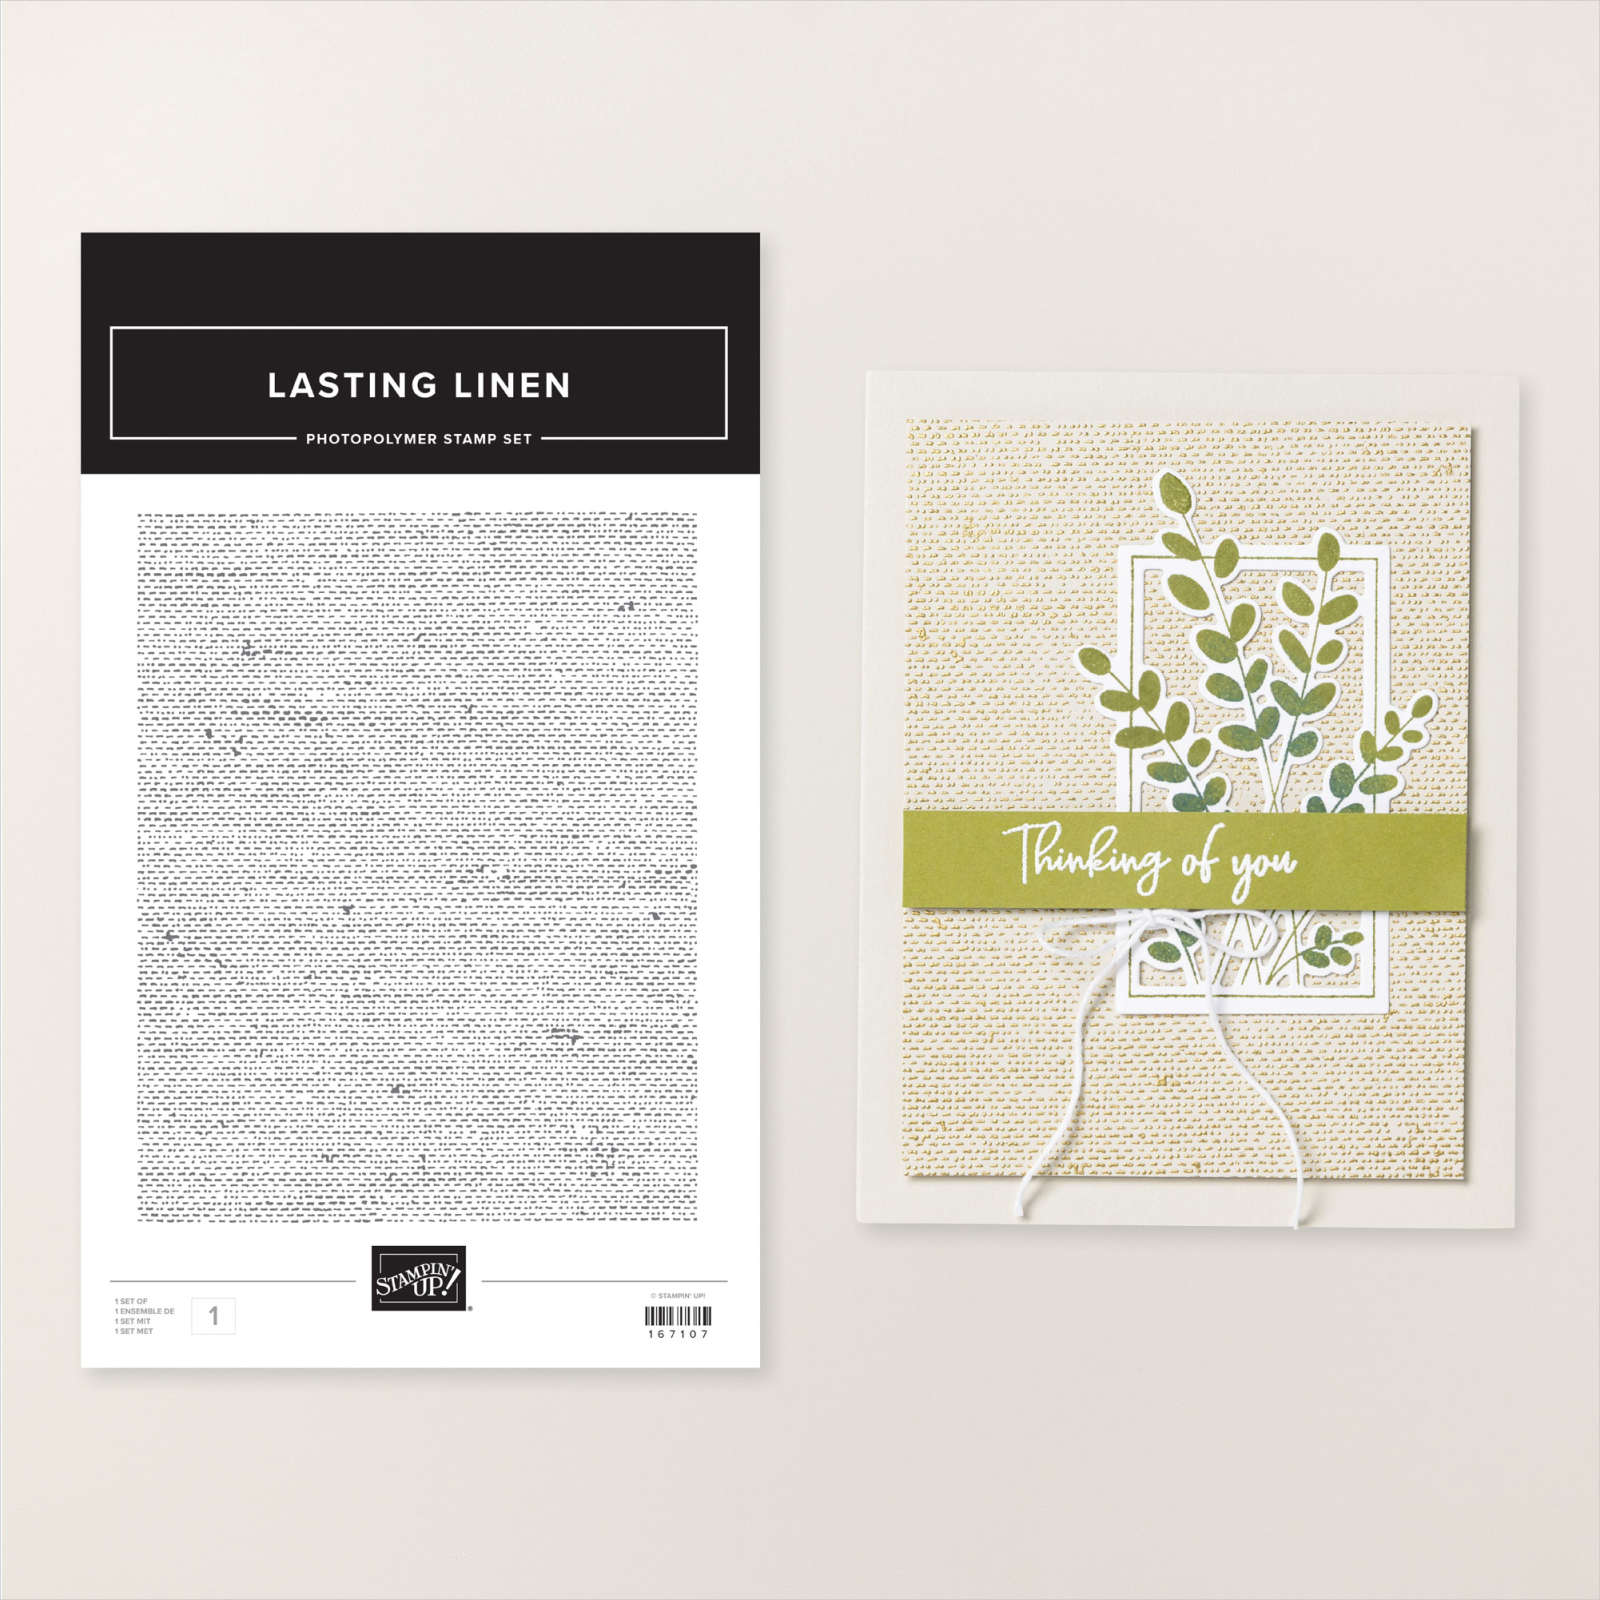
Today I thought I would share the card I made for my eldest daughter for her birthday. I stamped the Lasting Linen background onto Basic White card using Smoky Slate ink. The stamped panel is attached to Smokey Slate card and then scored and folded Gorgeous Grape card. I stamped another panel of Basic White card using the Lasting Linen Background and Smoky Slate ink. This panel is also attached to Smokey Slate card and Gorgeous Grape card before it is attached to the card front. I stamped the large floral outline image from the Petals of Beauty stamp set onto Basic White card using Gorgeous Grape ink.
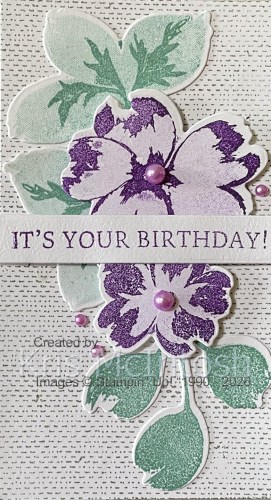
I stamped the solid large floral image onto the outline image using Highland Heather ink. I stamped the small floral images from the Petals of Beauty stamp set in the same manner using the same inks. The flowers are cut out using the co-ordinating Petals of Beauty Dies. I stamped the smaller three leaf image from the Petals of Beauty stamp set twice onto Basic White card using Lost Lagoon ink which I stamped onto scrap paper first. I stamped the detailed image over the top using Lost Lagoon ink. I stamped the larger three leaf image from the Petals of Beauty stamp set onto Basic White card using Lost Lagoon ink.
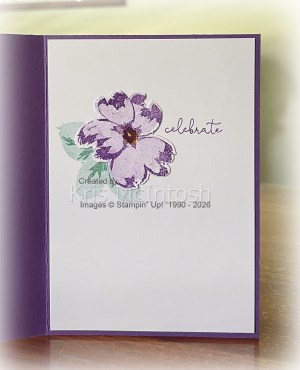
The leaf images are cut out using the co-ordinating Petals of Beauty Dies. I layered the die cut images onto the smaller panel stamped with the Lasting Linen Background adding dimensionals underneath the two flowers. I stamped the greeting from the Words of Beauty stamp set onto Basic White card using Gorgeous Grape in and cut it out using one of the banners from the Words of Beauty Dies. The greeting is attached across the floral images using dimensionals where necessary. I coloured two large and three small Basic Pearls (retired) using the Dark Highland Heather Stampin’ Blend. The large pearls are attached to the centre of the flowers and the small pearls around the images. To decorate the inside of the card, I stamped the smaller three leaf image from the Petals of Beauty onto Basic White card using Lost Lagoon ink. The solid image is stamped onto scrap paper first. I created another large flower as I did for the card front and attached it over the stamped leaf. I stamped “celebrate” from the Banner Sayings stamp set beside the flower using Gorgeous Grape ink. I love how pretty this card is, don’t you?
Bye for now,
Kris
Product Used: