Happy Days,
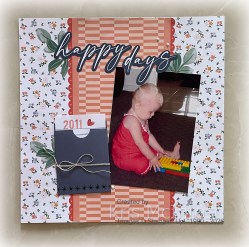
This was the first layout that we created during the 2026 Virtual Album Retreat and I loved it. I found these photos of my youngest granddaughter Ava playing in our loungeroom. She used to stay with me and Ron when her Mum went back to work. Such happy memories.
I didn’t change anything on this page except the date on the pocket which I decided not to write on so it is stuck in place and not removable. I cannot believe how much fun I had working along with the videos at the Album Retreat. Unfortunately due to the timing of the start I watch replays of the videos but in some ways that was better as I could pause them and not miss anything. This Album Retreat is still available for purchase and all the information including the preparation video are still available for you to watch.
Bye for now,
Kris
Product Used:
You can view the 2026 Album Retreat here in the online store.
Berry Botanicals
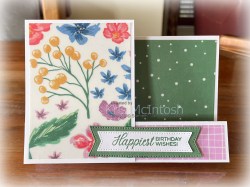
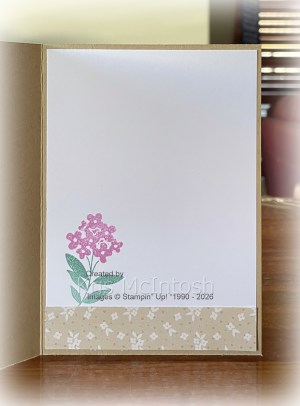
This week in my Facebook Live I shared some cards I created using the May Product of the Month. The very beautiful Berry Botanical Vellum 12″ x 12″ Paper. I decided to create a side step card today and cut my card base from Basic White card. I attached a strip of the Vellum Paper across the bottom step and another piece with a different pattern on the inside of the stepped card base. I attached a floral panel of the Berry Botanical Vellum onto the stepped panel before attaching it to the left hand side of the card base.
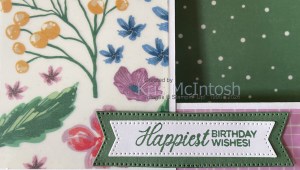
I stamped “happiest birthday wishes” from the Phrases & Frames stamp set onto Basic White card using Peaceful Pine ink. I cut out the greeting using one of the banners from the Stylish Shapes Dies. I cut Peaceful Pine card using another slightly wider banner from the Stylish Shapes Dies. I attached both banners together before I added them across the bottom of the card using dimensionals.
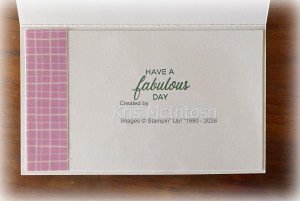
To decorate the inside of the card I stamped another greeting from the Phrases & Frames stamp set onto Basic White card using Peaceful Pine ink. I also attached a piece of the Berry Botanical Vellum to the left hand side of the stamped Basic White panel. The whole piece is attached inside the Basic White card base. This Vellum is amazing! I used Stampin’ Seal to attach the panels to the card base and you cannot see the adhesive. I love how this card turned out, this paper is so pretty. The Product of the Month is so much fun, it’s exciting to see what each month brings. The best thing is the Product of the Month is only $9.00 with a qualifying $125.00 order. Bargain!
Bye for now,
Kris
Product Used:
You can view the Peaceful Pine ink here in my Online store.
Please note the correct price for Thick Basic White A4 card is $30.00


Happy Retirement
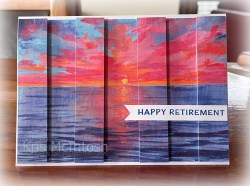
Have you seen all those cards on Pinterest and everywhere online using strips of Designer Series Paper to create a fun card front. I thought I would have a play using the Scenic Coast 6″ x 6″ Designer Series Paper. I cut two pieces of one pattern of the Designer Series Paper to card front size. Then I cut one piece of Designer Series Paper into 2cm strips. Cutting from the outside edges in.

The two outside edge pieces are attached to the outside edge of the full card front piece of Designer Series Paper using Foam Adhesive Strips, making sure that the pattern matches. The next two outside pieces are set aside and the next strips of Designer Series Paper are attached to the card front once more using Foam Adhesive Strips. So you have three strips of Designer Series Paper left over.

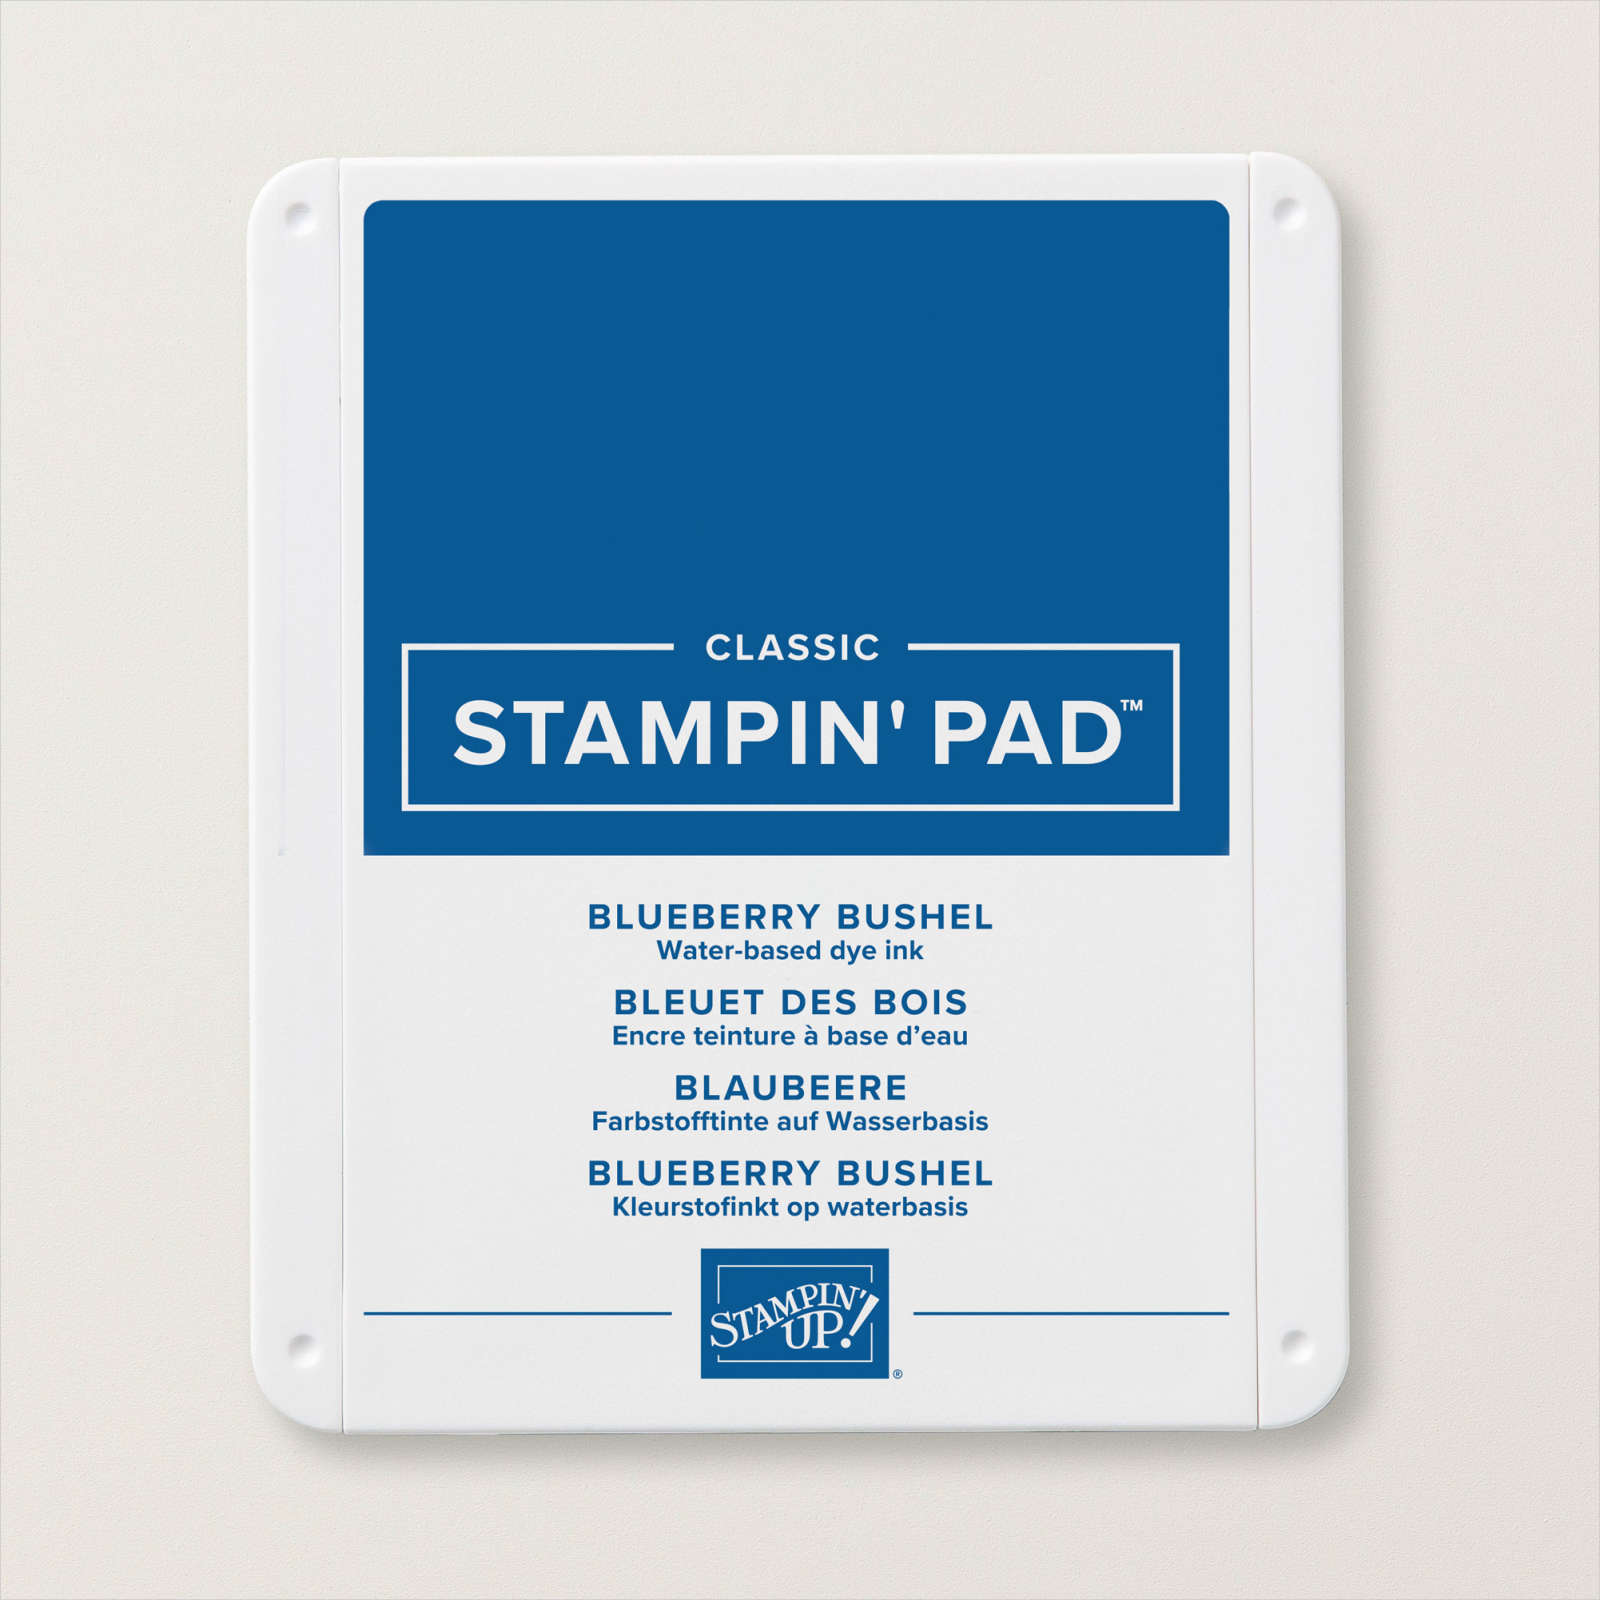
I attached the Designer Series Paper panel to scored and folded Thick Basic White card. I stamped the greeting from the Sunset Coast stamp set onto a strip of Basic White card using Blueberry Bushell ink. I cut a “v” in one end of the greeting before attaching it to the card front. I kept the inside of the card simple with just one of the left over strips of Designer Series Paper attached to the left hand side of Basic White card. I think maybe next time I would cut mys trips a little narrower – but maybe not. What do you think, would it look better if the strips were smaller?
Bye for now,
Kris
Product Used:


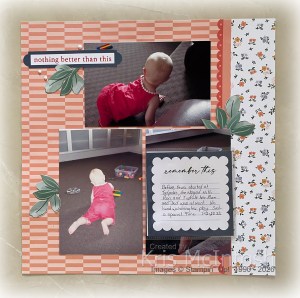
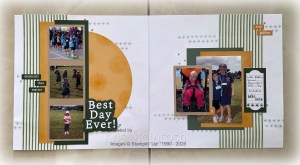
Best Day Ever
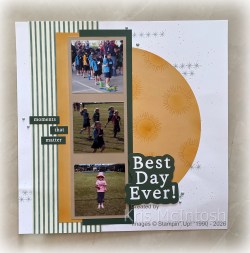
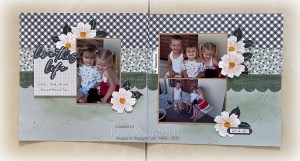
Today I am sharing Layout 9 from the 2026 Virtual Album Retreat. I found these photos of my grandchildren at an athletics day at school in 2011. My eldest two grandchildren were at school and I was babysitting two of my other granddaughters as well. What a lovely day watching the kids enjoy themselves and the teachers giving it all so that the children could have fun. I didn’t change anything on the layout.
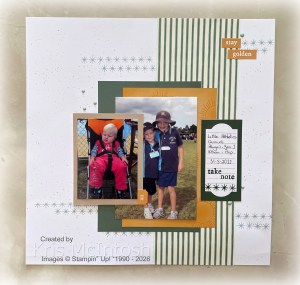
The colours just popped for me as being so happy so perfect for the photos. I love that I have been able to add so many more photos to my albums and get them off my computer as a result of this retreat.
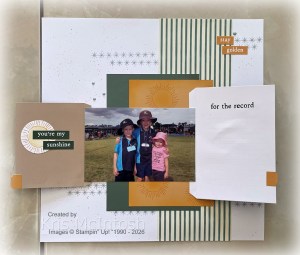
We learned a really fun way to add extra photos to our page 2 layout. I did lose the sun image that I stamped onto the die cut from the Album Retreat, so I substituted one that I stamped onto Basic White and punched out with one of the Circle Punches. I also loved the way we added texture with some stamping onto the base pages. If you are loving these pages, you can still purchase the 2026 Virtual Album Retreat and have all the videos and instructions to create your own pages.
Don’t the pages look beautiful together. Thank you again Stampin’ Up! for all the ideas and inspiration behind the layouts.
Bye for now,
Kris
Product Used:
You can view the 2026 Virtual Album Retreat here in my online store.
Congratulations
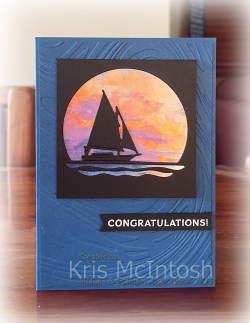
This week in my Facebook Live I shared some cards created using the Scenic Coast Suite Collection. Today I have two cards to share created using the same Collection. For the first card I embossed Blueberry Bushell card using the So Swirly Embossing Folder (retired) which I attached to scored and folded Blueberry Bushell card. I die cut the boat image from Basic Black card using the Sunset Coast Dies.
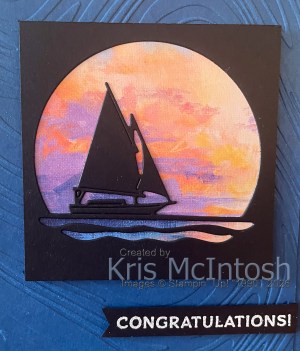
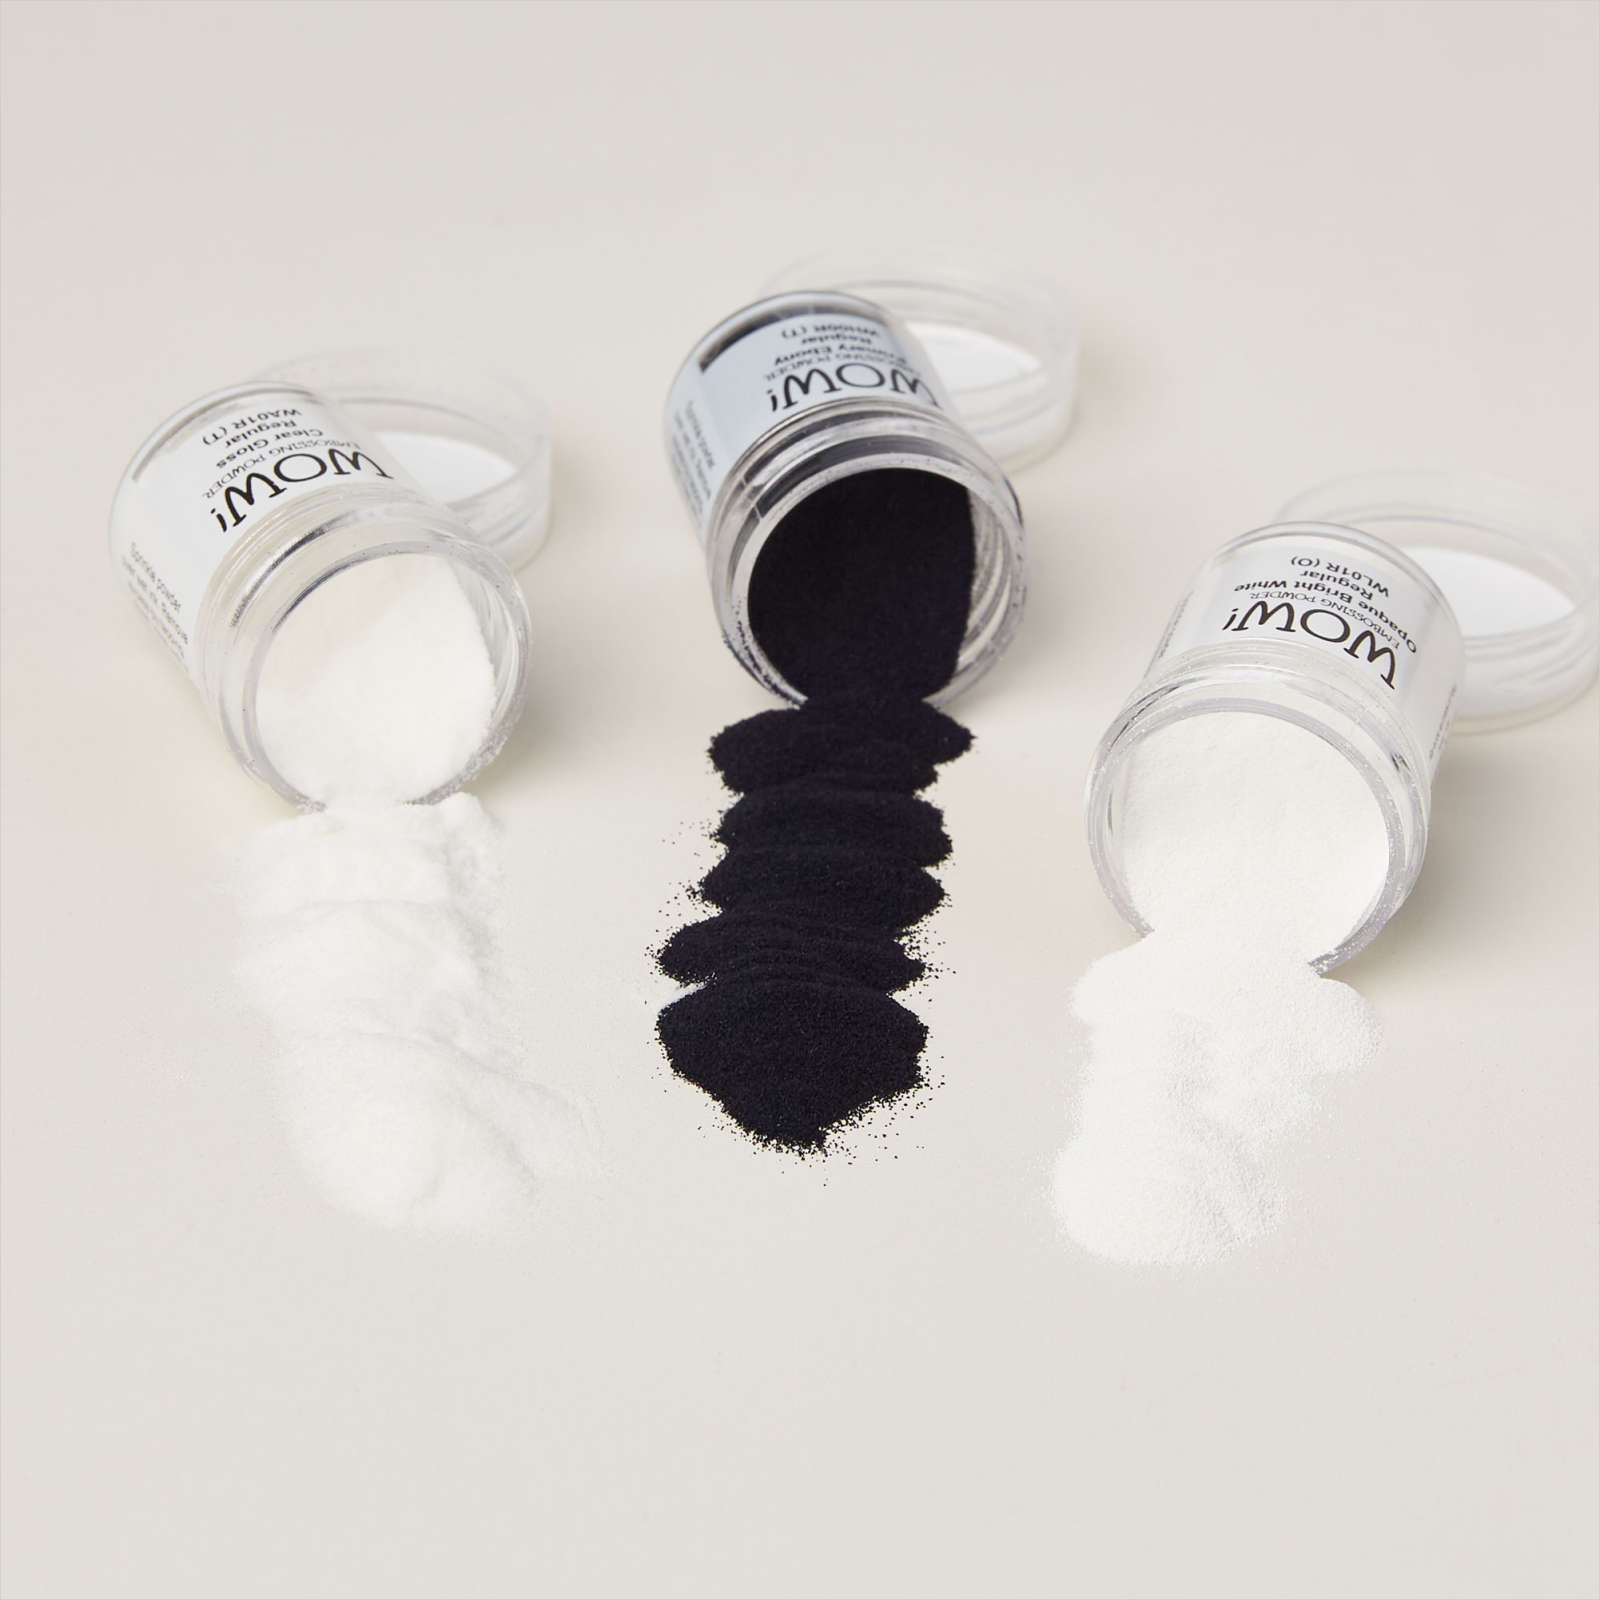
I cut a piece of Scenic Coast 6″ x 6″ Designer Series Paper and attached it to the back of the die cut panel. I attached the whole piece to the card front using dimensionals. I stamped “congratulations” from the Sunset Coast stamp set onto Basic Black card using Versamark ink. I sprinkled the greeting with white embossing powder and heat set it.
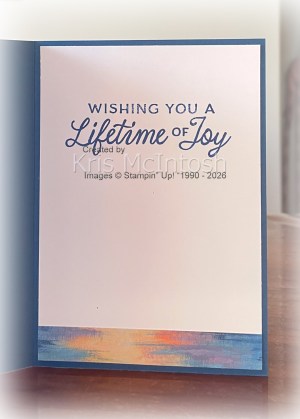
I trimmed around the greeting and cut a “v” in the left hand edge before attaching it to the card front using dimensionals. I attached a piece of the same Scenic Coast Designer Series Paper across the bottom of Basic White card. I stamped the greeting from the Sunset Coast stamp set onto the Basic White panel using Blueberry Bushell ink.
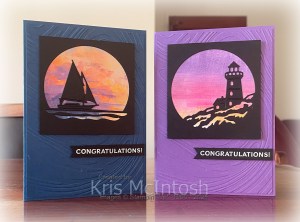
I loved playing with this Collection so I created another card using the lighthouse die from the Scenic Coast Dies. I constructed the card in the same manner as the first one but this time using Gorgeous Grape card and a different pattern paper from the Sunset Coast Designer Series Paper. I love both versions, don’t you?
Bye for now,
Kris
Product Used:


Forever Florals
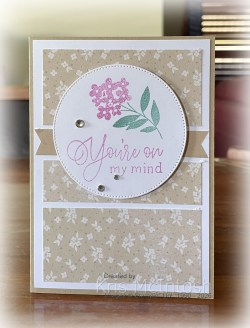
Today I have another card to share using the Forever Florals Bundle. I received this bundle as part of the 2026 Virtual Card Making Retreat, however, it will be released to customers as a stand alone bundle when the new Online Exclusive products go live on the 3rd March. I attached pieces of Designer Series Paper from the 2026 Virtual Card Making Retreat to Basic White card. I also used a piece of Crumb Cake two-tone paper from the Retreat to create the banner. The panel is attached to scored and folded Crumb Cake card. I cut Basic White card using one of the Stylish Shapes Dies. I stamped “you’re on my mind” from the Forever Florals stamp set onto the circle using Fresh Freesia ink.
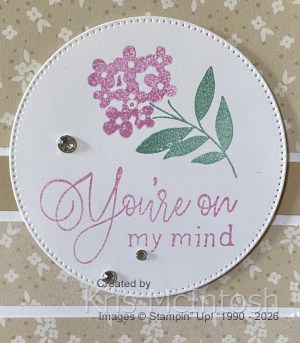
I stamped the leaf image from the Forever Florals stamp set above the greeting using Lost Lagoon ink. I stamped the floral image from the same stamp set onto the leaf image using Fresh Freesia ink. The whole panel is attached to the card front using dimensionals. I also added three Basic Rhinestones around the stamped images.
To decorate the inside of the card I stamped the leaf image from the Forever Florals stamp set onto the lower left hand corner of Basic White card using Lost Lagoon ink. I stamped the flowers onto the leaf image using Fresh Freesia ink. I also attached a piece of the same Designer Series Paper I used on the card front across the bottom of the stamped Basic White panel. I am loving that I can use the left over pieces of Designer Series Paper from the 2026 Virtual Card Making Retreat to create more beautiful cards.
Bye for now
Kris
Product Used:
You can view the 2026 Virtual Card Making Retreat here in my online store.


Tannum Sands
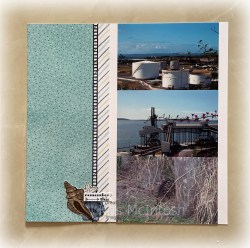
Today’s layout shows off some photos from our stay at Tannum Sands way back in 2010. I am slowly working my way through my photo album to finish that year. This is a 1, 2, 3 layout by Noreen Smith that I created quite a while back and I have no idea what paper this is but obviously it is retired. Anyway I decided to use the die from the Gears and Textures Dies to create a border to add to each page from the dark side of Night of Navy Two-Tone Paper.
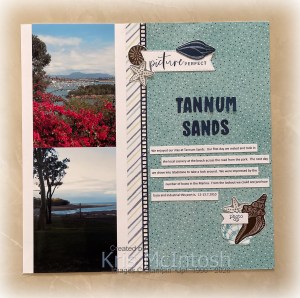
I cut the title from Night of Navy card using the Mini Alphabet Dies and attached it to the right hand page. I printed my journaling onto Basic White card, cut it into strips and attached it below the title. I stamped “picture perfect” from the retired Lovely Florals stamp set onto Basic White card using Night of Navy ink and cut it out using one of the banners from the Stylish Shapes Dies. I used the Shell Collecting stamp set (last chance) to create my embellishments using Night of Navy, Early Espresso and Smoky Slate ink. I fussy cut the shells before attaching them to the pages.
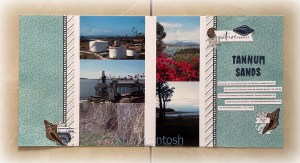
I stamped “remember this” from the long retired Project Life Remember This stamp set onto basic White card using Night of Navy ink. The greeting is punched out using the Three Banners Punch before being attached to the left hand page. I stamped “photo op” from the Capturing Smiles onto Basic Whtie card using Night of Navy ink and punched it out using the Three Banners Punch before attaching it to the right hand page. So happy with these pages and really happy with the progress I am making with my Memory Keeping. How about you? How is your Memory Keeping journey going?
Bye for now,
Kris
Product Used:


Relax & enjoy
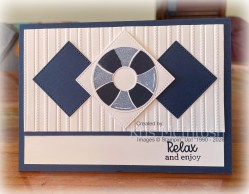
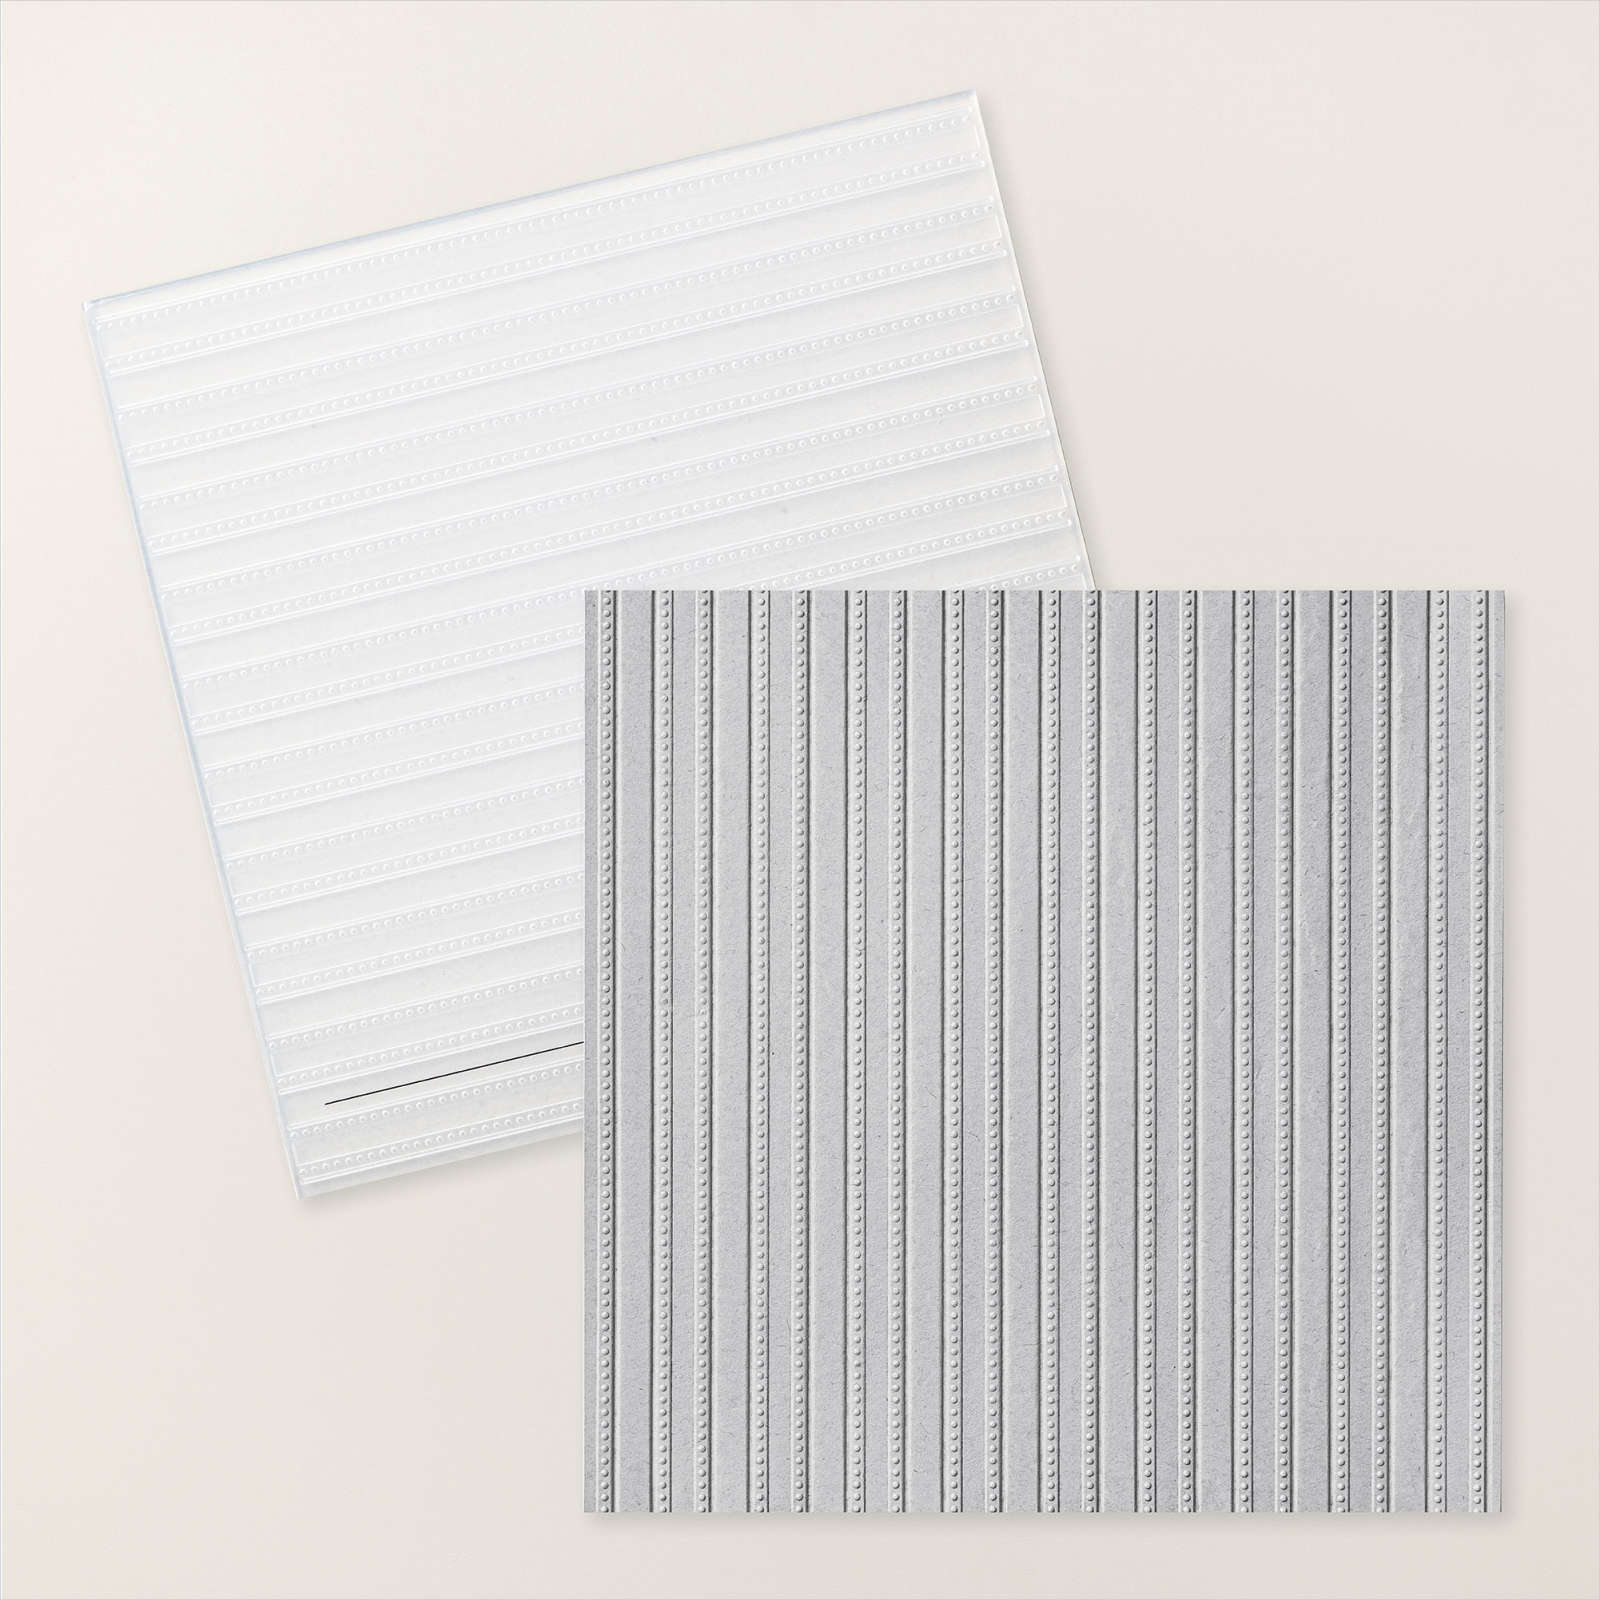
This week in my Facebook Live I shared some cards I created using the Splash & Relax Bundle. This is a new bundle from the the May to August Catalogue. For this card I embossed a piece of Basic White card using the Lovely Stripes 3D Embossing Folder. I attached a narrow strip of Night of Navy across the bottom of the embossed panel before attaching it to another piece of Basic White card. I stamped the greeting from the Splash & Relax stamp set onto the unembossed card using Night of Navy ink. The whole panel is attached to scored and folded Night of Navy card.
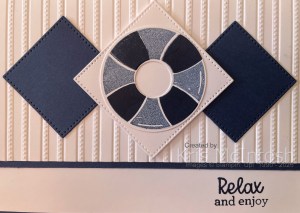
I cut Night of Navy using one of the squares from the Stylish Shapes Dies and Basic White card using a slightly large square. I attached the squares to the embossed part of the card front using dimensionals underneath the White square. I stamped the four panel lifebouy image from the Splash & Relax stamp set onto Basic White card using Night of Navy ink. I stamped the remaining part of the lifebouy image using Night of Navy ink which I stamped onto scrap paper first.
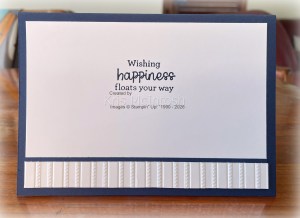
I cut out the lifebouy using the co-ordinating Splash & Relax image. The die cut image is attached to the Basic White square on the card front. To decorate the inside of the card I embossed a narrow strip of Basic White card using the Lovely Stripes 3D Embossing Folder. I attached narrow strip of Night of Navy card behind one long edge before attaching it to the bottom of Basic White card. I stamped the greeting from the Splash & Relax stamp set onto the panel using Night of Navy ink. Such a fun stamp set to play with and one I think would be a great addition to beachy memory keeping pages as well. So many lovely things in the new catalogue, don’t you think?
Bye for now,
Kris
Product Used:


Relaxing Birthday
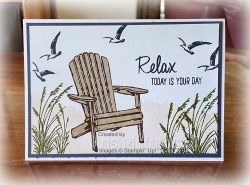
Today’s card is created using the Relaxing Waterside Bundle which is now available for customers to purchase. I tore a piece of scrap paper and used it to mask the top part of Basic White card. I used a Blending Brush and Crumb Cake ink to colour the lower part of the Basic White card. I removed the mask and used a Blending Brush to colour the remainder of the panel using Balmy Blue ink. I stamped the large and small grass images from the Relaxing Waterside stamp set using Mossy Meadow ink.
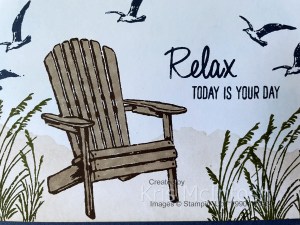
I stamped the seat image from the Relaxing Waterside stamp set using Early Espresso ink and coloured it using a Dark Crumb Cake Stampin’ Blend. The birds & greetings from the Relaxing Waterside stamp set are all stamped using Night of Navy ink. The stamped panel is attached to Night of Navy card and then scored and folded Thick Basic White card.
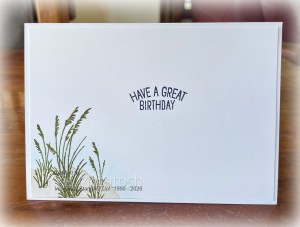
To decorate the inside of the card, I used Blending Brushes to add Crumb Cake & Balmy Blue ink to the lower left hand corner of Basic White card. I stamped the large grass image once onto the blended ink using Mossy Meadow ink. I stamped the small grass image twice onto the blending ink using Mossy Meadow ink. I stamped the greeting from the Relaxing Waterside stamp set onto the Basic White card using Night of Navy ink before attaching the panel to the inside of the Thick Basic White card. I am really loving using this beautiful bundle. What about you? Will this be on your Wish List?
Bye for now,
Kris
Product Used:


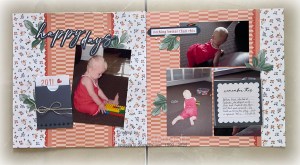
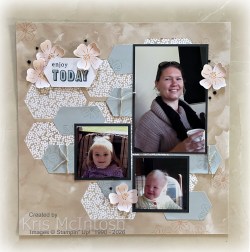
Enjoy Today
I recently participated in the 2026 Virtual Album Retreat with Stampin’ Up!. This was a 3 day virtual event and all you had to do was buy the kit to get access to all the information you needed to create 10 double page layouts. You have a preparation video which shows you how to cut your Designer Series Paper and prepare your die cuts. The videos will be available for you to watch on Facebook and will be updated all the time s they don’t go away. The class is free once you purchase the Album Retreat which includes Designer Series Paper, Die cuts, stickers and four stamp sets. Amazing!
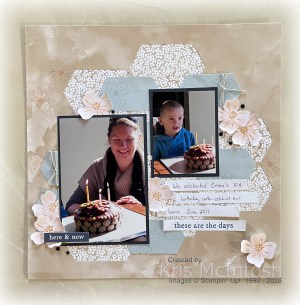
So today’s page shows off my youngest daughter celebrating her birthday way back in 2011 using one of the double page layouts from the retreat. I love the colours on this layout and the fabulous way we used the paper and die cuts to create the background. It shows off my photos so perfectly.
I did stamp an extra greeting from one of the supplied stamp sets onto one of the journaling strips. I am so happy that I participated in this Virtual Retreat. Now if you didn’t purchase the Retreat in time to participate during the live videos, don’t worry, you can purchase the Album Retreat for as long as its available and still have full access to everything you need. So thank you Stampin’ Up! for an amazing time. I completed 6 double page layouts with photos and 4 without photos during the retreat. So happy.
Bye for now,
Kris
Product Used:
You can view the 2026 Virtual Album Retreat here in my online store.


