Sailing Birthday

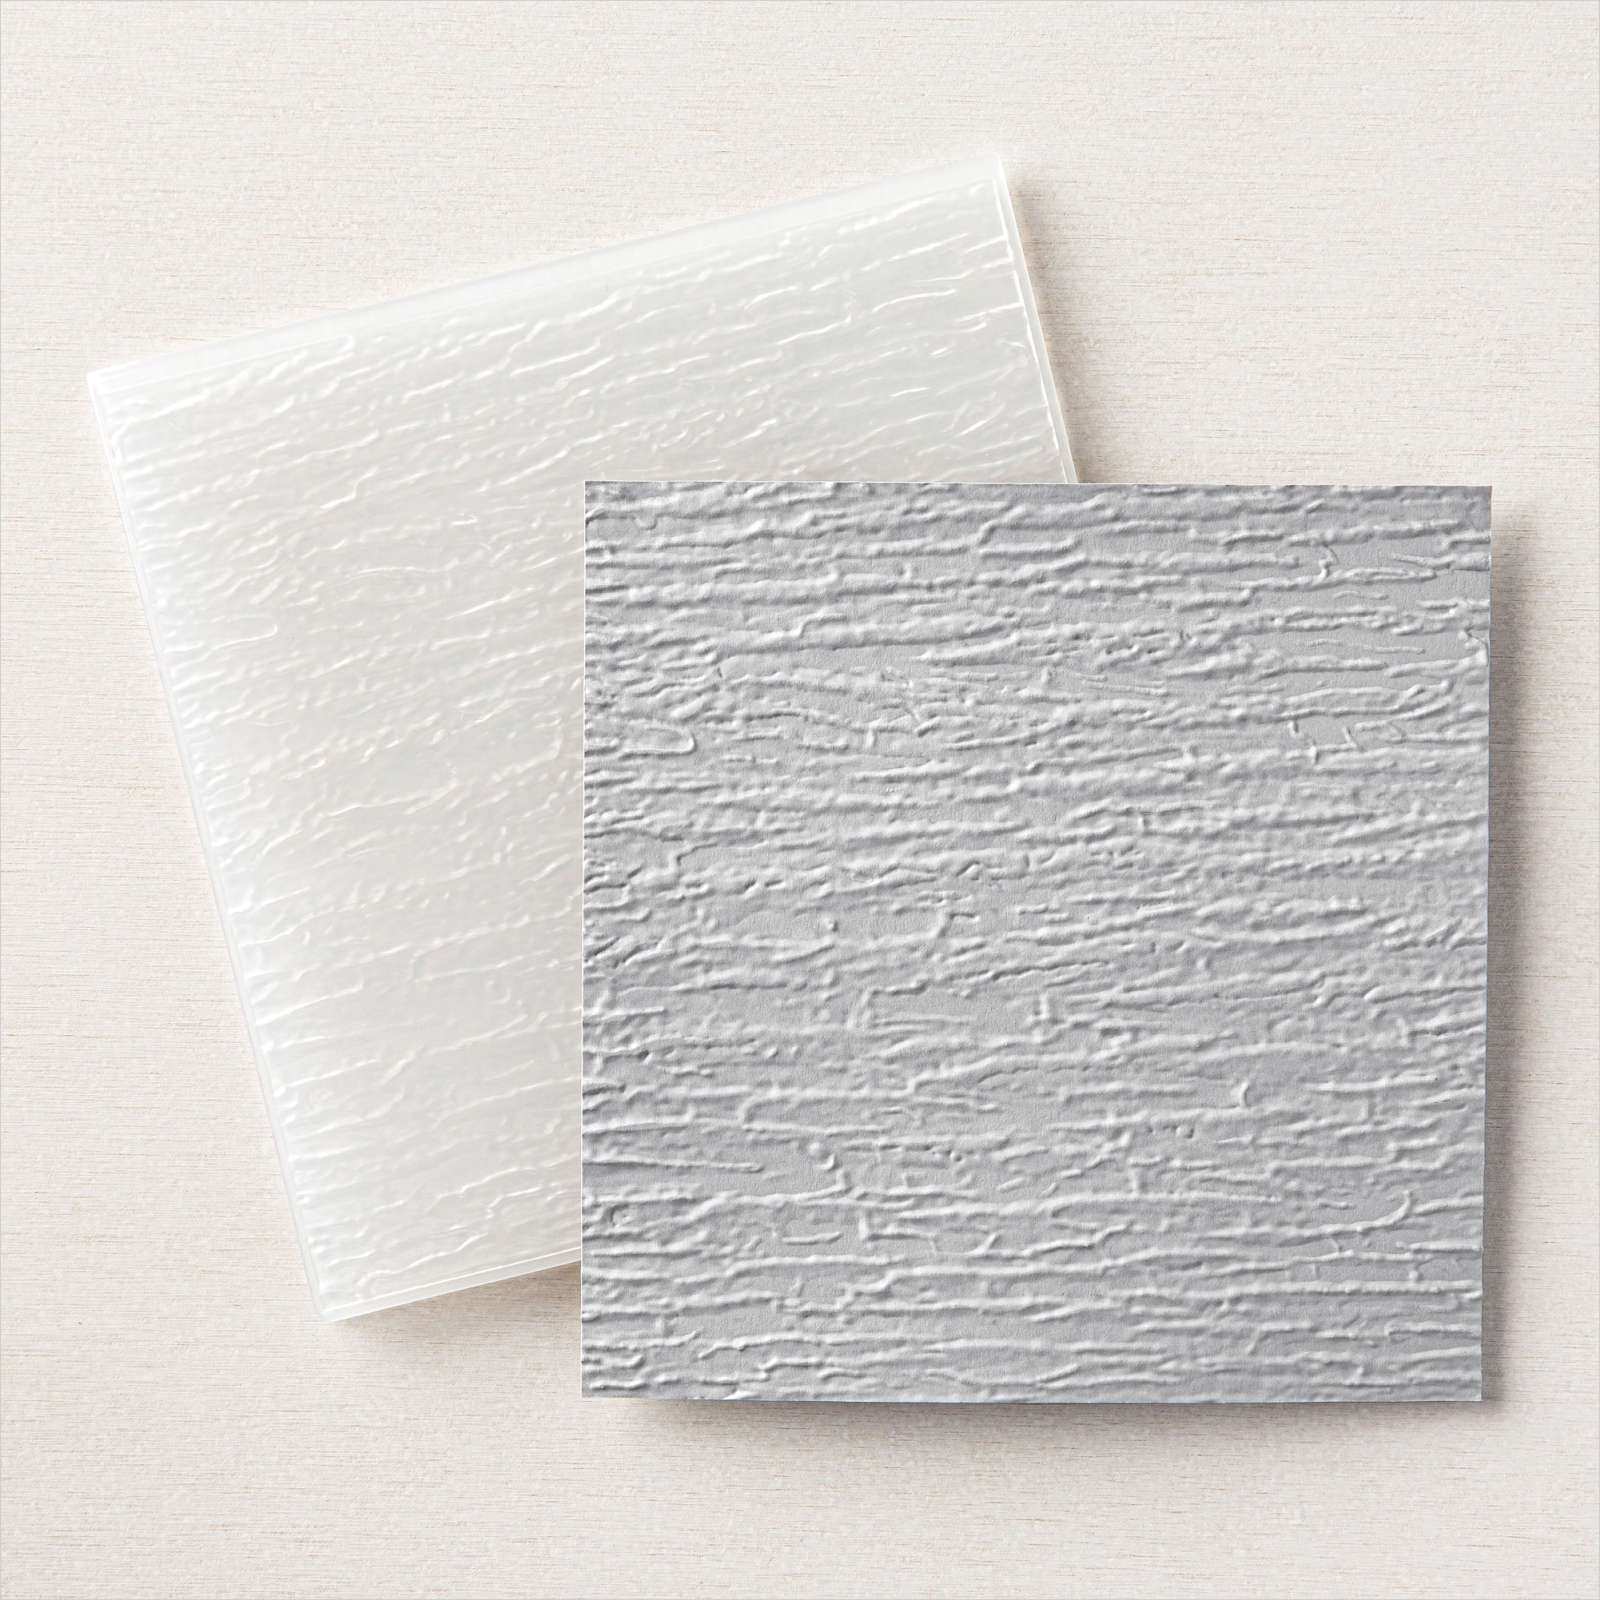
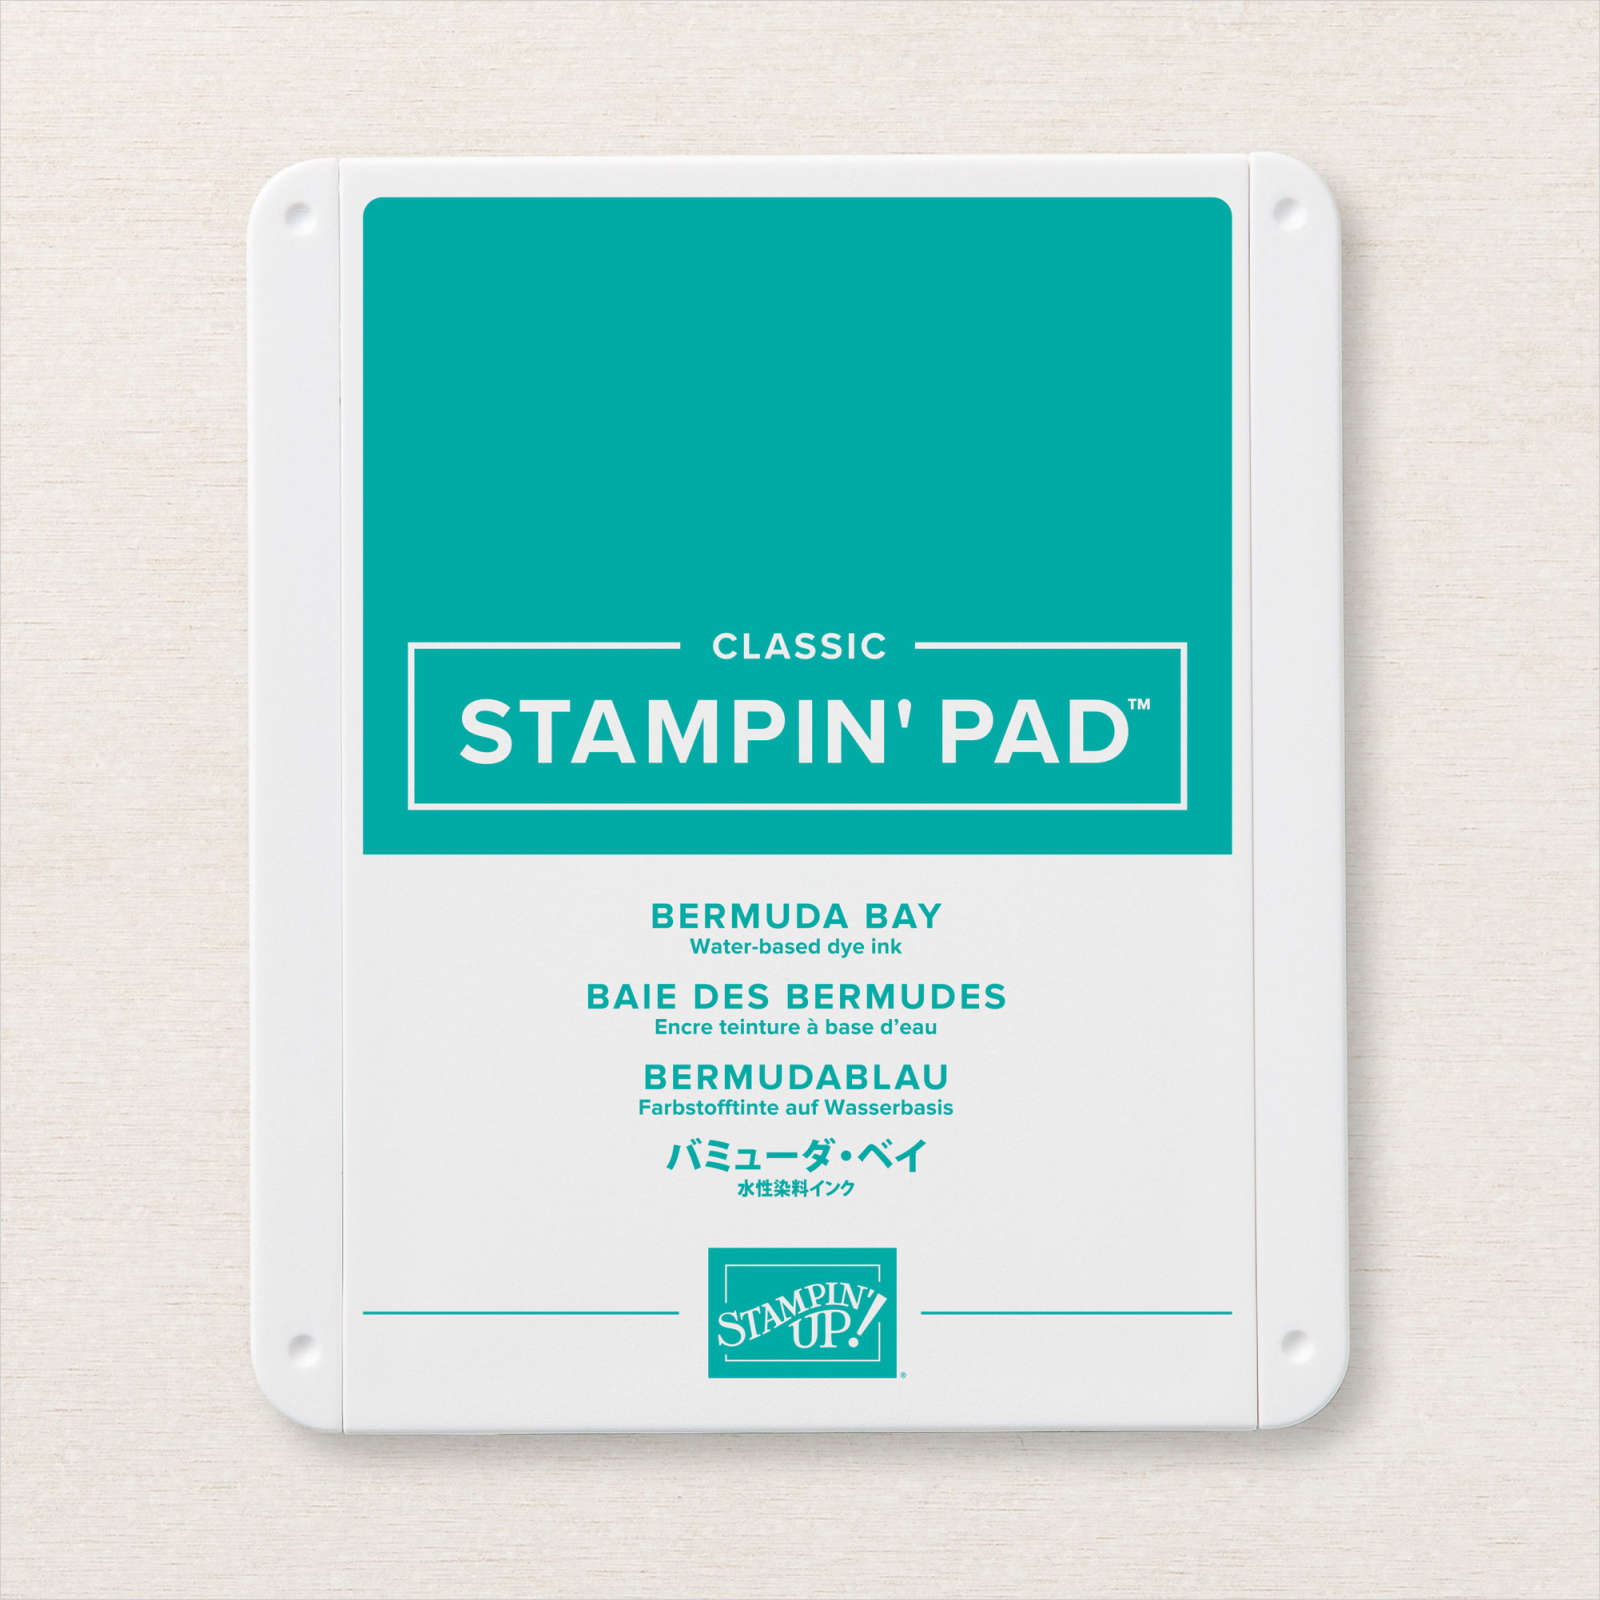
Todays card was inspired by a card sketch I found on Pinterest. I began by embossing a piece of Bermuda Bay card using the Bark 3D Embossing Folder. I attached the embossed card to Basic White card. I cut a piece of Beautifully Penned Designer Series Paper and attached it to the Basic White card using dimensionals behind the right hand side. The Basic White card is attached to scored and folded Basic Black card. I cut the largest circle from the Layering Circle Dies from Basic White card. I masked the circle and added Bermuda Bay ink to the lower part using a Blending Brush. I masked the Bermuda Bay ink and added Pool Party ink to the remainder of the circle using Pool Party ink.
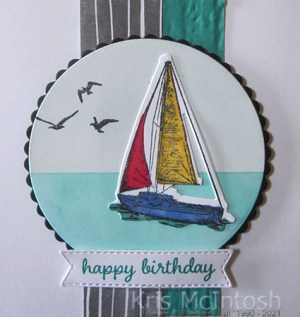
I stamped the bird image from the Sailing Home stamp set onto the upper left hand side of the circle using Memento Tuxedo Black ink. The circle is attached to a Basic Black scalloped circle cut using the Layering Circle Dies before being attached to the card front using dimensionals where necessary. I stamped the large sailing ship from the Sailing Home stamp set onto Basic White card using Memento Tuxedo Black ink.
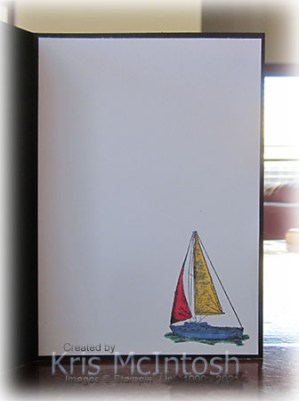
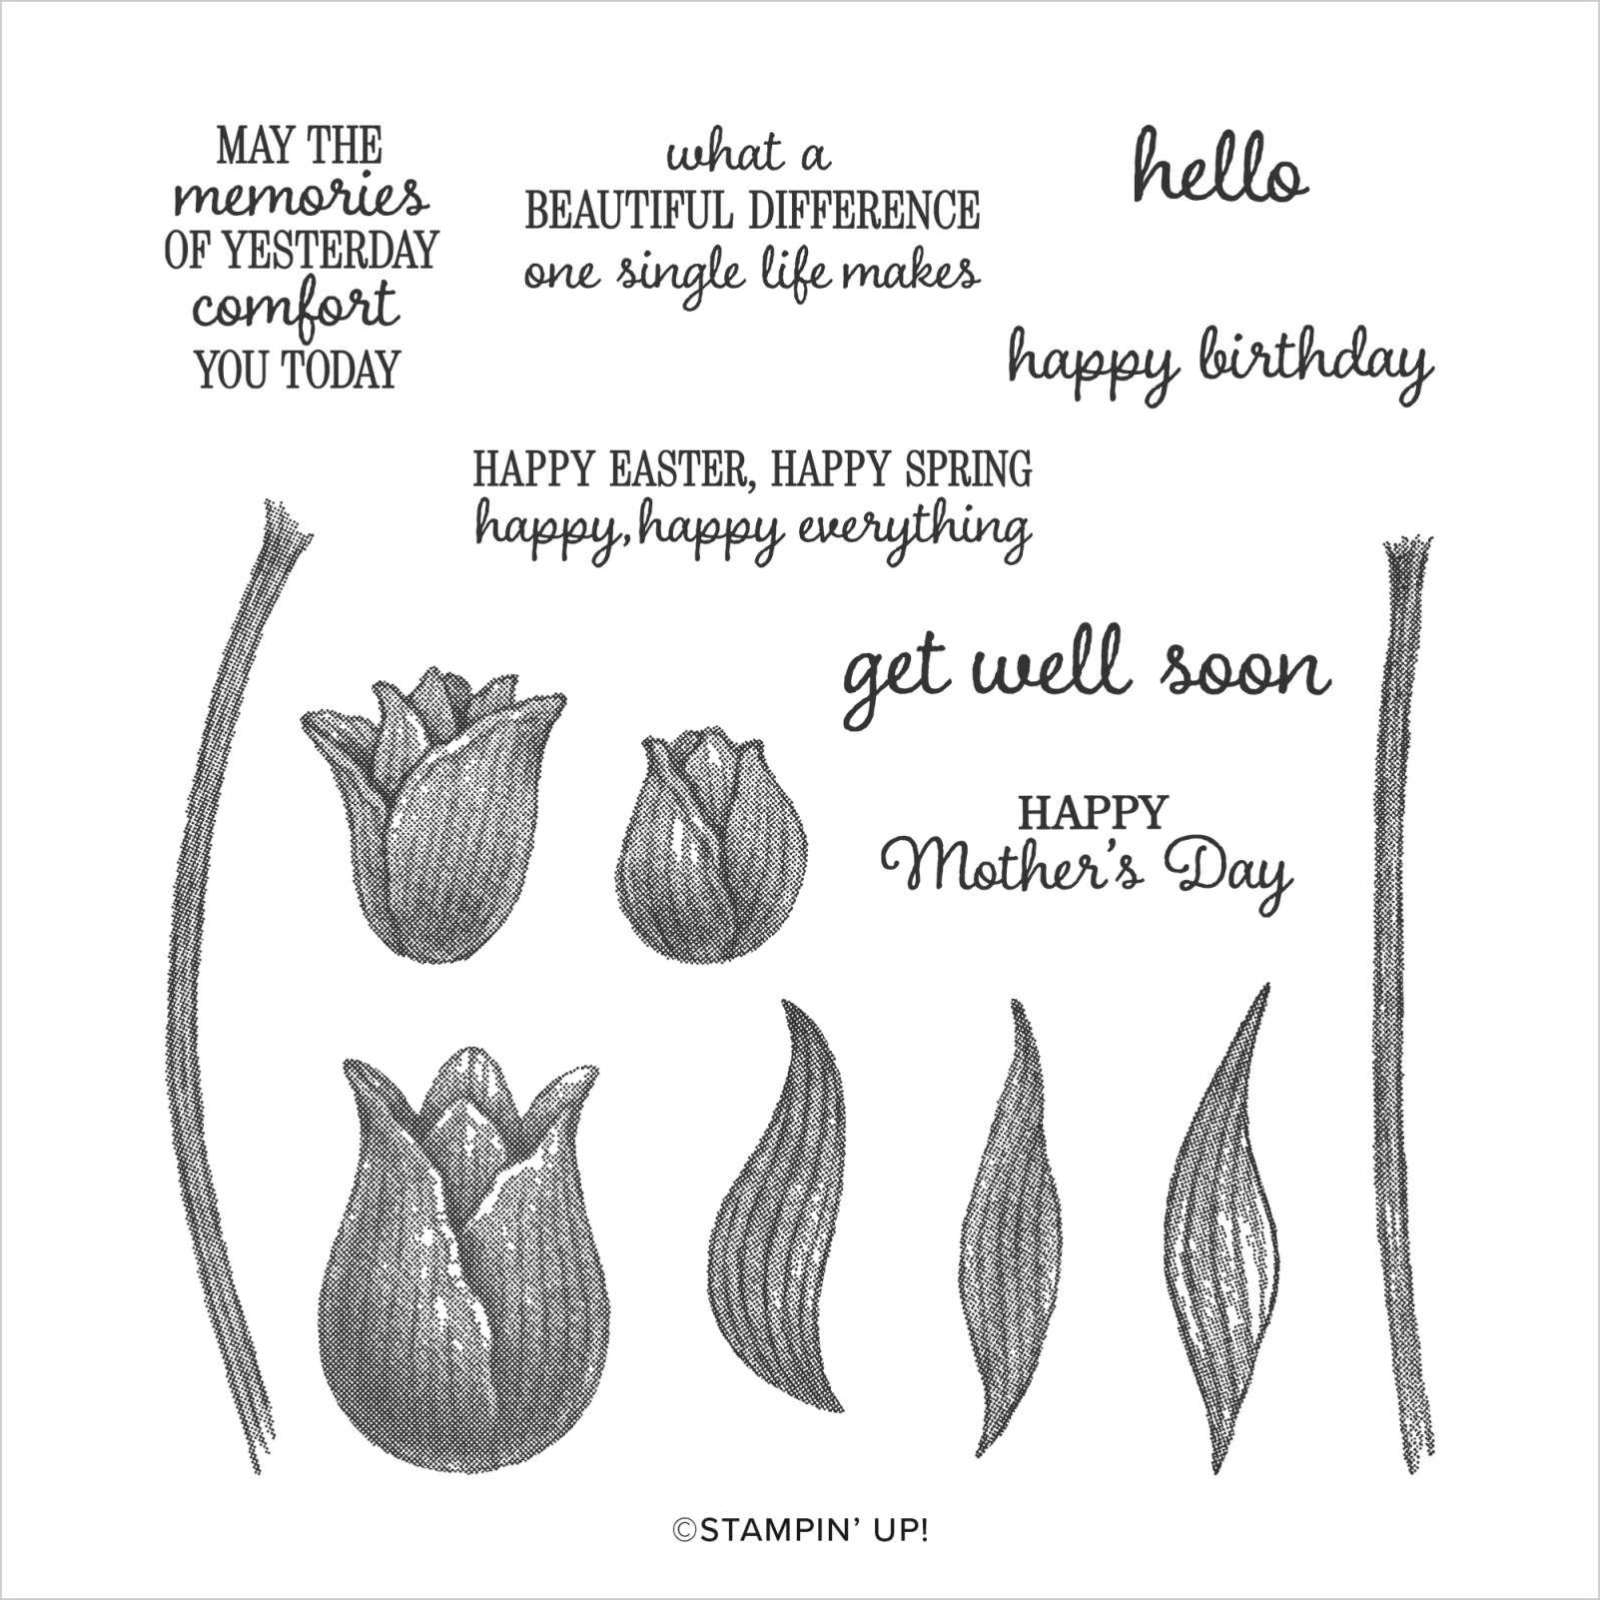
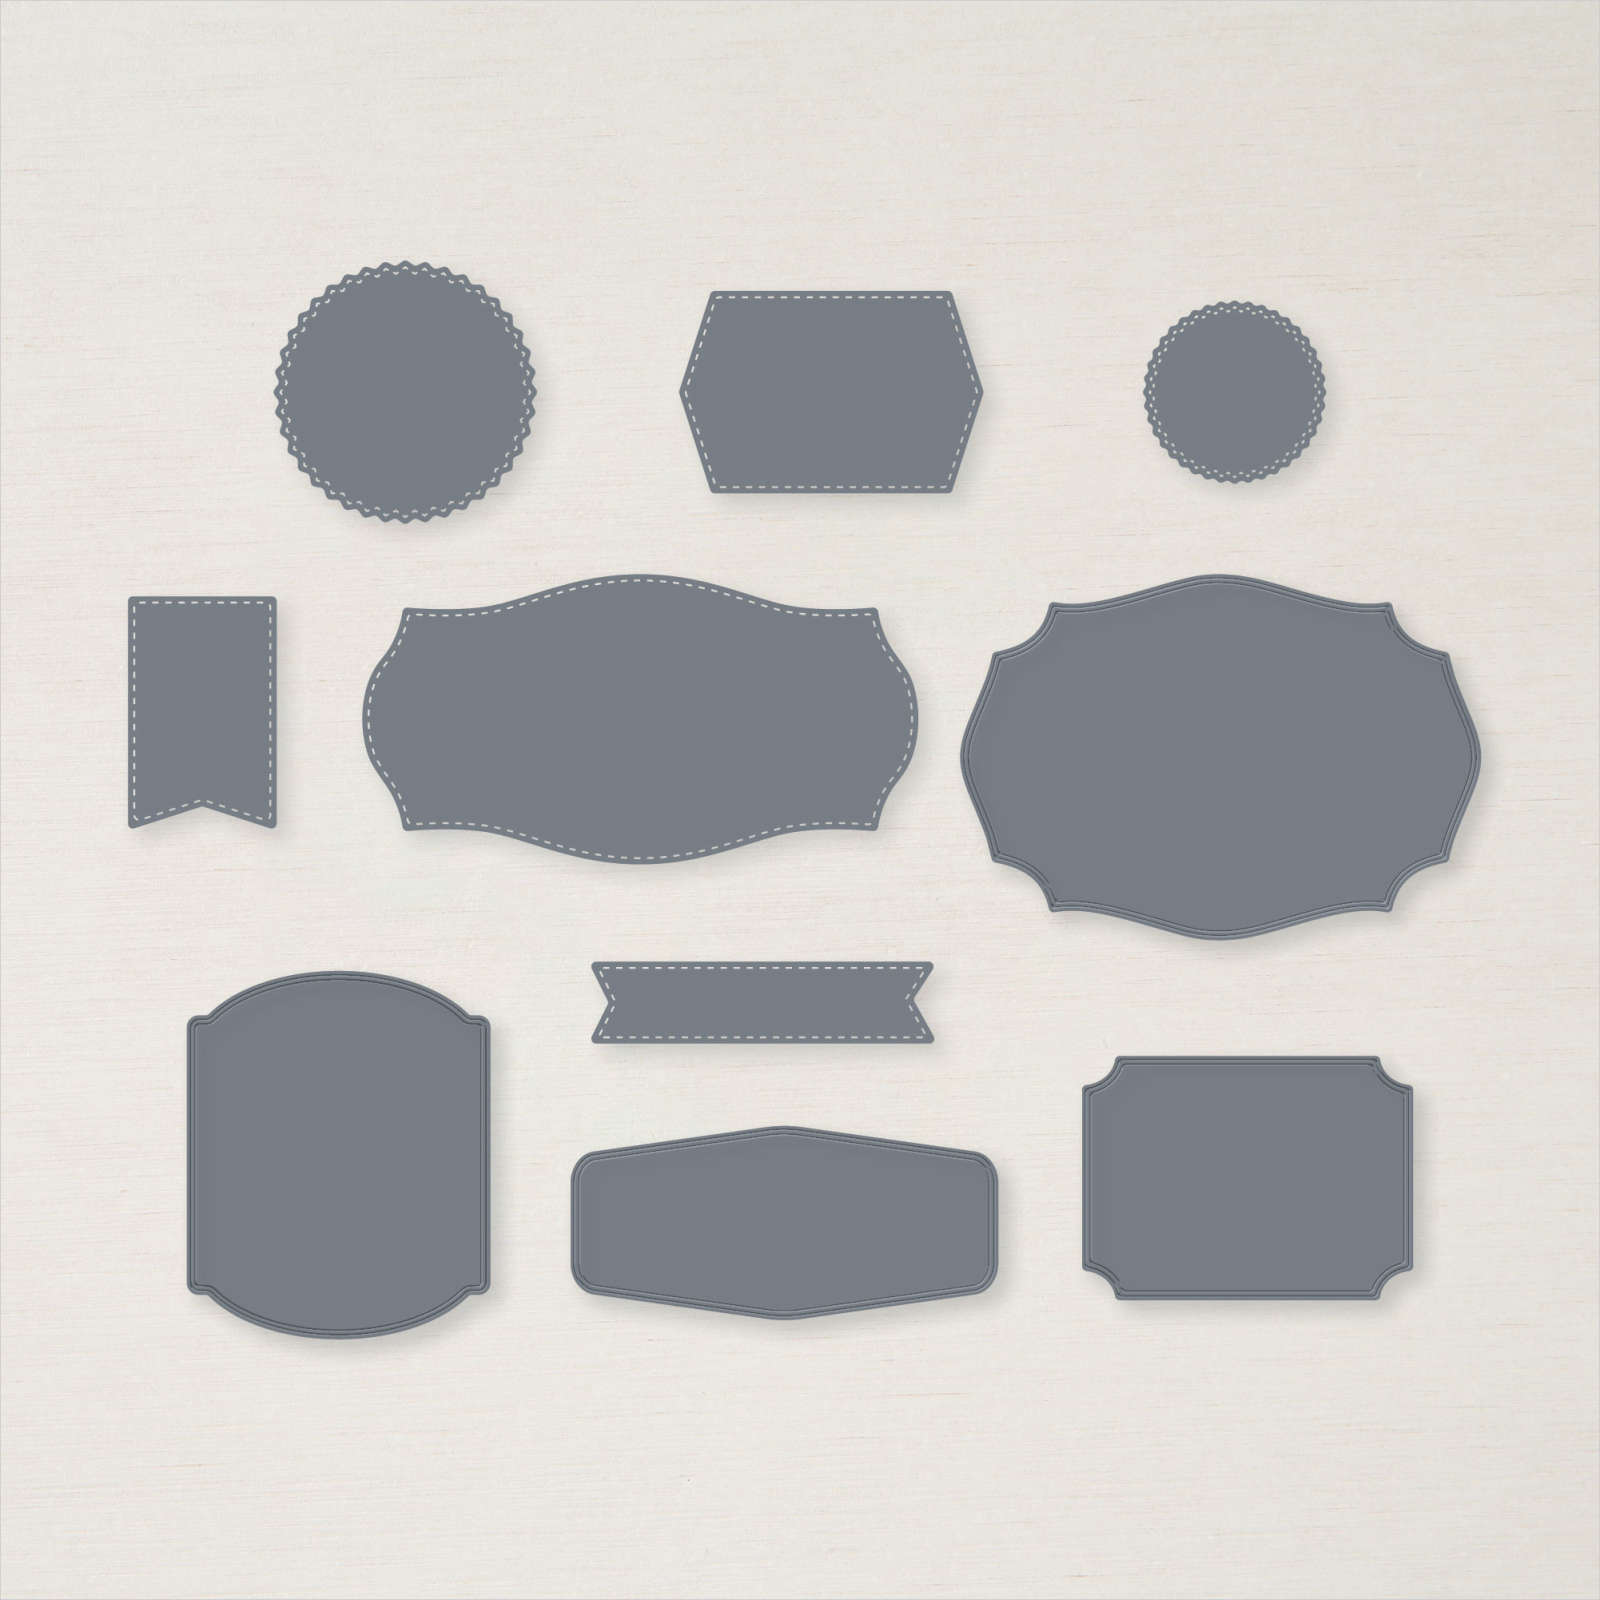
I coloured the sailing boat using Dark Daffodil Delight, Dark Poppy Parade, Light Night of Navy and Dark Bermuda Bay Stampin’ Blends. I cut out the sailing ship using the co-ordinating Sailing Home Dies. I attached the sailing ship to the Basic White circle. I stamped “happy birthday” from the Timeless Tulips stamp set onto Basic White card using Bermuda Bay ink and cut it out using one of the Tasteful Labels Dies. The greeting is attached to the card front, again using dimensionals where necessary. To decorate the inside of the card, I stamped the large sailing ship from the Sailing Home stamp set onto the lower right hand side of Basic White card. I coloured the image as before using the same Stampin’ Blends.
Kind of simple but I think it looks great, don’t you?
Bye for now,
Kris
Product Used:


Eromanga

Today’s page shows off some photos from our stay at Eromanga. This is where they found the brand new Sauropod Dinosaur which they call Cooper. The township itself is quite small but rich in dinosaur bones. The first dinosaur bone was found in the area by a 14 year old boy who was bright enough to realise it was something special. His family became the driving force behind the Living History Centre. I stamped an image from the long retired No Bones About It stamp set across the bottom of a Very Vanilla 12″ x 12″ page using Early Espresso ink.

I attached all of my photos and the computer generated journaling to Early Espresso card before attaching them to the page. I created my title on the computer, printed it onto Very Vanilla card and fussy cut it before attaching it to the page. So simple but it makes me quite excited to visit again and see what new things they have found.
Bye for now,
Kris
Product Used:


Happiest of Birthdays

Today’s card is another that has a pop up panel on the inside. For this card, I attached a piece of Balmy Blue card down the left hand side of Very Vanilla card before embossing the panel using the Painted Texture 3D Embossing Folder. The embossed panel is attached to scored and folded Night of Navy card. I stamped the greeting from the Happiest of Birthdays stamp set onto Very Vanilla card using Night of Navy ink. I cut out the greeting using one of the Stitched Rectangle Dies.

I cut Night of Navy card using the next size larger Stitched Rectangle Die and attached the greeting to the panel. The whole greeting panel is attached to the front of the card using dimensionals. To decorate the inside of the card, I cut the pop up panel from Very Vanilla card and attached it inside the card base.
I stamped the greeting from the A Good Man stamp set onto the right hand side of the Very Vanilla panel using Night of Navy ink. I stamped the image from the A Good Man stamp set onto Very Vanilla card using Memento Tuxedo Black ink. I coloured the image using the Dark Balmy Blue, Light Smoky Slate, Dark Daffodil Delight, Light Crumb Cake and Ivory Stampin’ Blends. I cut out the image using the Stitched Rectangle Dies. The image is attached to a Night of Navy stitched rectangle and then the pop up panel.
I love how this card turned out. So simple but just right for a guy, don’t you think?
Bye for now,
Kris
Product Used:


Memorable Pop Up
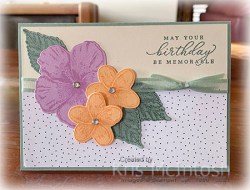
Today’s card is another one that I created with a pop up panel in the centre. I shared how I created these on my Facebook Live this week. For this card, I attached a piece of Pattern Party Designer Series Paper across the bottom of Very Vanilla card. I wrapped the top of the Designer Series Paper using Soft Succulent Open Weave Ribbon and tied a knot. I stamped the greeting from the Timeless Tropical stamp set onto the right hand corner of the Very Vanilla card using Soft Succulent ink. The whole panel is attached to scored and folded Soft Succulent card.
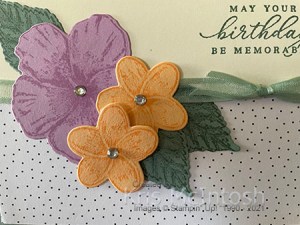
I stamped the large hibiscus flower from the Timeless Tropical stamp set onto Fresh Freesia card using Fresh Freesia ink and cut it out using the co-ordinating In The Tropics Die. I stamped the frangipani flower from the Timeless Tropical stamp set twice onto Pale Papaya card using Pale Papaya ink and cut them out using the co-ordinating In The Tropics Die. I stamped the leaf image from the Timeless Tropical stamp set three times onto Soft Succulent card using Soft Succulent ink and cut them out using the co-ordinating In The Tropics Die. I layered the flowers and leaves onto the card front using dimensionals to attach the last frangipani.
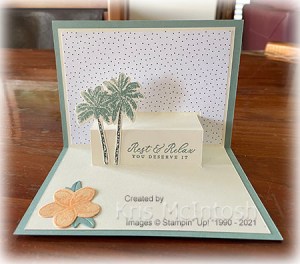
I added three Basic Rhinestones to the centre of each of the flowers to add a little bling just because I can. I cut my pop up from Very Vanilla card and attached it inside the card base. I attached another piece of Pattern Party Designer Series Paper to the top section of the pop up panel. I stamped the greeting onto the pop up panel using Soft Succulent ink. I inked the palm tree image from the Timeless Tropical stamp set using Evening Evergreen and Soft Succulent Stampin’ Write Markers and stamped the image onto Very Vanilla card. The image is cut out using the co-ordinating In The Tropics Die and attached next to the greeting on the pop up panel. I attached a frangipani flower to the lower left hand corner and also some leaves I die cut from Soft Succulent card using the In The Tropics Dies.
I am having fun creating this type of card. I would love to know what you think.
Bye for now,
Kris
Product Used:


Warmth-Joy-Happiness

Today I have another card to share with you using the Classic Cloche Bundle. For this card, I embossed a piece of Smoky Slate card using the Painted Texture 3D Embossing Folder. I cut a length of Merry Merlot card using one of the rectangle dies from the Scalloped Contour Dies to create a scalloped edge and attached it behind one long edge of the embossed card. The panel is attached to Very Vanilla card and then scored and folded Merry Merlot card.
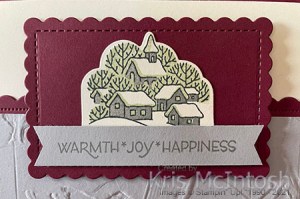
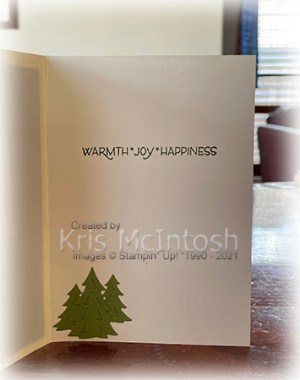
I die cut Merry Merlot card using the same rectangle from the Scalloped Contour Dies and attached it to the card front using dimensionals. I stamped the outline village image from the Classic Cloche stamp set onto Very Vanilla card using Memento Tuxedo Black ink. I stamped the house fill image using Smoky Slate ink and the tree fill image using Soft Sea Foam ink. I cut out the image using the co-ordinating Cloche Die. I attached the die cut panel to the centre of the scalloped rectangle. I stamped the greeting from the Classic Cloche stamp set onto Smoky Slate card using Smoky Slate ink.
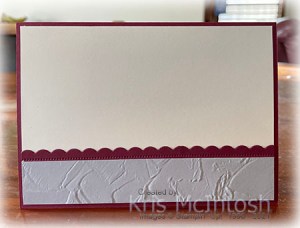
I used the Tailored Tag punch to cut a “v” in each end of the greeting banner before attaching it to the card front using dimensionals. To decorate the inside of the card, I cut another narrow strip of Merry Merlot card using the scalloped rectangle die from the Scalloped Contour Dies. The scalloped edge is attached behind one long edge of a strip of Smoky Slate card embossed using the Painted Texture 3D Embossing Folder. The whole panel is attached across the bottom of Very Vanilla card.
To be honest, I think this might be my favourite card using this bundle so far. What about you, which card to you love the most.
Bye for now,
Kris
Product Used:


Artistic Birthdays

I needed to make several birthday cards for some of my friends and had an idea in mind. I love the Expressions in Ink Specialty Paper but don’t like to cut it because it is so pretty. However, I did cut up one 12″ x 12″ sheet and I am so happy with my four creations. For the first card I attached a piece of the Expressions in Ink Specialty Designer Series Paper to Gold Foil card. I cut the centre out of the Gold Foil card using the second largest Stitched Rectangle Dies before attaching the Designer Series Paper. The Designer Series Paper panel is attached to scored and folded Thick Basic White card.

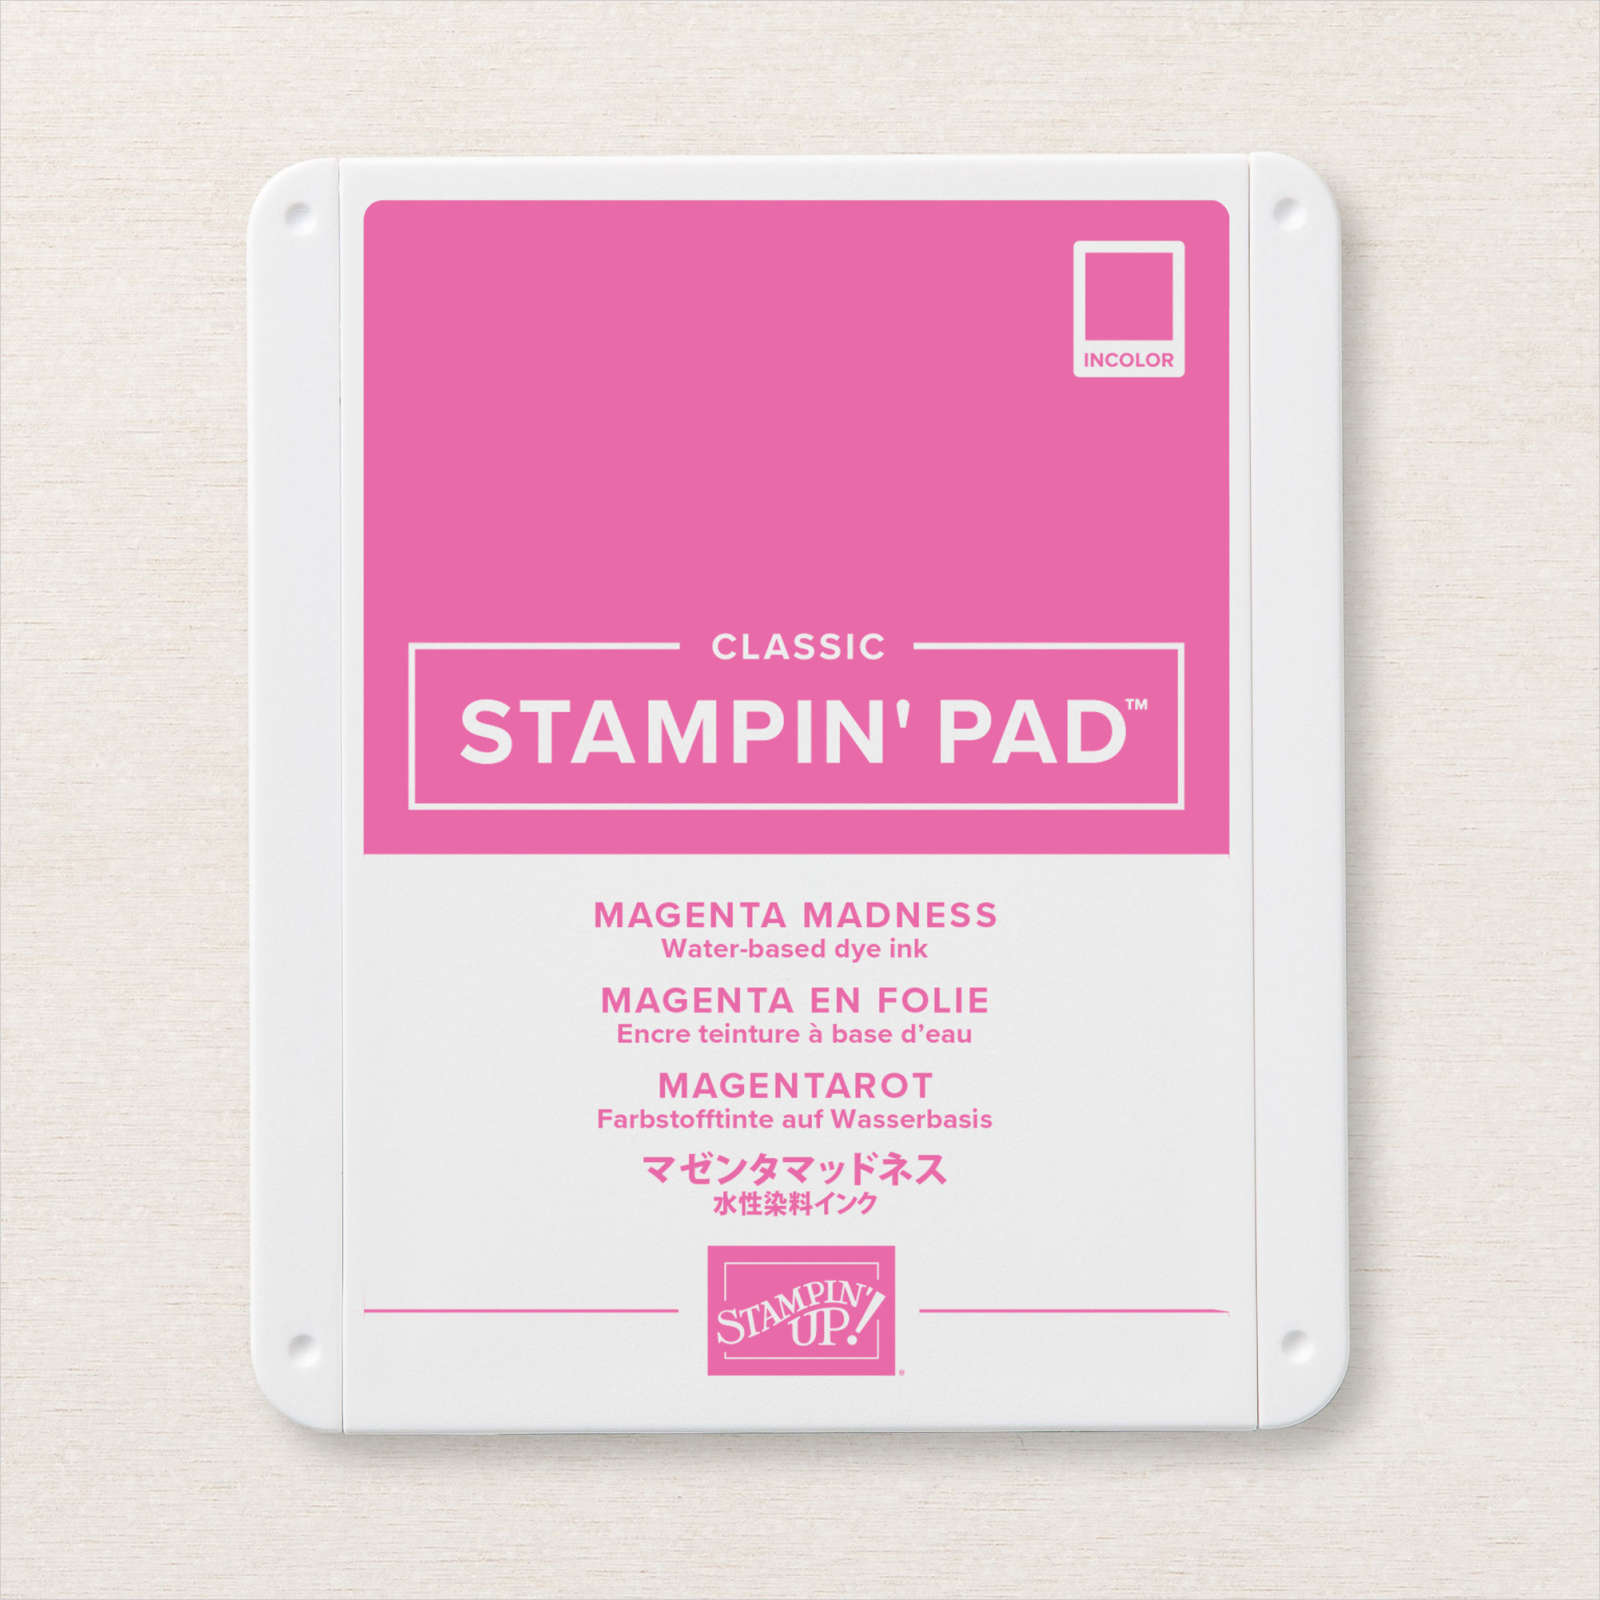
I used the Artistic Dies to cut Gold Foil card and attached the die cut to the card front. I also used the leaf die from the Artistic Dies to cut several leaves from Gold Foil card. I stamped the small flower from the Artistically Inked stamp set onto Basic White card using Magenta Madness ink. I cut the flower out using the co-ordinating Artistic Die.
I attached two die cut Gold Foil leaves to the back of the flower before attaching it to the card front. I stamped ”happy birthday” from the Artistically Inked stamp set onto Basic White card using Just Jade ink. I cut out the greeting using the Stitched Rectangle Dies and attached it to the card front using dimensionals.

To decorate the inside of the card, I attached a narrow strip of Gold Foil card behind one long edge of Expressions in Ink Specialty Designer Series paper, before attaching it to the bottom of Basic White card. I stamped the smaller flower from the Artistically Inked stamp set onto Basic White card using Magenta Madness ink. I attached two Gold Foil die cut leaves to the back of the flower before attaching it over the Designer Series Paper.
For the second card I attached a piece of the Expressions in Ink Specialty Designer Series Paper to the Gold Foil card panel cut from the front panel on the first card. The panel is attached to scored and folded Magenta Madness Card. The front of the card is decorated in the same manner as the first card, with the addition of an extra small flower. The inside of the card is decorated similarly to the first card.

I created two more cards using the reverse side of the Expressions of Ink Specialty Designer Series paper and a Just Jade card base. I love how they all turned out, don’t you.
Bye for now,
Kris


Start With Savings

Have you ever wondered what it would be like to be a Stampin’ Up! Demonstrator? Well now is the perfect opportunity to find out and join this awesome company. From the 4th November to the 30th November you can join Stampin’ Up! for $130.00 but you can select $235.00 worth of product from any current Stampin’ Up! catalogue. Your order might look like the one in the photo but more than likely you will want something different. So if you want to get a special bundle or need to buy paper or inks or anything that takes your fancy, now is the time! You can be a hobby demonstrator and use the products for just your own benefit or start a business in any way you like. Stampin’ Up! offers lots of help to get you started but no two businesses are ever the same. If you would like more information then please do not hesitate to contact me so we can get your started. OR if you want you can just go to my website and click on the Join button. It’s as easy as that. It doesn’t matter how you look at this deal it is amazing and you will be sorry if you don’t take advantage of it.
Have fun shopping.
Kris
Quilpie

Today’s pages show off some photos from our stay at Quilpie back in August/September. We stayed three nights here and it was so lovely. The park was beautiful and the town was typical with wide streets and centre gardens with some amazing sculpture as well! I began by stamping some mountains using the Mountain Air stamp set. I stamped the solid mountain image using Cajun Craze ink which I stamped onto scrap paper first. I stamped the detailed mountain image over the top using Early Espresso ink.
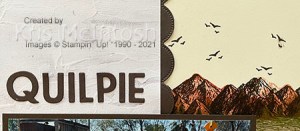
I stamped the solid tree image across the bottom of the mountains using Sahara Sand ink with the detailed image over the top using Mossy Meadow ink. The mountain images were stamped onto the right hand side of one Very Vanilla 12″ x 12″ page and the left hand side of another Very Vanilla 12″ x 12″ page. I cut two strips of Early Espresso 12″ x 12″ card using the border die from the Scalloped Contour Dies.

I attached the strips down the side of two pieces of In Good Taste Designer Series Paper. The designer series paper panels were attached to the left hand side of one Very Vanilla page and the right hand side of the other Very Vanilla page. I attached the photos to Early Espresso card before attaching them to the pages. I created the journaling on the computer and printed onto Very Vanilla card which I also attached to Early Espresso card before attaching to the right hand page. I cut the title from Early Espresso card using the Playful Alphabet Dies. Lastly I stamped the bird image from the Mountain Air stamp set above the mountains on both pages using Early Espresso ink.

I was a little worried about how to get a lot of photos onto these pages but I used a page layout from Pinterest to get me started and I am so happy with how they turned out. What about you? What do you think?
Bye for now,
Kris
Product Used:


Just Because
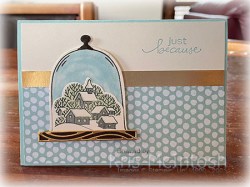
Today’s card is another that I created using the Classic Cloche Bundle. I found that the more I played with the stamps, the more ways I found to use them. For this card, I attached a piece of the Pool Party patterned paper from the Pattern Party Designer Series Paper across Very Vanilla card. I stamped the greeting from the Lovely You stamp set onto the top right hand corner of the Very Vanilla card using Balmy Blue ink.
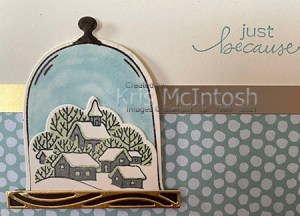
I attached a strip of Gold Foil card so that the edge touches the top of the Designer Series Paper. I stamped the cloche outline from the Classic Cloche stamp set onto Very Vanilla card using Early Espresso ink and used the co-ordinating Cloche Die to cut it out. I coloured the inside of the cloche image using a Light Balmy Blue Stampin’ Blend. I stamped the outline village image from the Classic Cloche stamp set onto Very Vanilla card using Memento Tuxedo Black ink.

I stamped the solid house fill image using Smoky Slate ink and the greenery image using Soft Sea Foam ink. I cut out the village scene using the co-ordinating Cloche Die and attached it inside the coloured cloche image. I cut Early Espresso card using the Cloche Die to create the solid shelf and Gold Foil card using the Cloche Die to create the decorative overlay. I attached the two shelf images together before attaching them to the stamped cloche image. The whole image panel is attached to the card front using dimensionals. To decorate the inside of the card, I attached a piece of the same patterned Pattern Party Designer Series Paper across the bottom of Very Vanilla card. I attached a narrow strip of Gold Foil card so that the edge touches the top of the Designer Series Paper.
I love the finished result. So pretty and so versatile for many occasions.
Bye for now,
Kris
Product Used:
Most Wonderful Time
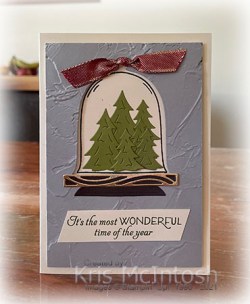
Yesterday in my Facebook Live, I shared several cards I created using the Classic Cloche Bundle. You can find this bundle in the July-December Mini Catalogue. I wasn’t immediately drawn to this stamp set but I am glad I gave in and purchased it! For this card, I cut Smoky Slate card using the cloche die form the Cloche Dies and then embossed the panel using the Painted Texture 3D Embossing Folder. I stamped the cloche image from the Classic Cloche stamp set onto Very Vanilla card using Early Espresso ink and attached it behind the window in the Smoky Slate card using dimensionals.

The whole panel is attached to scored and folded Thick Very Vanilla card. I cut the solid shelf panel from Early Espresso card using the Cloche Die and the detailed shelf panel from Gold Foil card. I attached the two images together before attaching them to the card front across the bottom of the cloche opening.
I also cut the half round image in the Cloche Dies from Early Espresso card. I trimmed the rounded edge off the die cut and attached it across the bottom of the shelf images to create the look of a “stand”. I die cut Old Olive card using the large and small tree dies from the Cloche Dies. I layered the trees inside the stamped cloche image. I tied a knot in a length of the Cherry Cobbler & Gold Metallic Ribbon and attached it to the front panel on the top of the cloche opening. I stamped the greeting from the Classic Cloche stamp set onto Very Vanilla card using Old Olive ink. I trimmed the edges on the diagonal and attached the greeting to the card front. To decorate the inside of the card I stamped the greeting from the Classic Cloche stamp set using Smoky Slate ink. I die cut the three larger trees from Old Olive card using the Cloche Die and attached them to the lower left hand corner.
Bye for now,
Kris
Product Used: