Jolly Santa
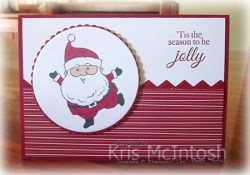
Today’s card once again uses the delightful Be Jolly and Holly Jolly Wishes stamp sets from the July to December Mini Catalogue. I cut Cherry Cobbler card in half using one of the Basic Border Dies and attached one piece behind the long edge of a piece of Tidings of Christmas Designer Series Paper. The panel is attached across the bottom of Basic White card.

I stamped the greeting from the Holly Jolly Wishes stamp set onto the top right hand corner using Cherry Cobbler ink. I stamped the Santa image from the Be Jolly stamp set onto Basic White card using Memento Tuxedo Black ink. I cut out the Santa using the Layering Circle Dies before colouring the image using the Dark Cherry Cobbler, Dark Basic Black, Light Flirty Flamingo and Ivory Stampin’ Blends. I attached the image to a Cherry Cobbler scalloped circle cut using the Layering Circle Dies. The whole panel is attached to the card front using dimensionals.
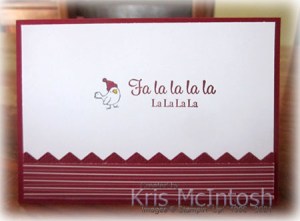
To decorate the inside of the card, I stamped the greeting from the Holly Jolly Wishes stamp set using Cherry Cobbler ink. I stamped the bird image from the Be Jolly stamp set beside the greeting using Memento Tuxedo Black ink. I coloured the birds hat using the Dark Cherry Cobbler Stampin’ Blend and his beak using the Dark Daffodil Delight Stampin’ Blend. I attached the second half of the die cut behind one long edge of a strip of the same Tidings of Christmas Designer Series Paper before attaching it across the bottom of the stamped Basic White panel.
Another cute card using these gorgeous stamp sets. I’d love to know what you think, will these sets be popular?
Bye for now,
Kris
Product Used:
You can find a link to the Be Jolly stamp set here and the Holly Jolly Wishes stamp set here in my online store.


A bit different

for me! I don’t usually go with really colourful cards, but I liked this card layout when I found it on Pinterest and decide to use it today. I embossed a panel of Pale Papaya card using the dotted folder from Checks & Dots Embossing Folders and attached it to scored and folded Thick Basic White card. I attached a piece of the Pattern Party Designer Series Paper to the centre of the embossed card. I stamped the greeting from the Encircled in Friendship stamp set onto a narrow strip of Soft Succulent card using Memento Tuxedo Black ink.

I cut a “v” in the right hand end of the banner and attached it across the card front using dimensionals. I stamped the floral image from the Encircled in Friendship stamp set onto Basic White card using Memento Tuxedo Black ink and coloured it using the Dark Pale Papaya and Dark Soft Succulent Stampin’ Blends. I cut out the image using one of the Layering Circle Dies and attached it to the card front using dimensionals where necessary.

To decorate the inside of the card, I stamped the greeting from the Encircled in Friendship stamp set using Memento Tuxedo Black ink onto Basic White card. I stamped the single floral image from the same stamps set beside the greeting using the same ink. I coloured the flower using the Dark Pale Papaya and Dark Soft Succulent Stampin’ Blends before attaching the panel to the inside of the card. The stamped Basic White card is attached to the inside of the Thick Basic White card base. Unfortunately if you are going to use the blends, you need to add an additional panel, otherwise your colouring shows through onto the back of your card!
I’d love to know what you think. Do you like these bright colours together!
Bye for now,
Kris
Product Used:


Tin Can Bay
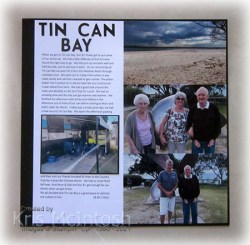
Today’s pages are dedicated to photos taken while we were staying at Tin Can Bay. For the title page, I began with a Basic Black 12″ x 12″ page and attached the three photos down the right hand side of the page. I printed my journalling onto Basic White card, making sure to leave enough room for the title and for the photo, which I attached to Basic Black card first. The panel is attached to the left hand side of the page.
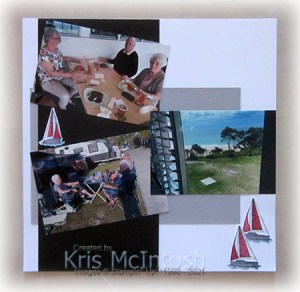
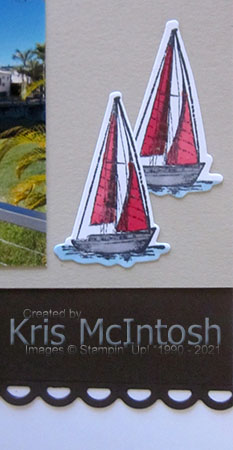
I cut the title from Basic Black card using the Playful Alphabet Dies. For the second page, I attached a Smoky Slate panel to a Basic White 12″ x 12″ page. I added a wide strip of Basic Black down the left hand side. before attaching the photos. I stamped two large and one small sailing ships from the Sailing Home stamp set onto Basic White card using Memento Tuxedo Black ink. I coloured the images using Dark Balmy Blue, Dark Smoky Slate and Poppy Parade Stampin’ Blends. I cut out the sailing ships using the co-ordinating Smooth Sailing Dies before attaching them to the page.

The view from the window at Rainbow Beach Surf Club was just amazing. Unfortunately we didn’t spot any whales.
Bye for now,
Kris
Product Used:


Counting Sheep
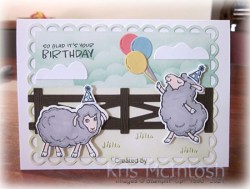
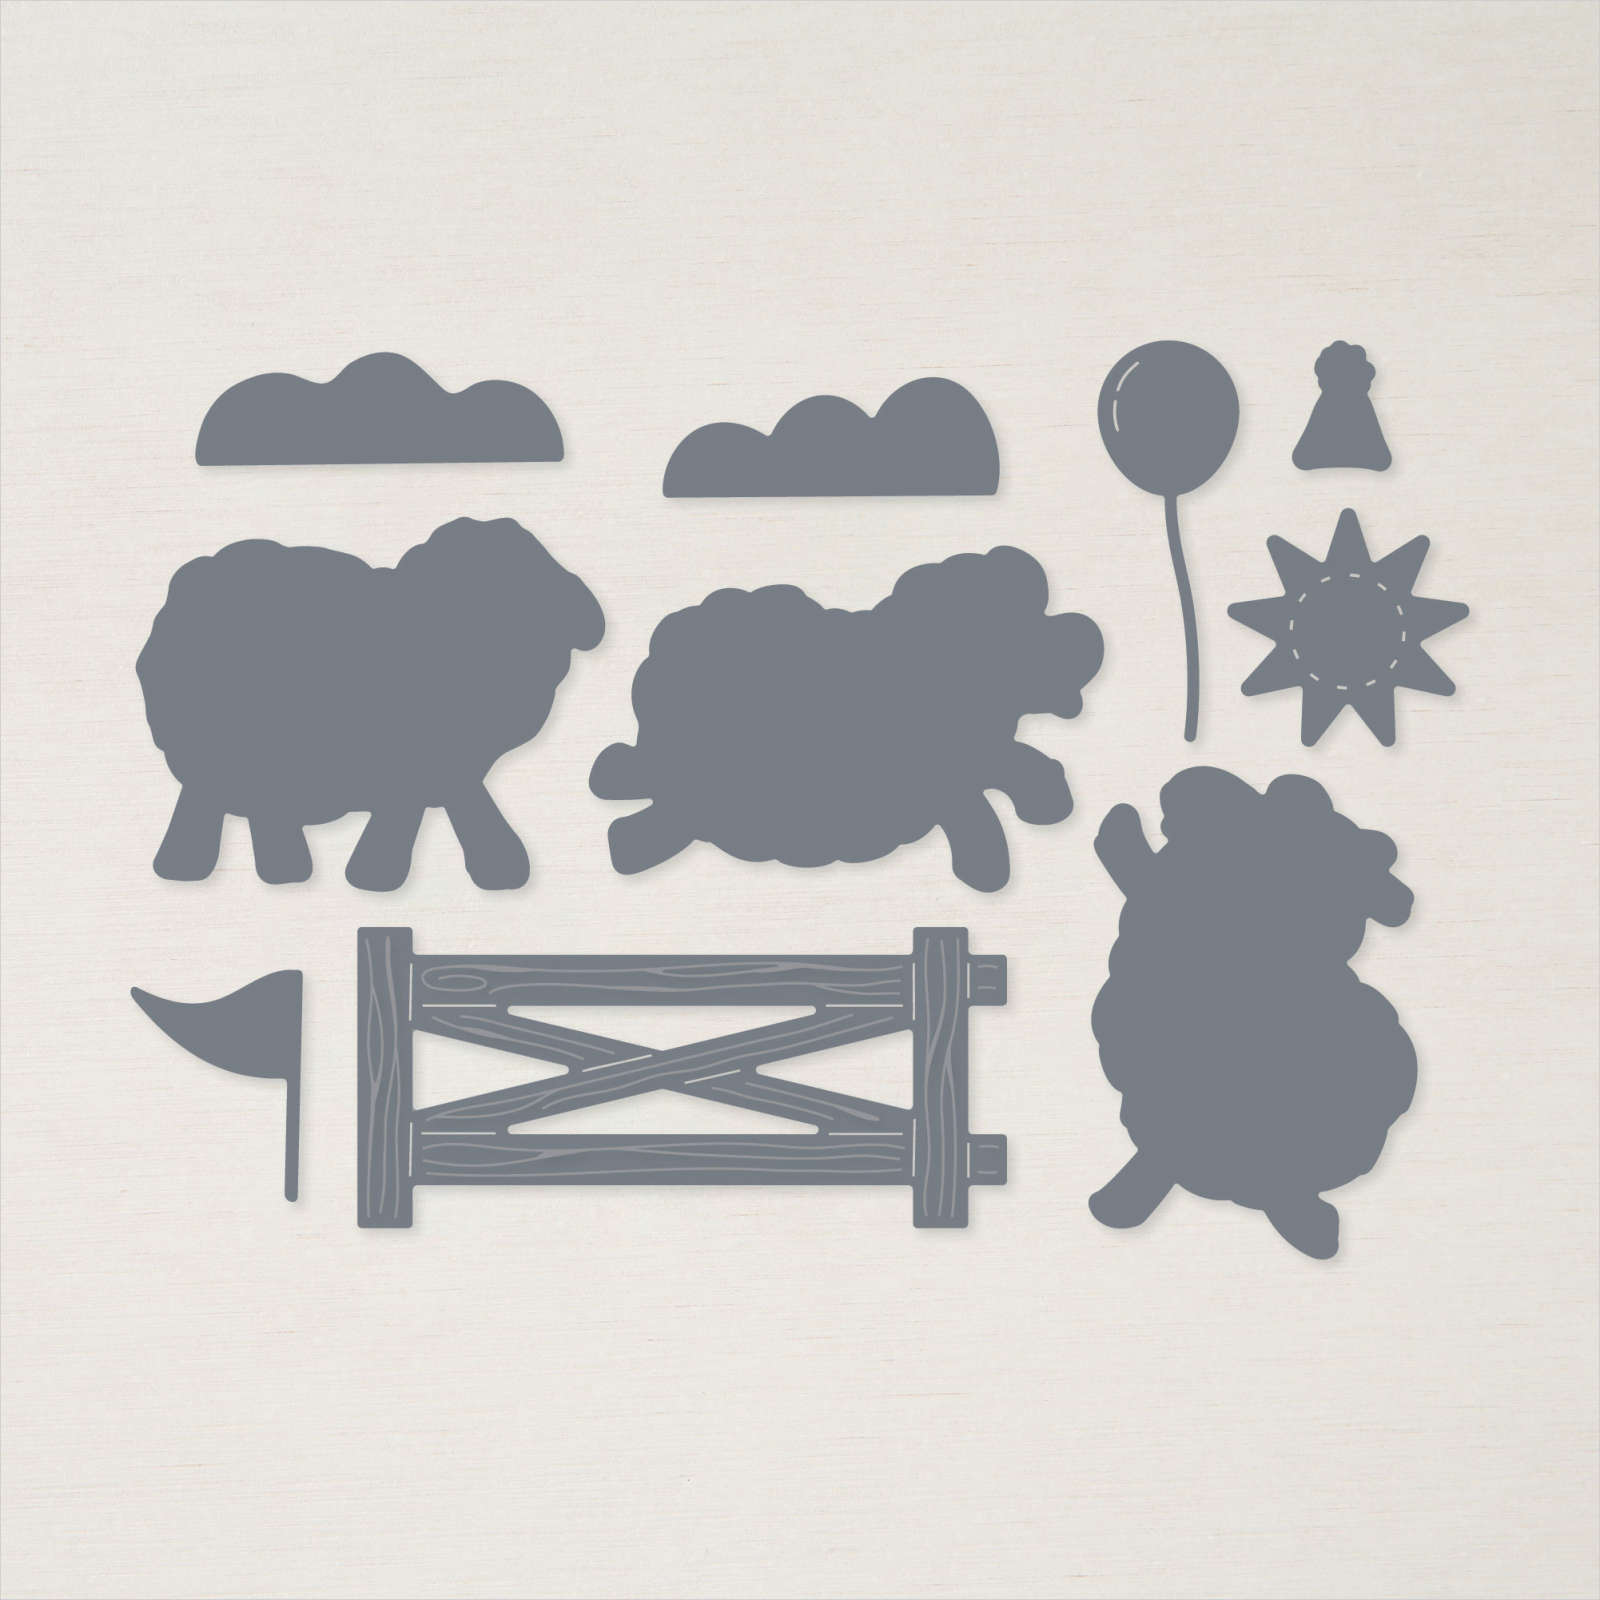
Today’s card was again created using the Counting Sheep stamp set and Sheep Dies. Both the stamp set and the dies are available FREE with a qualifying order during Sale-A-Bration. For my card today, I cut Basic White card using the largest rectangle from the Scalloped Contour Dies. I masked across the panel and added Soft Sea Foam ink to the bottom half using a Blending Brush. I changed the orientation of the mask and used a Blending Brush to add Pool Party ink to the other half of the die cut. I also cut some scrap card using the Basic Border Dies and used it as a mask to add a bit more depth to the colour of the sky.
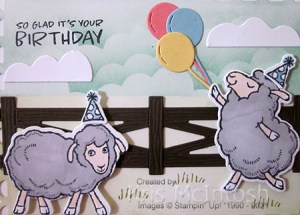
I stamped the greeting from the Counting Sheep stamp set onto the upper left hand corner of the die cut using Memento Tuxedo Black ink before attaching the panel to scored and folded Thick Basic White card. I cut Early Espresso card twice using the fence die from the Sheep Dies and attached them across the coloured panel. I stamped the two sheep images from the Counting Sheep stamp set onto Basic White card using Memento Tuxedo Black ink. I coloured the images using the Light Smoky Slate and Light Petal Pink Stampin’ Blends. I cut out the images using the co-ordinating Sheep Dies and attached them to the card front using dimensionals. I stamped the grass image from the Counting Sheep stamp set around the sheep.

I stamped the birthday hat image from the Counting Sheep stamp set twice onto Basic White card using Memento Tuxedo Black ink. I coloured the hats using the Dark Balmy Blue Stampin’ Blend before cutting them out using the co-ordinating Sheep Die. The hats are attached to the card front using a mini dimensional. I cut the Basic White card using the cloud die from the Sheep Dies and attached them to the card front. I cut Flirty Flamingo, So Saffron and Balmy Blue card using the balloon die from the Sheep Dies and attached them to the card front, tucking them under the sheep’s arm. To decorate the inside of the card, I stamped the sheep image from the Counting Sheep stamp set onto Basic White card using Memento Tuxedo Black ink. I coloured the image using the Light Smoky Slate and Light Petal Pink Stampin’ Blends. I cut out the image using the co-ordinating Sheep Die and attached it to the inside of the card. I stamped the greeting from the Counting Sheep stamp set to the right of the sheep using Memento Tuxedo Black ink.
Aren’t these sheep cute! Don’t forget to take a look at these amazing Free products during Sale-a-bration.
Bye for now,
Kris
Product Used:


A Sheep’s Birthday

Yesterday on my Facebook Live, I shared some cards I made using the Counting Sheep stamp set and Sheep Dies which you can early for Free during Sale-a-bration with a qualifying order. Today I am sharing another card i made using this stamp set and dies. To create the centre step for this card you need to cut a standard card base. You need to cut in 1-1/4″ on each side of one half of the card base and then glue these panels down.

I cut my card base from Thick Basic White card and added some Pattern Party Designer Series Paper to the glued down side panels. I scored the centre part of the card at 5cm to give me the centre step. I embossed Balmy Blue card using the Tasteful Textile 3D Embossing Folder and attached the panel to the 5cm section of the central panel. I cut Basic White card using one of the rectangles from the Scalloped Rectangle Dies and attached it to the embossed card. I stamped the sheep and birthday hat images from the Counting Sheep stamp set onto Basic White card using Memento Tuxedo Black ink.

I used the Light Smoky Slate and Light Flirty Flamingo Stampin’ Blends to colour the sheep image and Dark Balmy Blue Stampin’ Blend to colour the hat image. The images are cut out using the co-ordinating Sheep Dies. I also cut Balmy Blue and Basic Black card using the balloon die from the Sheep Dies. I attached the sheep and birthday hat to the card front using dimensionals. I layered the balloons so that it looks like the sheep is holding onto the balloons. I stamped the greeting from the Counting Sheep stamp set onto Balmy Blue card using Memento Tuxedo Black ink. The greeting is cut out using one of the Scalloped Contour Dies before being attached to the card base using dimensionals. This is a fun fancy fold card to make and it works really well with the sheep image don’t you think? Best of all it folds flat and fits a standard envelope.
Bye for now,
Kris
Product Used:

Holly Jolly Christmas
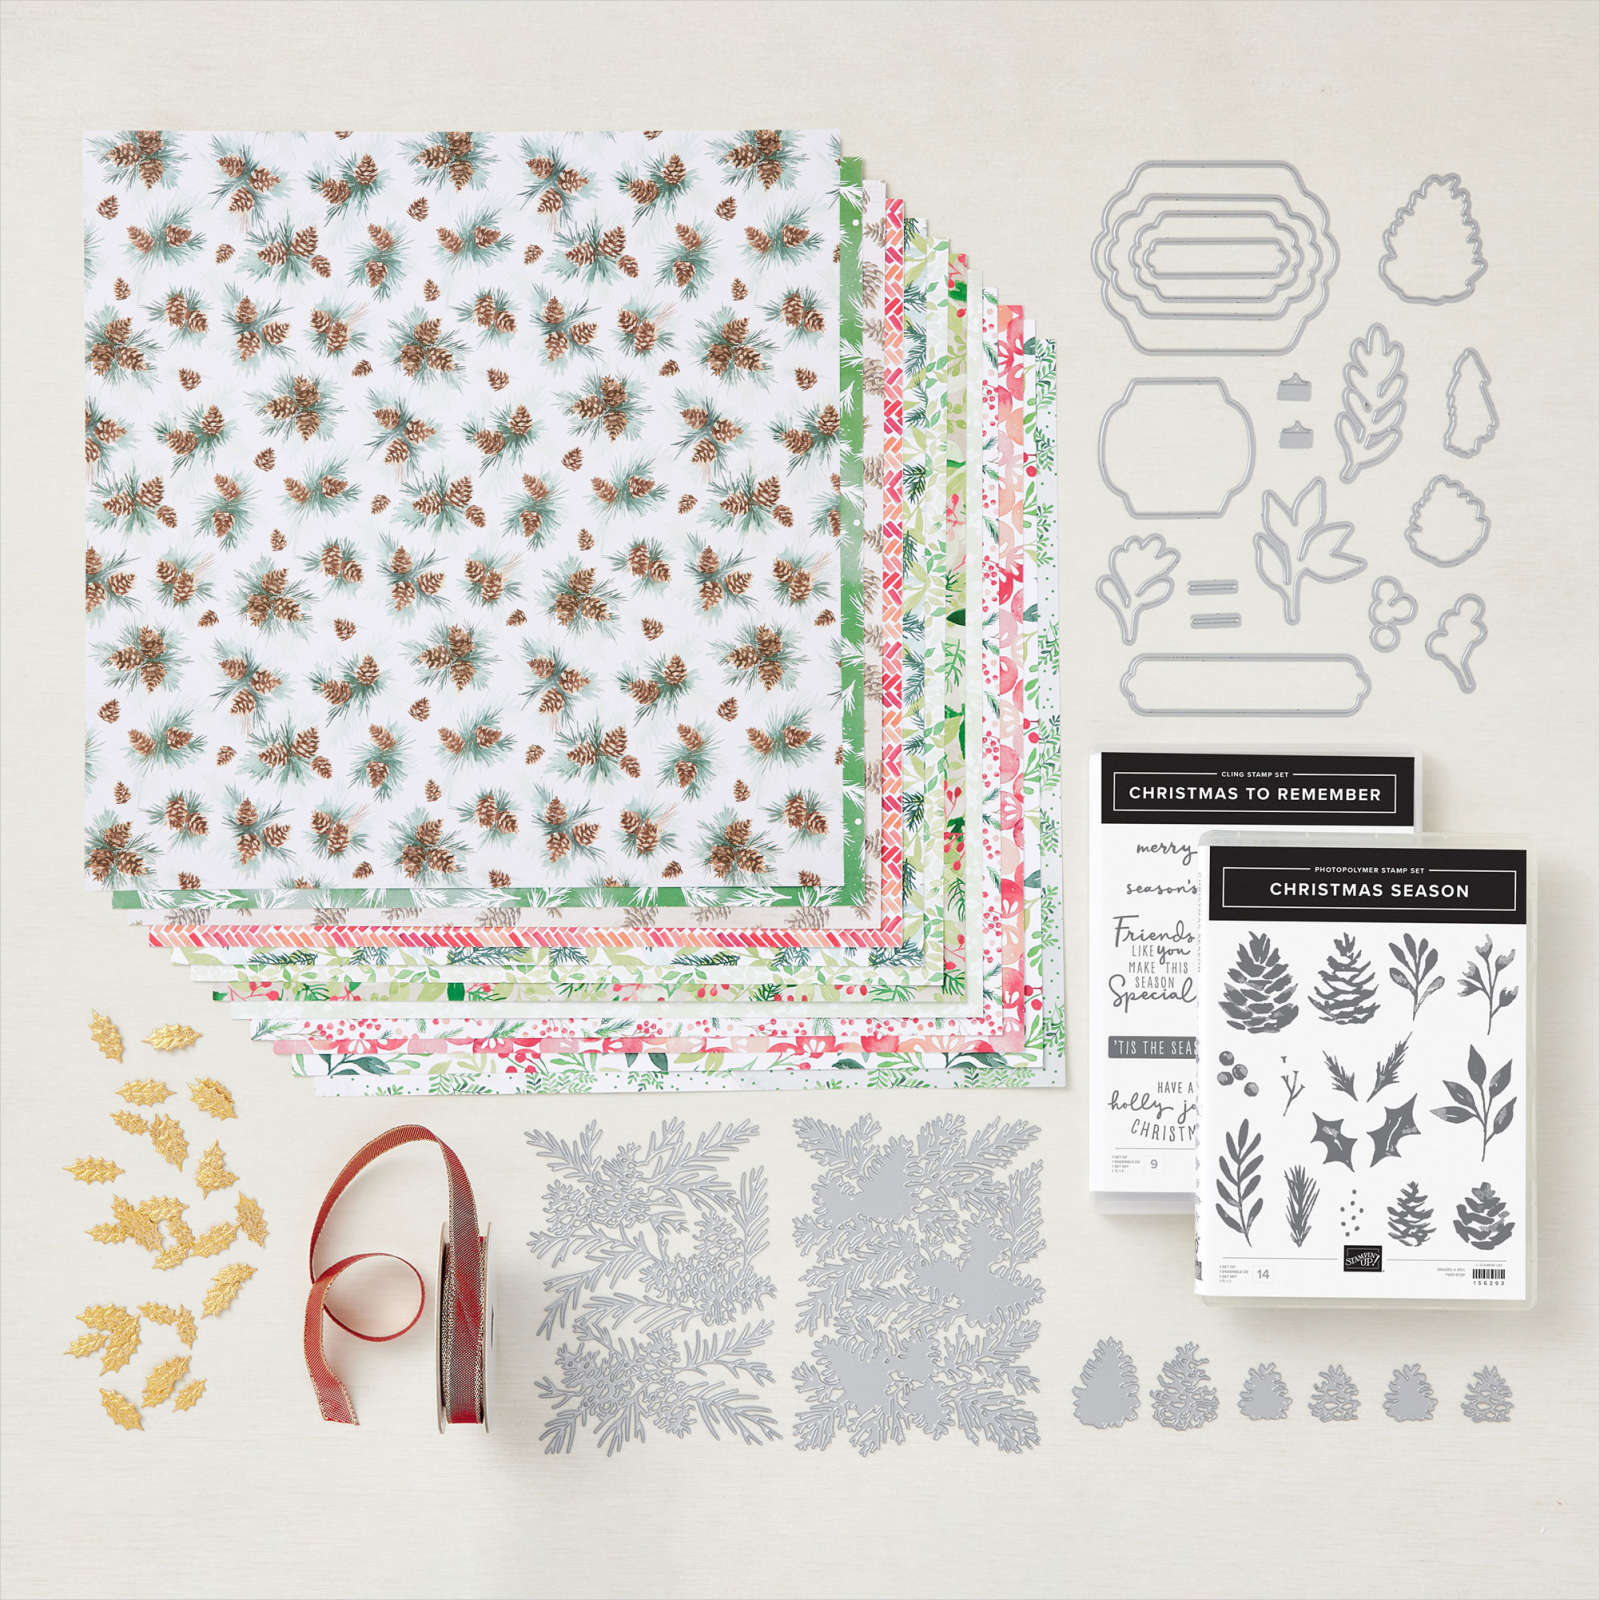
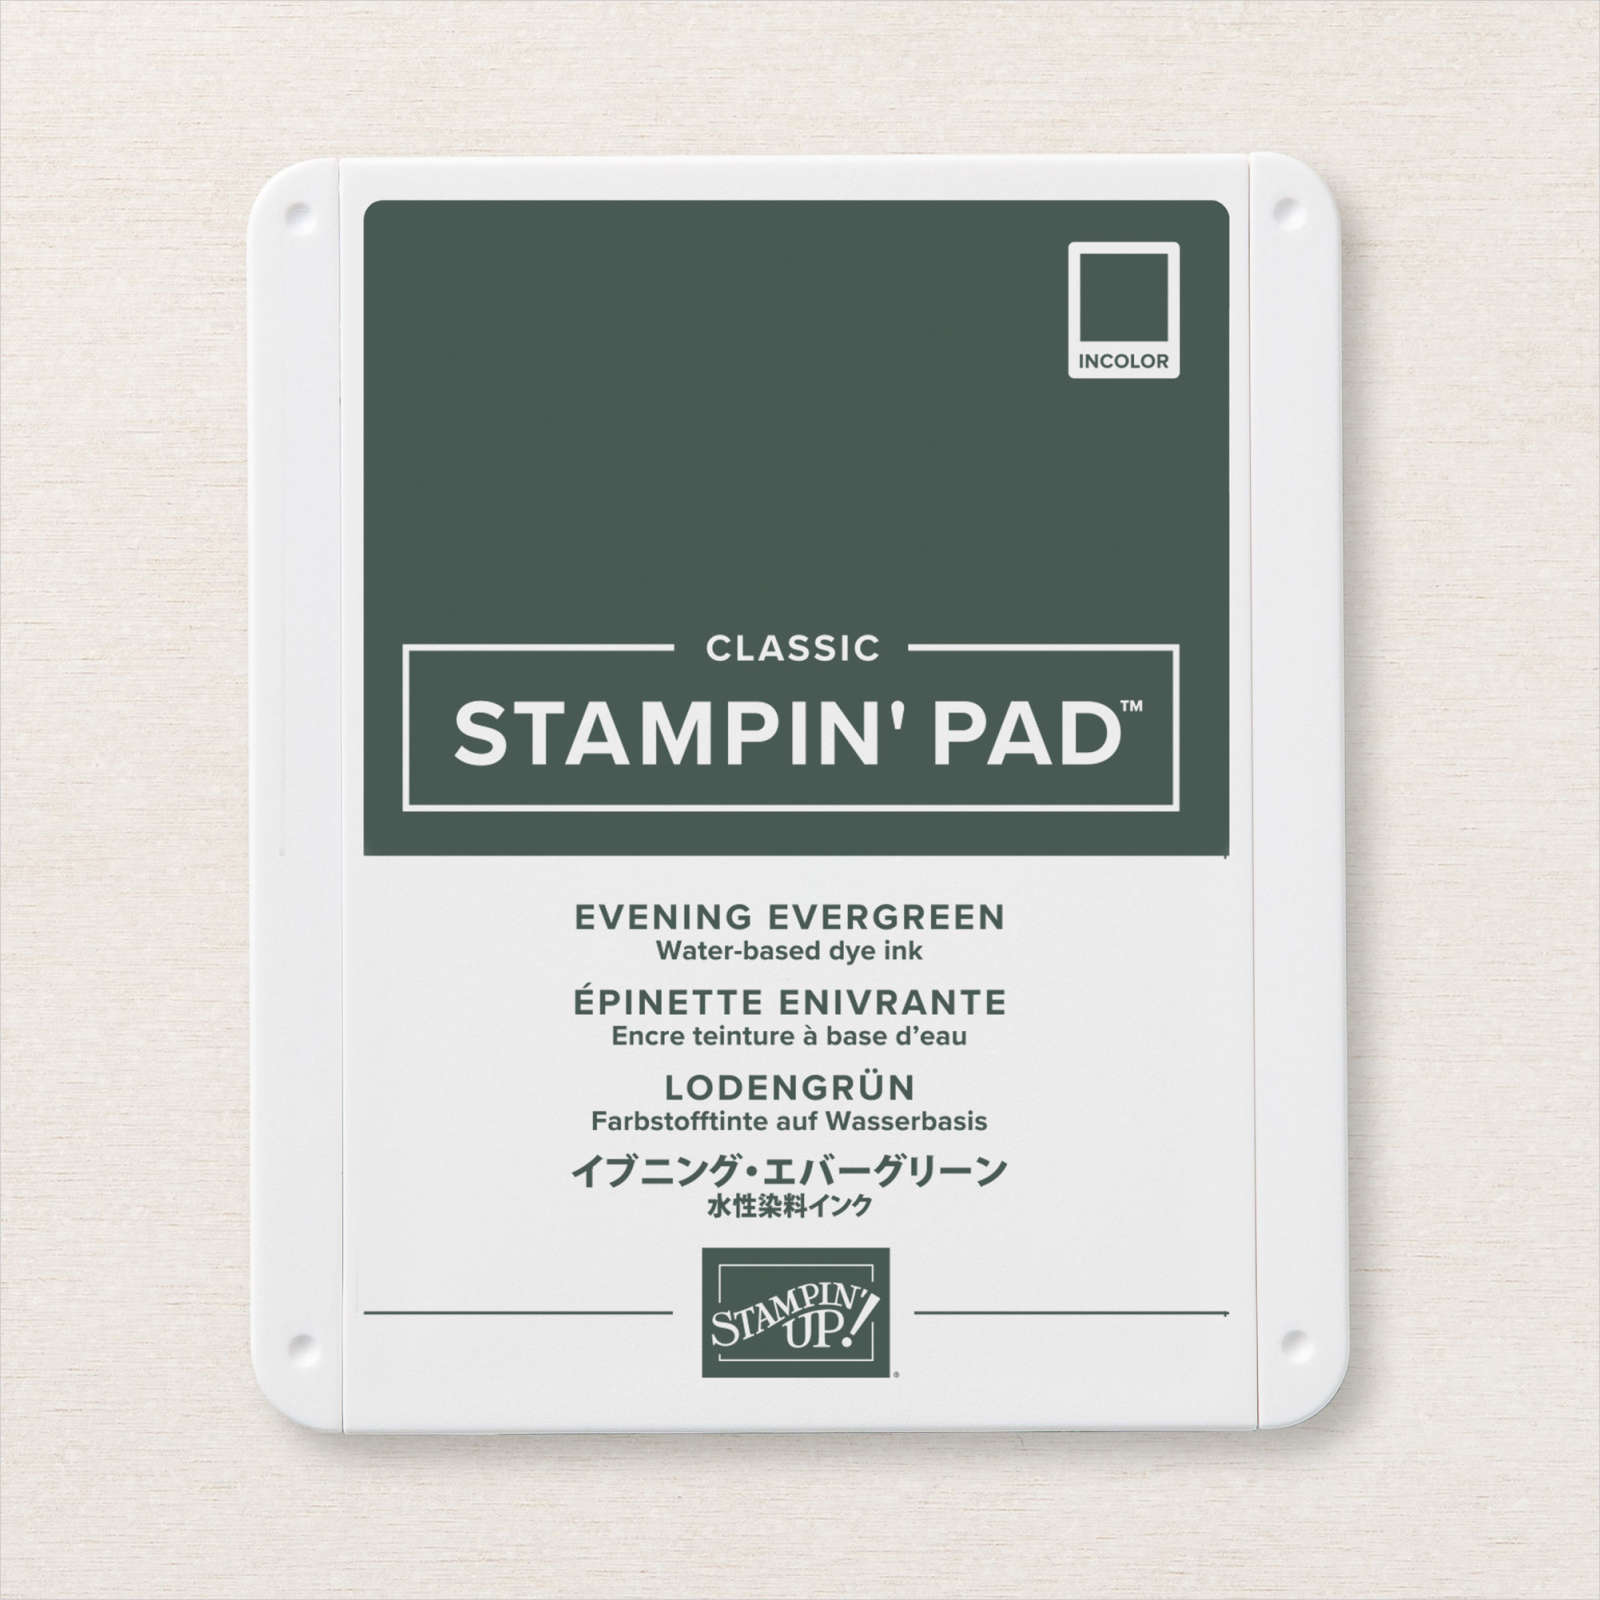
Today I am sharing a card I made using the Painted Christmas Suite which you can find in the new Mini Catalogue. I love this product suite which I shared last week on my Facebook Live. For this card today I embossed Basic White card using the Polka Dot folder from the Checks & Dots Embossing Folders. I attached the embossed card to scored and folded Evening Evergreen card. I stamped the leaf images from the Christmas Season stamp set using Soft Sea Foam and Evening Evergreen ink.

I stamped the berries using Evening Evergreen and Cherry Cobbler ink. All of the images were cut out using the co-ordinating Seasonal Labels Dies. I stamped the greeting from the Christmas to Remember stamp set onto Crumb Cake card using Evening Evergreen ink and cut it out using one of the tags in the Seasonal Labels Dies. I attached the leaves to the card front and the greeting over the top using dimensionals.

To decorate the inside of the card, I stamped the greeting from the Christmas to Remember stamp set onto Basic White card using Evening Evergreen ink. I stamped the holly images from the Christmas Season stamp set onto Basic White card using Soft Sea Foam ink and Evening Evergreen ink. I stamped the berries from the same stamp set using Cherry Cobbler ink. All of the images were cut out using the co-ordinating Seasonal Labels Dies. I attached the die cut images to the top left hand corner of the stamped Basic White card.
This is such a fun product suite, with so many elements I hope you take the time to have a look.
Bye for now,
Kris
Product Used:


Sailing Birthday
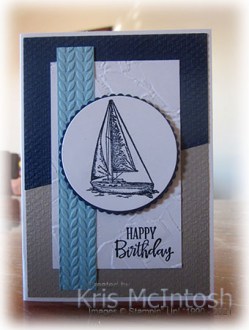
Today’s card was inspired by a card sketch that I found on Pinterest. It was a bit busy but I loved it and gave it a go. I cut Night of Navy card on an angle and attached it to Gray Granite card before embossing the whole panel using the Tasteful Textile 3D Embossing Folder. The embossed panel is attached to scored and folded Thick Basic White card. I stamped “happy birthday” from the Peaceful Moments stamps set onto the lower right hand corner of Basic White card using Night of Navy ink. I embossed the stamped Basic White card using the Painted Texture 3D Embossing Folder before attaching it to the card front.

I embossed a narrow strip of Balmy Blue card using one of the folders from the Greenery Embossing Folders and attached it to the card front on the left hand side of the Basic White card.

I stamped the large sailing boat from the Sailing Home stamp set onto Basic White card using Night of Navy ink. I cut out the image using the Layering Circle Dies. I attached the image to a Night of Navy scalloped circle cut using the same dies and then the card front using dimensionals. I stamped another greeting from the Peaceful Moments stamp set onto Basic White card using Night of Navy ink. I stamped the smaller boat from the Sailing Home stamp set beside the greeting before attaching it to the inside of the Thick Basic White card base.
I really love this card, lots of bits and pieces but it came together so well, don’t you think?
Bye for now,
Kris
Product Used:


Lets Get Away
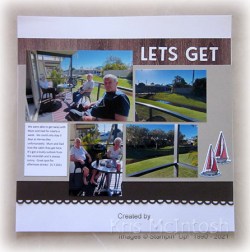
Ron and I were lucky enough to be able to have a week’s holiday with my Mum and Dad before our latest lockdown. We had three days at Hervey Bay and 3 days at Tin Can Bay. So lovely! Today’s pages show off the first couple of days of our break away. I cut one long edge of a piece of Early Espresso card using the largest rectangle from the Scalloped Contour Dies. I used a smaller top plate so that I could cut the whole edge without cutting any corners.
I attached the Early Espresso card behind one long edge of Crumb Cake card before attaching the panels to Basic White 12″ x 12″ pages. I cut narrow strips of In Good Taste Designer Series Paper and attached them to the page above the Crumb Cake card.
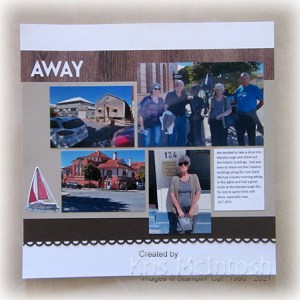
I attached the pictures to the pages and added journalling which I printed onto Basic White card. I cut the title from Basic White card using the Playful Alphabet Dies. I stamped two small and one large sailing boats from the Sailing Home stamp set onto Basic White card using Memento Tuxedo Black ink. I coloured the images using the Dark Balmy Blue, Dark Smoky Slate and Poppy Parade Stampin’ Blends. I cut out the sailing ships with the co-ordinating Smooth Sailing Dies before attaching them to the pages.

Simple but you know that’s my style! I hope that you are getting around to memory keeping in whatever form you love. I am especially grateful to document this time spent with my parents as they are both getting along in years and Mum’s memory is failing her very quickly.
Bye for now,
Kris
Product Used:

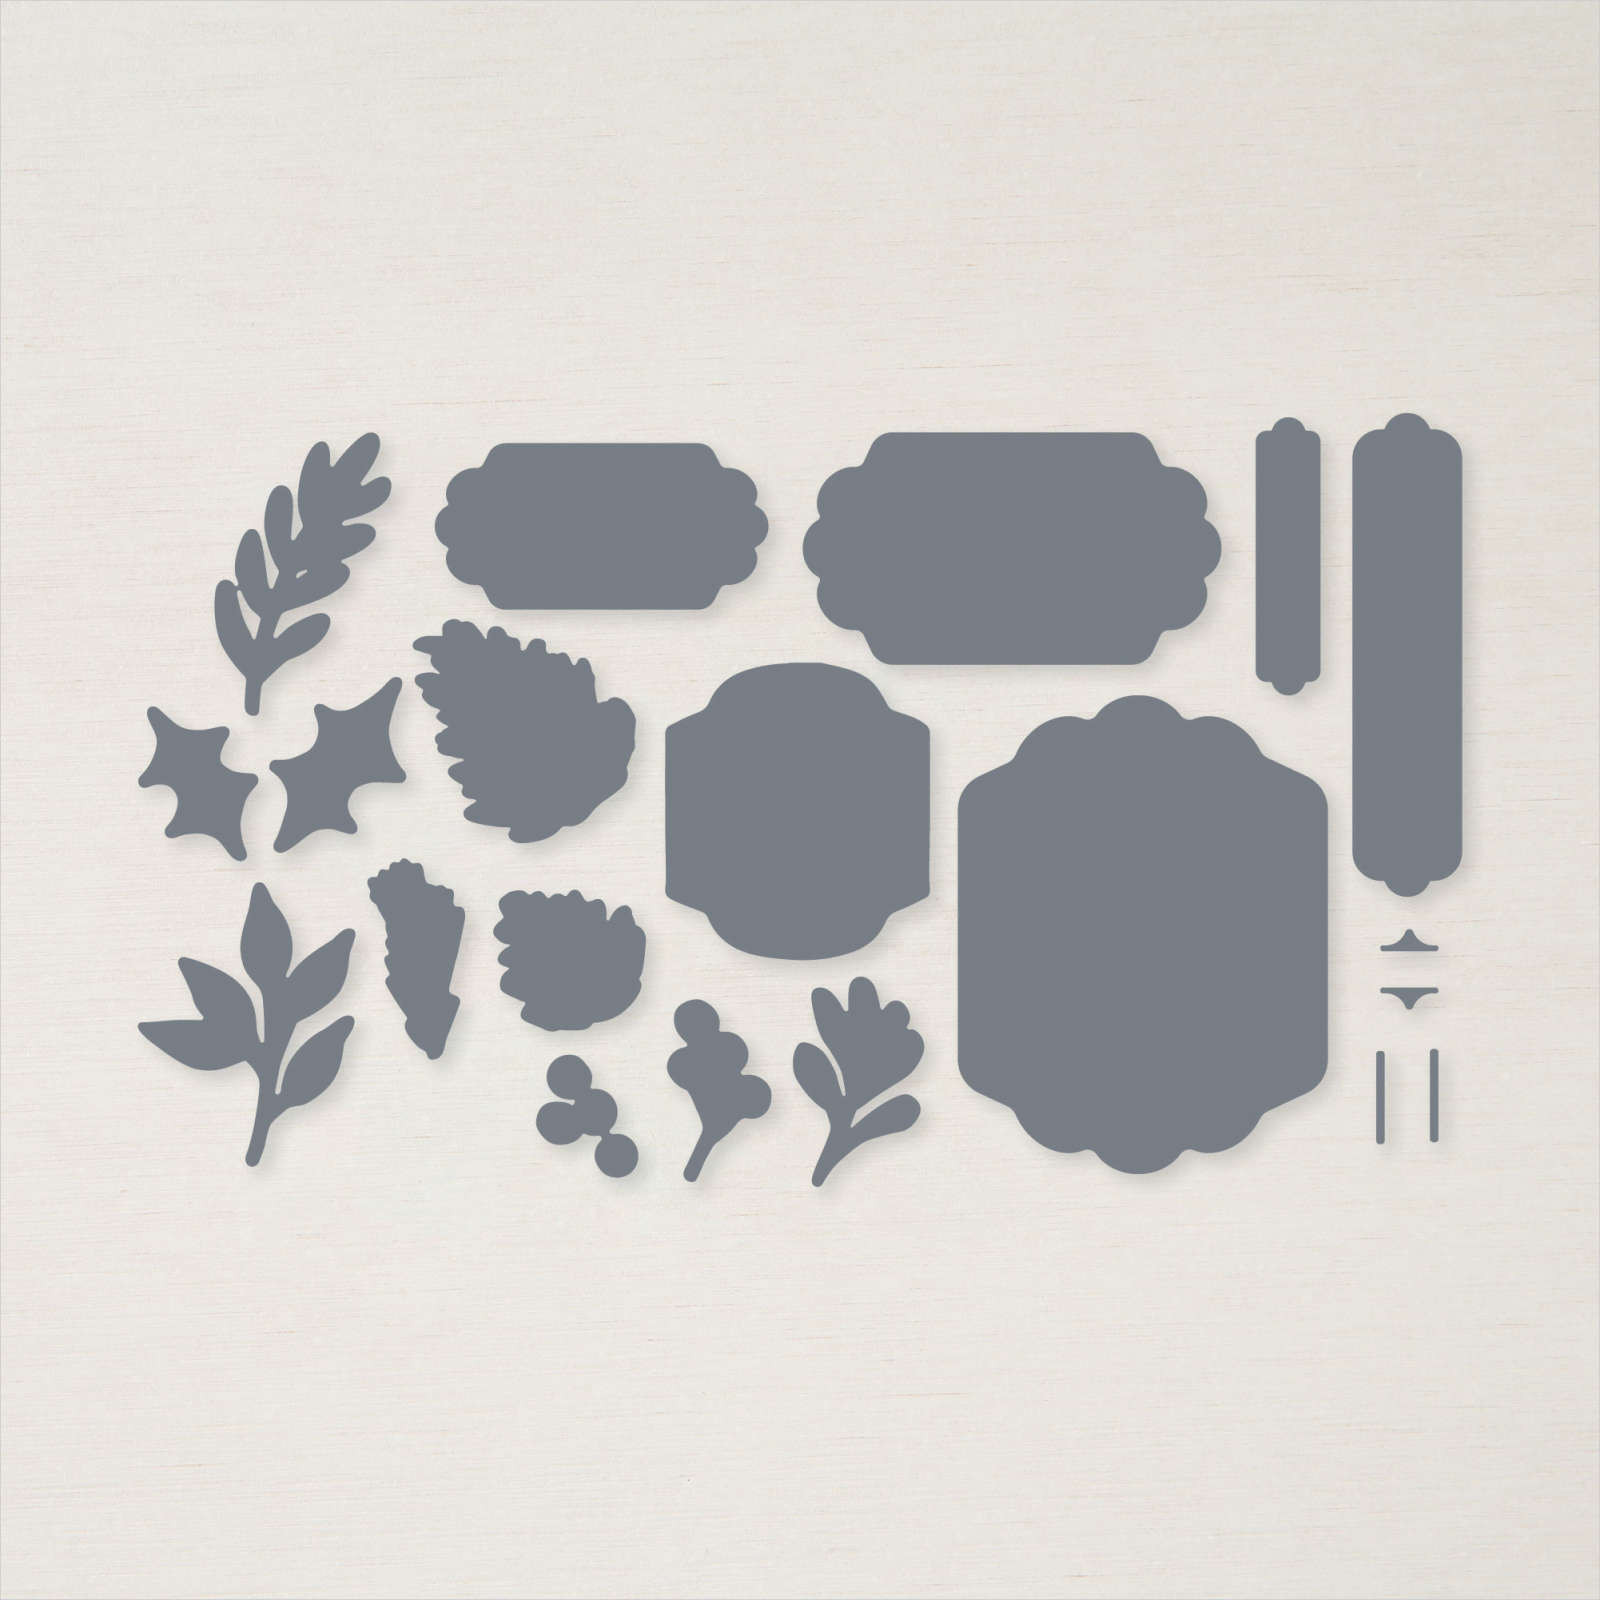
Christmas Pinecone Dies

I am using the Painted Christmas Suite again today. I shared a card with you yesterday and a couple more on my Facebook Live this week using the same product suite. I used the base Christmas Pinecone Die to cut Cherry Cobbler card. I cut the detailed Christmas Pinecone Die to cut a piece of Be Dazzling 6″ x 6″ Specialty Paper.

The Be Dazzling Specialty Paper is Free with a qualifying order during Sale-a-bration and believe me it is very beautiful. I attached the Be Dazzling die cut to the Cherry Cobbler die cut before attaching the panel to scored and folded Thick Basic White card.

I stamped the greeting from the Christmas to Remember stamp set onto Basic White card using Cherry Cobbler ink. I cut out the greeting using one of the Seasonal Labels Dies. I attached the greeting to Cherry Cobbler cut which I cut using the slightly larger die from the Seasonal Labels Dies. The greeting panel is attached to the card front using dimensionals. To decorate the inside of the card, I stamped the greeting from the Christmas to Remember stamp set using Cherry Cobbler ink. I cut the leaf from Be Dazzling Specialty Paper using the Seasonal Labels Dies.
A very simple card but the Be Dazzling Specialty Paper gives it a real WOW factor, don’t you think.
Bye for now,
Kris
Product Used:
Christmas Season

Today’s card was made using product from the Painted Christmas Suite. I shared a couple of cards and some tips and tricks for using the dies on my Facebook Live this week. I must say that I love everything about this suite, it is so amazing. For today’s card, I added a piece of the Painted Christmas 12″ x 12″ Designer Series Paper across the bottom of Basic White card. I wrapped the top of the designer series paper with a length of Cherry Cobbler & Gold Metallic Ribbon.

I stamped the greeting from the Christmas to Remember stamp set onto the top right hand corner of the Basic White card using Cherry Cobbler ink before attaching the panel to scored and folded Cherry Cobbler card. I tied a bow in a length of the Cherry Cobbler & Gold Metallic Ribbon and attached it to the ribbon already attached. I stamped the leaves from the Christmas Season stamp set onto Basic White card using Soft Sea Foam and Evening Evergreen ink. I stamped the berry image from the Christmas Season stamp set onto Basic White card using Cherry Cobbler ink.
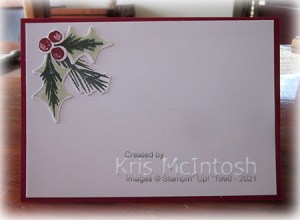
All of the images were cut out using the co-ordinating Seasonal Labels Dies. I layered the leaves, berries and two of the Gold Holly Leaves to the upper left hand corner of the Basic White card. To decorate the inside of the card, I stamped the leaves and berries as before and cut them out using the co-ordinating Seasonal Labels Dies. I layered the leaves and berries onto the top left hand corner of Basic White card.
This is an amazing Product Suite. Two stamp sets, two sets of dies, designer series paper, ribbon and gold holly leaves. Everything you could want to create beautiful Christmas cards this year. I hope I have inspired you to take another look at this product suite.
Bye for now,
Kris
Product Used:


