Darling Donkey

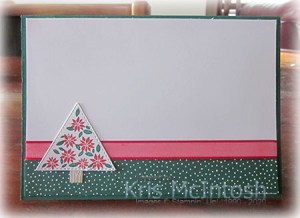
It’s getting close to the start of the new Mini Catalogue and with that start comes two months of Sale-a-bration. A time when you can earn free product based on what you spend. It’s a great time to stock up on Designer Series Paper and cardstock as well as adhesives and embellishments. For every $90.00 (or $180.00) you spend you can earn a free product which includes the Darling Donkey stamp set. The donkey images are really cute and it has some great sayings in the stamp set as well. So today I am sharing a card I made using this lovely stamp set. I attached a piece of Bumblebee patterned paper from the 2020-2022 In-colour 6″ x 6″ Designer Series Paper pack to Misty Moonlight card. The panel is attached to Very Vanilla card, Misty Moonlight card and then scored and folded Thick Very Vanilla card.

I stamped “happy birthday” from the Itty Bitty Greetings stamp set onto a strip of Very Vanilla card using Misty Moonlight ink and attached it across the bottom of the Designer Series Paper. I cut a circle from Very Vanilla card and a scalloped circle from Misty Moonlight card using the Layering Circle Dies. I attached the two circles together before attaching them to the card front using dimensionals. I stamped the donkey image from the Darling Donkeys stamp set onto scrap Very Vanilla card using Smoky Slate ink.

I coloured the donkey using the Smoky Slate, Light Petal Pink and Light Old Olive Stampin’ Blends. I coloured the flower using the Bumblebee Stampin’ Write Marker. I cut out the donkey and attached it to the circle with dimensionals underneath his ears to support where he extends beyond the circle. To decorate the inside of the card, I attached a narrow strip of Misty Moonlight card behind one long edge of the same pattern Designer Series Paper that I used on the front of the card. The panel is attached to the bottom of Very Vanilla card. I stamped another donkey from the Darling Donkeys stamp set just above the Designer Series Paper panel using Smoky Slate ink. I coloured the image using Smoky Slate and Light Petal Pink Stampin’ Blends. I stamped the greeting from the Darling Donkeys stamp set to the right of the stamped image using Misty Moonlight ink.
Such a cute card, don’t you think.
Bye for now,
Kris
Product Used:
You can see the Petal Pink Stampin’ Blends here


Garden Wishes

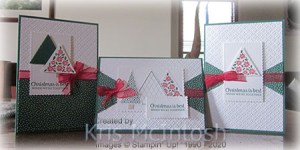
The first product I have played with from the next Mini Catalogue is the Dandy Garden Product Suite. Mostly because this is the one I used during our Onstage Online event in November. I shared some cards using this in my Facebook Live recently and also one other card on my blog. Today I have two variations on the same theme using the Garden Wishes stamp set which is part of this product suite.

For the first card, I embossed a piece of Garden Green card using the Subtle 3D Embossing Folder and attached it to the left hand side of Whisper White card. I embossed Daffodil Delight card using the Ornate Garden Embossing Folder and attached it to the card front partially over the embossed Garden Green card.
The whole panel is attached to scored and folded Garden Green card. I stamped the floral image from the Garden Wishes stamp set onto Whisper White card using Memento Tuxedo Black ink. I coloured the image using Garden Green, Daffodil Delight and Early Espresso Watercolour Pencils. When I finished colouring, I used the Blender Pen to even out my colouring. The stamped panel is attached to Garden Green card and then the card front using dimensionals.
To decorate the inside of the card, I stamped another image from the Garden Wishes stamp set onto the lower left hand corner of Whisper White card using Memento Tuxedo Black ink. I coloured the image using the Garden Green and Daffodil Delight Watercolour Pencils. I used the Blender Pen to even out the colour before attaching the panel to the inside of the card.

For the second card, I attached two strips of the Dandy Garden 6″ x 6″ Designer Series Paper to the left hand side of Whisper White card. The whole panel is attached to scored and folded Mossy Meadow card. I stamped the floral image from the Garden Wishes stamp set onto Whisper White card using Memento Tuxedo Black ink. The image is coloured using Crushed Curry, Old Olive and Early Espresso Watercolour Pencils and the Blender Pen. The panel is attached to Mossy Meadow card and then the card front. To decorate the inside of the card, I stamped the single floral image using Memento Tuxedo Black ink and coloured it using the Watercolour Pencils and a Blender Pen.
I love how pretty these cards are, don’t you.
Bye for now,
Kris
Product Used:


A Christmas Memory
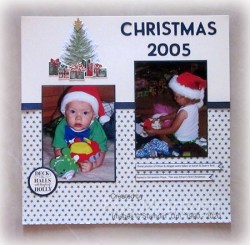
I was going through my box of photos and came across these photos of Ethan and Abigail on the occasion of Ethan’s first Christmas. I combined product from a lot of places to create this page and I love the end result. I attached a piece of Christmas Gleaming Specialty Designer Series Paper across the bottom of a Very Vanilla 12″ x 12″ page and wrapped the top of the Designer Series Paper with a length of Denim 3/8″ Ribbon. I attached the photos to Night of Navy card and attached them to the page. The title was cut from Night of Navy card using the Playful Alphabet Dies. I just love these dies! They are the perfect size for Memory Keeping and perfect for use on your cards. I especially love the fact that there are multiples of some letters and numbers too. Just perfect!
I attached a Christmas Tree die cut from the Tag Buffet Project Kit to the left hand side of the page. I stamped the present image from the Most Wonderful Year stamp set onto Very Vanilla card using Real Red and Shaded Spruce. I stamped the bow image from the same stamp set onto the presents using the same colours – just swapping them over. The presents are cut out using the Most Wonderful Time Dies. The die cuts out the presents all at the same time but gives three individual presents. This stamp set and co-ordinating dies are from the Most Wonderful Time Product Medley which carried over from last year. I cut a star from Gold Foil using the Most Wonderful Time Dies and attached it to the top of the tree. The journaling was printed onto Very Vanilla card, cut into strips with a “V” in one end and attached to Night of Navy card which I trimmed to match the “V”. I stamped the greeting from the Christmas Gleaming stamp set onto Very Vanilla card using Night of Navy ink. I punched out the greeting using the 1-1/2″ Circle Punch and attached it to a scalloped circle cut using the Layering Circle Dies. This page brings back so many memories.
Bye for now,
Kris
Product Used:
Some of these products may have already sold out.


From a Tutorial
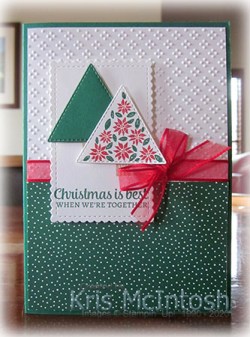
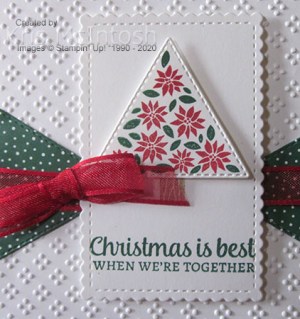
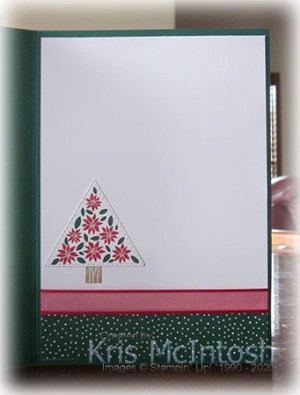
It’s Christmas morning and very quiet here in my house. I want to wish all of you a very Merry Christmas and a happy, healthy (COVID Free) New Year. I didn’t put my tree up this year because all my little helpers were away, so I thought I would share some cards with you today. I am a follower of Lyn Dunn, an American Stampin’ Up! Demonstrator. I receive her newsletter and one of them had a link to a tutorial for three cards. Unfortunately I lost the last page (third card) of instructions so I created two cards using her tutorial and added one of my own, inspired by her designs. For the first card, I embossed Whisper White card using one of the Wrapped in Texture Embossing folders and attached a piece of Shaded Spruce Classic Christmas 6″ x 6″ Designer Series Paper across the bottom of the card.
I wrapped the top of the Designer Series Paper with a length of Real Red 3/8″ Sheer Ribbon and attached the panel to scored and folded Shaded Spruce card. I stamped the greeting from The Tree Angle stamp set onto Whisper White card using Shaded Spruce ink and cut it out using the Stitched So Sweetly Dies. I stamped the floral image from The Tree Angle stamp set onto Whisper White card using Real Red ink.
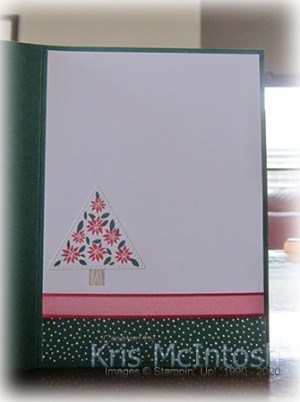
I stamped the leaf image around the flowers using Shaded Spruce ink. I cut out the image using one of the Stitched Triangle Dies. I also cut Shaded Spruce card using the same die. I attached the trees together and placed them over the stamped Stitched So Sweetly die so that I could get an idea of where to stamp the tree trunk images using Crumb Cake ink. The trees are attached to the stamped Stitched So Sweetly Die using dimensionals. I attached the whole panel to the card front also using dimensionals. I tied a bow in a length of Real Red 3/8″ Sheer Ribbon and attached it to the card front using a Glue Dot. To decorate the inside of the card, I attached a piece of the same Classic Christmas 6″ x 6″ Designer Series Paper across the bottom of Whisper White card. I wrapped the top with a length of the Real Red 3/8″ Sheer Ribbon before the panel is attached to the inside of the card.

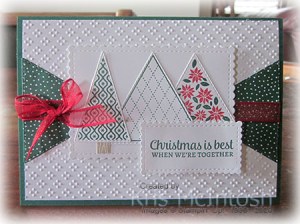
I stamped the tree trunk just above the ribbon using Crumb Cake ink. I stamped the flower and leaf image from The Tree Angle stamp set onto Whisper White card using Real Red and Shaded Spruce ink. The image is attached flat to the card over the top of the tree trunk image. For the second card, I embossed Whisper White card using the same folder from the Wrapped in Texture Embossing Folders. I cut Shaded Spruce patterned paper from the Classic Christmas 6″ x 6″ Designer Series Paper twice using the same Stitched Triangle Die that cuts out the floral tree.
The triangles are attached to each side of the embossed card and wrapped with the Real Red 3/8″ Sheer Ribbon. The whole panel is attached to scored and folded Shaded Spruce card. I stamped the greeting from The Tree Angle stamp set onto Whisper White card using Shaded Spruce ink. The image is cut out using one of the Stitched So Sweetly Dies.
I stamped the tree trunk onto the die cut before attaching it to the card front using dimensionals. I stamped the floral and leaf images again and cut it out using the Stitched Triangle Die. The tree is attached to the card front using dimensionals. I tied a bow in a length of the Real Red 3/8″ Sheer Ribbon and attached it to the card front using a dimensional. To decorate the inside of the card, I attached a piece of the same Classic Christmas 6″ x 6″ Designer Series Paper across the bottom of Whisper White card. I wrapped the top of the paper using the Real Red 3/8″ Sheer Ribbon before attaching the panel to the inside of the card. I stamped the tree trunk image from The Tree Angle stamp set above the ribbon. I stamped the floral and leaf images from The Tree Angle stamp set onto Whisper White card and cut out the tree using the co-ordinating Stitched Triangle Die and attached it to the top of the tree trunk.
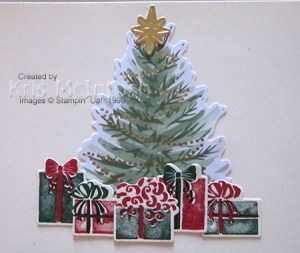
For the last card, I embossed Whisper White card using the same folder from the Wrapped in Texture Embossing Folders. I cut the Classic Christmas 6″ x 6″ Designer Series Paper using a larger triangle from the Stitched Triangle Dies and attached them to the sides of the embossed card. I wrapped the panel using the Real Red 3/8″ Sheer Ribbon before attaching the panel to scored and folded Spruce card.

I stamped the floral tree using Real Red and Shaded Spruce ink onto scrap Whisper White card. I also stamped two other images from The Tree Angle stamp set onto scrap Whisper White card using Shaded Spruce ink. I cut out all of the images using the co-ordinating Stitched Triangle Die. I stamped the tree trunk onto scrap Whisper White card using Crumb Cake ink and cut it out. I attached the tree trunk to the back of the tall slender tree. I cut Whisper White card using the Stitched So Sweetly Dies and attached all of the tree images to the die.
The panel is attached to the card front using dimensionals. I stamped the greeting from The Tree Angle stamp set onto Whisper White card using Shaded Spruce ink and cut it out using a smaller die from the Stitched So Sweetly Dies. The greeting is attached to the card front using dimensionals. To decorate the inside of the card, I attached a piece of the Classic Christmas 6″ x 6″ Designer Series Paper across the bottom ofWhisper White card. I wrapped the top of the paper using the Real Red 3/8″ Sheer Ribbon. I stamped the floral tree image onto scrap paper using Real Red and Shaded Spruce ink and cut it out using the co-ordinating Stitched Triangle Die. I stamped the tree trunk onto scrap Whisper White card using Crumb Cake ink and cut it out. I attached the tree trunk to the back of the tree before attaching the tree to the inside of the card, over the Designer Series Paper.
I am so happy with these cards. So thank you to Lyn for the tutorial and inspiration.
Bye for now,
Kris
Product Used:
Unfortunately some of the products I have used may already be sold out.


More Casing

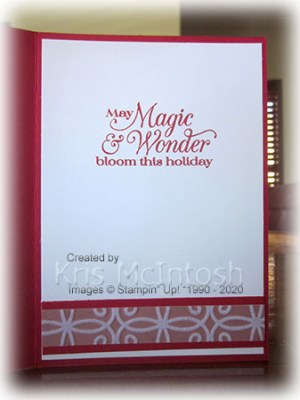
I shared some cards recently with you that I found on the Demonstrator only Facebook Page and today’s cards are inspired by two more cards from that same page. The original card for this first one was shared by Manda Moore. I attached a piece of the Plush Poinsettia Specialty Paper to Real Red card. I stamped the greeting from the Poinsettia Petals stamp set onto Whisper White card using Real Red ink and attached the Designer Series Paper panel above the greeting. I cut two leaves from Old Olive card using the small petal die and the insert to create the embossed look from the Poinsettia Dies.

I cut Whisper White card using the holly die from the same dies and Shaded Spruce card using the largest die from the Forever Flourishing Dies. I stamped the three sets of petals for the poinsettia flower onto Real Red card using Real Red ink and cut them out using the co-ordinating Poinsettia Die.

I attached the leaves flat onto the card front. I added some Real Red 3/8″ Sheer Ribbon and then attached the flower using dimensionals. Lastly I added one of the Beaded Pearls to the centre of the flower. To decorate the inside of the card, I stamped the greeting from the Poinsettia Petals stamp set onto Whisper White card using Real Red ink. I attached a piece of the Plush Poinsettia Specialty Designer Series Paper to Real Red card before attaching it to the bottom of the stamped Whisper White card.

The second card was inspired by one from Jen Ward. I cut a piece of Real Red card using the dotted edge die from the Curvy Dies. I also cut the a piece of the Plush Poinsettia Specialty Designer Series Paper using the same die.

I stamped the greeting from the Poinsettia Petals stamp set onto the lower right hand corner of Whisper White card using Real Red ink. I attached the Real Red panel and then the Plush Poinsettia Specialty Designer Series Paper panel to the stamped Whisper White card. The whole panel is attached to scored and folded Real Red card.

I cut Old Olive card twice using the small leaf die and the insert to create the embossed look. I cut Whisper White card using the holly die from the Poinsettia Dies and Shaded Spruce card using the largest die from the Forever Flourishing Dies. The leaves are attached flat to the card front before attaching a length of Real Red 3/8″ Sheer Ribbon.

I attached the flower over the top using dimensionals and added a Beaded Pearl to the centre. To decorate the inside of the card I attached a piece of Real Red and Plush Poinsettia Specialty Designer Series Paper to the bottom of Whisper White card. I stamped the greeting from the Poinsettia Petals stamp set onto the panel using Real Red ink. After creating these two cards, I was inspired to create one of my own! I cut Real Red card and also the Plush Poinsettia Specialty Designer Series Paper using the dotted edge Poinsettia Die.
I layered the panels onto Whisper White card and added a greeting to the lower right hand corner from the Itty Bitty Christmas stamp set using Real Red ink. I cut and stamped all of the same die pieces as the two previous cards. I attached the leaves flat onto the card front, added the Real Red 3/8″ Sheer Ribbon and then the flower using dimensionals. Lastly I added a Beaded Pearl to the centre of the flower. To decorate the inside of the card, I stamped the greeting from the Poinsettia Petals stamp set using Real Red ink. I attached a narrow strip of Plush Poinsettia Specialty Designer Series Paper to Real Red card and then the bottom of the stamped Whisper White panel.

I love these cards, so thank you to Manda Moore and Jen Ward for the inspiration.
Bye for now,
Kris
Product Used:
Unfortunately some of the product used on these cards has already sold out.


REAL RED A4 CARDSTOCK
$15.25Add All to Cart

Classic Christmas Take 3

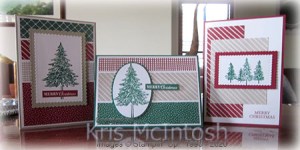
This is the third card I created using Dawn Griffin’s Sketch Gallery for inspiration. This time I cut the Cherry Cobbler paper from the Classic Christmas 6″ x 6″ Designer Series Paper 5cm x 12.8cm. I cut the Sahara Sand paper from the same designer Series Paper at 7.5cm x 9cm. The pieces are attached to Whisper White. I stamped “Merry Christmas” from the Curvy Christmas stamp set onto the lower right hand corner using Cherry Cobbler ink before attaching the whole panel to scored and folded Cherry Cobbler card.
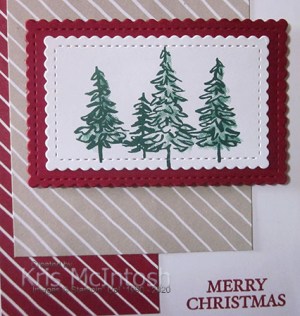
I stamped the line of tree image from the In The Pines stamp set onto Whisper White card using Shaded Spruce ink. I added the fill image using the same ink which I stamped onto scrap paper first.
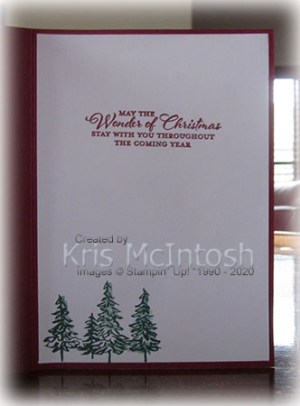
I cut out the image using one of the Stitched So Sweetly Dies and attached it to Cherry Cobbler card cut using the same Dies. The whole panel is attached to the card front using dimensionals. To decorate the inside of the card, I stamped the greeting from the Wishes and Wonder stamp set onto Whisper White card using Cherry Cobbler ink. I stamped the line of tree image from the In The Pines stamp set onto the lower left hand corner using Shaded Spruce ink and added the fill image using the same ink which I stamped onto scrap paper first. Don’t forget to check out the stamp sets that I have used on these cards. Most of them are retiring and some of them are discounted during the Mega Sale. So visit my store and check out the Giant Year-End Closeout.
Just so you can compare, here are all three cards that I created using Dawn Griffin’s Sketch Gallery and the Classic Christmas 6″ x 6″ Designer Series Paper.
I just love them. I know that I will be using Dawn’s Sketch Gallery many times for inspiration.
Bye for now,
Kris
Product Used:


Classic Christmas Take 2

So here is the second card I created using Dawn Griffin’s sketch gallery for inspiration. This card also uses some of the Classic Christmas 6″ x 6″ Designer Series paper. For this sketch, I cut one piece of Designer Series Paper 13.8cm x 2cm, one piece 13.8cm x 4cm and the last piece is 13.8cm x 3cm. The Designer Series Paper pieces are all attached to Whisper White card and then scored and folded Shaded Spruce card. I stamped the large single tree image from the In The Pines stamp set onto Whisper White card using Shaded Spruce ink.
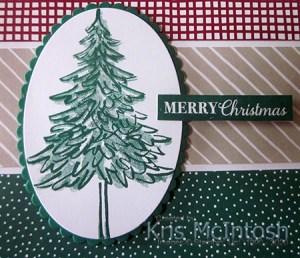
I stamped the fill image using Shaded Spruce ink which I had stamped onto scrap paper first. The tree is cut out using the Layering Ovals Dies. I cut Shaded Spruce card using one of the scalloped ovals from the same Dies and attached the image panel. The whole piece is attached to the card front using dimensionals. I stamped “Merry Christmas” from the Christmas Gleaming stamp set onto Whisper White card using Shaded Spruce ink and cut it out. I attached the greeting using dimensionals where necessary so that it sits partially onto the image panel.

To decorate the inside of the card, I stamped the greeting from the Wishes & Wonder stamp set onto Whisper White card using Cherry Cobbler ink. I also stamped the row of trees from the In The Pines stamp set onto the lower left hand corner using Shaded Spruce ink. The fill image is also Shaded Spruce ink which has been stamped onto scrap paper first.
Another card I am truly happy with. I love how the colours in the Designer Series Paper all blend together to look Christmassy but smart at the same time, don’t you?
Bye for now,
Kris
Product Used:
‘Tis The Season

This year Christmas will be a little different with both my girls heading away with their families to celebrate. So we decided to get together and have lunch last weekend. Unfortunately Abi couldn’t be there because she had to work!
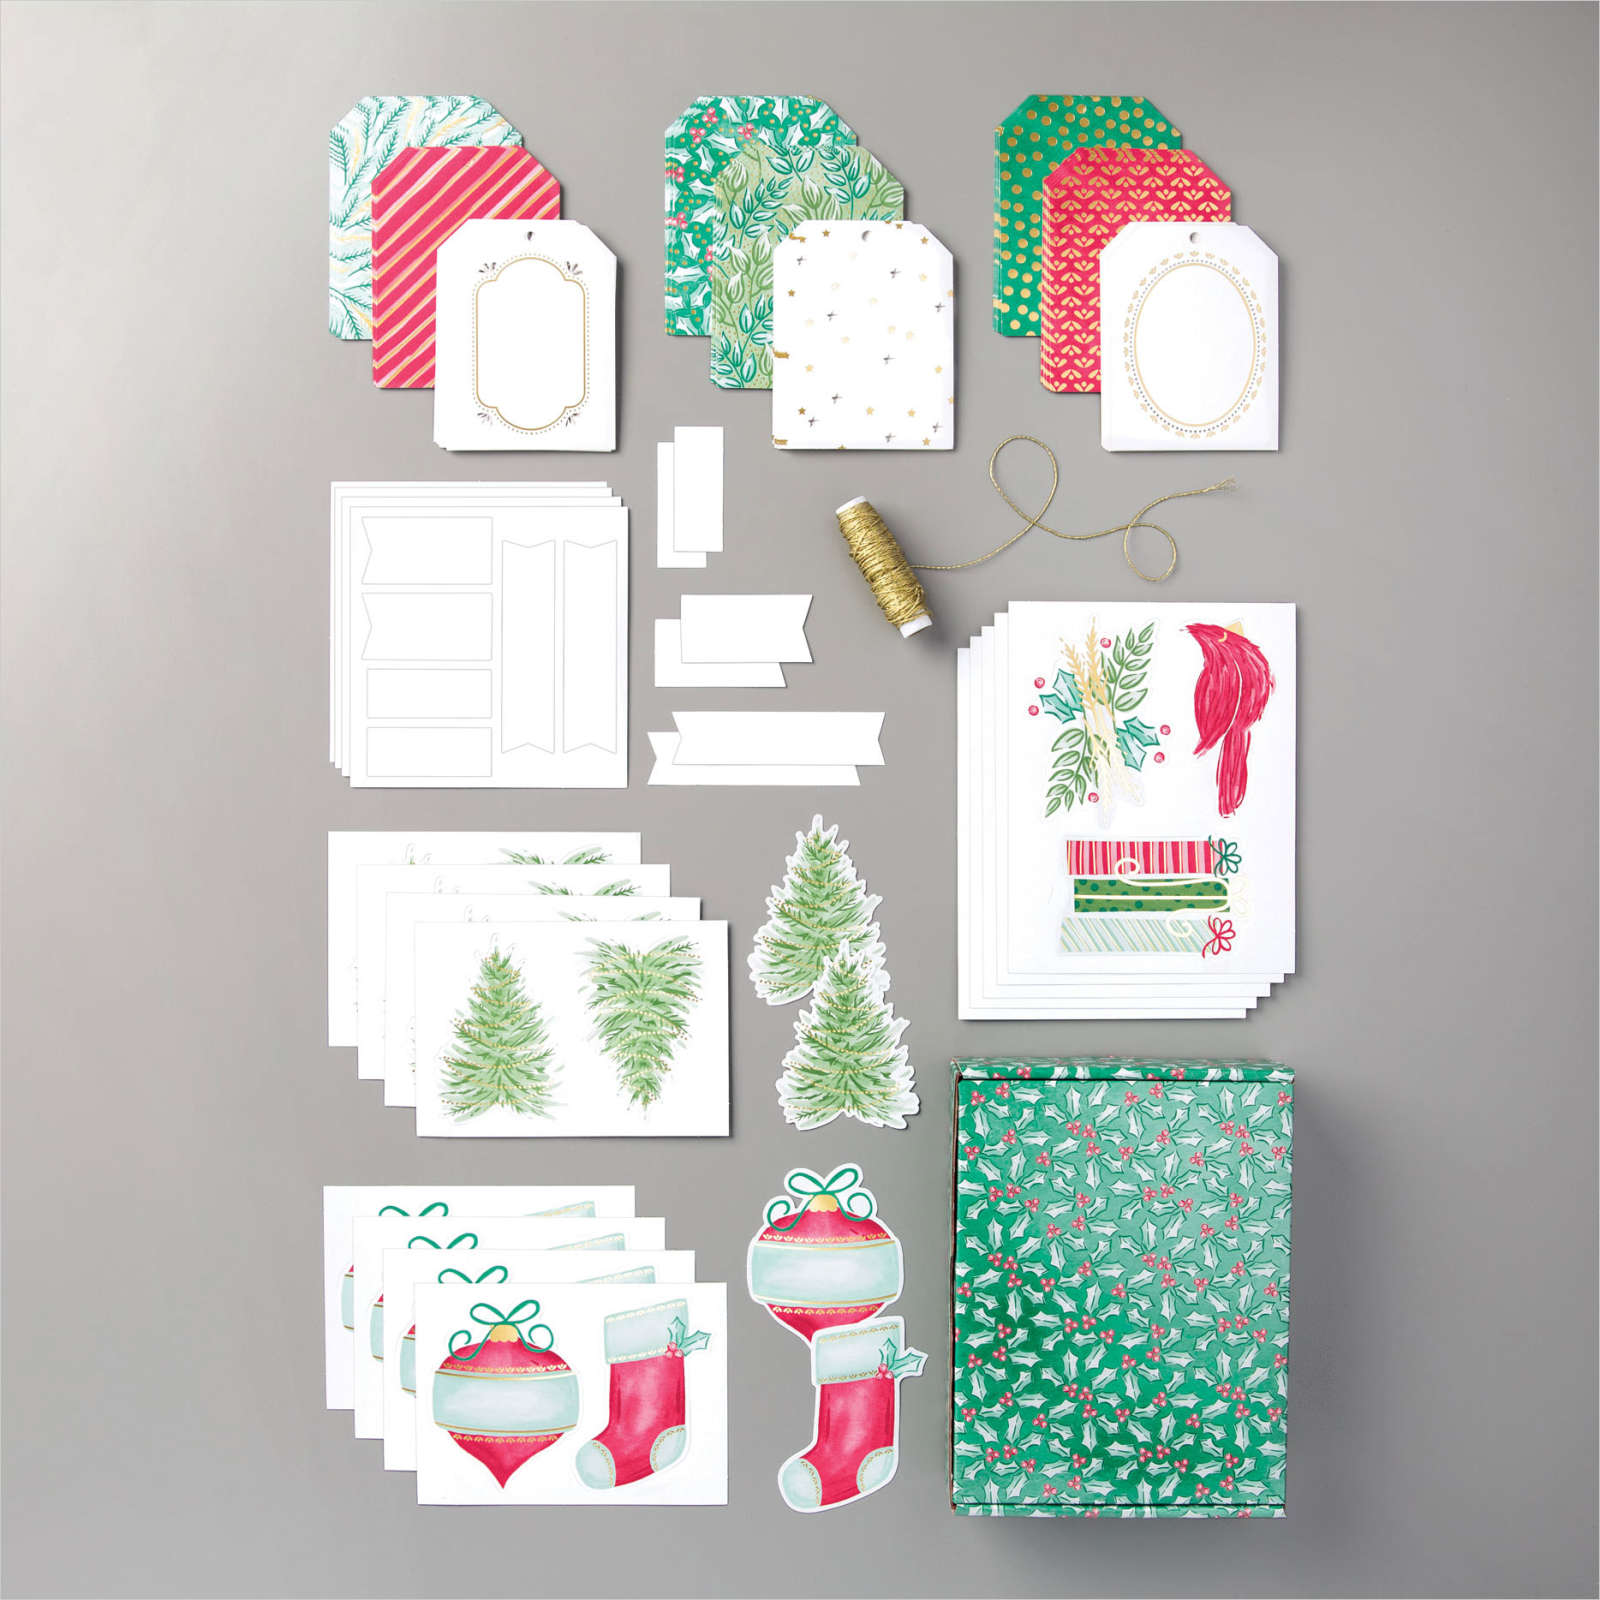
To create my page, I cut 8 of the background tags from the Tag Buffet Project Kit into 3-1/4″ squares and attached them to a 12″ x 12″ Whisper White page. I attached my photos to Early Espresso card and then the left hand side of the page. I created my jounaling on the computer and attached it to the photo mat. I stamped “‘Tis the Season” from the Tag Buffet stamp set onto one of the tags from the Project Kit using Real Red ink. I attached the tag to the bottom of the journaling. I cut down one of the gold framed tags from the Project Kit and stamped part of the greeting from the Tag Buffet stamp set using Real Red ink. This panel is attached to the top right hand corner of the background tag.

I attached the die cut tree from the Tag Buffet Project Kit into the space on the right hand side of the page. I cut down one of the “starry” tags from the Project Kit to 3″ x 3″ and attached it to the lower right hand background tag before attaching the Christmas stocking die cut from the Project Kit on top. Lastly I added the large die cut bauble from the Project Kit to the lower left hand corner of the photo panel. The photos we took on the day weren’t that great but good enough for me to remember the fun we had.
Bye for now,
Kris
Product Used:
Looks like the Tag Buffet stamp set has already sold out!
The Whisper White 12″ x 12″ card is also in transition to Basic White and is currently unavailable.

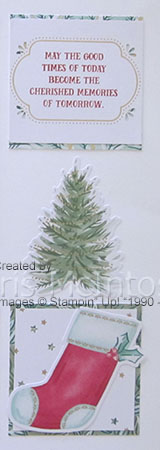
Happy 16th Birthday

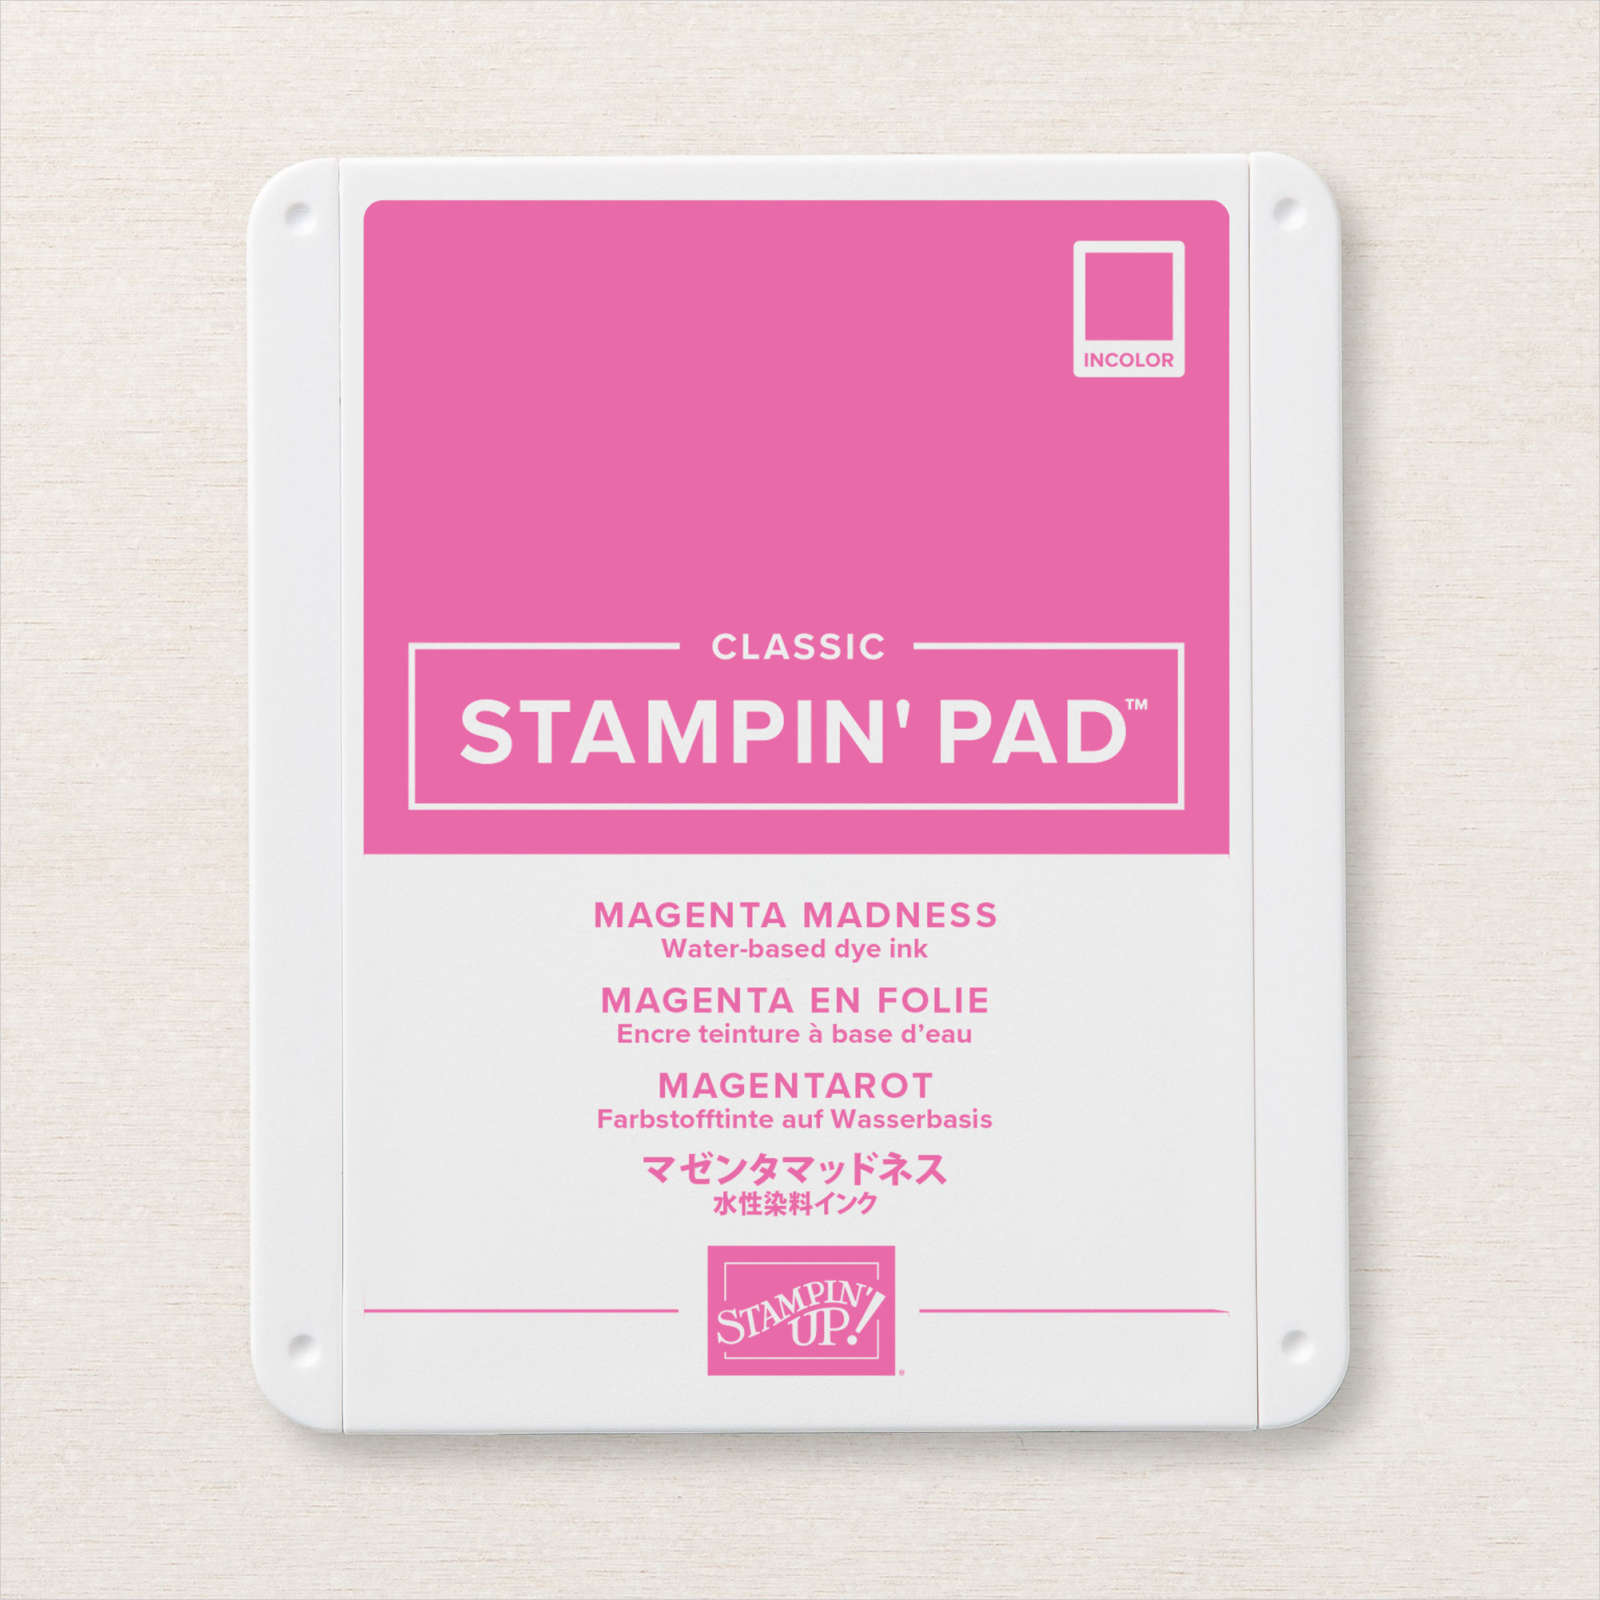
My eldest granddaughter celebrated her 16th birthday last Wednesday. She was very excited to get her learner driver licence (not so sure about her Mum). Anyway she is a gorgeous girl and I wanted to share the card I made for her. I cut the large die from the Garage Gears Dies and attached it to the top left hand corner of Whisper White card. I stamped the “smoke” image from the Geared Up Garage stamp set onto the lower right hand corner using Smoky Slate ink and the greeting from the same stamp set across the centre of the bottom edge using Magenta Madness ink. I embossed the whole Whisper White panel using the Subtle 3D Embossing Folder. The embossed panel is attached to scored and folded Magenta Madness card. I stamped the car from the Geared Up Garage stamp set onto Whisper White card using Soft Suede ink.

I coloured the card using the light Soft Suede and Light Smoky Slate Stampin’ Blends. I cut out the car using the co-ordinating Garage Gears Die. I stamped the two balloons and the star from the So Much Happy stamp set onto Whisper White card using Magenta Madness ink. I cut out the balloons and the star using the co-ordinating Happy Die. I also cut Whisper White card three times using the balloon string die from the Happy Dies.

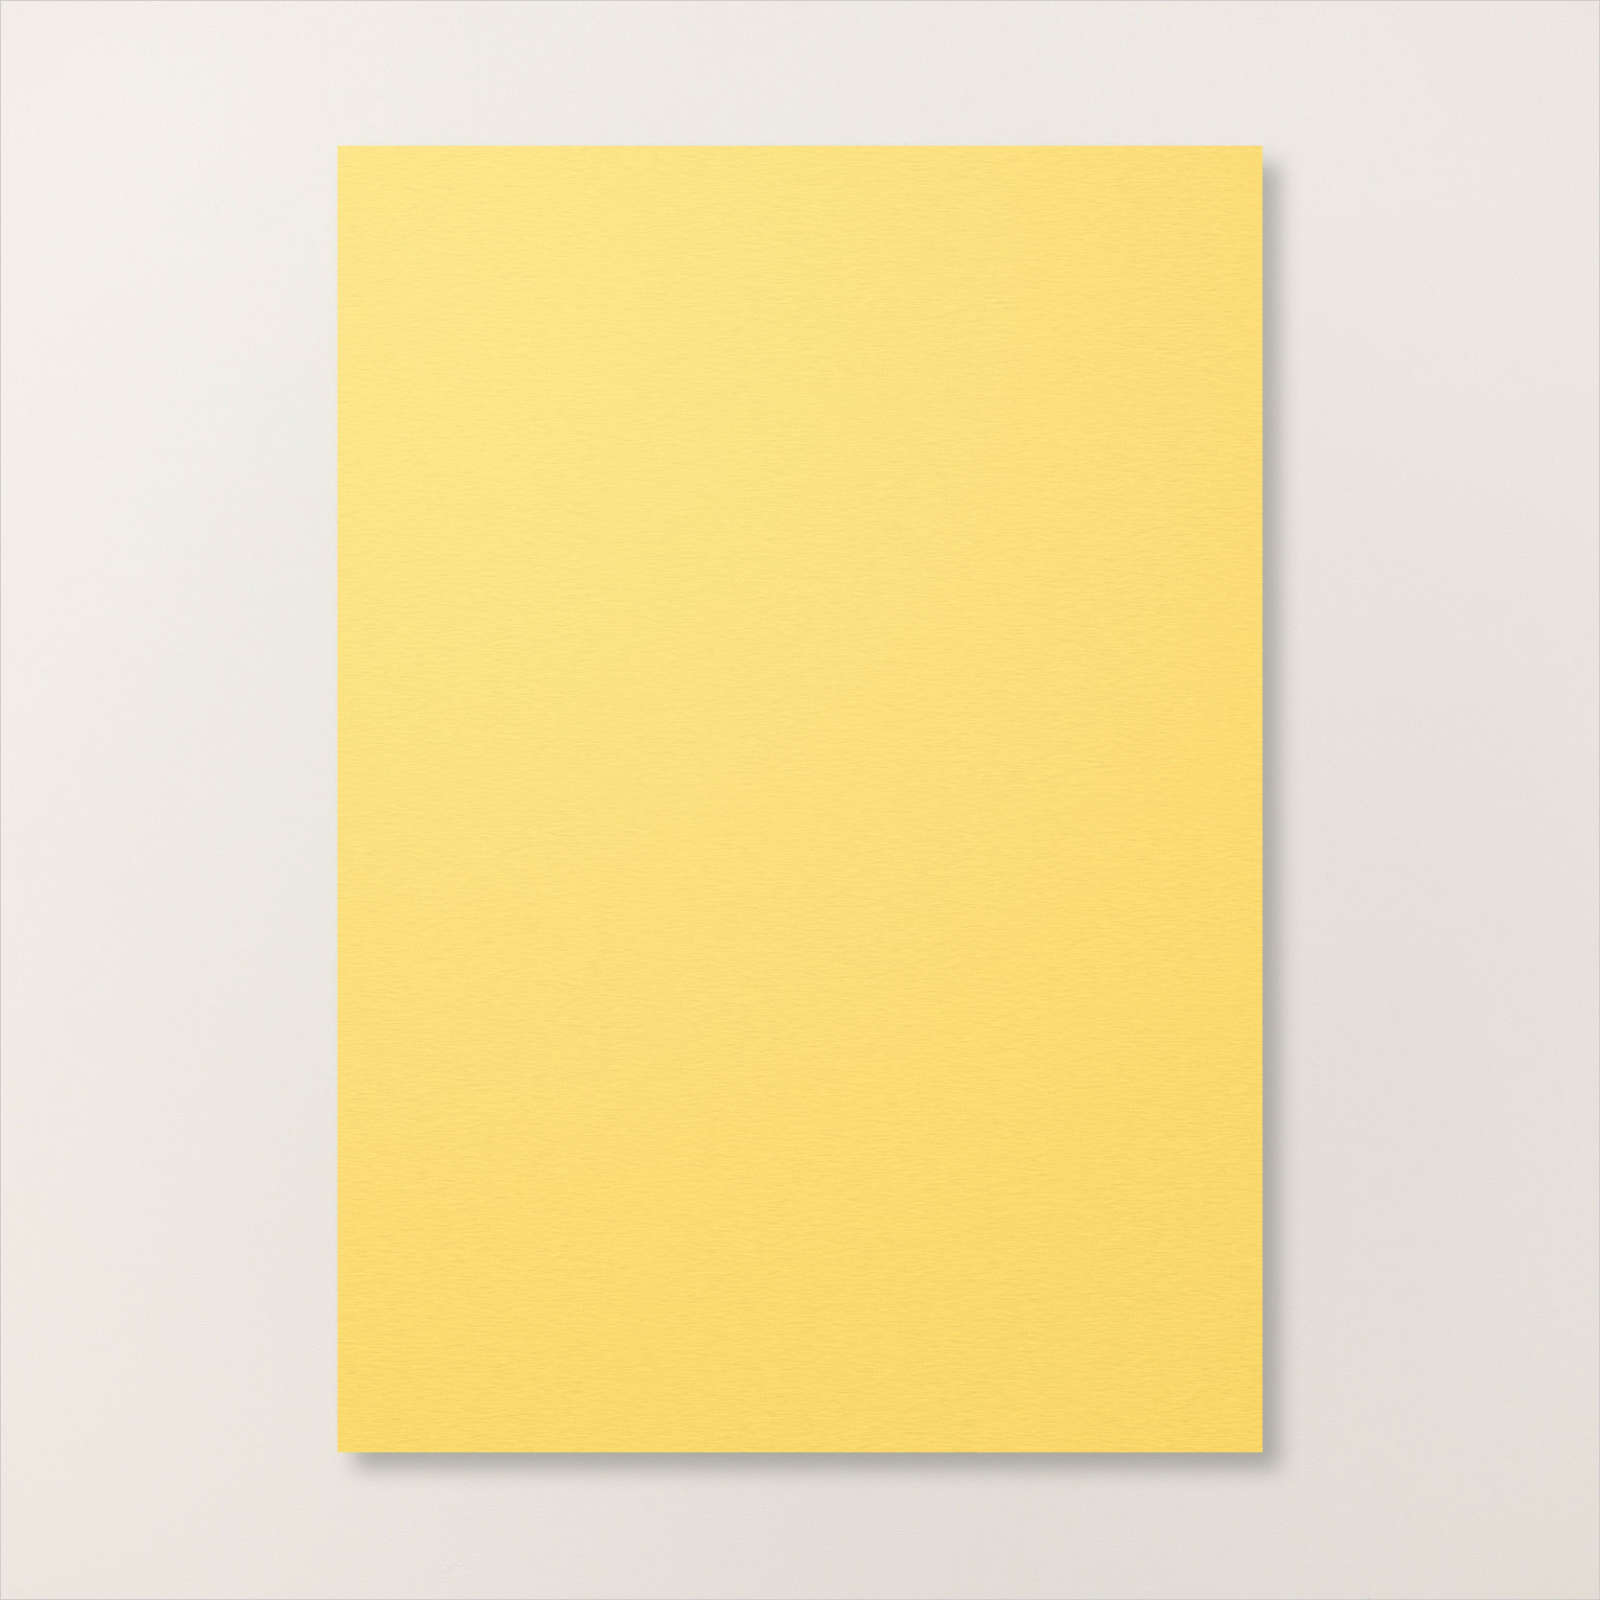
I attached the bottom of the balloon strings to the card front where the back of the card would sit and attached the balloons and the star to the top of the strings using dimensionals. The car is attached over the top of the end of the balloon strings using dimensionals. Lastly I used the retired Labeller Alphabet to stamp the “L” onto Daffodil Delight card using Memento Tuxedo Black ink. I cut out the “L” and attached it to the front of the card. For the inside of the card, I created a slightly smaller folded card from Whisper White card. I stamped the greetings from the A Grand Kid stamp set onto the front of the card (the fold needs to be on the right hand side) using Magenta Madness ink. I stamped the “happy” and “birthday” from the same stamp set below the first greeting using Magenta Madness ink.

I inked each of the words separately so that I could add “16th” using the Make a Difference stamp set. Rhe last greeting also comes from the A Grand Kid stamp set. I sponged around the edges of the panel using Magenta Madness ink. I stamped “You are So Loved” from the same stamp set onto the inside of the card before attaching it inside the Magenta Madness card base.
This is such a fun fold and I love all the greetings and balloons and of course the car. It’s a bit over the top but this is an over the top birthday!
Bye for now,
Kris
Product Used:


Dragonfly Garden

As a demonstrator I was able to attend our Onstage Online Convention earlier in November. One of the presentations was a kind of stamp along and to join in you could purchase the Dragonfly Garden stamp set and the co-ordinating Dragonflies Punch before the event. I was able to watch this event and join in on the day even though I was not at home. How good is that! Anyway, I loved the stamp set and haven’t had a chance to play till now. I attached a piece of the Dragonfly 6″ x 6″ Designer Series Paper across the middle of Whisper White card. The whole panel is attached to scored and folded Blackberry Bliss card.

I stamped the floral image from the Dragonfly Garden stamp set onto Whisper White card using Mossy Meadow ink. I used Dark Daffodil delight and Light Soft Suede Stampin’ Blends to add some colour to the “daisy” images before attaching the panel to Blackberry Bliss card. The image panel is attached to the card front using dimensionals.

I stamped the dragonfly image from the Dragonfly Garden stamp set onto scrap Whisper White card three times using Soft Suede ink. I used the wing fill image (you only get one image and it is not meant to be a perfect fit) to add Blackberry Bliss to the wings. I did stamp the image onto scrap paper first. I punched each of the dragonfly images out using the Dragonfly Punch. I used my bone folder to slightly curl the wings to give some dimension. I attached two of the dragonflies to the card front using mini dimensionals underneath the wings and glue dots in the centre of the bodies. To decorate the inside of the card, I stamped the greeting from the Dragonfly Garden stamp set using Mossy Meadow ink. I attached the last dragonfly beside the stamped image once more using mini dimensionals and glue dots.
I love this card! This is such a lovely stamp set and I know that you are going to love it too.
Bye for now,
Kris
Product Used:
The product used from the soon to be released January – June Mini Catalogue are currently not available for me to link to.