Just Thinking of You
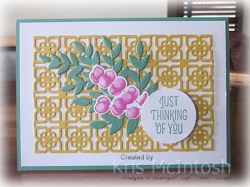
I have a friend who is going through a difficult time at the moment and I wanted to let her know that I am thinking of her. I thought I would share it with you. This is actually the first card I made using the Many Mates Bundle. I cut the large die from the Many Medallions Dies from Bumblebee card and trimmed it down so that instead of five by six squares it it four by six squares. This piece is attached to Whisper White card and then Just Jade card.  I cut Just Jade card using one of the Forever Flourishing Dies and attached it across the Bumblebee die. I stamped the image from the Forever Fern stamp set onto scrap Whisper White card using Magenta Madness ink. I cut out the image using the co-ordinating Forever Flourishing Die and attached it over the die cut leaf.
  I stamped the greeting from the Many Mates stamp set onto Whisper White card using Just Jade ink and punched it out using the 1-1/2″ Circle Punch. I attached the greeting to the card front using dimensionals.
To decorate the inside of the card, I stamped another of the greetings from the Many Mates stamp set onto Whisper White card using Just Jade ink. I also stamped the floral image from the Forever Fern stamp set beside the greeting using Magenta Madness ink.
I hope that my friend enjoys her card as much as I enjoyed making it.
Bye for now,
Kris
Product Used:


Set of Three
Yesterday on my Facebook Live I shared some tips for creating using the Many Mates Bundle. Today I am sharing a set of three cards I made using the same die cut. I love the large die cut from the Many Medallions Dies but wanted to use it in smaller pieces. So I cut Whisper White card using the die and then cut it off a section containing five squares x two squares across the width of the die cut. I cut off a two squares x four squares from the remaining piece. I then trimmed the remaining piece down to three squares x three squares and I still have a three square x 1 square piece left. For each of these cards, I attached the Whisper White die cut to Basic Black card.
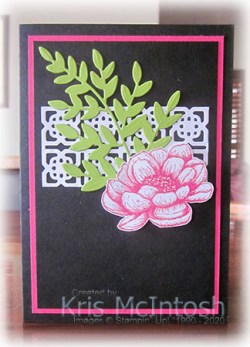
For the four squares by two squares card front, I cut Granny Apple Green card using the Forever Flourishing Dies and attached it over the Whisper White die cut. I stamped the flower from the Tasteful Touches stamp set onto scrap Whisper White card using Melon Mambo ink and cut it out.  I attached the flower to the card front using dimensionals. The whole panel is attached to Melon Mambo card and then scored and folded Basic Black card.
To decorate the inside of the card, I stamped the greeting from the Many Mates stamp set onto Whisper White card using Memento Tuxedo Black ink. I also stamped the flower from the Tasteful Touches stamp set onto the lower left hand corner using Melon Mambo ink.
For the five squares x 2 squares card front, I cut Granny Apple Green card using one of the Forever Flourishing Dies and attached it across the die cut. I stamped the flower from the Tasteful Touches stamp set onto scrap Whisper White card using Melon Mambo ink and cut it out.  I also stamped a greeting from the Many Mates stamp set onto Whisper White card using Melon Mambo ink. I cut the greeting out using one of the Layering Circle Dies and attached it to a scalloped circle cut from Granny Apple Green card using the same dies. I attached the greeting to the card front and then the flower using dimensionals. The whole panel is attached to Granny Apple Green card and then scored and folded Basic Black card.
 To decorate the inside of this card, I simply stamped the flower from the Tasteful Touches stamp set onto the lower left hand corner of Whisper White card using Melon Mambo ink.
For the three squares x three squares card front, I stamped the greeting from the Tasteful Touches stamp set across the bottom of the Basic Black card using Versamark ink. I sprinkled the stamped greeting with Gold Embossing Powder and heat set it.  I cut Gold Foil card using a die from the Forever Flourishing Dies and attached it across the Whisper White die cut. I stamped the flower from the Tasteful Touches stamp set onto Whisper White card using Melon Mambo ink and cut it out. I attached the flower to the card front using dimensionals. The whole panel is attached to Gold Foil card and then scored and folded Basic Black card.
This card is decorated in the same manner as the last card with the flower from the Tasteful Touches stamp set.
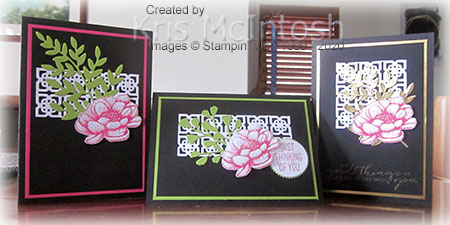
I think these cards look so pretty, don’t you? Although my gold embossed greeting is a little hard to see.
Bye for now,
Kris
Product Used:


Try Stampin’ on Tuesday Sketch Challenge 467
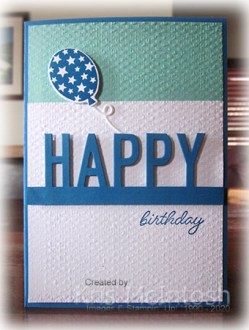
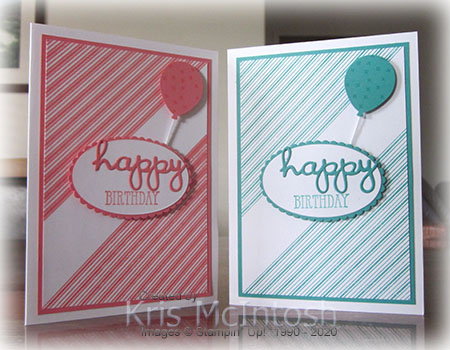
Today’s card was inspired by the sketch challenge at Try Stampin’ on Tuesday. I’m not sure that I have interpreted the sketch correctly but I am more than happy with the finishing result. I attached Whisper White card to the bottom of Coastal Cabana card and stamped “birthday” from the So Much Happy stamp set using Pacific Point ink. I embossed the panel using the Tasteful Textile 3D Embossing Folder and attached it to scored and folded Pacific Point card. I cut Pacific Point card using the Happy Dies and trimmed off the card at the top of the letters. I attached the “happy” to the card front using dimensionals.  I stamped the balloon image from the So Much Happy stamp set onto Whisper White card using Pacific Point ink and cut it out using the co-ordinating Happy Die. I also cut the balloon string from Whisper White card using the same dies.
  I attached the balloon string to the back of the balloon and attached the balloon to the card front using mini dimensionals. I trimmed the balloon string and tucked it behind the letter “p”.
To decorate the inside of the card I stamped the balloon and string from the So Much Happy stamp set onto Whisper White card using Pacific Point ink. I embossed a strip of Coastal Cabana card using the Tasteful Textile 3D Embossing Folder and attached it across the bottom of the stamped Whisper White card.
Thanks Try Stamping on Tuesday for the inspiration.
Bye for now,
Kris
Product Used:


Hand Stamped Sentiments Sketch Challenge #344
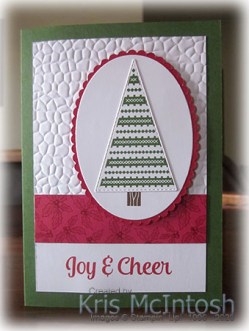
I was inspired by the sketch challenge at Hand Stamped Sentiments to create my card today using The Tree Angle stamp set from the soon to be released August to December Mini Catalogue. You can find this stamp set on page 22 of this Mini Catalogue. If you don’t have a demonstrator and would like a copy of this Mini Catalogue, contact me so that we can organise to get one to you. Another thing I love about this stamp set is that you can cut out most of the images using the Stitched Triangles Dies. I began by embossing the top two thirds of Whisper White card using the Hammered Metal 3D Embossing Folder.  I stamped the greeting from The Tree Angle stamp set onto the Whisper White card below the embossing using Real Red ink. I attached a piece of ‘Tis The Season 6″ x 6″ Designer Series Paper across the Whisper White card to cover the end of the embossing. The Whisper White panel is attached to scored and folded Garden Green card. I cut an oval from Whisper White card using the Layering Ovals Dies and stamped the tree trunk image from The Tree Angle stamp set onto the lower portion.
  I cut a scalloped oval from Real Red card using the Layering Ovals Dies and attached the stamped Whisper White oval. The panel is attached to the card front using dimensionals. I stamped the tree image from The Tree Angle stamp set onto Whisper White card using Garden Green ink. I cut out the tree using the co-ordinating Stitched Triangle Die. I attached the tree just above the stamped tree trunk.
To decorate the inside of the card I stamped a greeting from the Itty Bitty Christmas stamp set onto Whisper White card using Real Red ink. I also attached a piece of the same ‘Tis The Season Designer Series Paper across the bottom of the stamped panel.
I love the result, don’t you? Thank you so much Hand Stamped Sentiments for a great challenge (one I was finally able to complete on time!).
Bye for now,
Kris
Product Used:


Holidays

I was lucky enough to spend a few days away with my Mum and Dad recently. Ron and I took our van and Mum and Dad had a cabin. We had a great time and I am feeling very lucky that I still have them in my life. We had lovely sunny days and even did some fishing. So I thought I would create a couple of pages with photos from our trip. I used Whisper White 12″ x 12″ Card as the base of each page. I created my journaling blocks on the computer and printed them onto Whisper White card.  I attached the photos and journaling blocks to Night of Navy card before attaching them to the Whisper White page. The title is cut from Night of Navy card using the Playful Alphabet Dies. I love that we have a smaller alphabet in the Annual Catalogue, it’s the perfect size for Memory Keeping. I also stamped a greeting from the Well Said stamp set onto the bottom of the journaling block on the first page. I cut happy from Night of Navy card and day from Whisper White card using the Well Written Dies before attaching them to the journaling block of the second page. There is no die for day so it is cut from “birthday”.

I love these pages and will always treasure the memories.
Bye for now,
Kris
Product Used:


Another Triangle Birthday
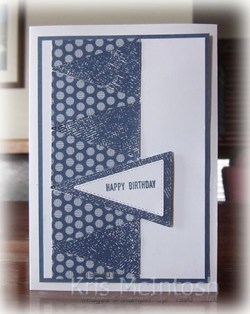
This is the second card I created for last week’s Facebook Live. I cut Misty Moonlight 6″ x 6″ In-Colour Designer Series Paper using one of the dies from the Stitched Triangle Dies to create five triangles from one side of the paper and three triangles from the reverse side of the Designer Series Paper. I also cut one triangle using a larger die from the Stitched Triangle Dies.  I attached the triangles to the left hand side of a piece of Whisper White card, attaching the larger triangle using dimensionals. I attached the Whisper White card to Misty Moonlight card and then scored and folded Thick Whisper White card.
  I stamped “happy birthday” from the Itty Bitty Greetings stamp set onto Whisper White card using Misty Moonlight ink and cut it out using a smaller die from the Stitched Triangle dies. I attached the greeting to the larger triangle.
To decorate the inside of the card, I stamped a greeting from the Peaceful Moments stamp set using Misty Moonlight ink.
I am really happy with the way this card turned out, what do you think?
Bye for now,
Kris
Product Used:


The Right Triangle

Yesterday I shared The Right Triangle bundle on my Facebook Live. For those of you who don’t visit my Facebook page today I am sharing one of the cards I showcased. I really love this bundle but apart from a couple of Memory Keeping pages, I was struggling with ways to use it for my cards, but finally created a couple that make me happy.
I used the largest triangle image from The Right Triangle stamp set, which I stamped using my Stamparatus onto the upper left and lower right hand corners of Whisper White card using Flirty Flamingo ink. I attached the stamped card to Flirty Flamingo card and then scored and folded Thick Whisper White card. I punched a balloon from Flirty Flamingo card using the Balloon Bouquet Punch. I stamped one of the small fill images from The Right Triangle stamp set all over the punched piece and attached a length of Whisper White Baker’s Twine to the back of the image. I attached the balloon to the card front using dimensionals and with one mini dimensional to hold the end of the twine in place. I cut an oval from Whisper White card and a scalloped oval from Flirty Flamingo card using the Layering Ovals Dies.
  I stamped “birthday” from the Well Said stamp set onto the Whisper White oval using Flirty Flamingo ink. I cut “happy” from Flirty Flamingo card using the Well Written Dies. I attached the “happy” to the Whisper White oval before attaching the whole piece to the Flirty Flamingo scalloped oval. The panel is attached to the card front using dimensionals, making sure to cover the end of the Whisper White Baker’s Twine.
To decorate the inside of the card, I stamped the same image from The Right Triangle stamp set onto Whisper White card using Flirty Flamingo ink. I used one of the Stitched Triangle Dies to cut three triangles from the striped image. I also cut four triangles from Whisper White card. I attached the triangles to a strip of Flirty Flamingo card, trimmed any excess and attached the panel across the bottom of Whisper White card.
I loved it so much, I created another one using Bermuda Bay ink and A4 card! I’d love to hear what you think.
Bye for now,
Kris
Product Used:


A Christmas Easel Card

I have been neglecting creating Fancy Fold cards of late and I mentioned an Easel Card in my Beachmere classes and everyone seemed keen to create one. So I thought I would start on my Christmas cards at the same time. I embossed Whisper White card using the Evergreen Forest 3D Embossing Folder from the new August-December 2020 Mini Catalogue. Such a pretty folder! I stamped the tree image from the Winter Woods stamp set onto Whisper White card using Old Olive ink.  I cut out the tree image using the Rectangle Stitched Dies. I also cut a rectangle from Old Olive card using the same dies. I layered the rectangles and then attached them to the embossed Whisper White card. The whole panel is attached to the Thick Whisper White card base. I stamped the greeting from the Itty Bitty Christmas stamp set onto Whisper White card using Old Olive ink. The greeting is cut out using one of the Rectangle Stitched Dies and attached to a rectangle cut from Old Olive card using the same dies. The greeting is attached to the inside of the card so that the easel panel will sit up. To finish off the tree I added some Red Rhinestones and a Star Designer Element to the tree.
Pretty simple but that embossing folder adds a whole lot of wow!
Bye for now,
Kris
Product Used:


Freshly Made Sketch #443
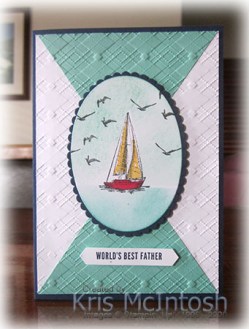
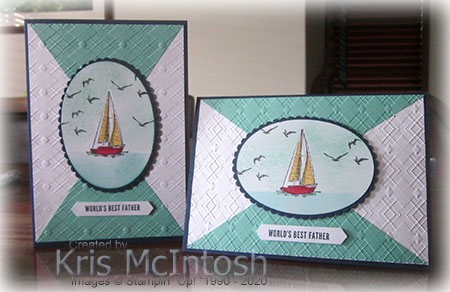
Here I am again with a card I made using the sketch challenge at Freshly Made which unfortunately I didn’t get made to meet the challenge deadline. In any case I love the sketch and I wanted to share my creation with you. I began by cutting a piece of Coastal Cabana card diagonally into four pieces. I attached two pieces to one piece of Whisper White card and embossed the panel using the Absolutely Argyle 3D Embossing Folder. The panel is attached to scored and folded Night of Navy card. I cut an oval from Whisper White card and stamped the boat image from the Sailing Home stamp set using Memento Tuxedo Black ink. I cut a mask for the boat from a post-it-note and covered the stamped image.  I also masked the whole panel in line with the top of the water on the boat image. I sponged the area below the boat using Bermuda Bay ink. I removed the post-it-note and replaced it so that it covered the sponged area. I sponged the rest of the oval lightly using Coastal Cabana ink. I removed all of the masks and stamped the bird image from the Sailing Home stamp set using Memento Tuxedo Black ink. I coloured the boat using the Dark Poppy Parade and Dark Daffodil Delight Stampin’ Blends.
  I attached the image panel to a scalloped oval cut from Night of Navy card and then the card front using dimensionals. I stamped the greeting from the Itty Bitty Greetings stamp set onto Whisper White card using Night of Navy ink and punched it out using the Classic Label Punch. The greeting is attached to the card front using dimensionals.
To decorate the inside of the card, I embossed a piece of Coastal Cabana card using the Absolutely Argyle 3D Embossing Folder and attached it to the bottom of Whisper White card. I stamped the boat image from the Sailing Home stamp set onto the left hand side of the Whisper White card just above the embossed panel. I coloured the boat image using the Dark Poppy Parade and Dark Daffodil Delight Stampin’ Blends.
When I cut the initial piece of Coastal Cabana card I was left with two more pieces which I used to create another similar card. I love them both together don’t you? So although I didn’t make the challenge thanks Freshly Made for the inspiration.
Bye for now,
Kris
Product Used:


Wonderful Christmas

Today’s page shows off a couple of photos from my Abigails first Christmas – I think she was just over one week old, so I am pretty sure she has no recollection of this one! The photos show Sarah holding Abigail, with her Dad and his mother in the top photo and my Mum and Dad with Abigail in the bottom photo. I am excited to reveal that the Most Wonderful Time Product Medley has carried over to the August to December 2020 Mini Catalogue. These photos gave me the perfect opportunity to use this beautiful Product Medley. I attached two pieces of the Most Wonderful Time 6″ x 6″ Designer Series Paper across the centre of a 12″ x 12″ Whisper White page. I cut another piece of the Designer Series Paper in half and attached the pieces across the bottom of the page. I attached the photos to Basic Black card and attached them to the right hand side of the page. I created the journaling on the computer and printed it onto Whisper White card. I stamped the greeting from the Most Wonderful Time stamp set onto the bottom of the card using Real Red ink. I stamped the large tree from the Most Wonderful Time stamp set onto Whisper White card using Old Olive ink. I also stamped the present image twice onto Whisper White card using Real Red ink. I stamped the ribbon image onto the parcels using Memento Tuxedo Black ink. I cut the tree and the present images using the co-ordinating Most Wonderful Time Dies. I attached the tree and the present images to the journaling block and added a Gold Faceted Star (also part of the medley) to the top of the tree. I attached the journaling to Basic Black card and then the left hand side of the page. I cut the “Merry” and “Christmas” from Basic Black card using the retired Merry Christmas Dies.
What fun it was to make this page using The Most Wonderful Time Product Medley. Did you know that once you have used all the paper and embellishments you can purchase a refill kit so you can continue creating with your stamp set and dies!
Bye for now,
Kris
Product Used:


