You’re Amazing
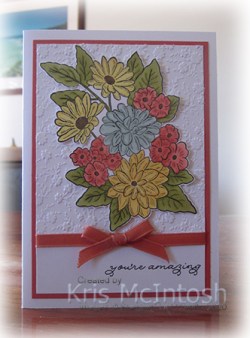
Today’s card once more uses the Ornate Garden Product Suite. Don’t forget this Product Suite will only be available to purchase during the month of April and will not return until the realease of the next Annual Catalogue in June. So, if you want to get an early start with these gorgeous products, don’t delay in placing your order. This time, I stamped the greeting from the Ornate Thanks stamp set onto the bottom of Whisper White card using Memento Tuxedo Black ink. I embossed the stamped card above the greeting using the Ornate Floral 3D Embossing Folder.  I wrapped the bottom of the embossing using the Terracotta Tile Ribbon from the Ornate Garden Ribbon Combo Pack. The embossed panel is attached to Terracotta Tile card and then scored and folded Thick Whisper White card.
  I stamped the floral image from the Ornate Style stamp set onto Whisper White card using Memento Tuxedo Black ink. I coloured the flowers using Daffodil Delight, Calypso Coral, Mint Macaron, Old Olive and Dark Soft Suede Stampin’ Blends. I cut out the image and attached it to the card front. I tied a bow in a length of the Terracotta Tile Ribbon and attached it to the card front using a Mini Glue Dot.
To decorate the inside of the card, I stamped the multifloral image from the Ornate Style stamp set onto the top right hand corner of Whisper White card using Terracotta Tile ink.
Time is running out to buy these products this month, so place your order without delay or you will have to wait until the launch of the next Annual Catalogue in June to make a purchase.
Bye for now,
Kris
Product Used:


Lest We Forget

Today is Anzac Day in Australia. This is a day where people attend Anzac Day Dawn Services and then the traditional Anzac Day March where we can honour past and present members of the Army, Navy and Air Force. This year my Grandson was going to march with his Air Force Cadet Squadron at the big march in Brisbane City. However, because of COVID-19 we are not having any Dawn Services or Marches. This is kind of sad for the Veterans, especially those who would have marched for the last time this year. So this year we will be doing what the RSL (Returned Services League) has called on everyone to do – stand at the end of our driveway at dawn, light candles, sing the National Anthem and listen to the Last Post. I found a photo of my Grandfather in his Army Uniform taken during WWII and thought it would be appropriate for today’s share. I used a 12″ x 12″ Whisper White page as the base card. I cut a circle from a piece of cardboard that comes with our Designer Series Paper. I tore sheets of Mossy Meadow card into strips and wrapped the cardboard. Kind of messy but kind of just right. I cut the solid poppies from Poppy Parade card and the detailed overlays from Real Red card using the Poppy Moments Dies. The flower centres are cut from Basic Black card. I also cut some leaves from Old Olive card using the Poppy Moments Dies. I attached the flowers and the leaves together and added them to my “wreath”. I attached the “wreath” to the Whisper White page. I attached my photo to Basic Black card and placed it inside the “wreath”. I attached a strip of Whisper White card to a slightly wider strip of Real Red card across the bottom of the page. I cut the letters from Basic Black card using the retired Little Letters Dies.
I am really happy with this page. I am going to create a co-ordinating page with the details of my Grandfather’s War Service so my grandchildren will know a bit more of his story.
Lest We Forget.
Bye for now,
Kris
Product Used:


Ornate
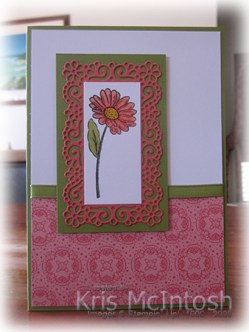
Today’s card features some of the product which is available as a kind of “get in early” product suite which will be released in the next Annual Catalogue. It gives us a chance to play with something new, but also something which will be around for a long while. I attached a piece of the Ornate Garden Specialty Designer Series Paper to the bottom of Whisper White card. I wrapped the top of the Designer Series Paper with the Old Olive ribbon from the Garden Ribbon Combo Pack before attaching the panel to scored and folded Old Olive card.  I cut the frame from Terracotta Tile card using the Ornate Layers Dies. I attached the die cut to Old Olive card and then the card front using dimensionals. I stamped the single flower from the Ornate Style stamp set onto Whisper White card using Memento Tuxedo Black ink.
 I coloured the flower using Calypso Coral, Old Olive and Dark Daffodil Delight Stampin’ Blends. I trimmed the Whisper White card and attached it to the centre of the Terracotta Tile frame.
To decorate the inside of the card, I attached a narrow strip of the same paper from the Ornate Garden Specialty Designer Series Paper to the bottom of Whisper White card. I also wrapped the top of the Designer Series Paper using the Old Olive Ribbon from the Ornate Garden Ribbon Combo Pack.
Simple but I think quite lovely. What do you think? Remember this gorgeous product suite is available to purchase during the month of April and then it won’t be available again until the new catalogue goes live in June. So if you need these products, don’t delay placing your order.
Bye for now,
Kris
Product Used:


Magnolia Slider
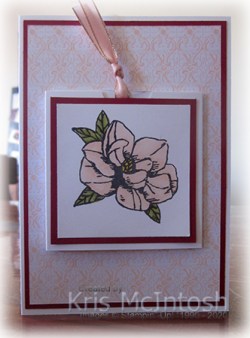
I loved creating this Double Slider card following Elizabeth Shannon’s instructions. This card uses the Magnolia Blooms and Good Morning Magnolia stamp sets. I attached a piece of the Parisian Blossoms Specialty Designer Series Paper to Cherry Cobbler card and then scored and folded Thick Whisper White card. I created the mechanism from Thick Whisper White card. I stamped the magnolia from the Magnolia Blooms stamp set onto Whisper White card.  I coloured the image using Petal Pink, Old Olive and Dark Daffodil Delight Stampin’ Blends. The panel is attached to Cherry Cobbler card and then the front of the mechanism. I used the Detailed Trio Punch to punch a hole in the top panel of the mechanism and tied a length of Petal Pink 5/8″ Metallic Edge Ribbon through the hole.
  I stamped the small magnolia from the Good Morning Magnolia stamp set onto the top panel using Memento Tuxedo Black ink. I coloured the image using Petal Pink and Old Olive Stampin’ Blends. I stamped “happy birthday” onto the bottom slide out panel using Cherry Cobbler ink.
To decoate the inside of the card, I stamped the large magnolia from the Magnolia Blooms stamp set onto the lower left hand corner of Whisper White card using Memento Tuxedo Black ink. I coloured the image using Petal Pink, Dark Daffodil Delight and Old Olive Stampin’ Blends. I love making fancy fold cards, especially ones that “move”, don’t you.
Bye for now,
Kris
Product Used:


Positive Thoughts

This stamp set kind of stayed below my radar when I was looking through the 2020 Handmade For You Mini Catalogue. However, when I saw the brochure for the additional Natures Thoughts Dies that became available to purchase from the 4th February, it made me have another look. The other thing that caught my eye was that Stampin’ Up! says these dies will carry over to the next annual catalogue. (Sorry they are not available to purchase right now.) So today I had a little play with my new goodies. I decided to create basically the same card for the beginner, casual and avid crafter.  So the beginner card has the leaf image from the Positive Thoughts stamp set stamped onto the front of a Whisper White note card using Soft Sea Foam ink. I stamped the image three times without re-inking to give a little depth. I stamped the greeting from the same stamp set using Smoky Slate ink. I also stamped the leaf image onto the envelope. Simple and easy for a beginner stamper to create. Only one stamp set and two ink pads.
 For the casual crafter, I stamped the leaf image from the Positive Thoughts stamp set onto Whisper White card using Soft Sea Foam ink three times without re-inking. I cut out the stamped panel using the die from the Natures Thoughts Dies. (Isn’t this cute with the stitching around the edges!) I stamped the greeting as before using Smoky Slate ink and this time I also stamped the flower image from the Positive Thoughts stamp set using Petal Pink ink.
  I attached the stamped card to Soft Sea Foam card and then scored and folded Thick Whisper White card. I stamped the leaf image onto the inside of the card using Soft Sea Foam ink for a little decoration. This card is slightly stepped up using one stamp set, one set of dies and three ink pads.
 For the Avid crafter, I embossed Whisper White card using the Subtle 3D Embossing Folder and attached it to scored and folded Thick Whisper White card. I stamped the leaf image from the Positive Thoughts stamp set onto Whisper White card using Soft Sea Foam ink twice without re-inking and a third time, stamping onto scrap paper first.
  I wanted the leaves to have a little more depth of colour. I cut out the stamped Whisper White card using the die from the Natures Thoughts Dies. I stamped the greeting from the Positive Thoughts stamp set using Smoky Slate ink. The stamped die cut is attached to Soft Sea Foam card and then the card front.
 I stamped the flower onto scrap Whisper White card using Petal Pink ink and cut it out using the co-ordinating Natures Thoughts Die. I also cut Soft Sea Foam card using the border from the Natures Thoughts Dies. I trimmed the border and attached it to the card front, with the flower attached over the left hand end. To decorate the inside of the card, I stamped the leaf image from the Positive Thoughts stamp set using Soft Sea Foam ink. I also stamped and cut out a flower and the border image as before. I attached the border and the flower across the bottom of the card, partially covering the stamped leaf image. This card is a stepped up again using one stamp set, one set of dies, one embossing folder and three ink pads.
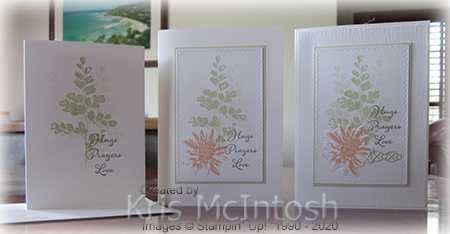 Don’t they look lovely together. I hope you have enjoyed this set of cards, as much I enjoyed creating them. I have to apologise for not sharing these cards earlier. I have had them on hand for quite a while but caught up sharing my creations using Sale-A-Bration items and these slipped off my radar!
Bye for now,
Kris
Product Used:


Using Up Kits – Last one

This is the card I created using the last of the left over kits from my March classes. This time I embossed the Poppy Parade card using the Brick & Mortar 3D Embossing Folder before attaching it to scored and folded Thick Whisper White card. I cut Whisper White card using the largest of the scalloped rectangles from the Stitched So Sweetly Dies. I stamped the leaf image from the Positive Thoughts stamp set twice, without re-inking, onto the Whisper White rectangle using Pear Pizzazz ink. I stamped the leaf once more onto scrap Whisper White card using Pear Pizzazz ink and cut it out using the Natures Thoughts Dies.  These dies were part of the co-ordination product that was available for purchase up until the end of March. However, Stampin’ Up! assured us that these dies were carrying over to the next Annual Catalogue – YAY! I also stamped the flower from the Positive Thoughts stamp set onto scrap Whisper White card twice using Poppy Parade ink before cutting them out using the co-ordinating Natures Thoughts Die.
  Lastly I stamped the butterfly image from the Positive Thoughts stamp set onto scrap Whisper White card using Blueberry Bushell ink and cut it out using the co-ordinating Natures Thoughts Die. I attached the leaf and the flowers onto the stamped Whisper White rectangle. I curled the wings of the butterfly and attached it to the card front using a Mini Glue Dot in the centre and Mini Dimensionals under each wing. Lastly I stamped the greeting from the Positive Thoughts stamp set using Blueberry Bushell ink.
To decorate the inside of the card, I stamped the leaf image from the Positive Thoughts stamp set three times, without re-inking, onto the lower left hand corner using Pear Pizzazz ink.
Since the cards, all started out using the same product, I thought I would show you the original card and the three variations.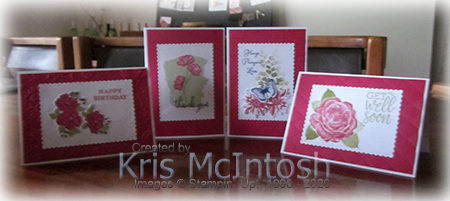
I think they all look pretty good, don’t you?
Bye for now,
Kris
Product Used:


Celebrate
 Today’s page shows off a couple of photos from my sister Karyn’s wedding. The one at the top shows Ron & I with his parents, my sister and her husband Jim. The bottom photo is just of Ron & I with his parents. I kind of followed a sketch that I found on Pinterest to create the page. I stamped the image from the Gallery Grunge stamp set onto a 12″ x 12″ Whisper White page using Crumb Cake ink. I embossed a strip of Mint Macaron card using the Ornate Floral 3D Embossing Folder. (I don’t have 12″ x 12″ Mint Macaron card, so I used a strip of A4 card. If you put your card into the Embossing Folder across the folder, you can emboss and then slide the card across and match the design and emboss again.
  To do this you need to have the embossing folder in your machine with the fold to the side, so you have to be careful, but it does work.) I cut two frames from Early Espresso card using the Ornate Layers Dies. I attached the photos to the frames and then the right hand side of the page. I cut another smaller frame from Early Espresso card using the Ornate Layers Dies and attached it over the split in the Mint Macaron embossed card.
  I used the Rectangle Stitched Dies to cut a 3″ x 4″ journaling card (from my stash) to create the panel to write my story. This piece fits perfectly onto the Ornate Layers Die. Lastly I stamped the floral image from the Ornate Style stamp set twice onto Whisper White card using Memento Tuxedo Black ink. I coloured the images using Calypso Coral, Daffodil Delight and Old Olive Stampin’ Blends. I cut out the flowers and spritzed them with a mix of Isopril and Champagne Shimmer Mist before attaching them to the page. The title is cut from Early Espresso card using the retired Celebrate You Dies.
These photos are over 40 years old – how time flies – and Ron’s parents are no longer with us. It makes me happy to see these photos on a page instead of in a box. I know my Grandchildren will get a surprise when they see these photos. (They forget Nan and Pop were once young!)
Bye for now,
Kris
Product Used:


Using Up Kits Take 2

I was so happy with the card I shared with you in my last post using up my left over kits, I decided to create another one. Once more I used the same supplies and another stamp set which I haven’t shown much love of late. I embossed Poppy Parade card using the Tufted 3D Embossing Folder and attached it to scored and folded Thick Whisper White card.  I cut Whisper White card using the largest of the scalloped rectangles from the Stitched So Sweetly Dies. I stamped the flower from the Healing Hugs stamp set onto the Whisper White rectangle using Poppy Parade ink. I masked the image and stamped the leaf image three times around the flower using Pear Pizzazz ink.
 I removed the mask and stamped the greeting onto the upper right hand corner of the Whisper White rectangle using Pear Pizzazz ink. The image panel is attached to the centre of the card front.
To decorate the inside of the card, I stamped another greeting from the Healing Hugs stamp set using Poppy Parade. I also stamped the leafy image from the Healing Hugs stamp set beside the greeting using Pear Pizzazz ink.
Another success story, don’t you think?
Bye for now,
Kris
Product Used:


Tri-Shutter Birthday

Today’s Fancy Fold is a Tri-Shutter card and you can find instructions for this card on Splitcoast Stampers if you need them. I cut the card base from Night of Navy card. The layers are Whisper White and the Designer Series Paper is from the Country Club Designer Series Paper. I used both sides of the one paper.  To decorate the long central panels on the top and the bottom of the card, I cut a strip of Garden Green card using my retired Fringe Scissors to give a grass effect. The cut strip is attached to Whisper White card before being attached to the card base. I cut a rectangle from Whisper White card and stamped the golfer image from the Clubhouse stamp set using Memento Tuxedo Black ink.
  I coloured the image using Night of Navy, Sahara Sand and Ivory Stampin’ Blends. I used a Blender Pen and Garden Green ink to colour the grass. I attached the images to the card front, making sure to only add adhesive in the appropriate places. For the middle panel I stamped the gold ball image from the Clubhouse stamp set using Memento Tuxedo Black ink.
 I coloured the image using Sahara Sand, Light Night of Navy Stampin’ Blends. I used the Blender Pen and Garden Green ink to colour the grass. I stamped the golf stick using Memento Tuxedo Black ink. I didn’t add any additional colour to the golf stick image. For the last panel I stamped the greeting from the Clubhouse stamp set using Night of Navy ink. I also stamped the flag image using Memento Tuxedo Black ink. I coloured the flag using the Light Night of Navy Stampin’ Blend.
  I stamped the balloon image from the Bonanza Buddies stamp set over the grass part of the image using Garden Green ink which I had stamped onto scrap paper first. I stamped the “happy birthday” from the Clubhouse stamp set onto Whisper White card using Night of Navy ink. I punched both short ends using the Triple Banner Punch and sponged Night of Navy ink around the edges before attaching the greeting to the front panel.
It’s been a while since I made one of these cards but I do love this fancy fold. This type of card looks very special when it is open with all the different sections and folds. However, as you can see from the last photo it folds up to fit inside a standard envelope. Isn’t that great, I’d love to know if you have made one of these fancy folds.
Bye for now,
Kris
Product Used:


Facebook Live
Hello everyone, just a quick post today to let you know that since I am unable to have in-person classes, I have started doing Facebook Lives! I know, amazing what you can learn even at my age! I did my first one last week and I will be doing one today at 10am. The purpose of these Facebook Lives are to keep interacting with all of you and to keep you crafting and especially sending all of the cards you make. With Social Isolation we all have a lot of time on our hands, so, for me, I have been finishing lots of projects, using up lots of DSP and generally making lots and lots of cards. Last week I shared a card sketch and some examples I had made and I thought you might be interested to see them.
Anyway, if you have the time, pop in and see what I am up to today and if you can’t make the live you can always pop in later and have a look. So just go to my Facebook Business page – Stamping with Kris – and you can see my very simple attempts at keeping in touch. I must give a big shout out to my son-in-law who made the stand for me so that I am not quite so clumsy with the camera (thank you Sean) and my daughter (Sarah) and her children (Abigail and Ethan) who have been amazing at helping me learn all the technical parts!
Bye for now,
Kris
Product Used:


