Thanks

My Mum asked me to make her a Thank You card recently and I thought I would share my creation with you today. I began by embossing Whisper White card using the Old World Paper 3D Embossing Folder. I attached the embossed card to scored and folded Misty Moonlight (one of the new in-colours). I stamped the image from the Jar of Flowers stamp set onto Whisper White card using Memento Tuxedo Black ink.  I coloured the image using Magenta Madness, Just Jade Misty Moonlight and Daffodil Delight Stampin’ Blends. I’m so excited to have finally received my order with the new in-colour ink pads and Stampin’ Blends. When I finished colouring the image, I cut it out. I cut Misty Moonlight card using one of the Stitched So Sweetly dies and attached it to the card front.
  I stamped the greeting from the So Sentimental stamp set onto Whisper White card using Misty Moonlight ink and cut it out using another of the Stitched So Sweetly Dies. I attached the floral image to the back of the greeting die before attaching it to the card front using dimensionals.
To decorate the inside of the card, I stamped the same floral image onto Whisper White card using Memento Tuxedo Black ink. I coloured the image using the same Stampin’ Blends before cutting it out. I attached the floral image to the lower left hand corner of Whisper White card.
Such a pretty card, don’t you think? Especially the colours!
Bye for now,
Kris
Product Used:


Happy Anniversary

Today I am sharing a card I made for my Mum and Dad who celebrated their 66th Wedding Anniversary last week. Happy Anniversary! I love the example on page 119 of the Annual Catalogue which uses the Floral Essence stamp set but wanted to use the Tasteful Touches stamp set instead. I also didn’t have the stamp set they used to create the background so I embossed Whisper White card using the Old World Paper 3D Embossing Folder but before I placed my card inside, I inked one side of the folder with Crumb Cake ink. So now I have an embossed and coloured piece of Whisper White card, which looks really pretty. I attached the embossed card to scored and folded Rococo Rose card. I stamped the flower from the Tasteful Touches stamp set twice onto Whisper White card using Rococo Rose ink and cut them out. I cut Pretty Peacock card using one of the dies from the Forever Flourishing Dies.  I attached the die behind one of the flowers and attached it to the embossed Whisper White card. I stamped “happy anniversary” from the Well Said stamp set onto Whisper White card using Pretty Peacock ink. I punched one end of the card using the Lovely Labels Pick a Punch and I attached a piece of Rococo Rose 1/2″ Scalloped Linen Ribbon behind the bottom edge of the label banner.
  I attached the greeting banner to the embossed Whisper White card using dimensionals and partially covering the flower. I trimmed the right hand edge of the greeting banner to match the edge of the embossed Whisper White card. I attached the second flower to the card front using dimensionals so that it sits partially over the greeting banner.
To decorate the inside of the card I stamped another greeting from the Well Said stamp set using Pretty Peacock ink. I embossed a narrow strip of Whisper White card using the Old World Paper 3D Embossing Folder and Crumb Cake ink. The embossed panel is attached to the bottom of the stamped Whisper White card.
CASEing the catalogue makes it pretty easy to come up with a unique design. I don’t know about you but when I CASE something, my card never looks exactly like the one I am CASEing.
Bye for now,
Kris
Product Used:


Ferns and Family

Today’s page shows off a couple of photos that my sister gave me of our children (and ourselves) taken back in 1983. They were taken on the front porch at my parents home in Sydney. I attached each of the photos to Pretty Peacock card and attached both photos to Very Vanilla card. I cut two long strips of Pretty Peacock card using one of the dies from the Ornate Borders Dies. I attached the borders behind the top and bottom edges of the photo panel. I cut two strips of Forever Greenery Designer Series Paper and attached one behind the top edge of the photo panel and one behind the bottom edge of the photo panel. I attached this panel to 12″ x 12″ Very Vanilla card using adhesive across the middle of the panel only. I cut Pretty Peacock card twice using the largest frame from the Ornate Layers Dies. I used the Stitched Rectangle Dies to cut Very Vanilla card to fit the centre of the frames.  I attached one Very Vanilla rectangle to one of the frames before attaching it to the page. I used liquid glue so that I could slide the frame behind the photo panel. I cut the letters for “cousins” using the retired Little Letters Dies. (Can’t wait for my new Playful Alphabet Dies to arrive!) I created my journaling on the computer and printed onto the remaining Very Vanilla rectangle. I attached the journaling to the remaining Pretty Peacock frame and then using liquid glue attached the frame to the page, once more sliding it behind the photo panel. I stamped two large leaves from the Forever Fern stamp set onto Very Vanilla card using Pear Pizzazz ink.
  I stamped four of another of the images from the Forever Fern stamp set onto Very Vanilla card using Pretty Peacock ink and another image four times using the same ink. All of the leaf images were cut out using the co-ordinating Forever Flourishing Dies. I layered one Pear Pizzazz image with two of each of the other images and placed the leafy arrangements onto the page, one at the top left of the Pretty Peacock frame and one at the bottom right of the second frame. The leafy arrangements are placed so that they are partially underneath the photo panel.
I used a sketch I had printed and stashed in a folder long ago as my inspiration for this page. I love using sketches as my starting point and I must admit I am very happy with the finished result. How about you? Do you like it?
Bye for now,
Kris
Product Used:


Celebrate the Best Day
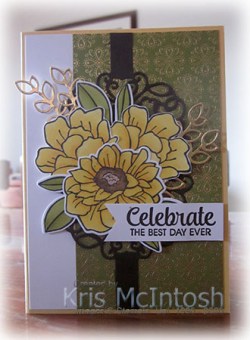
Today’s card uses a stamp set I haven’t used in a while, the Band Together stamp set and co-ordinating Detailed Band Dies. I attached a piece of Ornate Garden Designer Series Paper to the right hand side of Whisper White card. I cut the largest band from Early Espresso card using the Detailed Bands Dies and attached it to the centre of the card front. The whole piece is attached to scored and folded Daffodil Delight card. I stamped the flower image from the Band Together stamp set onto Whisper White card using Memento Tuxedo Black ink. I coloured the image using Melody Mango, Light Daffodil Delight, Bronze and Ivory Stampin’ Blends.  I stamped the leaf image from the Band Together stamp set three times onto Whisper White card using Memento Tuxedo Black ink and coloured them using Old Olive Stampin’ Blends. I cut Gold Foil twice using the long leaf die from the Detailed Bands Dies. I layered the flowers, stamped leaves and die cut leaves together before attaching to the card front using dimensionals. I stamped the greeting onto Whisper White card using Early Espresso ink.
  I punched one end using the Triple Banner Punch and attached the greeting to the card front using dimensionals where necessary.
To decorate the inside of the card, I stamped the greeting from the Band Together stamp set onto Whisper White card using Early Espresso ink. I cut Early Espresso card using another of the dies from the Detailed Bands Dies. I love the way this one sits across the bottom of the stamped Whisper White card.
This card was created using a tutorial from Create with Connie and Mary although I did change it a little. I hope that my daughter loved her card when she received it for her birthday last week as much as I loved creating it for her. I’m always happy to hear what you think too.
Bye for now,
Kris
Product Used:


Mountain Air

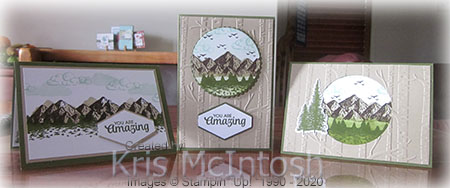
Yesterday on my Facebook Live, I shared some cards I made using the Mountain Air stamp set. I have had this stamp set since the July-December Catalogue launched last year and this is the first time I have used it! That’s a bit sad isn’t it. Never mind, I think I thought it was going to be harder to use than it actually is. It has co-ordinating dies as well and I am sure you could team this set with many other’s in the Annual Catalogue. It is also a reversible stamp set.  So on one side you get a solid image and on the other side you get a detailed image. For the first card I shared, I stamped the solid mountain image across Whisper White card using Crumb Cake ink. I stamped the detailed mountain image over the top using Early Espresso ink and because I wanted to have the image go from edge to edge, I didn’t line up the detailed image, I just stamped over the top. I stamped the detailed tree image across the bottom of the mountain image using Mossy Meadow ink. I stamped the solid image for the cloud across the top of the Whisper White card using Pool Party ink which I stamped off onto scrap paper first.
  I stamped the detailed cloud image using the same ink. I attached the stamped panel to Crumb Cake card and then scored and folded Mossy Meadow card. I stamped the greeting from the Band Together stamp set onto Whisper White card using Mossy Meadow ink and punched it out using the Tailored Tag Punch. I punched Crumb Cake card using the Tailored Tag Punch and cut it in half across the width. I attached one half behind the back of the top of the stamped tag and the other half behind the bottom of the stamped tag. I attached the greeting to the card front using dimensionals.
  To decorate the inside of the card, I stamped the detailed double tree image from the Mountain Air stamp set onto the lower left hand corner of Whisper White card using Mossy Meadow ink.
For the second card I embossed Crumb Cake card using the Woodland Embossing Folder and attached it to scored and folded Mossy Meadow card. I cut Whisper White card using the largest circle from the Layering Circle Dies and stamped the solid mountain image across the circle using Crumb Cake ink. I stamped the detailed mountain image over the top using Early Espresso ink and lined up the images so that they matched. I lightly sponged Old Olive ink below the mountain image and then stamped the detailed tree image using the same ink. I sponged Pool Party ink above the mountain image and then stamped the detailed cloud image using the same ink.
  I also added the small bird image from the Mountain Air stamp set using Early Espresso ink. The image panel is attached to a Mossy Meadow scalloped circle cut using the Layering Circle Dies and then the card front using dimensionals. I stamped the greeting, punched it out and added a layer of Mossy Meadow as I did on the greeting for the first card. The greeting is attached to the card front using dimensionals. To decorate the inside of the card, I attached a narrow strip of Mossy Meadow card behind one long edge of Crumb Cake card embossed using the Woodland Embossing Folder. I attached the embossed panel to the bottom of Whisper White card and stamped the detailed double tree image from the Mountain Air stamp set using Mossy Meadow ink.
For the third card I shared, I cut the largest circle from the Layering Circle Dies from the centre of a Crumb Cake panel. After I cut the circle, I embossed the Crumb Cake card using the Woodland Embossing Folder. I stamped the solid mountain image from the Mountain Air stamp set onto a piece of Whisper White card using Crumb Cake ink.  I stamped the detailed mountain image over the top using Early Espresso ink, lining up the image. I sponged Mossy Meadow ink below the mountain and stamped the detailed tree image also using Mossy Meadow ink. I sponged the sky using Pool Party ink and stamped the detailed cloud image using the same ink. I also added the bird image using Early Espresso ink.
  The Whisper White panel I stamped is larger than the circle I cut in the Crumb Cake card, so I simply lined up the part of the image, I liked the best behind the circle and attached it to the embossed Crumb Cake card. The embossed panel is attached to scored and folded Mossy Meadow card. I stamped the detailed double tree image from the Mountain Air stamp set onto Whisper White card and cut it out using the co-ordinating Majestic Mountain Die. I attached the tree image to the card front on the left hand side of the die cut circle. To decorate the inside of the card, I stamped the greeting from the Band Together stamp set onto Whisper White card using Mossy Meadow ink. I also stamped the detailed double tree image onto the lower left hand corner using Mossy Meadow ink.
I think these cards turned out great. I can’t believe I waited this long to use this stamp set. I’d love to know what you think.
Bye for now,
Kris
Product Used:


A Good Birthday

Today’s card combines some new product with a returning stamp set. I sometimes get bogged down thinking I have to use the products from a Product Suite only with other products from the same suite. Of course, that’s not true, all the products in the new Annual Catalogue are designed to be teamed with any other product you desire. So in a way, today’s card is a little outside my comfort zone! I embossed Very Vanilla card using the Tasteful Textures 3D Embossing Folder. I cut a strip of one of the designs from the In Good Taste Designer Series Paper and attached it to the left hand side of the embossed card. I attached the panel to scored and folded Early Espresso card.  I stamped the image from the A Good Man stamp set onto Very Vanilla card using Memento Tuxedo Black ink. I coloured the image using the Dark Night of Navy, Dark Balmy Blue, Ivory and So Saffron Stampin’ Blends. I cut out the image using one of the ovals from the Layering Ovals Dies and attached it to an Early Espresso scalloped die cut using the same dies. The image panel is attached to the card front using dimensionals.
  I punched both ends of a piece of Very Vanilla card using the Lovely Labels Pick a Punch and stamped “happy birthday” from the Itty Bitty Birthday stamp set using Early Espresso ink. I attached the label to a piece of Early Espresso card and then the card front. I only used dimensionals on the ends of the label so that it could sit across the bottom of the stamped oval panel.
To decorate the inside of the card, I stamped “Relax You Way” from the A Good Man stamp set onto Very Vanilla card using Early Espresso ink. I attached a narrow strip of Early Espresso card behind one long edge of Very Vanilla card embossed using the Tasteful Textures 3D Embossing Folder before attaching it to the bottom of the stamped Very Vanilla card.
It was really quite simple to create but I really love the finished card, don’t you?
Bye for now,
Kris
Product Used:


Happy Birthday Ethan

My grandson celebrated his birthday last week and today I am sharing the card I made for him. I embossed Whisper White card using the Old World Paper 3D Embossing Folder and attached it to Coastal Cabana card. I created a narrow folding section to attach to the centre of the card base using Coastal Cabana card. I attached Whisper White panels to the front and the inside of the folded section. I cut the starry spray from the Stitched Stars Dies from Coastal Cabana card and attached it to the card front.  I stamped “happy birthday” from the Itty Bitty Birthday stamp set onto Whisper White card using Coastal Cabana ink and punched both ends using the Lovely Labels Pick a Punch.
  I punched both ends of a piece of Coastal Cabana card and attached the greeting, which is attached to the lower right hand side of the central panel using dimensionals. I cut one of the larger stars from the Stitched Stars Dies from Coastal Cabana card and attached it to the top left hand side of the central panel using dimensionals. I cut “14” from Whisper White card using some old dies I have in my stash and attached the numbers to the large Coastal Cabana card. I didn’t decorate the inside of the folded panel because I wanted to leave plenty of room to write my message.
I found the instructions for this fancy fold on Lynn Dunn’s blog. I love it and I am sure to use this fold on more cards in the future. Thank’s Lynn for the inspiration and the tutorial.
Bye for now,
Kris
Product Used:


Happy Birthday Ethan

Yesterday my eldest grandson turned 14! Where have the years gone! We celebrated with cake after school and today’s pages show off some photos from this momentous occasion. I began with a Whisper White 12″ x 12″ page and used the starburst technique which I found on pinterest to add some of the beautiful but now retired Come Sail Away Designer Series Paper. The first page uses this technique to completely cover the Whisper White page. I added my photo to Night of Navy card and placed it over the ends of the Designer Series Paper (the ends can be a bit messy or at least mine were).  I cut the “happy” and “birthday” from Night of Navy card using the Well Written Dies and attached them to the top left hand side of the page. I cut the letters for his name from Night of Navy card using the retired Little Letters Thinlets Dies and attached them just above the photo. I stamped the greeting from the Band Together stamp set onto Night of Navy card and punched it out using the Tailored Tag Punch. The greeting is attached partially over the photo using dimensionals.
To create the second page I decided to only add the starbust design across the top half of the page, again using the retired Come Sail Away Designer Series Paper. To cover the ends of the Designer Series Paper I wrapped them with Denim 3/8″ Ribbon. I added my photo to Night of Navy card before attaching it to the page. I created my journaling on the computer and printed onto Whisper White card which I cut into strips and attached to Night of Navy card before attaching to the page. I stamped the greeting from the Band Together stamp set using Night of Navy ink.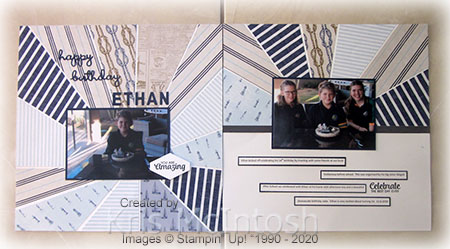
I really have to apologise for not getting these pages done sooner but I had to wait on the photos! Still, I think the pages are worth waiting for.
Bye for now,
Kris
Product Used:


Miles Apart…
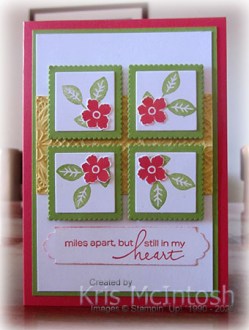
…but still in my heart. Isn’t that a lovely saying! This greeting can be found in the Lovely You stamp set and not only is it is a lovely greeting but the font is beautiful too! Today’s card is one I created using a sketch I found on Pinterest. I embossed Daffodil Delight card using the Lace 3DEmbossing Folder and attached it across Whisper White card. I attached the Whisper White card to Granny Apple Green card and then scored and folded Poppy Parade card. I stamped the leaf image from the Lovely You stamp set four times onto Whisper White card using Granny Apple Green ink and cut them out using one of the Layering Squares Dies. I attached the stamped squares to scalloped squares cut from Granny Apple Green card using the same dies. I attached the stamped squares to the card front using dimensionals. I stamped the single flower from the Lovely You stamp set onto scrap Whisper White card using Poppy Parade ink. I cut out the flowers and attached them to the stamped panels.
  I stamped the greeting onto Whisper White card using Poppy Parade ink and punched the ends of the banner using the Lovely Labels Pick a Punch. I sponged Poppy Parade ink around the edges of the greeting banner before attaching it to the card front.
To decorate the inside of the card, I stamped the same leaf image from the Lovely You stamp set onto the lower left hand corner of Whisper White card. I stamped the flower image onto scrap Whisper White card and cut it out before attaching over the end of the leaf.
This card is kind of fussy but I do love the end result. I’ll let you in on a secret, I stamped the greeting directly onto the card front and messed it up, so I added the separate label over the top. Card saved!
Bye for now,
Kris
Product Used:


Yesterday’s Facebook Live
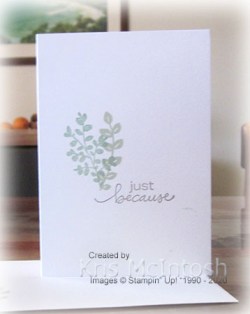
Yesterday on my Facebook Live, I shared some cards that I created using the Lovely You stamp set. Once again I decided to create a set of cards suitable for the Beginner stamper, Casual stamper and Avid stamper. The Beginner stamper card is created using a Whisper White Note Card for the base. I stamped the multi-leaf image from the Lovely You stamp set using Mint Macaron ink. I stamped the single stem image from the Lovely You stamp set using Soft Sea Foam ink. I stamped the greeting from the same stamp set using Basic Gray ink. Of course, I decorated the front of the envelope using the same leaf image with the same inks.
For the Casual Stamper, I stamped the same leafy images using Mint Macaron and Soft Sea Foam ink. I stamped the greeting from the Lovely You stamp set using Basic Gray ink beside the leafy images. I attached the stamped panel to Mint Macaron card and then scored and folded Thick Whisper White card.  To decorate the inside of the card, I stamped the multi-leaf image using Mint Macaron ink and the single stem image using Soft Sea Foam ink.
 To create the card for the Avid stamper, I attached Soft Sea Foam card to the bottom of Whisper White card and embossed the panel using the Old World Paper 3D Embossing Folder. I wrapped the top of the Soft Sea Foam card with Gold Metallic Edge Ribbon before attaching the whole panel to scored and folded Mint Macaron card.
  I cut Whisper White card using the largest square from the Stitched Shapes Dies. I stamped the multi-leaf image using Mint Macaron ink and the single stem image using Soft Sea Foam ink. I also stamped the greeting using Basic Gray ink before attaching to a Mint Macaron scalloped square cut using the Layering Squares Dies. The image panel is attached to the card front using dimensionals. To decorate the inside of the card, I embossed a narrow strip of Soft Sea Foam card using the Old World Paper 3D Embossing Folder. I attached the embossed card to the bottom of Whisper White card and wrapped the top edge using Gold Metallic Edge Ribbon.

Another set of cards, I am really happy with. I think I am a bit addicted to creating this type of card set. I know that when I do this, I start to get other ideas while I am stamping, so I think it is a good way to jump start my creativity.
Bye for now,
Kris
Product Used:


