Notes of Kindness

Today I am sharing the Notes of Kindness Card Kit with you. This is an all inclusive card kit. You will find all the product necessary to create five cards each of four different designs. The card size is not standard, more like a note-card. You also get a stamp set, clear block, a Basic Black Stampin’ Spot and 20 lined envelopes. The designs are really pretty and super quick to put together. Some of the pieces are like stickers so you don’t need to add Snail. The die cut pieces are all beautiful and you can add these with dimensionals if you wish. You also get plenty of Copper twine to create bows or just to add interest behind an image. The final finishing touch for some of the cards are lovely pearls which also come in the kit. The box everything is packed in is quite sturdy and would make a lovely gift box on its own. So far I have only create one each of the cards but I have a few ideas to maybe create some cards differently to the way they are intended.
I encourage you to take a look at the kits available in the Annual Catalogue and when you can the Holiday Catalogue. They truly are great quality and great value.
Bye for now,
Kris
Product Used:

Oberon
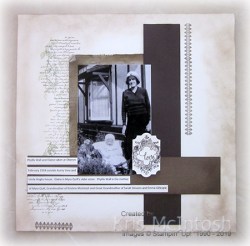
My Grandfather was born in Oberon and we spent a lot of time there visiting my Great Grandmother and assorted Aunts and Uncles. This photo was taken in 1934 outside my Aunty Vera and Uncle Hugh’s house. I spent many happy times in this house with my Grandparents and my Aunt and Uncle. This photo shows my Grandmother and my Mum’s sister in the garden. I decided to go with a vintage look because I thought it would suit the photo and because I was dying to try out the Very Versailles stamp set which I have only recently purchased.  I stamped the script image from the Very Versailles stamp set onto the left hand side of Very Vanilla 12″ x 12″ card using Crumb Cake ink. I stamped the leaf image from the same stamp set over the top using Mossy Meadow ink. I also stamped the border image from the Very Versailles stamp set onto the page using Soft Suede ink. Then I sponged around the edges using Crumb Cake ink. I stamped the script image and the leaf image onto a piece of Crumb Cake card, sponged the edges with Crumb Cake ink and distressed the edges using my bone folder and the retired Stampin’ Up! distressing tool. I sponged the edges of a long strip of Early Espresso card using Early Espresso ink and a piece of Soft Suede card using Soft Suede ink.
  Both pieces of sponged card are embossed using the Subtle 3D Embossing Folder. I attached the Crumb Cake piece to the page, layered on top the Early Espresso card and then the Soft Suede strip of card. The photo is attached on top. I printed the journalling onto Very Vanilla card and cut it into strips to attach to the page. I stamped the filigree image from the Very Versailles stamp set onto Very Vanilla card using Soft Suede ink and punched it out using the Everyday Label Punch. I stamped “love” into the middle of the image using a greeting from the Enjoy Life stamp set which I inked using an Early Espresso Stampin’ Write Marker. The filigree image is attached to the page using dimensionals.
I love the finished page. The vintage look suits the photo which has a couple of creases and tears in it. I don’t “photoshop” my photos, I just scan and print so you get the idea of the age of the photos.
Bye for now,
Kris
Product Used:


Sip Sip Hooray

I’m not sure exactly how I feel about the card I am sharing with you today, however, it is my first use of the Sip Sip Hooray and Cheers to That stamp sets. I had been trolling through my saved card sketches, one of which inspired me to create this card. I embossed Whisper White card using the Swirls and Curls Embossing Folder and wrapped the lower part using the Pretty Peacock 1/2″ Scalloped Linen Ribbon before attaching to scored and folded Pretty Peacock card. I cut a piece of Pretty Peacock 2019-2021 In-Colour Designer Series Paper using one of the Layering Circle Dies. I attached the Designer Series Paper to the embossed card. I stamped the glass from the Sip Sip Hooray stamp set onto Whisper White card using Smoky Slate ink.  I stamped the fill image using Rococo Rose ink before cutting the image with the same Layering Circle Die. I attached the stamped panel to a Pretty Peacock Scalloped Circle cut using the Layering Circle Dies before attaching to the card front, partially covering the Designer Series paper circle. I stamped the greeting from the Cheers to That stamp set onto Whisper white card using Rococo Rose ink.
  I stamped the leafy spray image from the Sip Sip Hooray stamp set below the greeting and cut it out using the Layering Circle Die. I cut a scalloped circle from Pretty Peacock card and attached the stamped panel before attaching to the card front using dimensionals. I tied a bow in the Pretty Peacock 1/2″ Scalloped Linen Ribbon and attached it to the left hand side of the card front using a Mini Glue Dot.
To decorate the inside of the card, I decided to die cut the top of Whisper White card using the bubble die from the Sip and Celebrate Dies.
I think I am having trouble with the fact that the colours are not truly “Christmassy”, what about you? Does it make the grade as a Christmas card? Let me know what you think.
Bye for now,
Kris
Product Used:


Triangle Corner Pop Up Card

I shared a pop up corner card recently which a lady from my Beachmere classes had asked me to have a look at. Well, included in the instructions for the card she was interested in was a link to a video for this style of card. I watched a couple and decided that Jan B’s video was the easiest to follow. I cut my card base from Thick Whisper White card and followed Jan’s instructions on scoring and cutting. My layers are all Whisper White card which I embossed using the Subtle 3D Embossing folder – except the one that is hidden which I wanted to be able to write a message on.  The embossed card is attached to Night of Navy card before attaching to the card base. I stamped the small daisy from the Daisy Lane stamp set onto Whisper White card 6 times and punched them out using the Medium Daisy Punch. I used my bone folder to add some dimension and then attached three flowers on top of each other. A daisy is added to each of the outside triangle panels. To create the easel for the focal panel, I cut Night of Navy card using the largest of the Scalloped Circles.
 I cut one full circle from Whisper White card using the largest circle from the Stitched Shapes Dies. I cut another circle using the Stitched Shapes Die from Whisper White card which I had scored. I cut the circle so that there was a little join at the top. I folded one of the joined circles in half. One the single stitched Whisper White circle I stamped the stem image from the Daisy Lane stamp set three times using Old Olive ink. I stamped the flower image onto scrap Whisper White card 3 times using Crushed Curry ink and cut them out.
  I attached one flower to each of the stems. The full circle is attached to the folded circle and the other full circle is attached to the Night of Navy scalloped circle which is attached to the card base. I stamped the greeting from the Daisy Lane stamp set onto Whisper White card using Night of Navy ink and punched it out using the Classic Label Punch. The greeting is attached to the circle die using dimensionals so that the folded circle will stand up. The last panel which you can’t see when the card is on display, has the leaf image stamped using Old Olive ink and the flower stamped using Crushed Curry ink. This leaves plenty of room to write a message and the card folds flat easily to go into an envelope!
I really love this card and truly it is very easy to create once you know how. Thanks Narelle for sending me the link. Have you made one of these, if not, I can thoroughly recommend it.
Bye for now,
Kris
Product Used:


Get Well Soon

I was inspired by this card I saw on Pinterest to create these cards I am sharing today. I already had the Whisper White frames cut out using the Rectangle Stitched Dies as they were left over from a class. I embossed the frames using the Subtle 3D Embossing Folder. I attached the frame to scored and folded Thick Whisper White card using dimensionals. I stamped the greeting from the Healing Hugs stamp set using Gorgeous Grape ink.  I stamped the flower from the Healing Hugs stamp set onto Whisper White card using Gorgeous Grape ink and cut it out. I stamped the leaf image from the Healing Hugs stamp set twice onto scrap Whisper White card using Granny Apple Green ink and cut them out. I attached the leaves to the flower before attaching to the card front, using dimensionals where necessary.
 To decorate the inside of the card, I stamped another of the greetings from the Healing Hugs stamp set onto Whisper White card using Gorgeous Grape ink. I inked the small floral image from the Healing Hugs stamp set using Granny Apple Green and Gorgeous Grape Stampin’ Write Markers. The image is stamped next to the greeting.
I loved this card and decided to make two more using different inks. The first one uses Bermuda Bay ink and Stampin’ Write Marker. The second one uses Mango Melody ink and Stampin’ Write Marker.
Here are all three cards.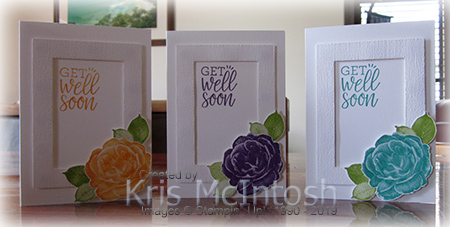
Aren’t they pretty?
Bye for now,
Kris
Product Used:


Soft Spring Birthday

I saw a card sketch on Pinterest which inspired me to create today’s card. I had a piece of Whisper White card embossed with the Layering Leaves 3D Embossing Folder so I trimmed it to size, attached it to Highland Heather card and then scored and folded Thick Whisper White card. I stamped “happy birthday” from the Itty Bitty Greetings stamp set onto Whisper White card using Highland Heather ink The greeting is attached to Highland Heather card and then the card front. I stamped the image from the Soft Spring stamp set onto Whisper White card using Memento Tuxedo Black ink.  I coloured the flowers using the Dark Highland Heather Stampin’ Blend and the leaves using the Light and Dark Soft Sea Foam Stampin’ Blends. I attached the stamped card to Highland Heather card and then the card front using dimensionals.
 To decorate the inside of the card I stamped the greeting from the Perennial Birthday stamp set using Highland Heather ink. I stamped the floral image from the Soft Spring stamp set beside the greeting using Memento Tuxedo Black ink. I coloured the image using the Dark Highland Heather and Dark Soft Sea Foam Stampin’ Blends.
As all of you know, Stampin’ Blends do tend to bleed through to the back of your card but I thought the Thick Whisper White might be just thick enough to get away without a second layer.

Unfortunately, it still does bleed through to the back of the card! It won’t stop me from using this card, but it is a reminder to make sure that we are colouring on a piece of card where the back will be hidden on our finished project.
Bye for now,
Kris
Product Used:


Nana
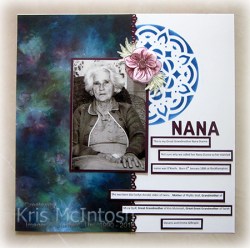
Today I am sharing a page I made with a photo of my great grandmother. I remember her very well as she didn’t die until I was in my mid teens. My page base is 12″ x 12″ Whisper White and I used the Decorative Masks to add the medallion using Blueberry Bushell ink. I punched a length of Blackberry Bliss card using the Decorative Ribbon Border Punch and attached it behind one long edge of a piece of the gorgeous Perennial Essence Designer Series Paper. I added a Blackberry Bliss mat to my photo before attaching to the page. I stamped the large open flower from the Floral Essence stamp set twice onto Whisper White card using Blackberry Bliss ink.  I also stamped the open leaf image four times onto Whisper White card using Old Olive ink. I used my Aqua Painter to move the ink on the flowers and the leaves, to add colour. I hand cut the full flower and then a partial flower. I also cut out the leaves. I attached the smaller flower on top of the large flower using a dimensional. I attached the leaves to the back of the flower before attaching to the page, slightly covering the photo. I coloured a Clear Faceted Gem with the Dark Blackberry Bliss Stampin’ Blend before attaching it to the centre of the flower. I cut the title from Blackberry Bliss card using the retired Little Letters Dies. I printed my journaling onto Whisper White card and cut it into strips. The journaling is attached to Blackberry Bliss card and then the page. I have one piece of information missing. I don’t know the exact date of my Great Grandmother’s death, so I need to talk with my Dad and Mum before adding that final touch. I am really enjoying scrapping these photos and getting them into my Family Memory Album. I hope they are inspiring you to do the same.
Bye for now,
Kris
Product Used:


Simple Christmas
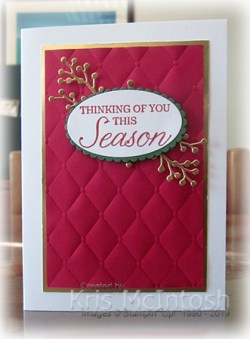
Whilst I was anxiously awaiting new supplies from the Holiday Catalogue I created this simple Christmas card utilising Christmas stamp sets which carried over to the Annual Catalogue. I embossed Real Red card using the Tufted 3D Embossing Folder which is attached to Gold Foil Card. The whole panel is attached to scored and folded Thick Whisper White card. I stamped the greeting from the Winter Woods stamp set onto Whisper White card using Real Red ink.  I cut out the greeting using one of the ovals from the Layering Ovals Dies. I also cut Garden Green card using one of the scalloped ovals from the same dies. I cut Gold Foil Card using one of the leafy dies from the Frosted Bouquet Dies.
  I attached dimensionals to the back of the greeting panel so that the Gold Foil die cuts could be attached to the back using the dimenionals to hold them in place before attaching the whole piece to the card front.
To decorate the inside of the card I stamped a greeting from the Merry Christmas to All stamp set onto Whisper White card using Real Red ink. I stamped the flourish also from the Merry Christmas to All stamp set just below the greeting, again, using Real Red ink.
I think this turned out quite pretty. I love the look of Gold Foil with Real Red card, don’t you?
I want to share a little tip with you. To cut down on waste, I die cut a piece from the middle of the Gold Foil layer which is behind the Real Red card using one of the smaller Stitched Rectangle Dies.

Now I have another piece to use on a card front somewhere else and I didn’t waste all that Gold Foil card behind the embossed Real Red card. Do you do this too?
Bye for now,
Kris
Product Used:


Pop Up Corner Card

One of the ladies who comes to my classes at Beachmere, asked me to have a look at this video and see if I could work out how to make the card. I followed Mary Deathridge’s instructions on her You Tube video and managed to get it to work! Mary uses the Daisy Delight stamp set to create her card, however, I used the new Daisy Lane stamp set to create mine. I cut my base from Thick Whisper White card, which may have been a mistake but I did manage to get it to work. I cut Night of Navy card to add to the sections which needed to be decorated. I added Whisper White layers, two of which I embossed using the Subtle 3D Embossing Folder. I cut a circle in the centre of one of these panels and also cut the same sized circle in the front panel of the card using the Layering Circle Dies.  I cut the same circle from Night of Navy card but at the same time cut a scalloped circle around it to create a frame for the front of the card and also for the back of the panel as well. To decorate the stamped panel for the inside of the card, I stamped the greeting from the Daisy Lane stamp set using Night of Navy ink. I stamped the flower stem using Old Olive ink and stamped the single leaf over the top using Old Olive ink which I stamped onto scrap paper first. I stamped the tall flower onto the stem but found I didn’t leave enough room to do that for the second flower. So I stamped the flower onto scrap Whisper White card, cut it out and attached it onto the flower stem.
  I stamped the large and the small daisies from the Daisy Lane stamp set twice each onto scrap Whisper White card. I punched out the daisies with the co-ordinating Daisy Punches and used my bone folder to curl the petals. I stacked the flowers on top of each other, making sure to stagger the petals. I closed the card and attached the daisy to the inside panel through the hole in the front of the card using a dimensional.
Isn’t it amazing. I am really loving playing with fancy fold cards and this one is a sure winner. So thanks Narelle for asking me to have a look and thanks to Mary for the great instructions.
Bye for now,
Kris
Product Used:

</d
Thinking of You
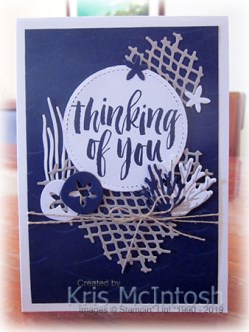
Today’s card is another one that I have CASEd from the internet. I found this gorgeous card by Alessandra Winfield on Pinterest and couldn’t resist making my own version. I embossed Night of Navy card using the High Seas 3D Embossing Folder. I cut the Gray Granite card using the net die from the Under The Sea Dies. I cut down one piece and attached it to the upper right hand corner of the embossed card. I attached the second piece as a whole across the middle of the card. I die cut some of the other dies from Whisper White card and Night of Navy card. I also stamped the larger sea weed image from the Sea of Textures stamp set onto Whisper White card using Gray Granite ink and then used the co-ordinating Under The Sea Die to cut it out.  I stamped “Thinking of You” from the Rooted in Nature stamp set onto Whisper White card using Night of Navy ink. I cut out the greeting using one of the circles from the Stitched Shapes Dies. The greeting is attached over the die cut netting using dimensionals. The other die cuts are attached around the greeting, some on dimensionals, some not.
  I wrapped the panel with Linen Thread and tied a bow before attaching it to scored and folded Thick Whisper White card.
To decorate the inside of the card I stamped the greeting from the Stitched All Around stamp set using Night of Navy ink. I stamped the netting image from the Sea of Textures stamp set onto the lower left hand corner using Gray Granite ink. I stamped the small and large seaweed images as well as the long tall seaweed image over the netting using Night of Navy ink.
Another card I am totally happy with. Thank you Alessandra for the inspiration.
Bye for now,
Kris
Product Used:


