More Happiness Blooms
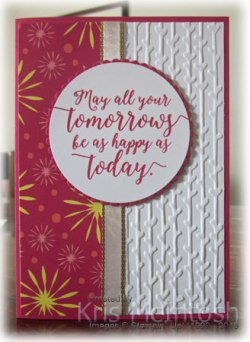
Today’s cards are all created in the same manner but each one uses a different pattern from the Happiness Blooms Designer Series paper. I embossed the right hand side of Whisper White card using one of the folders from the Petal Pair Embossing Folders. Unfortunately this pair of embossing folders is retiring with this Annual Catalogue. I know that I will miss them, especially this folder. I attached the Designer Series Paper to the left hand side and wrapped the edge of the Designer Series Paper with the Gold Metallic Edge Ribbon.  The Whisper White panel is attached to scored and folded Lovely Lipstick card. I stamped the greeting from the Colourful Seasons stamp set using Lovely Lipstick ink and cut it out using the Layering Circles Framelits Dies.
 I attached the greeting to a Lovely Lipstick scalloped oval cut using the same dies and then the card front. The inside of the card is decorated by attaching a piece of the same Designer Series Paper across the bottom of Whisper White card.
I love that this card gave me the opportunity to use one of the patterns in this Designer Series Paper which I found a little busy and didn’t quite know what to use it for. I created two more cards Calypso Coral card and Calypso Coral ink and one using Night of Navy card and Night of Navy ink.

I think they turned out great, don’t you?
Bye for now,
Kris
Product Used:


Computer Glitch
My posts may be a little hap hazard for the next week or so as my computer crashed on Thursday. I am waiting on the technicians to retrieve the files and photos and reload them to my new computer. I am hoping that they can retrieve everything, especially my photos. Anyway, as soon as I am up and running again I will share some projects using new product.
in the meantime if you want the Everything is Rosy product medley won’t be available after the 31st of this month. This medley is gorgeous and excellent value. Also if you haven’t ordered the So Shelli Paper Pumpkin kit which is available for purchase as a one-off opportunity from the 15th of this month while stocks last. The cards in this kit are truly gorgeous and the stamp set will be very useful on all sorts of projects in the future.
So until my computer is sorted……
Bye for now
Kris
Vibrant Birthday

I needed to make a birthday card for a friend recently and thought I would share it with you. I punched a narrow strip of Basic Black card using the Decorative Ribbon Border Punch and attached it behind one edge of a piece of Garden Impressions 6″ x 6″ Designer Series Paper. I attached the designer series paper to Whisper White card which is embossed using the Country Floral Dynamic Embossing Folder. The whole panel is attached to scored and folded Basic Black card. I cut an oval from Whisper White card using the Stitched Shapes Framelits Dies and stamped “‘happy birthday” from the Best Birds stamp set using Memento Tuxedo Black ink.  I stamped the vase outline from the Vibrant Vases stamp set onto Whisper White card using Memento Tuxedo Black ink and stamped the fill image over the top using Melon Mambo ink which I had stamped off once. I punched out the vase using the Vases Builder Punch and attached it to the stamped oval. I stamped the flower outline image onto scrap Whisper White card using Memento Tuxedo Black ink. I stamped the flower fill image using Melon Mambo ink and the leaf fill image using Shaded Spruce ink.
  I cut out the flower image and attached it to the oval over the top of the vase using Mini Dimensionals. I cut a scalloped oval from Basic Black card using the Layering Ovals Framelits and attached the stamped oval. The stamped panel is attached to the card front using dimensionals.
To decorate the inside of the card, I punched a narrow strip of Basic Black card using the Decorative Ribbon Border Punch and attached it behind one long edge of a narrow strip of Whisper White card which is embossed using the Country Floral Dynamic Embossing Folder. The panel is attached to the bottom of Whisper White card.
I really love how this card turned out. So bright and pretty, don’t you think? I also want to let you know that whilst you won’t find the Country Floral Dynamic Embossing Folder in my shop just now but it will be available for purchase once the new catalogue goes live in June. The Best Birds stamp set is also on the retiring list so if you don’t have this stamp set and you need it, don’t delay in placing your order because once the catalogue ends it will no longer be available.
Bye for now,
Product Used:


Enjoy Your Special Day

Today’s card is one that once more is using up some of my soon to be retired Happiness Blooms Designer Series Paper. I stamped the greeting from the Stitched All Around stamp set onto the lower right hand corner of Whisper White card using Calypso Coral ink. The Whisper White card is attached to scored and folded Calypso Coral card. I cut a square of the Happiness Blooms Designer Series Paper and attached it to a scalloped square cut from Calypso Coral card using the Layering Squares Framelits Dies. The Designer Series Paper panel is attached to the card front.  I stamped the large flower from the Bloom by Bloom stamp set onto scrap Whisper White card using Calypso Coral ink and cut it out. I stamped the single leaf from the Bloom by Bloom stamp set onto scrap Whisper White card three times using Call Me Clover ink.
 I cut out the leaves and attached them to the flower before attaching to the card front using dimensionals.
To decorate the inside of the card, I attached a narrow strip of the same Designer Series Paper to the bottom of Whisper White card.
You know when I start using my Designer Series paper, I wonder why it has taken me so long to use it. I am truly grateful to Kylie Bertucci and her #Loveitchopit Facebook Page for the inspiration to actually use the beautiful Designer Series Papers I have on hand.
I love how this card turned out and truly it was super simple to make. I’d love to know what you think.
Bye for now,
Kris
Product Used:


Wedding Card

Today I am sharing a wedding card I made for my neighbours who got married on the weekend. This card gave me the opportunity to use a new set from the soon to be released 2019 Annual Catalogue. The first thing I did was to decorate the inside of a Thick Whisper White card base. I stamped the small magnolia flower from the Good Morning Magnolia stamp set using Versamark ink. I sprinkled the image with Copper Embossing Powder and heat set it. I cut the bottom edge of a piece of Whisper White card using the Magnolia die to give that gorgeous shape. Next I stamped the beautiful large magnolia flower image from the Good Morning Magnolia stamp set using Versamark ink.  I sprinkled the image with Copper Embossing Powder and heat set it. I stamped Congratulations from the Flourishing Phrases stamp set using Versamark ink, sprinkled it with Copper Embossing Powder and heat set it. I attached the Whisper White card to a piece of Copper Foil card, wrapped the panel with the Copper Ribbon and tied a knot. The whole piece is attached to the scored and folded Thick Whisper White card.
 I know it is a little hard to see how pretty this is and to see the actual colour but I think you get a better idea in the photo for the card and envelope. It really is very pretty and, I think, perfect for the occasion.
Of course for such a special occasion I had to decorate the envelope and so I stamped the small flower onto the lower left hand corner using Versamark ink and embossed it using Copper Embossing Powder.
I am truly in love with this gorgeous stamp set. I bet you can’t wait to see the new catalogue. If you don’t have a Stampin’ Up! demonstrator already, please contact me so that I can organise to get one to you.
Bye for now,
Kris
Product Used:


Something old,
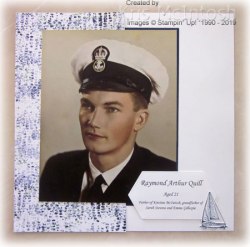
Something new! Today’s page shows off a photo of my Dad taken when he first joined the Navy at the age of 21. My Dad always wanted to go to sea and tried to join the Merchant Navy when he was 16 but his parents wouldn’t sign the papers for him to join. So he got an apprenticeship and as soon as he turned 21 he joined the Navy. I have used Whisper White 12″ x 12″ card as the base for my page. I attached a 6″ strip of Tranquil Textures Designer Series Paper to the left hand side . I attached the photo to Night of Navy card and slipped the Night of Navy card under the Designer Series Paper to offset the photo.  I printed my journaling onto Whisper White card using the Computer and used the Stitched Nested Labels to cut it out. I stamped the sailing ship image from the Sailing Home stamp set onto scrap Whisper White card using Night of Navy ink. The image is cut out using the co-ordinating Smooth Sailing Dies. The Stitched Nested Labels, the Sailing Home stamp set and the Smooth Sailing Dies will be available when the new catalogue launches in June.
This page turned out just the way I imagined it, with the photo being the main focus.
Bye for now,
Kris
Product Used:


Lacy Flowers

Today I am sharing some cards I created using the Garden Impressions Designer Series Paper and Delightfully Detailed Laser Cut Designer Series paper. I attached the pre-cut panel from the Delightfully Detailed Laser Cut Designer Series Paper to a piece of Garden Impressions Designer Series Paper and then scored and folded Early Espresso card.  I stamped the flower from the Flourishing Phrases stamp set twice onto Whisper White card using Mango Melody ink. I cut out one whole flower and the centre from the second flower. The small flower is attached to the centre of the large flower using dimensionals. I stamped the leaf image from the Flourishing Phrases stamp set onto Whisper White card using Granny Apple Green ink, cut them out and attached them to the back of the large flower.
  The flower is attached to a Whisper White circle cut using the Layering Circle Framelits Dies. The Whisper White circle is attached to an Early Espresso scalloped circle and then the card front. I added a large Clear Faceted Gem to the centre of the flower.
To decorate the inside of the card, I stamped the greeting from the Flourishing Phrases stamp set onto Whisper White card using Granny Apple Green ink. I attached a piece of the same Garden Impressions Designer Series Paper across the bottom of the stamped Whisper White card.
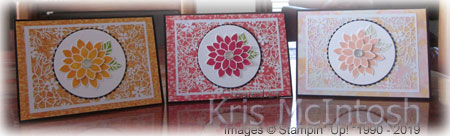 I liked the finished result and created two more cards using Melon Mambo ink and Petal Pink ink. They look pretty don’t they. I am kind of chuffed that I have created three cards today and used six pieces of designer series paper from my stash. Kind of like double dipping!
Bye for now,
Kris
Product Used:


Thinking of You
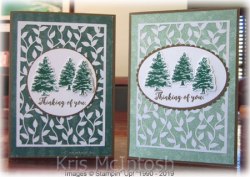
Here are another couple of card which gave me the opportunity to use two different designer series papers on the one card! I attached Delightfully Detailed Laser Cut Specialty Designer Series paper to Tranquil Textures Designer Series Paper and then Soft Suede card. I stamped the double tree image and the single tree image from the Rooted in Nature stamp set onto Whisper White card using Shaded Spruce ink.  The images were cut out using the co-ordinating Natures Roots Framelits Dies. I cut Whisper White card using the Layering Oval Framelits dies and stamped the greeting from the Colourful Seasons stamp set using Soft Suede ink.
 I attached the double tree image above the greeting and the single tree image using dimensionals. I attached the Whisper White oval to a Soft Suede scalloped oval and then the card front.
To decorate the inside of the card, I attached a piece of the same Tranquil Textures Designer Series Paper across the bottom of Whisper White card.
Simple cards, but I kind of like the masculine feel. What do you think?
Bye for now,
Product Used:


Daisy cards
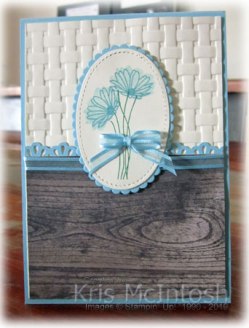
I was happy to see that the Daisy Delight stamp set will be in the next Annual Catalogue and that there will be a co-ordinating stamp set and another, slightly smaller, daisy punch. Woohoo! Anyway I am combining my determination to use up my Designer Series Paper with my passion to use stamp sets that have been a little neglected. This set of cards is one of my first results. I embossed Very Vanilla card using the Basket Weave Dynamic Embossing Folder. I punched a narrow strip of Balmy Blue card using the Decorative Ribbon Border Punch and attached it behind one long edge of Wood Textures Designer Series Paper.  I wrapped the top of the Designer Series paper with a piece of the Balmy Blue Organdy Ribbon (free during Sale-a-Bration) and attached the panel to the bottom of the embossed Very Vanilla card. The whole panel is attached to scored and folded Balmy Blue card. I stamped the stem image from the Daisy Delight stamp set using Call Me Clover ink. I stamped the solid image for the flower using Balmy Blue ink which I stamped onto scrap paper first.
  I stamped the detailed flower image over the top of the solid image using full strength Balmy Blue ink. I cut out the image using an oval from the Stitched Shapes Framelits Dies and attached it to a Balmy Blue scalloped oval cut using the Layering Ovals Dies. The image panel is attached to the card front using dimensionals. I tied a bow in the Balmy Blue Organdy Ribbon and attached it over the flower stems. To decorate the inside of the card, I punched a narrow strip of Balmy Blue card using the Decorative Ribbon Border Punch and attached it behind Very Vanilla card which I embossed using the Basket Weave Embossing Folder. The panel is attached to the bottom of Very Vanilla card.
I liked this card very much and decided to make additional cards using all the colours of the Organdy Ribbon. So I created four more cards in exactly the same way but using Lemon Lime Twist, Highland Heather, Daffodil Delight and Grapefruit Grove.
I love the way these cards turned. I think that the bright colours work perfectly with the Wood Textures Designer Series Paper.
As I said I am on a mission to use up my retiring Designer Series Paper, so you will see it featuring in lots of cards over the coming weeks.
I’d love to hear what you think? Bye for now,
Kris
Product Used:


Mother’s Day card

Wishing everyone a Happy Mother’s Day for last Sunday. Hope you all had a wonderful day. I was able to celebrate by having lunch with my Mum and my Dad. Today I am sharing the card I made for her. I embossed Whisper White card using the Layering Leaves Dynamic Embossing Folder and attached it to scored and folded Gorgeous Grape card. I cut Gorgeous Grape card using the Rectangle Stitched Framelits Dies and attached it to the right hand side of the embossed Whisper White card. I attached a strip of Gorgeous Grape, Brights 6″ x 6″ Designer Series paper to the left hand side, partially covering the Gorgeous Grape rectangle. I cut a rectangle from Whisper White card using the Rectangle Stitched Framelits Dies.  I stamped the long stem image from the Daisy Delight stamp set twice onto Whisper White rectangle using Granny Apple Green ink. I also stamped the shorter multi-stem image twice onto the rectangle. I stamped the flower onto the shorter stem image using Gorgeous Grape ink. The image panel is attached to the card front using dimensionals. I punched two daisies from Whisper White card using the Daisy Punch. I sponged the centre of the flowers using Gorgeous Grape ink and the rest of the petals using Highland Heather ink. I cut one flower into two sections, each containing four petals and the other flower into two sections, each containing three petals.
  I attached the two four section petals on top of each other before attaching the flower to the left hand stem on the card front using Mini glue Dots. I attached the two three section petals on top of each other before attaching them to the right hand stem on the card front, again using Mini Glue Dots. I punched Silver Glimmer Paper using the 1/2″ Circle punch and sponged Gorgeous Grape ink over them. I attached one circle to the centre of each of the flowers.
To decorate the inside of the card, I stamped “happy Mother’s Day” from the Strong and Beautiful stamp set onto Whisper White card using Gorgeous Grape ink. I attached two narrow strips of the same Brights 6″ x 6″ Designer Series paper across the bottom of the stamped card.
This card turned out so pretty and I love the way that you can colour the Glimmer Paper to match the colours in the card.
Once again Happy Mother’s Day to all the Mothers, Grandmothers and perhaps Great Grandmothers for last Sunday
Bye for now,
Kris
Product Used:


