Beautiful Girl

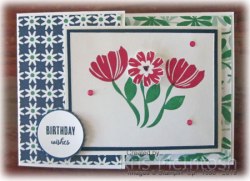
I have a stack of photos sitting on top of my printer, that I removed from old picture frames. Since we had moved a lot, I had frames from over the years and this photo has been sitting on top of that stack for a while. As you know I am on a mission to use up my DSP and when I was looking through the ones I hadn’t cut up yet, I found the Delightfully Detailed Laser Cut paper which I purchased when the catalogue first launched! Again this paper is so beautiful I didn’t quite know how to use it, but it seemed a perfect match for this photo. I attached the Delightfully Detailed Laser Cut paper to a 12″ x 12″ piece of Smoky Slate card. Then I simply attached the photo. My photo was a little damaged on to the lower right hand corner so that is where I decided to add embellishments. I created the title on my computer and printed it onto Whisper White card. The title is cut using the Rectangle Stitched Framelits Dies and attached to a Smoky Slate rectangle cut with the same dies. I stamped the flower from the Flourishing Phrases stamp set twice onto Whisper White card using Calypso Coral ink. I cut out one full flower and only the centre from the second flower. I attached the smaller flower to the full flower using dimensionals. I stamped the leaf from the Flourishing Phrases stamp set twice onto Whisper White card using Pear Pizzazz ink. I cut out the leaves and attached them to the back of the flower and then the card front. Lastly I add a Clear Faceted Gem to the centre of the flower (these will be in the new catalogue).
Since I have separated my retiring stamp sets from the ones that will be carrying over to the new catalogue, I have discovered a few favourites amongst the carrying over sets which have been neglected for a while and the Flourishing Phrases stamp set is one of those.
Again a simple page but one, I hope, inspires you to create pages to share your memories with your family and friends.
Bye for now,
Kris
Product Used:


Your Own Kind of Beautiful
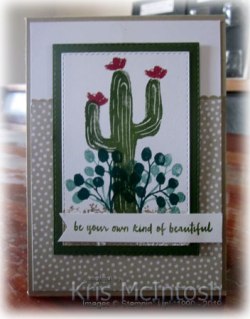
This is another card I created while having fun and using the Flowering Desert stamp set for the first time. To begin with I punched a narrow strip of Crumb Cake card using the Decorative Ribbon Border Punch and attached it behind one short edge of a piece of Crumb Cake Neutrals 6″ x 6″ Designer Series Paper. The Designer Series Paper is attached to Whisper White card and then scored and folded Crumb Cake card. I stamped the large cactus image onto Whisper White card using Mossy Meadow ink and added the smaller flower image using Tranquil Tide ink.  I did stamp the image twice each time without re-inking to create some variation in colour. The cactus flowers are stamped using Cherry Cobbler ink. I stamped the desert sand using the image from the High Tide stamp set and Crumb Cake ink. The image is cut out using one of the Rectangle Stitched Framelits Dies and attached to a Mossy Meadow rectangle cut using the same dies. The image panel is attached to the card front using dimensionals.
  I stamped the greeting from the Flowering Desert stamp set onto a strip of Whisper White card using Mossy Meadow ink. I punched one end using the Triple Banner Punch before attaching it to the card front over the bottom of the image panel.
To decorate the inside of the card, I punched another strip of Crumb Cake card using the Decorative Ribbon Border Punch and attached it behind one long edge of the same pattern of Neutrals 6″ x 6″ Designer Series Paper. The Designer Series paper panel is attached to the bottom of Whisper White card.
Well I hope you have enjoyed this card and the ones I shared earlier using the lovely stamp set. Have you used this one yet? If you have I’d love to hear what you think.
Bye for now,
Kris
Product Used:


Beautiful Bouquet #Avid Stamper
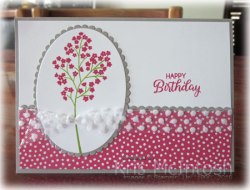
Today’s cards are the last of the Beautiful Bouquet cards I created using a simple image as the inspiration. For the first card, I cut a piece of Gray Granite card using the scalloped edge from the Be Mine Stitched Framelits Dies. I attached the scalloped edge behind one long edge of a piece of Melon Mambo Designer Series Paper from the Brights 6″ x6″ Designer Series Paper. The panel is attached to the bottom of Whisper White card. I stamped the stem image from the Beautiful Bouquet stamp set onto Whisper White card using Granny Apple Green ink.
  I stamped the flower image onto the stem using Melon Mambo ink. The image is cut out using an oval die from the Layering Ovals Framelits Dies and attached to a Gray Granite scalloped oval cut using the same dies. The image panel is attached to the card front before stamping the greeting from the Beautiful Bouquet stamp set using Melon Mambo ink. I tied a knot in the end of Whisper White 5/8″ Polka Dot Tulle, and then attached it across the card front, over the floral image and the top edge of the Designer Series Paper. The whole panel is attached to scored and folded Gray Granite card.
To decorate the inside of the card, I attached a narrow strip of the same Designer Series Paper across the bottom of Whisper White card.
I think these cards look so pretty and I love that I have created three sets of cards using the same focal image and yet they are all different. I would love to hear what you think. Do you think I have created cards to suite the #simple stamper, #casual stamper and today the #avid stamper?
Bye for now,
Kris
Product Used:


Beautiful Bouquet #Casual Stamper

You will remember the set of Note Cards that I shared with you yesterday, well today I am sharing the #Casual Stamper version. I stamped the stem image from the Beautiful Bouquet Stamp set onto Whisper White card using Granny Apple Green ink. I stamped the flowers and the greeting from the Beautiful Bouquet stamp set using Melon Mambo ink. I attached the stamped Whisper White card to Melon Mambo card and then to scored and folded Gray Granite card.
To complete the inside of the card, I stamped the greeting from the Perennial Birthday stamp set onto Whisper White card using Melon Mambo ink. So to complete the set, I created the same card using Melon Mambo, Daffodil Delight and Gorgeous Grape ink and cardstock.
 Don’t they look lovely and still relatively quick and easy to whip up at the last minute. I still have my #Avid Stamper version of this card to share so check back soon.
Bye for now,
Kris
Product Used:

Beautiful Bouquet #Simple Stamping

Today’s cards were inspired by an image I saw on Pinterest. It showed one of the images from the Beautiful Bouquet stamp set, one that I didn’t realise was in the set. So I thought I would do a set of simple cards to show off this image. I stamped the stem image from the Beautiful Bouquet stamp set onto a Whisper White Note Card using Granny Apple Green ink and added the floral image using Melon Mambo ink. I stamped “Happy Birthday” from the same stamp set using Melon Mambo ink. So simple but really quite pretty.
The other three Note Cards are stamped in the same fashion, using Mango Melody, Daffodil Delight and Gorgeous Grape ink for the flowers and sentiment.

Creating these cards, started me thinking about the possibilities for the Casual Stamper. I will share these cards with you soon.
Bye for now,
Kris
Product Used:

Happy Easter
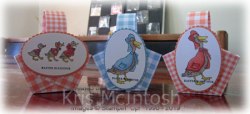
Today I am sharing the small baskets and cards that I made for my grandchildren. The small basket is super easy to make. You take a 6″ x 6″ piece of Designer Series Paper (or cardstock if you wish) and- in this case, I used the Gingham Gala 6″ x6″ Designer Series Paper – scored at 2″ and 4″, rotate 90 degrees and score again at 2″ and 4″. Cut up the score lines to the intersecting score lines on two opposite sides. Fold in the two outside flaps over the top of the central flap and glue together. I cut a 1″ strip of matching Designer Series Paper to create handles. To decorate the front of the baskets, I stamped images from the Fable Friends stamp set onto Whisper White card using Memento Tuxedo Black ink. The images are coloured using the Crumb Cake, Dark Daffodil Delight, Petal Pink, Calypso Coral or Balmy Blue (depending on whether it was for a boy or a girl) Stampin’ Blends. The images are cut out using one of the Layering Circle Framelits Dies and attached to a co-ordinating Grapefruit Grove or Balmy Blue scalloped oval cut using the same dies.

They look lovely don’t they and as I said super easy to make.
 Of course, I also created cards to co-ordinate with the baskets. I created Folding Bridge cards using Thick Whisper White card as my card base. I attached strips of the Gingham Gala 6″ x 6″ Designer Series paper on the outside panels and also on the bridge panel. I embossed either Grapefruit Grove or Balmy Blue card using one of the Petal Pair Embossing Folders to attach to the inside narrow panels.
  To decorate the centre of the panel, I cut “happy” from either Grapefruit Grove or Balmy Blue card using the Well Written Framelits Dies. The die cut is attached to Whisper White card before stamping the greeting from the Fable Friends stamp set using the co-ordinating coloured ink. The Whisper White panel is attached to either Grapefruit Grove or Balmy Blue card. I stamped the bunny rabbit from the Fable Friends stamp set onto Whisper White card using Memento Tuxedo Black ink and coloured the images using Crumb Cake, Petal Pink, Calypso Coral or Balmy Blue Stampin’ Blends. The images are cut out using one of the ovals from the Layering Ovals Framelits Dies and attached to either a Grapefruit Grove or Balmy Blue scalloped oval. The image panels are attached to the left hand side of the card front taking care to only put adhesive where it is needed. I attached a panel of Whisper White card on either Grapefruit Grove or Balmy Blue card to the back of the card so that I could write a message to my grandchildren.
 It takes a little bit of work to create these gifts for my grandchildren but I know they love and appreciate that I make something special for them. Of course, I love creating for them as well!
Wishing each and every one of you a Happy Easter.
Bye for now,
Kris
Product Used:


Stylish Birthday
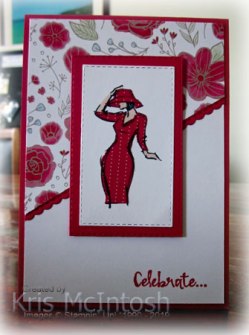
A neighbour of mine recently celebrated a milestone birthday and today I am sharing the card I created for her. I cut a piece of the All My Love Designer Series Paper on the diagonal. (Since I started following Kylie Bertucci on her Facebook Page #Love it Chop it, I am getting so much more use from the Designer Series Paper.) I cut a piece of Lovely Lipstick card using the die from the Be Mine Stitched Framelits Dies and attached it behind the diagonal edge of the Designer Series Paper before attaching it to Whisper White card. I stamped the greeting from the Beautiful You stamp set onto the lower right hand corner of the Whisper White card using Lovely Lipstick ink.  The whole panel is attached to scored and folded Lovely Lipstick card. I stamped the image from the Beautiful You stamp set onto Whisper White card using Memento Tuxedo Black ink and cut it out using one of the Rectangle Stitched Framelits Dies. I stamped the same image onto the reverse side of the All My Love Designer Series paper and cut out the dress and the hat.
  Before attaching the Designer Series Paper pieces to the stamped image I coloured where necessary using the Ivory Stampin’ Blend. The image panel is attached to Lovely Lipstick card cut using the Rectangle Stitched Framelits Dies. The whole panel is attached to the card front using dimensionals.
To decorate the inside of the card, I used the Well Written Framelits Dies to cut “happy” and “birthday” from Lovely Lipstick card. I cut “birthday” once more and trimmed out the “th”. The numbers are cut from the same card using some old Sizzix dies I had stashed away. The words and numbers are attached to Whisper White card.
I love how this card turned out. Stylish but relatively simple. Paper piecing the stamped image takes it to a new level as well, don’t you think?
Bye for now,
Kris
Product Used:


Joy Fold Birthday
Today’s card is a Fancy Fold card called a Joy Fold. To create these cards, you cut a normal card base and then trim down the left hand side to about 1/2. You cut another smaller folding card which is attached to the inside of the base of the main card so that the fold is facing to the right.  I cut the two card bases from Thick Whisper White card. I used a piece of Happiness Blooms Designer Series paper to decorate the inside of the base card and the reverse side of the same Designer Series paper to decorate the small fold on the left. To decorate the front of the smaller folding card, I stamped the small flower stem from the Bloom by Bloom stamp set three times onto Whisper White card using Call Me Clover ink.
 I stamped the small flower onto the two outside stems using Lovely Lipstick ink. I stamped the third flower onto scrap Whisper White card and cut it out by hand. The hand cut flower is attached to the centre flower stem using dimensionals. I added a Night of Navy Happiness Blooms Enamel Dot to the centre of the popped up flower. I randomly added three of the Lovely Lipstick Enamel Dots around the stamped images. The image panel is attached to Night of Navy card and then the small card front. To decorate the inside of the card, I stamped the dotted border image from the Bloom by Bloom stamp set across the bottom of Whisper White card using Lovely Lipstick ink. The stamped panel is attached to Night of Navy card and then the inside of the smaller card base.
  To hold the card closed, I stamped “birthday” and “wishes” from the Tabs for Everything stamp set onto scrap Whisper White card using Night of Navy ink. I punched out the greeting using the 1-1/4″ circle punch and attached it to a Night of Navy 1-3/8″ scalloped circle. The greeting is attached to the front left hand flap using dimensionals so that the front of the smaller card sits under the greeting to hold the card closed.
I love these type of cards. It’s such an easy card to make and you really don’t have to stick to set dimensions. Hope that the young lady this is going to loves it as much as I do.
Bye for now,
Kris
Product Used:


What’s coming Up
There is are so many things going on at Stampin’ Up! over the next few weeks, that I thought I would try and put them all down in one post for you. You need a cuppa to get through all this information!
Firstly, the retiring lists are here! Can you believe it, a whole year has gone since the excitement of our last Annual Catalogue. Anyway you can view the retiring list for the Occasions Catalogue here and the Annual Catalogue here. Now once you have looked at these lists you will be a little overwhelmed as it seems like everything is retiring, well that’s not exactly true BUT Wood Mount and Clear Mount stamps are retiring. So some of the stamps on your lists will only be there because they are presently Wood Mount or Clear Mount. In the next Annual Catalogue we will only have Cling Mount stamps or Photopolymer so you can view the list here of what will not be retiring completely as they will be in the new catalogue as Cling Mount stamps.
Still on the retiring product, you will notice that the Big Shot and all its accessories and the Paper Cutter and all its accessories are also retiring. If you have a Big Shot, that’s great, you can still find accessories including cutting plates wherever Sizzix products are sold. The Paper Cutter unfortunately is another matter and accessories for this product are selling out fast. The reason these two products and their accessories are retiring is because Stampin’ Up! is working on tools that will best meet our needs as Stampin’ Up! customers. Unfortunately, this process has taken longer than expected but personally I cannot wait to see what’s in store, especially since the release of the Stamparatus! So as you can imagine, these products will sell out quickly.
Secondly, Stampin’ Up! has a great promotion beginning on the 1st of May and finishing on the 31st May to purchase a fabulous Product Bundle called Everything is Rosy which will cost $139.00. The bundle will be sold on a While Stocks Last basis, so if you want this bundle do not wait to place your order! The bundle includes a stamp set, co-ordinating framelits, designer series paper, foil paper, die cuts, ribbon and more. While the bundle doesn’t clear blocks you will, I am sure, already have these in your stash. This Bundle is unlike anything that has been released before. It doesn’t come with instructions on how to use the kit, rather leaving it to your imagination to create as you wish. Of course there will be many samples appearing on the net and via Stampin’ Up! so you will have some inspiration. Please watch this short video to see the amazing products contained in this bundle to see what amazing value it really is.
Another great product release during the month of May is a one off Paper Pumpkin kit – Hugs from Shelli – which will be available on the 15th May while stocks last. Paper Pumpkin has been around in the United States for a long while and lets people subscribe to the kit each month or for a longer 3, 6 or 12 month period. We don’t have this yet in Australia but Shelli, the co-founder of Stampin’ Up! has worked with the Paper Pumpkin team to create a special kit in her style. Stampin’ Up! have decided that it is so special they are going to share it with everyone in all their markets. So the kit will be released on the 15th May as a one off purchase in Australia for a cost of $37.00. The kit holds enough product to complete 12 cards, three each of four designs, which is pretty amazing value don’t you think. This is a quick run down of what the kit includes –
- An exclusive stamp set not available anywhere else
- One Classic Stampin’ Spot® from our Classic ink collection
- Paper and crafting materials to create 12 cards (3 cards of 4 unique designs)
- 12 exclusive, coordinating envelopes
- Adhesives and embellishments for all 12 cards
And the co-ordinating colours for the kit are – Crumb Cake, Early Espresso, Old Olive, Petal Pink, Pool Party, Pretty Peacock (one of the new in-colours for the 2019 Annual Catalogue), Soft Suede and Very Vanilla. Please watch the video below to see what Shelli has to say about this great kit.
The last thing I want to talk about is the amazing new storage options Stampin’ Up! have released. These have been available for purchase since the 1st April and will be in the next Annual Catalogue so it is a continuing product. I have just got my first batch of these great storage options and thought I would share my new look with you. It is a work in progress, which will change over time I am sure, but the difference in the space from before

to after is amazing, don’t you think.

So check out these great options at my online store. You can use this PDF to check out the prices and this one to see how many you need to store your Stampin’ Up! product. Please be aware that the Ink Pad and Marker storage will not fit the old style pads only the new style.
Whew, that was a long post, but hopefully will help you with all the great things going on this month and into the future.
Bye for now,
Kris
Quick Acceptance
I needed to make an acceptance card for neighbours who invited us to their wedding and finally got around to it. I cut a flower stem cut from Mossy Meadow ink using the Bouquet Bunch Framelits Dies. I used one of the flower dies to cut Gorgeous Grape, Island Indigo (retired), Coastal Cabana, Garden Green, Daffodil Delight, Pumpkin Pie and Real Red card. I attached a length of Braided Linen Thread to the back of the flower stem before attaching it to a Whisper White Note card.  I attached the flowers over the ends of the flower stem using Multipurpose Glue. To add a little more interest, I painted over all of the flowers using the Clear Wink of Stella. I tied a bow in the Braided Linen Thread and frayed out the ends.
Simple but effective, don’t you think?
Bye for now
Kris
Product Used:


