It’s arrived
Today is the day that you too can start purchasing from the 2017 Holiday Catalogue. What a great catalogue it is too! If you don’t have a catalogue and don’t have a Stampin’ Up! Demonstrator, please contact me so that we can talk about how you can get one. There is a link to the catalogue in the side-bar so that you can download it and have a look before you get a copy. Or you can click on the photo to download the catalogue.

Today also marks the beginning of an opportunity to earn an exclusive stamp set. The stamp set is called Merry Patterns and is available to anyone who Hosts a Party or creates an order which reaches $450.00. This is in addition to any other benefit or Freebies you might qualify for. So with the launch of a new catalogue, everyone has a long wish list, so why not buy what you want and pick up a bargain at the same time. You do not have to host a party as such, although this is a great way to get the things on your Wish List without spending so much money yourself, you can simply place a qualifying order of $450.00 and you will automatically receive the Merry Patterns stamp set. There are many ways you can qualify for this stamp set, so if you need any details please do not hesitate to contact me.

Sooo, while all these great things are happening today, I have to apologise for having the worst blogging week I have had in a long time. Things just didn’t go my way this week, visitors and other things just kept getting in my way. Not that I’m complaining we had a lovely time with our visitors, I just didn’t get time to create. So hopefully, life is back to normal and my blogging will get back to being more regular.
Don’t forget to check out the Holiday Catalogue and the Merry Patterns stamp set.
Bye for now,
Kris
With Sympathy
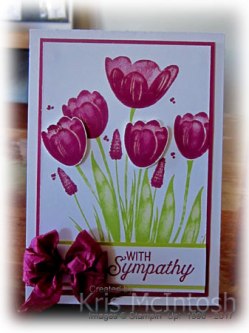
Today’s card was created using the sketch challenge at Case This Sketch. I decided to use the Hostess Set Tranquil Tulips to create my card. I started by stamping the long single stem and the short narrow stem using Lemon Lime Twist ink onto Whisper White card. I added several leaves, long and short to the page using the same ink. I stamped the large flower and two medium flowers directly onto the Whisper White card using Berry Burst ink. I also added the cone shaped flowers using the same ink. I stamped two medium flowers onto scrap Whisper White card using Berry Burst ink and cut them out. I attached them to the flower stems using dimensionals. Lastly I stamped the small dots around the flowers for some added interest. I stamped “with Sympathy” from the Flourishing Phrases stamp set onto Whisper White card using Berry Burst ink and attached it to a strip of Lemon Lime Twist card. The greeting panel is attached across the bottom of the stamped card. I attached the Whisper White card to Berry Burst card and then scored and folded Thick A4 Whisper White card.
  I tied a bow in a length of Berry Burst 1/2″ Crinkled Seam Binding and attached it to the left hand side of the greeting panel.
To decorate the inside of the card, I stamped one lone and one short flower stem and one large and one small leaf using Lemon Lime Twist ink. I stamped the flowers directly onto the card using Berry Burst ink.
I did alter the sketch slightly by adding my ribbon to the left hand side and not the right, but I don’t think that will matter. I love the colours in this card, even for a Sympathy card, don’t you.
Bye for now,
Kris
Product used:


Wedding Washi

Recently I shared this card with you that I created for my Technique Class in October? Well, when I created that card I had a couple of pieces of card decorated with Pick a Pattern Washi Tape left over. So I decided to create another card. I embossed Whisper White card using the Sweetheart Embossing Folder and attached it to scored and folded Basic Black card. I cut a layer of Whisper White card and Basic Black card and attached them together.  I used the rectangle of card that I cut the hearts from as a guide and stamped the greeting from the Butterfly Basics stamp set onto the Whisper White card using Real Red ink. I attached the stamped panel to the card front. I tied a bow around one edge of the Washi Tape rectangle using Cherry Cobbler 1/4″ Double Stitched Ribbon and attached it to the card front using dimensionals.
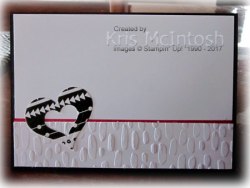 To decorate the inside I embossed a narrow strip of Whisper White card using the Sweetheart Embossing Folder. I attached a narrow strip of Real Red card behind one long edge before attaching to the bottom of Whisper White card. I attached the last Washi Tape heart over the left hand side of the embossed card.
I love using up bits and pieces like this – a two for one – if you like. Hope you enjoyed my “leftover” card, let me know what you think. Just to show you the two variations here is a photo of both cards together.

Now let me tell you, it wasn’t until I was putting the icons together for the product used that I realised that the ribbon was Cherry Cobbler and not Real Red. Lucky for me it works anyway!
Bye for now,
Kris
Product Used:


Global Design 101

The current challenge at Global Design Project is a colour challenge. I don’t usually play along with these, however, I had seen a card by Rebecca Borkowski which used the Wood Words stamp set to create a background and I thought I would combine my CASE with the colour challenge.
I stamped the large circle image from the Wood Words stamp set onto Whisper White card using Flirty Flamingo, Night of Navy and Bermuda Bay ink. I alternated the colours in rows across the Whisper White card. I embossed another piece of Whisper White using the Polka Dot Basics Embossing Folder and attached the stamped panel to the bottom.  I attached a strip of Bermuda Bay card across the top of the stamped card and then cut a Delicate White Doily in half and attached it so that the cut edge matched the top of the Bermuday Bay card. The Whisper White panel is attached to Bermuda Bay card and then scored and folded Night of Navy card. I stamped the greeting from the Butterfly Basics stamp set onto Whisper White card using Night of Navy ink. The greeting is cut out using one of the circles from the Layering Circles Framelits Dies. I cut a scalloped circle from Bermuda Bay card using the same dies and attached the greeting. The greeting is attached to the card front using dimensionals.
  I tied a bow in the Night of Navy 5/8″ Crinkled Seam Binding and attached it to the greeting panel using a glue dot.
To decorate the inside of the card, I stamped a narrow panel of Whisper White, once more using the circle image from Wood Words and Flirty Flamingo, Bermuda Bay and Night of Navy ink. I attached a narrow strip of Bermuda Bay card behind one long edge and attached the panel to Whisper White card.
I do not have a link to the actual card shared by Rebecca (I can’t seem to find it), but here is a link to her blog. Thank you so much Rebecca for sharing your card and giving me the inspiration I needed. Thanks also to Global Design Project for the colour inspiration.
I’d love to hear what you think of my card.
Bye for now,
Kris
Product Used:


Washi Tape Technique
 A little while ago I bought a set of technique tutorials from Elizabeth Shannon, a very talented UK Stampin’ Up! Demonstrator. I have slowly been working on my collection and trying to decide how to share these techniques with my customers. So to cut a long story short, I have decided that every couple of months, my monthly class will be based on techniques. We will create five technique cards with instructions and we will make one card using each of the 5 techniques. I am storing my technique and sample cards in the 6″ x 8″ Memories and More Album, however, I am leaving their storage option up to my customers.
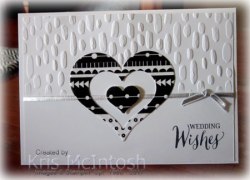
Today I am going to share with you the card I created to go with the Punched Washi Tape technique (only my card uses framelits to create the shapes. I embossed Whisper White card using the Sweetheart Embossing Folder to emboss the top half of the card only. I stamped the greeting from the Rose Wonder stamp set onto the bottom right hand corner of the embossed card. I wrapped the bottom of the embossing using the Silver 1/8″ Ribbon and tied a knot before attaching to scored and folded Thick A4 Whisper White card. I attached lengths of the Pick a Pattern Washi Tape across a piece of Whisper White card and then used the Sweet and Sassy Framelits Dies to cut out 3 different heart sizes. I attached the largest of the pieces I created to the card front and attached the smallest heart inside the larger heart shape using Mini Dimensionals.
To decorate the inside of the card, I embossed a strip of Whisper White card using the Sweetheart Embossing Folder and attached it across another piece of Whisper White card. I ran a length of Pick a Pattern Washi Tape across the top of the embossed card.
I love how cute this card turned out. Don’t you. I am also a big fan of black and white cards, another reason to love this card.
Bye for now,
Kris
Product Used:


A Floral Case
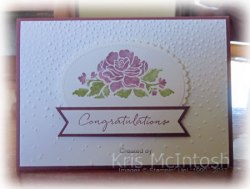 This is the last card I CASED last weekend. It is cased from my friend and fellow demonstrator Vicky Wright. Vicky’s card is so gorgeous I CASED it almost exactly. I embossed Whisper White card using the Softly Falling Embossing Folder and attached it to scored and folded Rich Razzleberry card. I inked the image from the Floral Phrases stamp set using Rich Razzleberry and Old Olive Stampin’ Write Markers. I cut the image using the largest oval in the Stitched Shapes Framelits Dies.
 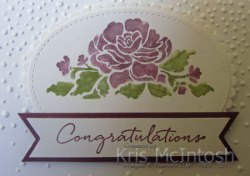 I also cut a scalloped oval from Whisper White card using the Layering Oval Framelits Dies. I stamped the greeting from the Floral Phrases stamp set onto Whisper White card using Rich Razzleberry ink. I punched each end of the greeting using the Triple Banner Punch. I attached the greeting to a banner cut from Rich Razzleberry card.
  I attached the banner to the ovals and then the card front using dimensionals.
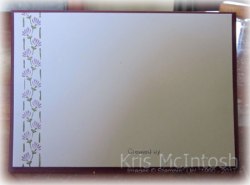
To decorate the inside of the card, I followed Vicky’s lead and inked the border image using the same markers and stamped down the left hand side of the Whisper White card.
Oh my goodness, this card is so pretty. Thank you so much Vicky for the inspiration. I’m not sure if I like the addition of the Rich Razzleberry behind the greeting or not. What do you think? Should I have left if off like Vicky did?
Bye for now,
Kris
Product Used:


Another Idea Cased

Here is another card inspired by one I saw when I was browsing the internet on Saturday. This one is inspired by one share by Angelique Nederpel in a blog hop post. I loved her layout and the use of a butterfly which inspired me to break out my butterfly stamps. I stamped the border image from the Watercolour Wings stamp set across the Whisper White card using Fresh Fig ink. I attached a piece of Tranquil Tide paper from the Florals Designer Series Paper Stack. I stamped the greeting from the Window Shopping stamp set below the stamping using Fresh Fig ink. I attached the stamped panel to scored and folded Fresh Fig card.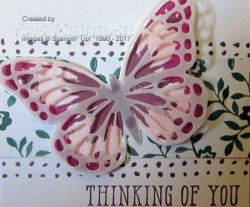 I stamped the first image for the large butterfly from the Watercolour Wings stamp set onto scrap Whisper White card using Powder Pink ink. I stamped the second image over the top using Berry Burst ink. The third image is stamped using Fresh Fig ink.
  I cut the image using the matching Bold Butterfly Framelit Die. I stamped the body of the butterfly using Fresh Fig ink. I cut the matching detailed butterfly from Vellum Cardstock using the matching Butterflies Thinlits Die. I attached the Vellum butterfly to the stamped butterfly using Glue Dots along the back of the body. I attached the butterfly to the card front also using Glue Gots along the back of the body only. I did fluff the wings a little so as it has some dimension.
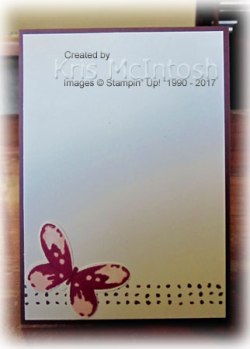
To decorate the inside of the card, I stamped the dotted border image across the bottom of the Whisper White card using Fresh Fig ink. I stamped the small butterfly image onto scrap Whisper White using Powder Pink ink. I stamped the detailed image over the top using Berry Burst ink. I cut the butterfly using the matching Butterflies Thinlits Die and then stamped the body using Fresh Fig ink. I attached the butterfly image onto the lower left hand corner of the Whisper White card.
Thanks again Angelique for the inspiration to create my card.
Bye for now,
Kris
Product Used:


Casing Ideas
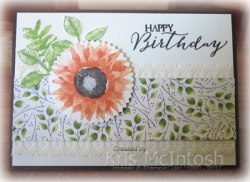
Today I spent a little time following a blog hop with ideas for the Holiday Catalogue and spying on what other demonstrators are sharing on a Demonstrator only facebook page. I was inspired to create several cards, some are an exact case and some use the same products but in a slightly different way.
The first card I am sharing with you is inspired by a card on this post by Chris Smith. I used the same designer series paper and lace trim but changed the orientation and greeting. So thank you Chris for your inspiration.
I attached Very Vanilla 1/2″ Lace Trim behind each long edge of a strip of Painted Harvest Designer Series Paper. This paper is absolutely gorgeous and you will be able to purchase it once the Holiday Catalogue has gone live on 1st September. The Designer Series Paper is attached to Very Vanilla card.  I stamped the greeting from the Butterfly Basics stamp set onto the top right hand corner using Early Espresso ink. I stamped the long frilly edged leaf from the Painted Harvest stamp set onto the top left hand corner. This is a two step image, so the first image is stamped in Lemon Lime Twist and the second image in Garden Green. I stamped the three petal leaf onto scrap Very Vanilla card. This is also a two step image and I used the same inks – Lemon Lime Twist and Garden Green. I punched the leaf using the matching Leaf Punch. The punched leaves are attached over the top of the stamped leaf using Glue Dots. I stamped the flower onto scrap Very Vanilla card. This is also a two step image. I stamped the first image in Peekaboo Peach and the second image over the top using Tangerine Tangeo.
 I punched the image using the Starburst Punch. I stamped the centre of the flower using Early Espresso ink which I stamped onto scrap paper first to give a lighter image. The flower is attached to the card front using dimensionals.
To decorate the inside of the card I once more stamped the frilly edged leaf using Lemon Lime Twist and Garden Green ink. I also stamped and punched the three petal leaf using the same colours.
I am really loving the Painted Harvest stamp set and the co-ordinating products. I am sure that you will love it too once you begin to imagine the possibilities. I’d love to hear what you think.
Once more a big thank you to Chris for her inspiration.
Bye for now,
Kris
Product Used:


August Memory Keeping Class

I have updated my Classes and Workshops page with details for the August Memory Keeping Class but I thought I would share the page here as well.
We are still using our kits with the Colour Theory Memories and More Card Pack and the Colour Theory Designer Series Paper. For this page I cut the darker piece of Dapper Denim Designer Series paper into 2″ strips and used two pieces to create the long strip on the right hand side of the Whisper White 12″ x 12″ card. I stamped the outline circle image from the Playful Background stamp set onto the left hand side of the page using Dapper Denim ink. I stamped the solid circle image from the same stamp set over the top of the Dapper Denim Circles using Crushes Curry ink. I cut the other piece of Designer Series paper in half and attached it to the page over the top of the strip of Designer Series paper. I attached two 3″ x 4″ photos, one to the left hand side of the page and the other to the right hand side of the page. I attached the 3″ x 4″ journaling card to the 4″ x 6″ photo, wrapped them with Crushed Curry Mini Chevron 3/8″ Ribbon and tied a knot. The photo and journaling card are attached to the page slightly covering each of the smaller photos. A simple page but that’s my favourite kind of Memory Keeping. Stampin’ Up! make it so easy with so many co-ordinating products, don’t you think?
Check out the Class and Workshops page for more details about the class and if you live near me and would like to attend, don’t delay in reserving your place as space is limited.
Bye for now,
Kris
Product Used:


Christmas Sneak Peak

Today I am sharing a very quick card I made using up some left over kits from my card class last Tuesday. I was also lucky enough to receive delivery of some more goodies from the upcoming Holiday Catalogue this morning and I decided to use the Watercolour Christmas stamp set to create this quick but cute Christmas Card.
I embossed the top two-thirds of Whisper White card using the Softly Falling Embossing Folder and stamped the tree image from the Watercolour Christmas stamp set onto the bottom right hand corner of the embossed card using Garden Green ink. I wrapped the bottom of the embossing using the Real Red Mini Tinsel Combo Trim before attaching to scored and folded Real Red card.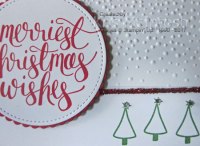 I stamped the greeting which is also from the Watercolour Christmas stamp set onto Whisper White card using Real Red ink before cutting it out using the largest of the circles in the Stitched Shapes Framelits Dies. I attached the greeting to a Real Red scalloped circle cut using the Layering Circle Framelits Dies and then the card front using dimensionals. I added a small Basic Rhinestone to the centre of the stars at the top of the trees.
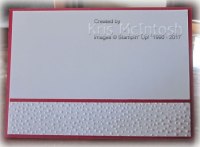
To decorate the inside of the card I attached a narrow strip of Real Red card behind one long edge of Whisper White card embossed using the Softly Falling Embossing Folder. The embossed card is attached to the bottom of Whisper White card.
 This is such a great stamp set which I am sure you will love. It has three very large greetings in the set, three tree images and a great stamp to complete the inside of your cards. The stamp set is designed to co-ordinate with the Watercolour Christmas card Project Kit. This kit contains everything you need (except the stamp set) to create 20 Christmas cards.
I was happy to use up the pieces I had laying on my desk. I usually end up with a fair bit of waste from my card classes but not this time. I think I will create a few more cards using up the remaining pieces.
I’d love to know what you think.
Bye for now,
Kris
Product Used:







