Delightful Birthday

I have a friend who celebrated her birthday yesterday and I thought I would share the card I made for her with you. This one is once more full of new product but it is only a couple of days now till the new catalogue launches.
I cut two pieces of Fresh Fig designs from the Fresh Florals Designer Series Paper Stack and attached them to the left hand side of Whisper White card. I stamped the greeting from the Vertical Greeting stamp set onto the right hand side of the Whisper White card using Fresh Fig ink.  I wrapped the edges of the designer series paper with Fresh Fig 1/2″ Finely Woven Ribbon and attached the Whisper White card to scored and folded Fresh Fig card. I stamped the flower stem from the Daisy Delight stamp set twice onto Whisper White card using Lemon Lime Twist ink. I stamped the solid leaf twice onto scrap Whisper White card using Lemon Lime Twist ink which I stamped off once first. I stamped the outline leaf over the top of the solid leaf using Lemon Lime Twist ink and cut them out. The hand cut leaves are attached to the flower stems. I cut out the images using a circle from the Layering Circle Framelits Dies and attached it to a scalloped circle cut from Fresh Fig card.
  The image panel is attached to the card front. I stamped the daisy from the Daisy Delight stamp set onto Whisper White card using Fresh Fig ink. I punched the flowers out using the co-ordinating Daisy Punch, cut the flowers in half and stacked them on top of each other to create the flowers. (The Daisy Delight stamp set and the Daisy Punch are available to purchase as a bundle when the new catalogue goes live.) I stamped the flower centre onto scrap Whisper White card using Fresh Fig ink and punched them out using the 1/2″ Circle Punch. I attached the flower centres to the flowers and attached one flower to the left hand stem. I attached the second flower to the right hand stem using dimensionals.
  Lastly I added a Clear Faceted Gem to the centre of each flower.
To decorate the inside I stamped the flower stem onto the lower left hand corner of Whisper White card using Lemon Lime Twist ink. I stamped and cut out the leaf image and attached it to the flower stem. I stamped cut, layered and attached another flower stamped using Fresh Fig ink. I also stamped the flower centre using Fresh Fig ink, punched it out using the 1/2″ Circle Punch and attached it to the flower.
After creating this card, I needed to find some packaging for the gift. I had a large plain white gift bag in my stash and created a panel to go across the front of the back to match the card. I stamped the stem, leaves and flower and created a circle panel as I did for the front of the card. I also used a new die, the Happy Birthday Thinlit to create a greeting from Fresh Fig card. The circle and the greeting are attached to Whisper White card and then Fresh Fig card.  I love how this co-ordinates the card and the gift for a total Wow.
Anyway, I love this card and gift bag. At first I thought it might have been a little too dark using just the one colour, but the addition of the Lemon Lime Twist is absolutely perfect and gives it just the right amount of zing. I am also loving those faceted gems, so pretty. I can’t wait for this new catalogue to go live. What about you, are you getting excited.
Bye for now,
Kris
Product Used:


Touches of Texture Take Two
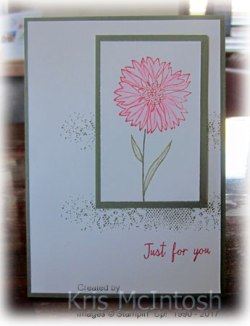
Here is the second card I made whilst I was playing – er I mean experimenting with the Touches of Texture stamp set. I once more stamped the border background image across the bottom of Whisper White card using Tranquil Tide ink. I stamped the large dotted background twice above the border using Powder Pink ink. I attached the stamped card to scored and folded Tranquil Tide card.  I stamped the flower image onto Whisper White card using Memento Tuxedo Black ink. I coloured the image using Berry Burst and Lemon Lime Twist Stampin’ Write Markers. The image is cut out using the largest oval in the Stitched Shapes Framelits Dies and attached to a scalloped oval cut from Berry Burst card using the Layering Ovals Framelits Dies. The image panel is attached to the card front using dimensionals. Lastly I added small Basic Pearls to the centres of some of the flowers.
 To decorate the inside of the card, I inked “thinking of you” from the Thoughts and Prayers stampset using Tranquil Tide ink and stamped the greeting onto the centre of Whisper White card. I stamped the large dotted background image over the top using Powder Pink ink.
This is still quite a simple card. Letting the stamps speak for themselves and not too much fuss or decoration. I think I like this one slightly better than the last one, what do you think?
Bye for now,
Kris
Product Used:


Touches of Texture
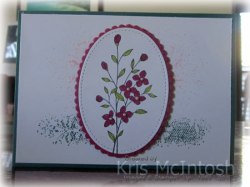
When I found out that Gorgeous Grunge was retiring and that Touches of Texture was not, I decided I needed to buy it. Today is the first time I have had a play with this stamp set. I have seen many gorgeous cards created using elements from this stamp set but my card today is fairly simple.
I stamped the border background image twice onto Whisper White card using Always Artichoke ink. I stamped the greeting from the Watercolour Wings stamp set below the border using Rose Red ink.  I attached the stamped card to scored and folded Always Artichoke card. I stamped the stem and leaf image onto Whisper White card using Always Artichoke ink and then used my Aqua Painter to move the ink, so that the image appears more coloured.
  I stamped the flower using Rose Red ink and once more used my Aqua Painter to spread the ink to colour the flower. I attached the stamped card to Always Artichoke card and then the card front using dimensionals.
To decorate the inside I stamped the border image across the bottom of Whisper White card using Always Artichoke ink.
I don’t know if I am truly loving this card or not but I am happy to have used the stamp set and realise that it has a lot more potential. I’d love to hear what you think.
Bye for now,
Kris
Product Used:


Delightful Daisies
 Firstly let me apologise for not posting yesterday. With my catalogue launch only about 8 days away I have been trying to get some samples done to showcase some of the new product from the 2017-2018 Annual Catalogue. So sorry about yesterday but hopefully I won’t miss any more posts.
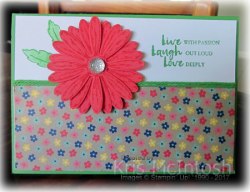
Today I am sharing a card that I made using a new stamp set Daisy Delight. What a great stamp set! I am sure you have already seen many examples on social media. So many possibilities. Anyway, I started by embossing the top third of Whisper White card using the Petal Burst Embossing Folder. I stamped the greeting from the Daisy Delight stamp set onto the bottom of the embossed card using Night of Navy ink.  The greeting uses two stamps from the set. I wrapped the bottom of the embossing with 5/8″ Burlap Ribbon and then over the top with Daffodil Delight 1/4″ Double Stitched Ribbon. The embossed card is attached to scored and folded Night of Navy card. I stamped the stem image onto Whisper White card using Old Olive ink. The solid flower is stamped using Soft Sky ink and the detail flower over the top using Night of Navy ink.
  The image panel is cut using a circle from the Layering Ovals Framelits Dies and attached to a Night of Navy scalloped circle cut using the same dies. The image circle is attached to the card front using dimensionals.
To decorate the inside of the card I embossed Whisper White card using the Petal Burst Embossing Folder, attached a narrow strip of Night of Navy card behind one long edge and then attached it to the bottom of Whisper White card.
The more I have this set out, the more I realise its great potential. I am sure I will be sharing many samples using this lovely stamp set.
Bye for now,
Kris
Product Used:


It’s all about the shoes
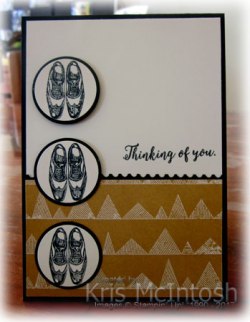
I wanted to create a male card for my class at Beachmere this week and saw a card that had been created by Irenes Bastelzimmer who is a very talented Stampin’ Up! demonstrator. It was a cute card created back in 2012 with current Stampin Up! So this is my version of her card which you can find on Pinterest as well.
I punched a narrow strip of Basic Black card using the Ticket Tear Border Punch and attached it behind one long edge of a piece of the now retired and sold out Urban Underground Designer Series paper.  The designer series paper is attached to the bottom of Very Vanilla card. I stamped “thinking of you” from the Colourful Seasons stamp set (new to the 2017-2018 annual catalogue) above the designer series paper using Memento Tuxedo Black ink. (Now that I have posted this online, I think I stamped the greeting a little crooked – oh well.) The stamped panel is attached to scored and folded Basic Black card.
 I stamped the shoe image from the Guy Greetings stamp set onto Very Vanilla card using Memento Tuxedo Black ink. The images are punched out using the 1-1/4″ Circle Punch and attached to Basic Black 1-3/8″ circles. I attached the image circles to the left hand side of the card front. The second circle has dimensionals under the top and the top image is attached using dimensionals only.
To decorate the inside of the card, I attached a piece of Basic Black punched with the Ticket Tear Border Punch behind one long edge of a narrow strip of the same designer series paper I used on the front of the card. The panel is attached to Very Vanilla card.
A very simple card but one that I think most guys would like because it is so simple. What do you think?
Bye for now,
Kris
Product Used:


Just Add Ink sketch challenge #360
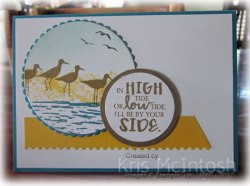
I was looking for some inspiration to get me crafting and found the sketch challenge at Just Add Ink. I love the High Tide stamp set which I thought would work well with this sketch.
I punched one edge of Crushed Curry card using the Ticket Tear Border Punch (from the soon to be released annual catalogue) and trimmed one end on an angle. The punched card is attached to Whisper White card and then scored and folded Island Indigo card. I cut Whisper White card using the largest circle in the Layering Circle Framelits Dies and stamped the water image from the High Tide stamp set across the bottom using Island Indigo ink. I stamped the sand image above the water using Crushed Curry ink. I sponged the top part of the circle using Soft Sky ink. The water birds are stamped using Soft Suede ink and the birds in the sky are stamped using Memento Tuxedo Black ink. I cut Island Indigo card using the largest scalloped circle from the Layering Circle Framelits Dies and attached the stamped circle before attaching to the left hand side of the card front. I stamped the greeting from the High Tide stamp set onto Whisper White card using Soft Suede ink and punched it out using the 1-3/4″ Circle Punch. The greeting is attached to a Soft Suede 2″ circle and then the card front using dimensionals.
 To decorate the inside of the card, I stamped the sand image using Crushed Curry ink and added the grass stamped in Always Artichoke.
I am pretty happy with this one, I always take a little while to get motivated if I have been out of the craft room for a couple of days, so it’s nice to create something I like. Does that happen to you? You go away to relax and while you’re away you miss crafting, then you get home and suddenly no mojo. Thank heavens for sketch challenges and Pinterest!
Bye for now,
Kris
Product Used:


A Lovely Card

Just recently I shared with you the scrapbook page we will be making at our Memory Keeping Class this month. This is a very fluid kind of class where everyone is able to be creative in their own way. One of the ladies who comes along is not a scrapbooker but loves making cards, so I decided to design two cards for her using the same Hello Lovely Project Life Card Collection (sorry this one is already sold out but I’m sure you could do this with any of the Card Collections).
For this first card I embossed Soft Sky card using the Softly Falling Embossing Folder and attached it to scored and folded A4 Thick Whisper White card. I attached the 3″ x 4″ Hello Lovely Project Life Card to Soft Suede card and then the card front. I stamped the greeting from the Butterfly Wishes stamp set onto Whisper White card using Peekaboo Peach ink and cut it out using an oval Stitched Shapes Framelit Die. The greeting is attached to a Soft Suede scalloped oval cut using the Layering Ovals Framelits Dies and attached to the card front using dimensionals. To decorate the inside I attached Soft Sky card which is embossed using Softly Falling Embossing Folder.
 The second card using the other two 3″ x 4″ Hello Lovely Project Life cards that were used on the 12″ x 12″ scrapbook page. I flipped over the card which I used for the title on the scrapbook page and using the striped pattern on the reverse side. The card is attached to Whisper White card and then scored and folded Soft Suede card.
  I inked the greeting from the Thoughts and Prayers stamp set using Soft Suede ink and stamped onto the other 3″ x 4″ card. The card is attached to Soft Suede card and the the card front using dimensionals. To decorate the inside I used another 3″ x 4″ card from the collection and fussy cut out one of the flower images and attached it to the lower left hand corner of Whisper White card before attaching it to the inside of the card.
I think these are such lovely cards and so quick and easy to make using the Project Life Card Collections. I am going to have to have a look at what is left in my stash and see what other cards I can create.
What about you, do you have some cards left over that you don’t need in your scrapbooking? Why don’t you create a card and share it with me?
Bye for now,
Kris
Product Used:


Something Old/Something New
This card today uses some of the beautiful but retiring Affectionately Yours Specialty Designer Series Paper – something old, and the soon to be released Daisy Delight stamp set – something new. This set contains a number of images but the gorgeous large flower has a matching punch. So it is easy to create gorgeous flowers.
I attached a piece of the Affectionately Yours Specialty Designer Series Paper to the bottom of Whisper White card. I used Cucumber Crush Thick Bakers Twine to wrap around the card just above the Designer Series Paper. I stamped the greeting from the Beautiful You stamp set using Cucumber Crush ink (retiring in-colour). I also stamped the leaves from the Daisy Delight stamp set onto the left hand side using Cucumber Crush ink.  The solid leaf is stamped once onto scrap paper first to give a lighter impression. The outline is stamped over the top without stamping off so that you get the variation on the colour. The Whisper White card is attached to scored and folded Cucumber Crush card. I stamped the large daisy flower three times onto Watermelon Wonder card (retiring in-colour) using Watermelon Wonder ink and punched out the image using the matching Daisy Punch. I attached the flowers together making sure to stagger the petals and attached it to the card front using a dimensional. I added one of the new Silver Faceted Gems to the centre of the flower. These are so pretty, I’m sure you are going to love them.
 To decorate the inside of the card, I stamped the leaves onto the bottom left hand corner and the top right hand corner of the Whisper White card. I also added a strip of the Affectionately Yours Specialty Designer Series Paper across the bottom of the stamped card.
I am loving the combination of old and new, but of course that is only until all the new is released. It’s a hard time of the Stampin’ Up! year to be creating. Sometimes everything you go to use is retired and then you start wishing that you already had some of the product from the new catalogue.
I will let you in on a little secret – I wasn’t going to stamp the leaves on the top right hand corner of the inside of the card, but I made a mark with my finger and decided that rather than start again, I would cover the spot with a few more leaves. I like the way it looks and I am happy I didn’t have to start again. I’m sure you know the feeling!
Hope you are stay safe during the current rain event in Australia.
Bye for now,
Kris
Product Used:


A Flirty Flamingo
 Although that’s not the colour I used I love the title anyway. I saw an old challenge on the Global Design Project challenge and decided to use the layout to create this card. I started by cutting a piece of Pop of Pink Specialty Designer Series paper (retired) on an angle and layering it onto Basic Black card. The panel is attached to Whisper White card and I added two rows of Pop of Pink Washi Tape across the top of the designer series paper. The Whisper White card is attached to scored and folded Basic Black card. I stamped the flamingo from the Pop of Paradise stamp set onto Whisper White card using Melon Mambo ink.
  I stamped the leaves all around the flamingo using Old Olive ink. Stamping several times without re-inking. I attached the stamped card to Basic Black card and then the card front using dimensionals. I stamped the greeting from the Thoughtful Banners stamp set onto Whisper White card using Memento Tuxedo Black ink and punched it out using the 1″ circle punch.
  The greeting is attached to a 1-1/4″ Melon Mambo circle and then a 1-3/8″ circle of Basic Black before being attached to the card front. I did use half a dimensional under the right hand side of the greeting circle.
To decorate the inside of the card I stamped the leaf image across the bottom of Whisper White card. Once more stamping several times without re-inking.
This is probably not the kind of card I would usually make, but sometimes we need to push ourselves outside our crafting boundaries. In any case, I really love the end result. I think it is a fun and happy card, perfect for someone’s birthday, don’t you think?
Bye for now,
Kris
Product Used:


April Thank You
 This is the card I sent out to my customers who placed orders during April. It’s a mix of old and new. I really love the Pop of Pink Specialty Designer Series Paper and will be sad to see it go. I couldn’t help pairing it with the gorgeous Eastern Medallion Thinlit Dies. I attached strips of the Pop of Pink Specialty Designer Series paper in varying widths and lengths across Whisper White card.
  I attached the Whisper White card to Gold Foil card and then scored and folded Basic Black card. Using the Eastern Medalllion Thinlit Dies I cut Gold Foil card and attached it to the card front. I cut the smaller die from Melon Mambo card and attached it to the centre of the Gold Foil medallion. I stamped the greeting onto Whisper White card using Melon Mambo ink and punched it out using the 1″ Circle Punch. The greeting is attached to the card front using dimensionals.
 To decorate the inside I attached a narrow strip of Basic Black card behind one long edge of the Pop of Pink Specialty Designer Series Paper before attaching to Whisper White card.
I really love the combination of the Specialty Designer Series paper, Eastern Medallion Thinlits and the Gold Foil card. It is really pretty and I hope that my customers liked it.
I would really love to hear what you think. Why don’t you leave me a comment, I love reading them.
Bye for now,
Kris
Product Used:


