More Daisy Delight

A couple of days ago I shared with you one of the Thank You cards I made and today I thought I would share the other design I used. My background is created the same way, four pieces of card or designer series paper cut the same way and swapped around to make four card fronts. I used the Delightful Daisy Designer Series paper, Daffodil Delight card and Night of Navy card. The card is embossed using the Polka Dot Basics Embossing Folder. Again the pieces are attached to Whisper White card and then scored and folded Night of navy card.  To create the focal panel, I stamped various images from the Daisy Delight stamp set using Old Olive, Daffodil Delight, Calypso Coral, Night of Navy and Crushed Curry ink on Whisper White card. The panel is cut
 using one of the circles from the Stitched Shapes Framelits Dies and attached to a Night of Navy scalloped circle cut using the Layering Circles Framelits Dies. The panel is attached to the card front using dimensionals. I stamped “thank you” from the Daisy Delight stamp set onto Whisper White card and punched each end using the Triple Banner Punch. The greeting is attached over the focal panel using dimensionals under each end of the banner.
The inside of the card is decorated in the same manner as the card I shared yesterday. I punched a strip of Night of Navy card using the Decorative Ribbon Border Punch and attached it behind a piece of the Daisy Delight Designer Series Paper before attaching to Whisper White card.
Just to show you how the whole set turned out, here is a photo of all four cards. Aren’t they pretty?

Bye for now,
Kris
Product Used:


Washi Basics
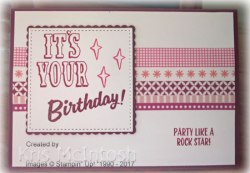
This year Stampin’ Up! decided to do something different with the Washi Tape selections. Instead of making them specific to a product suite, they have created four Basics Packs of Washi. Each of the packs is colour related. Pick a Pattern Washi Tape is a selection of 5 rolls of Washi in a Black and White colour combination. Basics Pack 1 which is the one I am using today is a pack of 5 pink shades of Washi. Basics pack 2 is yellow/green in colour and Basics Pack 3 is blue in colour.  This makes it easy to create across all the product suites using these Washi selections. Anyway for today’s card, I used the Basics Pack 1 and added one of each of the Washi Tape selections in the pack across Whisper White card. I stamped “party like a rock star” from the Marquee Messages stamp set onto the lower right hand corner using Berry Burst ink before attaching the card to scored and folded Rich Razzleberry card. I cut a piece of Whisper White card using the largest square in the Stitched Shapes Framelits Dies to create my focal panel. I stamped “it’s your” from the Marquee Messages stamp set onto the top left hand corner using Berry Burst ink. I stamped “birthday” from the same stamp set onto the lower right hand corner using Rich Razzleberry ink. I stamped the three stars, also from the Marquee Messages stamp set onto the top right hand corner using Melon Mambo ink.
 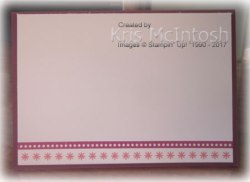 The stamped panel is attached to a scalloped square of Rich Razzleberry card which is cut using the Layering Squares Framelits Dies. The panel is attached to the card front using dimensionals.
To decorate the inside of the card, I simply added two rows of Washi Tape across the bottom of Whisper White card.
Simple isn’t it but I think it is kind of special as well. The colours used for the Washi Tape in Basics Pack 2 are Berry Burst, Blushing Bride, Flirty Flamingo, Melon Mambo and Rich Razzleberry.
I think this might be part of an upcoming Beachmere Class.
Bye for now,
Kris
Product Used:


Daisy Delight – Again
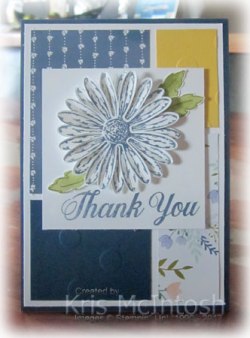
I think this is an absolutely fabulous stamp set and I couldn’t go past it when creating my Thank You gifts for the ladies who placed online orders using my Hostess Code during June. I fell back on an old layout which uses four pieces of card, cut into four pieces and then swapped around so that you get four different card fronts. I used the Delightful Daisy Designer Series Paper, Daffodil Delight card and Night of Navy card. The card is embossed using the new Polka Dot Basics Embossing Folder. The pieces are attached to Whisper White card and then to scored and folded Night of Navy card. For this card, I stamped the large daisy from the Daisy Delight stamp set onto scrap Whisper White card using Night of Navy ink and punched them out using the co-ordinating Daisy Punch.  Unfortunately this punch has been so popular that the item has been turned off until new stocks arrive around the middle of August. I used my bone folder to curl the petals of each one a little and then folded each petal in half to add even more dimension. I stamped the flower centre onto scrap Whisper White card using Night of Navy ink and punched it out. I stacked the flowers on top of one another and added the flower centre. I stamped “Thank You” from the Daisy Delight stamp set onto the bottom corner of a square of Whisper White card using Night of Navy ink. I attached the flower above the greeting.
  I stamped the solid leaf onto scrap Whisper White card using Old Olive ink, which I stamped onto scrap paper first. The outline leaf is stamped over the top using Old Olive ink, without stamping onto scrap paper first. I hand cut the leaves and attached them behind the flower. The panel is attached to the card front using dimensionals.
To decorate the inside, I punched a narrow strip of Night of Navy card using the Decorative Ribbon Border Punch and attached it behind a piece of the Daisy Delight Designer Series Paper. The panel is attached to Whisper White card.
Isn’t this pretty? The Designer Series Paper is gorgeous and I think the fading on some of the patterns is just lovely. I hope whoever receives this card, loves it.
Before I go I must apologise for not posting yesterday. Unfortunately an appointment that my husband and I had turned out to take much longer than I had anticipated.
Bye for now,
Kris
Product Used:

Sneak Peak
Beginning on the 1st August Stampin’ Up! is releasing one stamp set from the Holiday Catalogue so that you can pre-purchase and jump start your Christmas cards. It also means that those bonus coupons you earn this month can be used towards this purchase. But wait there is more! If you sign up to be a demonstrator this month, in addition to purchasing your kit of $235.00 worth of product for $169.00, you will get an additional free Essentials pack work $85.00 and the Carols of Christmas stamp set. How good is that! Once the Holiday catalogue goes live in August you will be able to purchase the stamp set and the dies as a bundle – Yay!
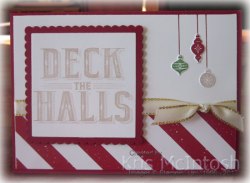
Soooooo, I thought you might like to see the first card I have made using this set. I attached a piece of the Be Merry Designer Series Paper across the bottom of Whisper White card. 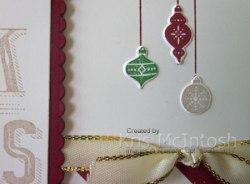 I wrapped the top of the paper with a length of Gold 3/8″ Metallic Edge Ribbon and tied a knot. I stamped one of the ornament images from the Carols of Christmas stamp set onto the right hand side of the Whisper White card using Cherry Cobbler ink. On scrap paper I stamped the same image three times, once using Cherry Cobbler ink, once using Garden Green ink and once using Crumb Cake ink. I used the co-ordinating Card Front Builder Thinlits Dies to cut out all of the ornaments. Then I attached one of each colour over the stamped images using Tombow Multipurpose Glue. The panel is attached to scored and folded Cherry Cobbler card. I stamped the greeting from the Carols of Christmas stamp set onto Whisper White card using Crumb Cake ink and cut it out using one of the Layering Squares Framelits Dies. I attached the greeting to a Cherry Cobbler scalloped square cut using the same dies and then the card front using dimensionals.
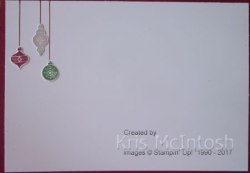 To decorate the inside I stamped the same ornament image from the Carols of Christmas stamp set onto the top left hand corner using Cherry Cobbler ink. I attached three of the ornaments that I had previously cut over the stamped image.
It’s a simple card but I am happy with my first creation. Life has been a little hectic as Ron and I only returned home on the weekend after spending two weeks in our caravan travelling with our grandsons to visit the dinosaurs in Winton. We had so much fun. Starting to get back into routine, so hopefully will have some more samples with this lovely stamp set and co-ordinating dies soon.
Bye for now,
Kris
Product Used:


Happy Birthday

Here is a quick and simple card that I am pretty sure I cased (not sure where from) and created for my catalogue launch to show off the gorgeous Fresh Florals Designer Series Paper stack. This paper comes in all five of the new in-colours. I used the Tranquil Tide Designer Series Paper which I attached to the bottom of Whisper White card. I wrapped the top of the designer series paper with the Tranquil Tide 1/2″ Finely Woven Ribbon and tied a knot. I cut the happy birthday from Tranquil Tide card using the Happy Birthday Thinlit Die. Isn’t this a fabulous die. It practically creates the card without doing anything at all. I attached the Happy Birthday to the top of the Whisper White card before attaching to scored and folded Tranquil Tide card.
 To decorate the inside, I punched a narrow strip of Tranquil Tide card using the Decorative Ribbon Border Punch. I attached the punched card behind one long edge of a piece of the same Tranquil Tide Designer Series Paper before attaching to Whisper White card.
This is such a simple card but I think it packs a big wow. It’s so much fun to create that I think I made 4 variations of this card for my catalogue launch. The ladies at Beachmere enjoyed making this card last week too. What about you.
Bye for now,
Kris
Product Used:


Shimmer and Shine with Copper Foil

As you know, I have been busy creating cards for my upcoming July Card Class and this one is created by taking a couple of different ideas and adding them all to the one card. So thanks once more to everyone who shares their creations. I cut a piece of Old Olive Colour Theory Designer Series paper and attached it to the bottom of Whisper White card. I stamped the greeting from the Colourful Seasons stamp set onto the right hand side of the Whisper White card using Old Olive ink.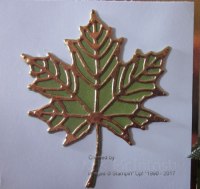 I wrapped the top of the Designer Series paper with Old Olive 3/8″ Mini Chevron Ribbon and tied a knot. The Whisper White panel is attached to scored and folded Old Olive card. I cut a Whisper White square and attached it to a square of Copper Foil card (this is so pretty, I do not know why I waited so long to use it). The panel is attached to the card front using dimensionals. I used the Seasonal Layers Thinlits Dies to cut an Old Olive leaf. I also used the same dies to cut the detailed leaf from Copper Foil. I attached the Copper Foil leaf over the solid leaf before attaching to the Whisper White square.
To decorate the inside of the card, I stamped the solid leaf from the Colourful Seasons stamp set onto the lower left hand corner of Whisper White card using Old Olive ink. I stamped the detailed image over the top using Versamark ink. I sprinkled the image with Copper Embossing Powder and heat set it.
Well, what do you think? Do you like my creation? I’d love to hear. If you live near me and want to attend my July class, check out the details on the Classes and Workshops page.
Bye for now,
Kris
Product Used:


July Memory Keeping Class
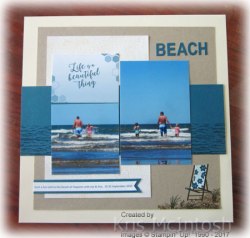
As you know Stampin’ Up! has released a new Memory Keeping line called Memories and More. This is a fantastic product, which not only lets us continue making great pocket pages but also so much “more”. Each month I hold a Memory Keeping Class (I use this term loosely because everyone really gets to do their own thing) where I create a 12″ x 12″ somewhat traditional scrapbook page and everyone gets to create the same page or use the product in whatever way they wish. My customers have each purchased a kit which will let us create for several months and then they will take home the remainder of their kit and we will get a new kit for the next couple of months. Such a fun way to get new product, learn how to use it and then continue on your merry way making whatever you wish. Last month’s class didn’t make the cut as everyone was just waaaay too busy and so this month everyone will make two pages – last month’s and then this month’s.
I am really happy with my page for July’s class, it shows off some of the Colour Theory Memories & More card pack, along with the Colour Theory Designer Series Paper and I love how it co-ordinates with the Colourful Seasons stampset. 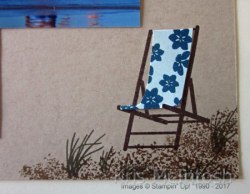 I trimmed a 12″ x 12″ piece of Crumb Cake card to 10-1/2″ x 10-1/2″ and stamped the sand image from the High Tide stamp set onto the lower right hand corner using Soft Suede ink. I stamped the grass image from the same stamp set over the “sand” using Always Artichoke ink. I stamped the frame of the deck chair from the Colourful Seasons stamp set onto the sand using Soft Suede ink. The deck chair seat image was stamped onto Whisper White card using Soft Sky ink and cut out. I stamped the flowers from the Colourful Season stamp set over the deck chair seat using Dapper Denim ink and attached it over the deck chair frame. I cut a Crushed Curry piece of Colour Theory Designer Series Paper in half and attached one half to the top left hand corner of the stamped Crumb Cake card and the other piece to the bottom left hand corner. The Crumb Cake card is attached to 12″ x 12″ Whisper White card. I cut a piece of Dapper Denim card the length of the A4 sheet and attached it across the page to cover the gap in the designer series paper.
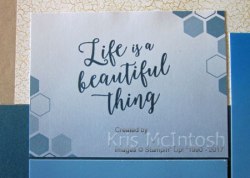 A fun thing which happened very accidentally was that I was able to line up the photos on my page so that the sea lines matched, so I carried the sea line across my Dapper Denim card by stamping the sea image from the High Tide stamp set across the card using Dapper Denim ink. I stamped the greeting from the Colourful Seasons stamp set onto one of the 4″ x 3″ Colour Theory Memories and More cards using Dapper Denim ink. The title is cut from Dapper Denim card using the Little Letters Thinlits Dies (retired). I printed my journaling onto Whisper White card using my computer and attached it to Dapper Denim card before attaching to the page. I am completely in love with this page and really, it was so easy to create. I can’t wait for July’s class to see my customer’s reactions. If you live near me and want to attend please check out the Classes and Workshops page for more details. I hope I have inspired you to take a look at this fantastic product suite and give it a try.
Bye for now,
Kris
Product Used:


Another Glossy Technique
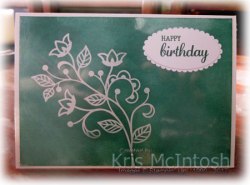 This is another technique that made me so glad that Glossy White card is back in the catalogue. I love the Glossy White card, it is pretty on its own but it is fantastic for creating lots of gorgeous looks. The technique I used to create this card is the emboss resist technique. I stamped the large flourish from the Flourishing Phrases stamp set onto Glossy card using Versamark ink. I sprinkled the image with Clear Embossing Powder and heat set it. I used a sponge and Tranquil Tide ink to ink the whole piece of Glossy White card and then used a clean tissue to rub over the image to remove any ink on top of the embossing.
 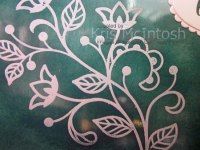 So pretty. I love how it’s almost magic when the image starts to appear. I also love that the ink goes on so easily and spreads smoothly over the Glossy card. The Glossy panel is attached to scored and folded Thick Whisper White card. I stamped the greeting from the Best Birds stamp set onto Whisper White card using Tranquil Tide ink. I cut the greeting using an oval from the Layering Ovals Framelits Dies and attached it to a scalloped oval cut from Whisper White card using the same dies.
  The greeting is attached to the top right hand corner of the Glossy White card.
To decorate the inside of the card, I simply stamped the large flourish image onto the lower left hand corner using Tranquil Tide ink.
This card is also destined to star in my upcoming class at Beachmere demonstrating some of the ways to use this Glossy White card.
A simple card but sometimes simple is best. Don’t you agree?
Bye for now,
Kris
Product Used:


Life’s a Beach
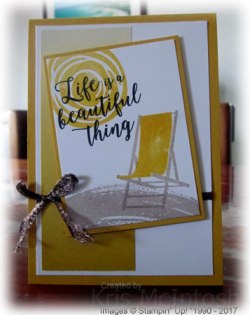
This card makes me think of summer and the beach. This is another card for my July Card Class and is loosely based on the example on page 146 of the 2017-2018 Annual Catalogue. I think the sun idea is one that has been shared on the internet. I attached a piece of Crushed Curry Colour Theory Designer Series Paper to the left hand side of Whisper White card. 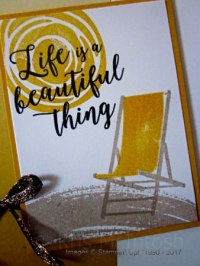 I wrapped the card with the 1/4″ Copper Trim and tied a bow. This ribbon is amazing! You can pull and stretch it and it has an awesome texture. The Whisper White card is attached to scored and folded Crushed Curry card. I stamped the image from the Work of Art stamp set across Whisper White card using Cumb Cake ink. I think it looks a little like sand, don’t you? I stamped the chair frame from the Colourful Seasons stamp set onto the sand using Crumb Cake ink and added the seat using Crushed Curry ink.
 I stamped the image from the Swirly Bird stamp set onto the top left hand corner using Crushed Curry ink. I stamped the greeting from the Colourful Seasons stamp set onto the card using Early Espresso ink. I attached the stamped panel to Crushed Curry card and then the card front using dimensionals.
To decorate the inside of the card, I attached a narrow strip of the same Crushed Curry Designer Series Paper to the left hand side of Whisper White card.
Thanks to Stampin’ Up! for providing most of the inspiration for this card. Do you use the examples in the catalogue as a place to start creating? It certainly helps when your mojo is lagging. I think Stampin’ Up! actually like us to CASE (copy and share everything) their catalogue samples.
Bye for now,
Kris
Product Used:


Peaceful in Pink
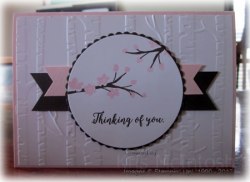 This is another of the cards for my July Card Class. This one was inspired by a sketch challenge – I have forgotten which one, but thank you whoever you are. I embossed Whisper White card using the Woodlands Embossing Folder and attached it to scored and folded Pink Pirouette card. I punched both ends of a narrow strip of Early Espresso card using the Triple Banner Punch and attached it to the card front using dimensionals.
  I punched both ends of a narrower strip of Pink Pirouette card using the same punch and attached it over the Early Espresso banner. I stamped the branch image from the Colourful Seasons stamp set twice onto Whisper White card using Early Espresso ink. I stamped the flower image over the branch image using Pink Pirouette ink. I also stamped the greeting from the Colourful Seasons stamp set using Early Espresso ink.
  The image panel is cut using a Layering Circle Framelit Die and attached to an Early Espresso scalloped circle. The stamped panel is attached to the card front using dimensionals.
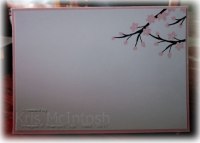
To decorate the inside I stamped the branch image onto the top right hand corner of Whisper White card three times using Early Espresso ink. I stamped the flower image over the branch image using Pink Pirouette ink.
This is probably my favourite card created using the Colourful Seasons stamp set so far. I am sure I will have another favourite down the track but for now, this is No. 1.
Bye for now,
Kris
Product Used:







