Petite Petals Thinlet Card
Next weekend is very busy with Mother’s Day and also my Mother-in-law and grandson’s birthdays. So today I am going to share with you the card I made for my Mother-in-law. I found a gorgeous card on Pinterest by Chantal Caste and decided to create my own version.
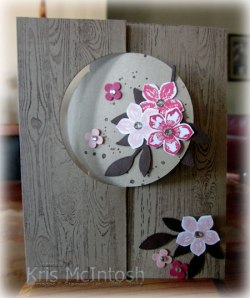 I wanted to create an extra flap to hide my message on the Circle Thinlet card so I cut Crumb Cake card the width of an A4 sheet and just slightly less than 5-1/2″. Once cut and folded I stamped the front of the card and the front and back of the flap using the Hardwood Background stamp and Chocolate Chip ink. I stamped the front and back of the Circle using the spotty image from the Gorgeous Grunge stamp set and Chocolate Chip ink. I cut Chocolate Chip card using the Little Leaves Sizzlit and attach one set to the front of the Circle and another to the back of the Circle. I stamped various flowers from the Petite Petals stamp set using Pink Pirouette, Strawberry Slush and Rose Red ink and punched them out using the Petite Petals Punch. I also punched Rose Red and Pink Pirouette card using the four petal flower punch from the Itty Bitty Shapes Punch Pack. On the front I attached three stamped flowers and two punched flowers. I also added Basic Rhinestones to the centre of each flower.
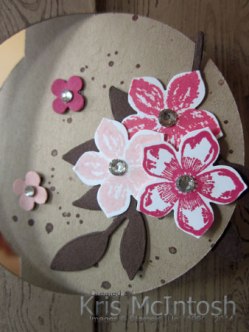 On the back of the circle I attached two stamped flowers over the leaves and also added Basic Rhinestones to the flower centres.
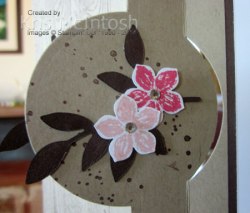 On the front of the right hand flap, I attached some leaves and one stamped flower along with two punched flowers. Basic Rhinestones again decorate the flowers.
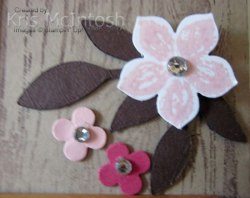 Inside the card I stamped Happy Birthday wishes from the Petite Pairs stamp set onto Whisper White card using Chocolate Chip ink. This panel also has some leaves and two stamped flowers. I attached the Whisper White card to Chocolate Chip card before attaching to the inside of the card.
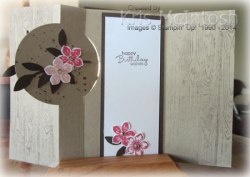 I hope my Mother-in-Law loves this card as much as I do. Thanks so much to Chantal for the inspiration.
Bye for now,
Kris
Product Used:


Introducing Project Life by Stampin’ Up!
Isn’t this just so exciting. Becky Higgins and Stampin’ Up! partnering together to release an exclusive range of Project Life products for Stampin’ Up!. These products will be available in our new catalogue which releases on the 1st July, however, as demonstrators we will be able to pre-purchase a limited range of the product. So if you can’t wait until the 1st July, become a demonstrator and you can get your hands on these goodies earlier than everyone else.
Here is a Video from Stampin’ Up! with some of the details.
Stampin’ Up! is also releasing Project Life as Digital Downloads and guess what – from today you can purchase the Everyday Adventure Digital Project Life Cards as well as the Day to Day Digital Project Life Stamp Brush Set and the Point and Click Digital Project Life Stamp Brush Set. I purchased and downloaded my copies early this morning and this is my first creation using the products.
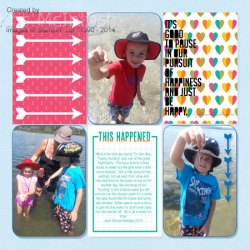
Hope you are as excited as I am by this fabulous new product range.
Bye for now,
Kris
Product Used:


MDS Monday 63
I’ve been so buy this past two weeks, I almost missed the deadline for the current MDS Monday scrapbook challenge.
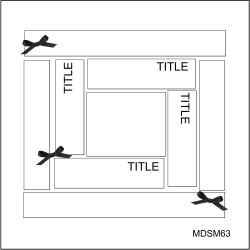
Its a fun sketch and I’ve used one of my favourite techniques and added just one picture to fill all the photo boxes.
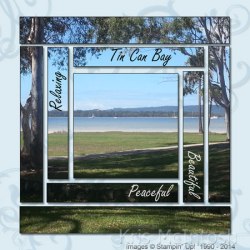
I also used the photo to select the colours for the background and journalling. I love this photo taken by my daughter Sarah on a recent holiday. I did add a couple of embellishments to the background – the large swirl from the Baroque Motifs Brush Stamp Set Digital Download. I changed the opacity to about 80% to soften the stamps on my background and added a shadow to give them some more dimension. Love My Digital Studio – have you tried it yet?
Bye for now,
Kris
Product Used:


Feel Better Soon
I had occasion to send a card to a friend recovering from an operation recently and thought that you might like to see it. The flowers were inspired by some I saw on a card on Pinterest by Cheryl Garratt. If you visit her blog she has some great instructions for making your flowers have more dimension.
 I started by stamping the greeting from the Express Yourself stamp set onto Whisper White card using Island Indigo ink and then I embossed with the Perfect Polka Dots Embossing Folder. I attached the embossed card to the bottom of Soft Sky card. I cut Whisper White card using the Paper Doily Sizzlits Large and then cut the Doily in half and attached to the centre of the Soft Sky card. I wrapped this piece with Crumb Cake 1/2″ Tafetta Ribbon and tied a bow before attaching to scored and folded Crumb Cake card.
  I stamped the flowers from the Stippled Blossoms stamp set onto scrap Whisper White card using Soft Sky/Marina Mist ink, Soft Sky/Island Indigo ink and cut them out. The leaves are stamped onto scrap Whisper White card using Pear Pizzazz and Gumball Green ink and then cut out. I added some dimension to the flowers and leaves as per Cheryl’s instructions. The flowers and leaves are attached using Glue Dots. I also added a Basic Pearl to the centre of each of the flowers.
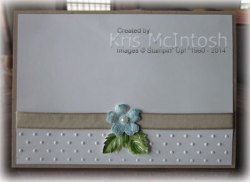 Inside the card I embossed the lower portion of Whisper White card and wrapped it with Crumb Cake 1/2″ Tafetta Ribbon. I added another flower and a couple of leaves to complete the decoration.
I hope that my friend loves her card as much as I do.
Bye for now,
Kris
Product Used:


Oh Hello
 I wanted to send a friend a card this week to let her know that I am thinking of her. She has quite a lot going on in her life and sometimes it’s nice to know people care.
I found this great card on Pinterest (really, where would I be without it) – unfortunately it doesn’t have a name or watermark to give credit to the creator. Anyway it was really pretty and so I CASED it to create my own card.
I started by cutting Whisper White card using one of the Oval Framelit Dies and then embossing the card to just below the bottom of the oval. 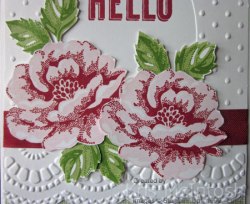 I cut one long side of a narrow piece of Whisper White card using the Large Scallop Edgelits Die and then embossed using the matching Delicate Designs Embossing Folder. I attached a strip of Gingham Garden Designer Series paper to the bottom of the Whisper White card with the oval cut out and then attached the narrow strip of embossed card over the top.
  I wrapped the join with a strip of Cherry Cobbler 1/2″ Seam Binding and attached the whole piece to scored and folded Whisper White card. I stamped the greeting from the Oh Hello stamp set inside the oval cut out using Cherry Cobbler ink. I stamped two of the large flowers from the Stippled Blossoms stamp set onto Whisper White card using Pink Pirouette/Cherry Cobbler ink and cut them out. I stamped three sets of leaves using Pear Pizzazz/Gumball Green ink and cut them out. The flowers and leaves are attached around the greeting and over the ribbon using Glue Dots.
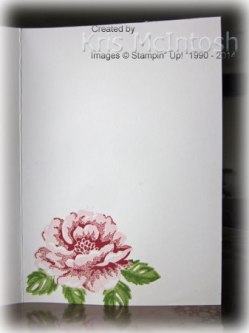
Inside the card I stamped the large flower once again using Pink Pirouette/Cherry Cobbler ink and then I covered it with a mask and stamped the leaves around it once again using Pear Pizzazz/Gumball Green ink.
This is such a pretty card and I can’t thank the creator enough for the inspiration. The Stippled Blossom stamp set is one that I just adore, but do not use often enough.
Bye for now,
Kris
Product Used:


MDS Monday 61
I love the scrapbook challenges at MDS Monday and this challenge was no exception, however, I procrastinated too long and missed the deadline to enter. But… I finally found something I wanted to scrap and used this sketch anyway.

My grandsons came to stay with us on Easter Sunday night to camp out in the backyard. This event has been talked about for quite a while and finally the day was here. We put up the tent and when we went to bed, Ron and I expected that the children would come inside almost immediately. They surprised us by staying out in the tent the whole night! So I guess, the sleep-outs in the tent may become a bit of a tradition.

I used the Sweet Details Designer Series Paper Digital Download to add to my page but re-coloured them using the colours of the tent. In fact all the colours were picked from the photo for the page. It is a little blue, but it will always remind me of the first overnight camp in our backyard.
Bye for now,
Kris
Product Used:

Happy Birthday for my sister
Today is my sister’s birthday and I made a card for her which I cased from the internet and now I can’t find the original design. Anyway I found an ombre colour combination which I thought would work for this card and here is what I created.
 I cut one long edge of pieces of Pink Pirouette, Blushing Bride, Primrose Petals and Rose Red card using the Large Scallop Edgelit. Then I embossed each piece using the matching Delicate Designs Embossing Folder. I layered the embossed card onto Very Vanilla card which I stamped in the top right hand corner with a greeting from the Petite Pairs stamp set using Raspberry Ripple ink. I wrapped the top of the Rose Red card with Crumb Cake 1/2″ Seam Binding and attached it to Rose Red card and then scored and folded Pink Pirouette card.
  I stamped the large flower from the Flower Shop stamp set onto Very Vanilla card using Blushing Bride ink and punched it out with the Pansy Punch. I stamped the small flower from the Petite Petals stamp set onto Very Vanilla card using Rose Red ink and punched it using the matching Petite Petals Punch. I attached the large flower to the card front using Glue Dots and then the small flower to the centre using a dimensional. Lastly I added a Basic Pearl to the centre of the flower.
 On the inside of the card I attached a piece of cut and embossed Raspberry Ripple card to the bottom of a piece of Very Vanilla card and wrapped it with Crumb Cake 1/2″ Seam Binding. I stamped and punched one large and one small flower as before and attached them over the ribbon using Glue Dots.
I really love this card and would love to thank the person who created the original card (which was done in shades of Blue). If it was your card, please let me know so that I can give you credit.
Before I go I just want to give some credit to StampinBuddy for letting me add the pictures of the product I have used. If you click on the picture it will link you directly to the product at my online store. I hope this makes it easier for you to view the product which I showcase in my creations.
Although I am sharing this card with you today, I’m not sure that my sister will have received it yet. I forgot about it being Easter long weekend and didn’t get it in the post as early as I should have, anyway I hope that she loves it when she does get it. Happy Birthday Jenny.
Bye for now,
Kris
Product Used:


The Easter Bunny has arrived
Happy Easter to you all, hope you are having a lovely weekend spending time with your family and friends. I’m off to spend the day with my girls, grandchildren and my parents, can’t wait.
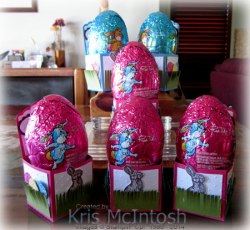
I made these cute little Easter Boxes for my grandchildren after I saw one on the internet and although there were no instructions it seemed simple enough.
 I started by cutting my A4 card in half and then scoring at 2, 4, 6 and 8″ across the width. I scored at 1-1/2″ and 3-1/2″ down the length. I cut away most of the top section of the card, leaving one long piece which I punched using the Scallop Tag Topper Punch. You can download a rough drawing to help you here.
I created four of these using Melon Mambo card and two using Marina Mist. I embossed squares of Whisper White card using the Perfect Polka Dot Embossing Folder and attached them to the outside of the lower section of the box. I punched a piece of Whisper White card using the Scallop Tag Topper Punch and embossed it using the same folder to decorate the section at the back. I used the Fringe Scissors on pieces of Old Olive card to create grass and attached it to each of the lower sections of the box. My Digital Studio came to the rescue to create my Chocolate Bunnies. I simply coloured them Chocolate Chip and printed them out. I cut out the bunnies and attached them to the front panel behind the grass. I punched Marina Mist, Daffodil Delight and Melon Mambo card, embossed them using various embossing folders and added them to the side panels, behind the grass to look like easter eggs. I used My Digital Studio again to create the greetings (All Holidays Stamp Brush Set Digital Download) which I printed in Chocolate Chip, punched using the Large Oval Punch and then attached them to Scalloped Ovals. I used the Fringe Scissors on some scrap Old Olive card to create a little shredded card for my eggs to sit.

Unfortunately, the large egg is a little big for the box, not that the children will mind!
Bye for now,
Kris
Product Used:


SUDSOL Sketch Challenge
The sketch challenge at SUDSOL (demonstrator online group) was really lovely this week and I had a chance to play along.

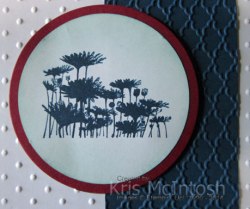
 I started by embossing Whisper White card using the Perfect Polka Dots Embossing Folder and attaching it to scored and folded Pool Party card. I embossed Midnight Muse card using the Fancy Fan Embossing folder and attached it to the right hand side of the card front. I stamped the “upsy daisy” image from the Best of Flowers stamp set onto Whisper White card using Midnight Muse ink and then stamped it again, slightly offset, without re-inking. I punched the flower image using the 2-1/2″ Circle Punch and sponged around the image using Pool Party ink. I cut Cherry Cobbler card using a Circle Framelit, attached the flower image to it and then the card front using dimensionals.
  I stamped the greeting from the Bring on the Cake stamp set onto Whisper White card using Midnight Muse ink and again sponged around the greeting using Pool Party ink, before attaching it to the card front.
Inside my card I stamped the “upsy daisy” image onto the bottom left hand corner of Whisper White card twice as I did on the front. 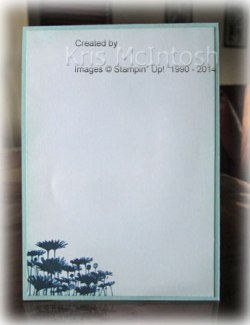 The edges are once again sponged using Pool Party ink.
I used my Colour Coach to get my colour combo and was a little skeptical of the addition of Cherry Cobbler, however, I am more than pleased with the finished card. The stamp set I used Best of Flowers is only available for purchase until the end of this month, so don’t delay if you want this lovely set.
Bye for now,
Kris
Product Used:


Kaleidescope Birthday
Here is my version of a beautiful card shared by Julie Davison on Pinterest.
 My card starts with scored and folded Strawberry Slush card to which I added a layer of Summer Starfruit. I stamped the greeting from the Geometrical stamp set onto Whisper White card using Strawberry Slush ink. I attached a strip of Kaleidescope Designer Series Paper to Basic Gray card which has both long edges punched using the Scallop Border Punch.
  This piece is attached to the stamped Whisper White card below the greeting. I stamped the three triangle images from the Geometrical stamp set onto scrap Whisper White card using Summer Starfruit, Basic Gray and Bermuda Bay ink, punched them using the Triangle Punch and attached them to the card front next to the greeting.
Inside I kept it very simple and attached another strip of Kaleidescope Designer Series Paper/Basic Gray card to lower edge of Whisper White card.
I have struggled to use this paper and stamp set but really love this card. I think it will be one that will feature in one of my Beachmere card classes.
Bye for now,
Kris
Product used:







