Try Stampin’ On Tuesday Challenge 470

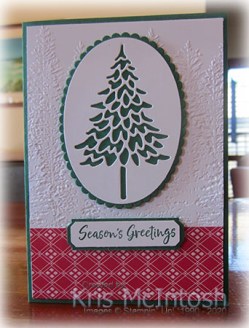
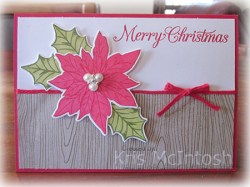
I thought this sketch challenge at Try Stampin’ on Tuesday was a really good one, so I couldn’t resist coming up with a creation. I embossed Cinnamon Cider card using the Subtle 3D Embossing Folder and attached it to scored and folded Thick Whisper White card. I stamped the image from the Zany Zebras stamp set onto Whisper White card using Cinnamon Cider ink. I attached a piece of Bumblebee Designer Series Paper from the 2020-2022 In-Colour 6″ x 6″ Designer Series Paper to either side of the stamped image. I wrapped the edge of the Designer Series Paper to the right of the stamped image with Linen Thread.  I attached the stamped Whisper White card to Bumblebee card using dimensionals. I stamped he greeting from the Zany Zebras stamp set onto Whisper White card using Cinnamon Cider ink.
  I punched out the greeting using the Postage Stamp Punch and attached it to the back of the image panel. The whole piece is attached to the card front. I tied a bow in a length of Linen Trim and attached it to the card front using a small dot of Multipurpose Glue.
To decorate the inside of the card, I stamped another image from the Zany Zebras stamp set using Cinnamon Cider ink. I also stamped the greeting from the same stamp set using Cinnamon Cider ink.
Such sweet images. Thanks Try Stampin’ on Tuesday for the inspiration. I’d love to know what you think.
Bye for now,
Kris
Product Used:


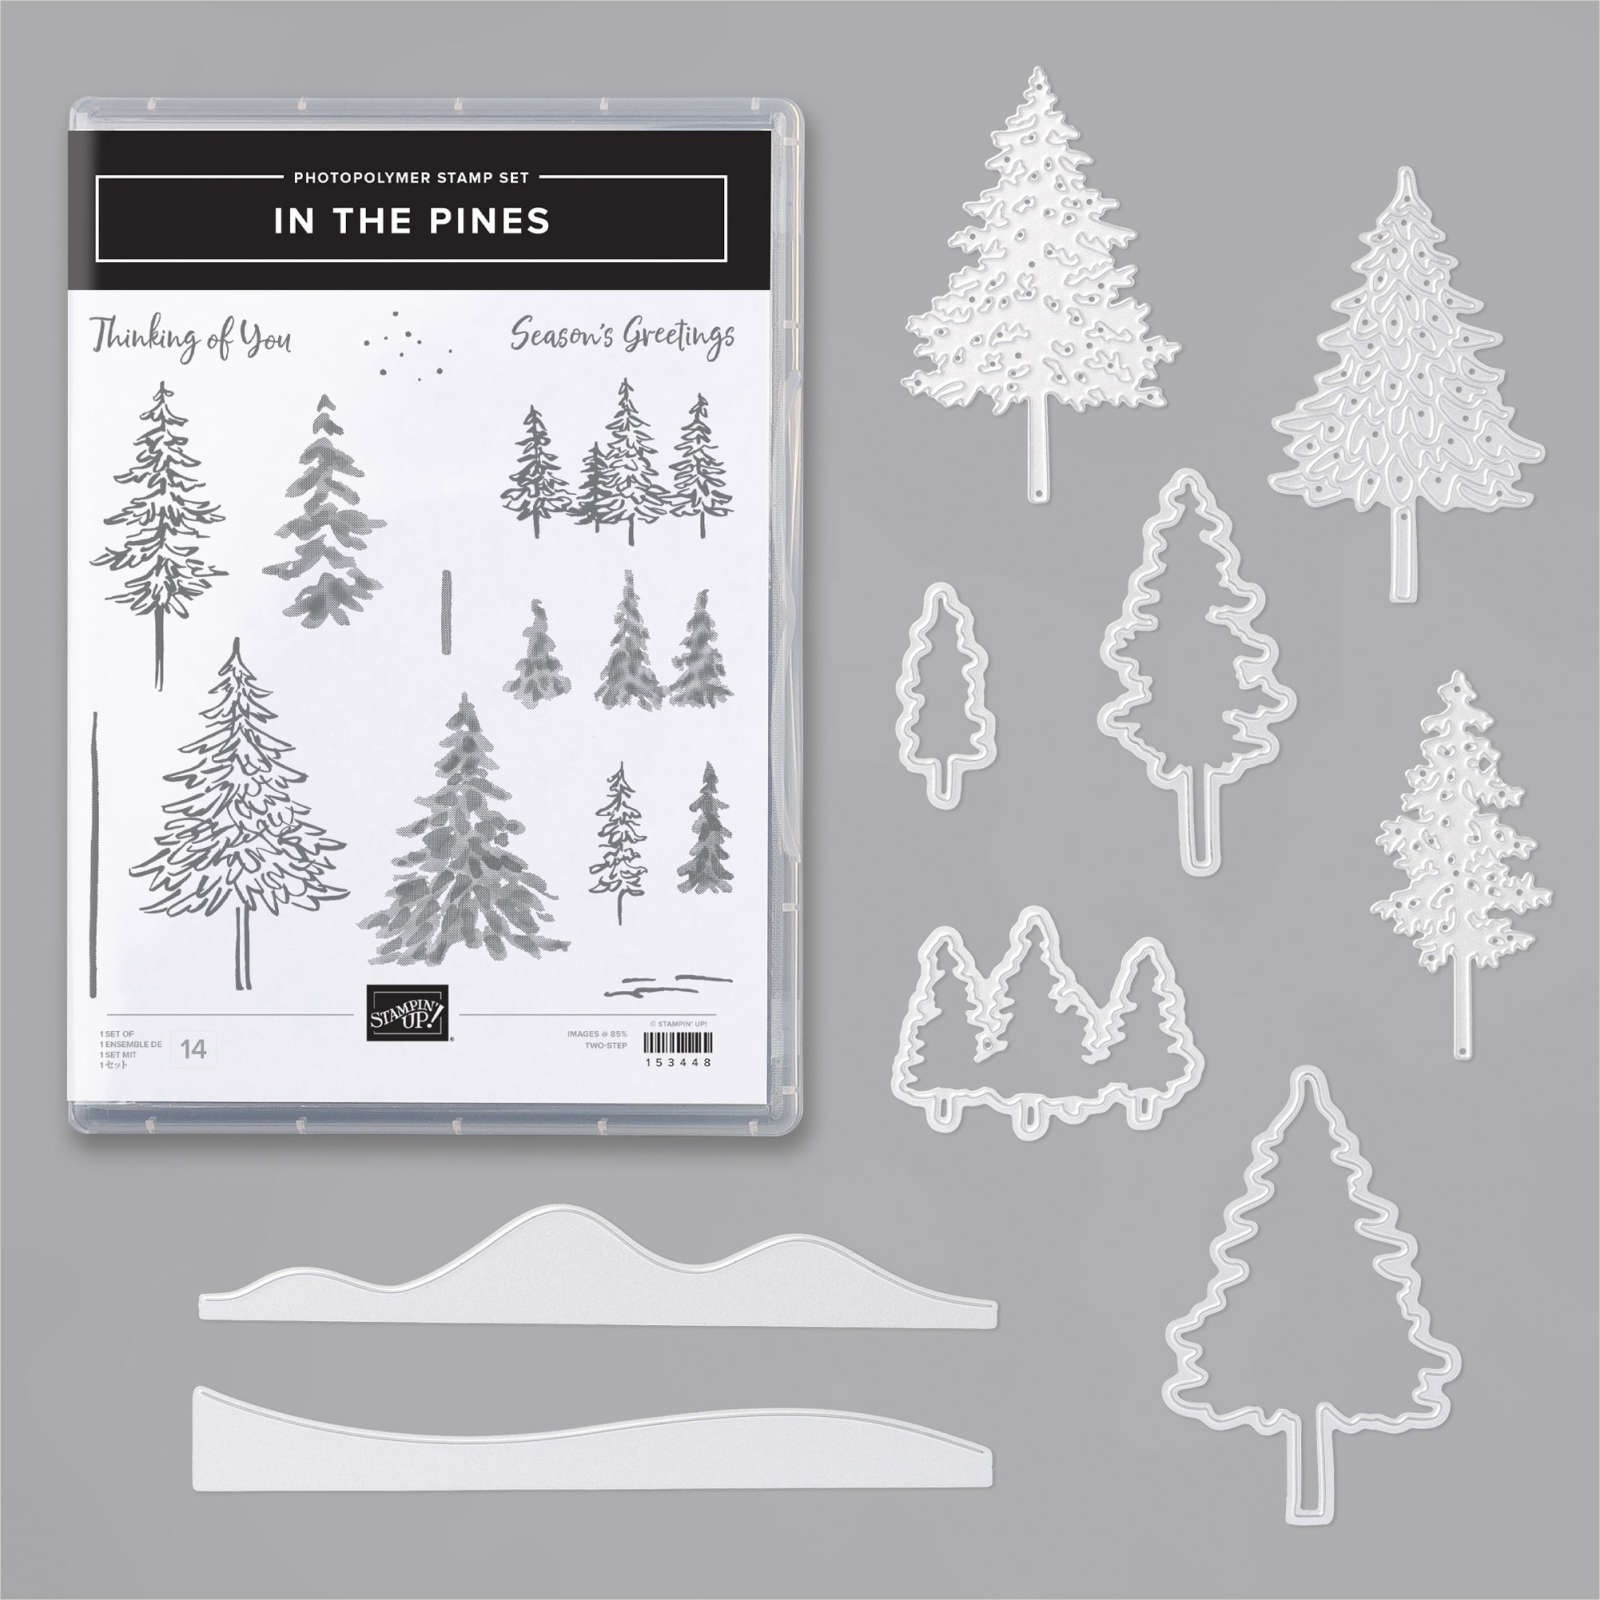
In The Pines
Yesterday on my Facebook Live I shared some cards using the In The Pines stamp set and co-ordinating Pine Woods Dies. Today I have another card to share using this Product Bundle. I began by embossing Whisper White card using the Evergreen Forest 3D Embossing Folder. I moved the Whisper White card down inside the embossing folder so that the embossing went to the top of the Whisper White card. I attached a piece of ‘Tis The Season 6″ x 6″ Designer Series Paper across the bottom of the embossed card. This also covered the line where the embossing folder ended. I attached the embossed panel to scored and folded Shaded Spruce card.
  I stamped the greeting from the In The Pines stamp set onto Whisper White card using Shaded Spruce ink and punched the ends using the Lovely Labels Pick a Punch. I attached the greeting to Shaded Spruce card which also has the ends punched to co-ordinate. The greeting is attached to the card front using dimensionals. I used the Layering Ovals Dies to cut a Whisper White oval before using the Pine Woods Die to cut the tree shape. I attached the Whisper White oval to a Shaded Spruce scalloped oval cut using the same dies before attaching it to the card front using dimensionals.
To decorate the inside of the card, I cut the tree shape using the Pine Woods Die into the lower left hand corner of Whisper White card.

I love this card and decided to make a second one swapping the paper and ink for Cherry Cobbler. I love the way they both look but I guess I am a little bit traditional because I like the one with the greeting tree best. What about you?
Bye for now,
Kris
Product Used:


Zebra Birthday

I refused to give in to the temptation to purchase this stamp set on my initial orders from the Annual Catalogue because I thought it would have limited use. However, as happens over time, my resolve was worn down by the cute images and the gorgeous creations other people shared. So, here is my first card using the Zany Zebra stamp set. I embossed Whisper White card using the Woodland Embossing Folder and attached it to scored and folded Misty Moonlight card. I attached a narrow strip of one of the Misty Moonlight patterns from the 2020-2022 In-Colour 6″ x 6″ Designer Series Paper to Misty Moonlight card and then the card front.  I stamped the Zebra image from the Zany Zebra stamp set onto Whisper White card using Misty Moonlight ink and cut it out using the Layering Circles Dies. I attached the stamped Whisper White circle to a Misty Moonlight scalloped circle before attaching to the card front using dimensionals. I stamped the party hat image from the Zany Zebra stamp set onto scrap Whisper White card using Bumblebee ink and cut it out before attaching it to the stamped Zebra.
  I stamped “happy birthday” from the Zany Zebra stamp set onto Whisper White card using Misty Moonlight ink and punched both ends of the card using the Lovely Labels Pick a Punch. I punched both ends of a strip of Misty Moonlight card using the same punch and attached the greeting. The greeting is attached to the card front using dimensionals.
To decorate the inside of the card, I stamped another Zebra image from the Zany Zebras stamp set onto Whisper White card using Misty Moonlight ink. I stamped another greeting from the same stamp set next to the Zebra also using Misty Moonlight ink. I attached a narrow strip of Misty Moonlight card being one long edge of Whisper White card embossed using the Woodland Embossing Folder. The panel is attached to the bottom of the stamped card.
Such a fun card and one I think my ladies at Beachmere with enjoy making.
Bye for now,
Kris
Product Used:


Poppies and Medallions

I saw a card on Pinterest by Kim Fee which inspired my creations today. I attached Adhesive Sheet to the back of Gray Granite card and cut the card using the large medallion from the Many Medallion Dies. I cut down the medallion into three pieces, one piece two x six squares and two pieces three squares x three squares. I stamped the greeting from the Peaceful Moments stamp set onto the bottom right hand corner of Whisper White card using Gray Granite ink. I attached the long strip to the left hand side of the stamped Whisper White card. I stamped the multi-leaf image from the Painted Poppies stamp set twice onto the card front using Soft Sea Foam ink.  The Whisper White panel is attached to Gray Granite card and then scored and folded Thick Whisper White card. I stamped one large and one small poppy from the Painted Poppies stamp set onto scrap Whisper White card using Highland Heather ink. I stamped the fill image over the poppies using Highland Heather ink which I had stamped onto scrap paper first.
  I cut out the poppies using the co-ordinating Painted Labels Die. I attached the poppies to the card front using dimensionals under the larger image.
I stamped the greeting from the Peaceful Moments stamp set onto the inside of the card using Gray Granite ink. I stamped the small poppy from the Painted Poppies stamp set onto scrap Whisper White card using Highland Heather ink. I stamped the fill image using Highland Heather ink which I stamped onto scrap paper first. I cut out the poppy using the co-ordinating Painted Labels Die and attached it beside the stamped greeting.
I loved this card and wanted to use up the remaining pieces from the Gray Granite die cut. I used one piece on a card using poppies which I stamped in Balmy Blue ink and the other piece on a card with poppies stamped using Calypso Coral ink. The inside of the cards has a greeting and another small poppy. All of the greetings come from the Peaceful Moments stamp set.
Don’t they look pretty?
Bye for now,
Kris
Product Used:


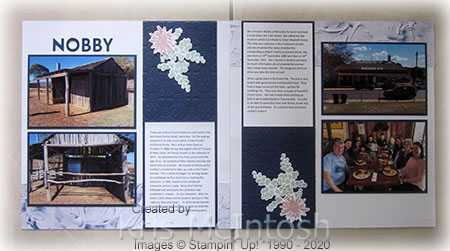
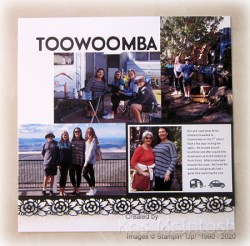
Nobby
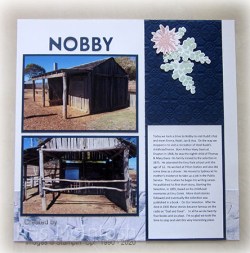
Today’s pages share some more photos of our recent holiday in Toowoomba. We took a drive to Nobby to have lunch at Rudd’s Pub and on the way stopped in to look at a reproduction of Steel Rudd’s home at Emu Creek. Emma and her children joined us for lunch and the next couple of days at Toowoomba. I started with a Whisper White 12″ x 12″ page and added a strip of In Good Taste Designer Series Paper. I embossed a portion of a 12″ strip of Night of Navy card using the Tin Tile 3D Embossing folder before attaching the panel to each page.  I attached each of the photos to Night of Navy card as well. I cut the title from Night of Navy card using the Playful Alphabet Dies. I created my journaling on the computer and printed onto Whisper White card. The journaling panels are attached to the un-embossed section of the Night of Navy card. To decorate the embossed panels I stamped the leaf image from the Positive Thoughts stamp set four times onto Whisper White card using Mint Macaron ink. I also stamped the flower from the Positive Thoughts stamp set twice onto Whisper White card using Blushing Bride ink. I cut out the stamped images using the co-ordinating Natures Thoughts Dies and attached two leaves and one flower to each embossed panel.
Again, simple, but that’s my style.
Bye for now,
Kris
Product Used:


Magic & Wonder

I have been having fun playing wit the Poinsettia Place Suite, it has so much to play with! This card uses the Poinsettia Petals stamp set and the Poinsettia Dies. I began by embossing Granny Apple Green card using the Old World Paper 3D Embossing Folder. I attached a strip of Early Espresso card behind one long edge before attaching it to Whisper White card. I stamped the greeting from the Poinsettia Petals stamp set onto the right hand corner of the Whisper White card using Poppy Parade ink.  The whole panel is attached to scored and folded Early Espresso card. I cut Gold Foil card using the leaf die and the flower centre die from the Poinsettia Dies. I stamped the three layering flower images from the Poinsettia Dies onto Poppy Parade card using Poppy Parade ink. I cut out the flowers using the co-ordinating Poinsettia Dies. I attached the Gold Foil leaf images to the card front before attaching the layered flower die cuts.
  Lastly I added the Gold Foil flower centre.
To decorate the inside of the card, I cut the leaf die from Gold Foil card. I embossed Granny Apple Green card using the Old World 3D Embossing Folder and attached a narrow strip of Early Espresso card behind one long edge. I attached the Gold Foil leaf to the lower left hand side of Whisper White card before attaching the embossed panel.
I love how bright and cheery this card, exactly what I love in a Christmas card. What about you?
Bye for now,
Kris
Product Used:


Poinsettia Christmas
Yesterday on my Facebook Live, I shared some ideas for using the Poinsettia Place Product Suite. Of course, I didn’t cover everything, so I thought I would share another idea for using this beautiful suite. For this card, I attached a piece of the Poinsettia Place Designer Series Paper across the bottom of Whisper White card. I wrapped the top of the Designer Series Paper with a length of Real Red Braided Linen Trim. I stamped the greeting from the Poinsettia Place stamp set onto the Whisper White card using Real Red ink and attached the panel to scored and folded Real Red card.  I stamped the single flower image from the Poinsettia Petals stamp set onto Whisper White card using Real Red ink. I also stamped three of the smaller single leaves from the Poinsettia Petals stamp set onto Whisper White card using Old Olive ink. I cut out the images using the co-ordinating Poinsettia Dies. I coloured the leaves using the Light Old Olive Stampin’ Blend and the flower using the Light Real Red Stampin’ Blend. I attached the leaves to the back of the flower before attaching the whole piece to the card front using dimensionals.
  I added one of the beautiful Beaded Pearls to the centre of the flower. I also tied a bow in a length of the Real Red Braided Linen Trim and attached it to the card front using a Glue Dot.
To decorate the inside of the card, I stamped the greeting from the Poinsettia Petals stamp set using Real Red ink. I used the Old Olive Stampin’ Write Marker to add colour to the stems on the berry image and stamped it next to the greeting. I stamped the berry fill image using Real Red ink and I was pretty happy with how the images lined up.
This amazing product suite can be found in the new 2020 August to December Mini Catalogue which was released on Tuesday. You can view a PDF copy here (look at the bottom of the page) but If you don’t have a demonstrator and would like a catalogue, please contact me so that we can get one to you.
Bye for now.
Kris
Product Used:


Floral Birthday
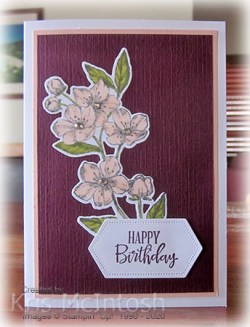
I recently made a birthday card for one of my downline and thought that you might like to see it. I embossed Blackberry Bliss card using the Subtle 3D Embossing Folder and attached it to Petal Pink card. The whole panel is attached to scored and folded Thick Whisper White card. I stamped the large floral image from the Forever Blossoms stamp set onto Whisper White card using Memento Tuxedo Black ink. I coloured the image using Petal Pink and Old Olive Stampin’ Blends and cut it out using the co-ordinating Cherry Blossoms Die.  I stamped the greeting from the Peaceful Moments stamp set onto Whisper White card using Blackberry Bliss ink and cut it out using one of the Stitched Nested Labels Dies. I attached the floral image to the card front before adding the greeting using dimensionals. I also added some Basic Rhinestones to the centre of the flowers.
 To decorate the inside of the card, I stamped the single flower from the Forever Blossoms stamp set onto the upper left and lower right hand corners of Whisper White ink using Memento Tuxedo Black ink. I used a post-it-note mask to cover the flowers and stamped the double leaf image from the Forever Blossoms stamp set using the same ink. I coloured the flowers using Petal Pink and Old Olive Stampin’ Blends. I stamped the greeting from the Peacful Moments stamp set onto the centre of the Whisper White card.
I haven’t used this stamp set in a while and I don’t really know why. I think this card shows that you don’t need a lot of supplies to make a beautiful card.
Bye for now,
Kris
Product Used:


Deepest Sympathy
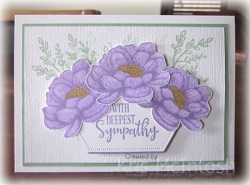
I was asked by my Dad to make a sympathy card for him. As most people this is not one of my go-to kind of cards and can be difficult to make. However, with so many beautiful stamps within the available catalogues, it did not take too long to come up with an idea. I stamped the leaf image from the Tasteful Textures stamp onto Whisper White card using Mint Macaron ink before embossing the card using the Subtle 3D Embossing Folder. I attached the stamped card to Mint Macaron card and then scored and folded Thick Whisper White card. I stamped “with deepest sympathy” from the Peaceful Moments stamp set onto Whisper White card using Highland Heather ink.  The greeting is cut out using one of the Stitched Nested Labels Dies. I also cut Highland Heather card using the same Stitched Nested Labels Die. I attached the Highland Heather die cut behind the greeting so that just a small amount shows across the bottom and on the lower sides. I attached the greeting to the card front using dimensionals. I stamped the flower from the Tasteful Textures stamp set three times onto Whisper White card using Highland Heather ink. I coloured the flower using the Light Highland Heather Stampin’ Blend and the Dark Daffodil Delight Stampin’ Blend.
  I out the flowers and attached them to the card front across the top of the greeting panel using dimensionals where necessary.
To decorate the inside of the card, I stamped the flower from the Tasteful Textures stamp set onto the lower left hand corner of Whisper White card. I masked the flower using a Post-it-Note and stamped the leaf image from the Tasteful Textures stamp set twice using Mint Macaron ink. I removed the Post-it-Note mask and coloured the flower using the Light Highland Heather and Dark Daffodil Delight Stampin’ Blends. The panel is attached to the inside of the card.
I hope my Dad likes the card I made for him.
Bye for now,
Kris
Product Used:


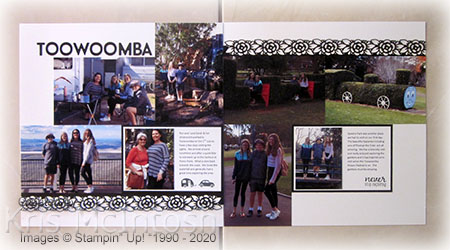
Toowoomba
Recently Ron and I were lucky enough to spend a few days in Toowoomba with our girls and their children. Unfortunately our sons-in-law were not able to make it. The first day was beautiful and sunny and we had no wind. Ron & I and Sarah and her children arrived at lunchtime and after lunch had a quick look around town, first visiting Picnic Point. I am drawn to this place, as this was the name of the suburb I grew up in! We also visited Queen’s park where the topiaries are amazing, especially the one of Thomas!  I used Whisper White 12″ x 12″ card as the base of each page. I cut Basic Black card using one of the Ornate Border Dies and attached it behind the bottom two photos on the first page and the top two photos on the second page. I created my journaling on the computer and printed onto Whisper White card. The journaling is attached to Basic Black card before being attached to the page. I also cut down a photo for each journaling block. I cut the title from Basic Black card using the Playful Alphabet Dies and attached it to the first page. I also added some stamping to each journaling block using the retired Let’s Get Away stamp set and Memento Tuxedo Black ink.
I love how simple but beautiful these pages are, don’t you. I have a few more pages to share from our trip, hopefully soon.
Bye for now,
Kris
Product Used:


