My First Christmas Card

for this year. A PDF copy of the 2020 August to December Mini Catalogue is now available on the Stampin’ Up! Demonstrator Website. It is truly lovely and I know you will love it when you see it, but it got me thinking about Christmas and what items I already have which I can use for Christmas and since I was already playing with the Birds & Branches Bundle, this card was born. I began by stamping the tree trunk image from the Winter Woods stamp set onto Crumb Cake card using Early Espresso ink. I sponged the edges of the stamped card using Crumb Cake ink and attached it to the bottom of Whisper White card. I stamped the greeting from the Winter Woods stamp set onto the top right hand corner of the Whisper White card using Cherry Cobbler ink. I coloured a length of Silver 3/8″ Metallic Edge Ribbon using the Dark Cherry Cobbler Stampin’ Blend and wrapped it over the ends of the stamped Crumb Cake card. The whole panel is attached to scored and folded Cherry Cobbler Card. I cut Shaded Spruce card using the die from the Birds & More Dies and then cut around it using the largest circle from the Layering Circle Dies. I also cut Whisper White card using the same circle and attached the Shaded Spruce die cut on top. I punched Cherry Cobbler card using the largest circle from my retired Crop-A-Dile and attached them over the circles on the Shaded Spruce die cut. I stamped the flower from the Birds & Branches stamp set three times onto Whisper White card using Cherry Cobbler ink. I cut out the flowers using the co-ordinating Birds & More Die and attached the flowers over the leaves on the Shaded Spruce Die Cut. I stamped the solid bird image from the Birds & Branches stamp set onto Whisper White card using Crumb Cake ink. I stamped the detailed bird image over the top using Cherry Cobbler ink. I cut out the bird using the co-ordinating Birds & More Die and attached it to the circle die cut.
  I attached the image panel to the left hand side of the card front using dimensionals. Lastly I added some Basic Rhinestones to the flower centres.
To decorate the inside of the card, I stamped the tree trunk image from the Winter Woods stamp set onto a narrow strip of Crumb Cake card using Early Espresso ink. I sponged the edges of the stamped card using Crumb Cake ink and attached it to the bottom of Whisper White card. I stamped the solid bird image from the Birds & Branches stamp set using Crumb Cake ink and stamped the detailed image over the top using Cherry Cobbler ink. The bird is cut out using the co-ordinating Birds & More Die and attached to the inside panel just above the Crumb Cake.
I am kind of on the fence about this one. What about you? Do you like it? Or is it a complete fail? Let me know what you think.
Bye for now,
Kris
Product Used:


How cute is this
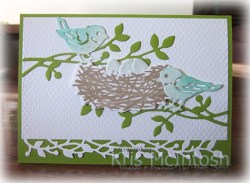
I got a little carried away while playing with the Birds & Blooms stamp set and the co-ordinating Birds & More Dies. This time, I cut the border from the Birds & More Dies along one long edge of Whisper White card before embossing the panel using the Tasteful Texture Embossing Folder. I die cut Granny Apple Green card twice using the leafy die from the Birds & More Dies and attached them to the embossed card before attaching the panel to scored and folded Granny Apple Green card.  I stamped the nest image onto Whisper White card using Crumb Cake ink and cut it out using the co-ordinating Birds & More Die. I stamped the egg image onto Whisper White card using Pool Party ink and cut the eggs out using the co-ordinating Birds & More Die. I attached the eggs to the back of the nest and then the card front using dimensionals. I cut two birds from Whisper White card using the Birds & More Dies. I used a sponge to add some Pool Party and Bermuda Bay ink to the die cut birds before attaching to the card front.
  I did use dimensionals where necessary on the bird on the right.
To decorate the inside of the card I attached a narrow strip of Granny Apple Green behind one long edge of Whisper White card embossed using the Tasteful Texture Embossing Folder. The embossed panel is attached to the bottom of Whisper White card. I cut one bird from Whisper White card using the Birds & More Dies and added some Pool Party and Bermuda Bay ink using a sponge. I attached the bird to the left hand side of the embossed Whisper White card.
This is so cute and so pretty, don’t you think?
Bye for now,
Kris
Product Used:


My Girls
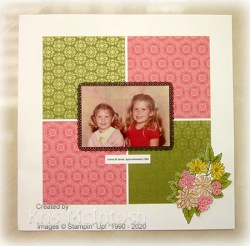
Maybe you are like me and have lots of photos from over the years sitting on a shelf or in a cupboard. I have a box of photos that I have taken from various photo frames collected over the years and now no longer on display. This is my go to box when I am looking for something to scrapbook. I love that I can flick through the photos and decided which ones I want to display. This photo is from that box and is a photo of my girls taken at pre-school in approximately 1984. I cut two patterns from the Ornate Garden Specialty Designer Series Paper to create four squares.  I attached the Designer Series Paper squares to a 12″ x 12″ Whisper White page. I cut Early Espresso card using the Ornate Layers Dies to create the frame for my photo and attached it to the centre of the Designer Series Paper. I created the title on my computer, cut it out using one of the Rectangle Stitched Dies before attaching it to the page below the photo. I stamped the floral image from the Ornate Style stamp set onto Whisper White card using Memento Tuxedo Black ink. I coloured the image using Old Olive, Daffodil Delight, Petal Pink, Flirty Flamingo and Light Soft Suede Stampin’ Blends. I cut out the floral image and attached it to the lower right hand corner of the page.
If you are following me on Saturdays you will see that my memory keeping style is definitely simple. I look at this page and it makes me so happy to look at this photo of my beautiful girls.
Bye for now,
Kris
Product Used:


Balloon Birthday

Today’s card is a really simple card which would be perfect for any child. I used the Stamparatus to hinge stamp the “happy birthday” greeting from the Itty Bitty Birthday stamp set onto the right hand side of Whisper White card using Pacific Point ink. I stamped “birthday wishes” from the Itty Bitty Birthday stamp set between the “happy birthday” greeting using Poppy Parade ink and the Stamparatus. I punched one large balloon from Granny Apple Green card using the Balloon Bouquet Punch.  I also punched a small balloon from Pacific Point card and also Poppy Parade card using the Balloon Bouquet punch. I embossed the balloons using the Tasteful Textile 3D Embossing Folder and attached a length of Linen Thread to the back of each balloon. I attached the balloons to the card front using dimensionals and tied the ends of the Linen Thread in a knot. I attached the Linen Thread knot to the card front using Mini Glue Dot.
To decorate the inside of the card, I punched a large balloon from Pacific Point card using the Balloon Bouquet Punch. I embossed the balloon using the Tasteful Textile 3D Embossing Folder and attached a length of Linen Thread to the back. I attached the balloon to the top left hand corner of Whisper White card. I wanted the thread to hang like a balloon string so I used the tiniest amount of liquid glue to attach the Linen Thread at the end and in the middle.
Such a simple card but also so much fun.
Bye for now,
Kris
Product Used:


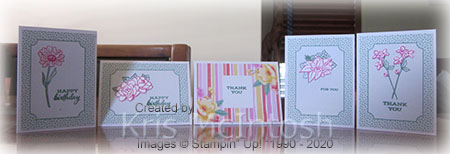
Four Season Floral
Today I want to share with you a lovely bundle from the Beginner Brochure. This brochure runs concurrently with the 2020-2021 Annual Catalogue and features some fantastic stamps and bundles for anyone who is just getting started with stamping and Stampin’ Up! This particular bundle includes the Four Season Floral stamp set and ten 3″ x 4″ Flowers for Every Season Memories and More Cards, Card Bases and co-ordinating envelopes. The bundle also includes two Stampin’ Spots in Magenta Madness and Just Jade (two of the new in-colours) as well as a “C” block to mount your stamps and a Stampin’ Seal to put your cards together.
So to give you an idea of what you can create, I used both sides of each of the Flowers For Every Season Memories and More cards included in the bundle and the stamps and ink from the bundle to create some sweet little cards.
 Not only are the cards gorgeous but the envelopes have been lined with some gorgeous Flowers For Every Season Designer Series Paper to make them extra-special as well.
 I shared this bundle on my Facebook Live yesterday and instead of showing how to create the cards using the Memories and More Cards supplied in the bundle, I created some Whisper White Note Cards to show the process of creating using only the two ink colours and images from the Four Season Floral stamp set. The first Note Card uses the daisy image and to give it colour I used the Magenta Madness Stampin’ Spot to add colour to the flower and the Just Jade Stampin’ Spot to add colour to the stem and leaves. Stampin’ Spots make it very easy to add colour to a specific area of a stamp like this one.
  I stamped the image twice onto the Whisper White Note Card and added the “happy birthday” from the Four Season Floral stamp set using the Just Jade Stampin’ Spot. I also decorated the envelope with the same floral image. Simple! To use the larger floral images and just the two colours was not quite as simple. For these two cards, I stamped the whole image onto the Whisper White Note Card twice using the Just Jade Stampin’ Spot. I also stamped the greeting using the same ink. I stamped the whole flower onto scrap Whisper White card using Magenta Madness ink and fussy cut just the flowers and attached them over the Just Jade image. Kind of sweet and not much more work or even supplies.

I love that by taking the supplies in the bundle and slowly adding extra product such as the Whisper White Note Cards, the bundle will keep you creating for quite a while. I have some ideas for stepping up this bundle to add in more product from the Flowers For Every Season Bundle to slowly build your crafting supplies and give a beginner stamper more creative opportunities.
Bye for now,
Kris
Product Used:


Dies & Embossing
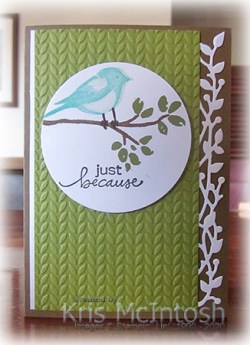
Here is a card, I made while I was preparing for my last Facebook Live. I believe it would appeal to the Avid Stamper, someone who has a lot of supplies in their stash! (Like me.) It was such fun creating with the Birds & Branches Bundle and I am still on a roll, so I have a few more cards to share over the next week or so. For this card, I cut one long edge of a piece of Whisper White card using the border die from the Birds & More Dies. I embossed a piece of Old Olive card using one of the Greenery Embossing Folders and attached it to the die cut Whisper White card. The whole panel is attached to scored and folded Soft Suede card. I stamped the branch image from the Birds & Branches stamp set across Whisper White card using Soft Suede ink.  I stamped the leaves from the same stamp set using Old Olive ink. I stamped the bird feet onto the branch using Early Espresso ink. I stamped the solid bird using Pool Party ink and the detailed bird using Bermuda Bay ink. I stamped the greeting from the Lovely You stamp set using Early Espresso ink.
 I used the largest circle from the Layering Circles Dies to cut out the stamped images before attaching the panel to the card front using dimensionals.
To decorate the inside of the card, I cut one long edge of Whisper White card using the border from the Birds & More Dies. I embossed a narrow strip of Old Olive card using the same Greenery Embossing Folder and attached it to the die cut Whisper White card.
Although this card uses the same product that I used to create my samples for my last Facebook Live, I think it has a totally different feel, don’t you think?
Bye for now,
Kris
Product Used:


Another Lovely Card
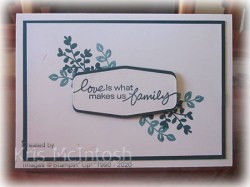
Today I am sharing another card I created using the Lovely You stamp set. This is also a rather simple card which would suit the casual stamper perfectly. I began by stamped one leaf image from the Lovely You stamp set using Pretty Peacock ink onto the top left and lower right hand corners of Whisper White card. I stamped the second leaf twice onto each corner using Pretty Peacock ink which I stamped onto scrap paper first. I attached the stamped panel to Pretty Peacock card and then scored and folded Thick Whisper White card. I stamped the greeting from the Lovely You stamp set onto Whisper White card using Pretty Peacock ink.
  I cut out the greeting using one of the Tasteful Labels Dies. I cut Pretty Peacock card using the same Tasteful Labels Die and cut it in half across the width. I attached one half behind the top edge of the greeting panel and the other behind the bottom half of the greeting panel. The greeting panel is attached to the card front using dimensionals.
To decorate the inside of the card, I stamped the same images using Pretty Peacock ink, making sure to stamp the single leaf image onto scrap paper first.
I love creating cards in only one colour. It’s amazing how much variation you can achieve by simply stamping off onto scrap paper before stamping on your project. Let me know what you think.
Bye for now,
Kris
Product Used:


Wedding Page

Today’s Memory Keeping page shows off a photo of Sarah and Sean on their Wedding Day with Ron and I. Such a lovely day. I have to admit I am a little obsessed with the new Stitched Triangle Dies and can’t seem to stop thinking about ways to use them. Unfortunately, my card ideas have not been as successful as I would wish yet. However, using them for Memory Keeping seems really easy! Today I cut four triangles from Garden Green card and four triangles from Soft Sea Foam card. I embossed the triangles with the Ornate Floral 3D Embossing Folder once they were die cut.  I attached four Garden Green and three Soft Sea Foam triangles across a 12″ x 12″ Whisper White page. I didn’t add a mat to my photo as it already had a white border. I stamped three leaves from the Forever Fern stamp set onto Whisper White card using Garden Green ink and cut them out using the co-ordinating Forever Flourishing Dies. I stamped two different leaves from the Forever Fern stamp set onto Whisper White card using Soft Sea Foam ink and cut them out using the co-ordinating Forever Flourishing Die. I stamped the floral image from the Forever Fern stamp set three times onto Whisper White card using Blushing Bride ink and cut them out using the co-ordinating Forever Flourishing Dies. I used the last Soft Sea Foam embossed triangle as a base and layered the leaves and flowers. Once I had attached the triangle to the page, I tied a bow in a length of Gold Twine from the Forever Greenery Trim Combo Pack. I actually tied three lengths of the twine at the same time to give a bit more depth. I used a now retired Journaling Pen to add the date and a title.
I love the simple beauty of this page. I’d love to hear what you think.
Bye for now,
Kris
Product Used:


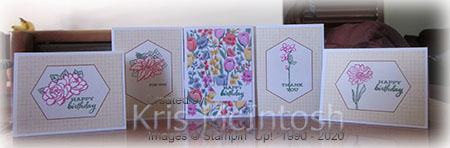
Double Dutch Fold
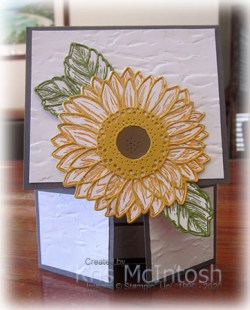
Sounds complicated doesn’t it, but it really is quite a simple card to create. I followed the instructions on Splitcoast Stampers and I am more than happy with the result. I used Basic Gray card to cut the two pieces to create the card base. I think the only thing you need to be careful about is making sure that the pieces fit together properly before using your bone folder to fold the score line. You need the top piece to sit so that it just meets the bottom flaps and that bottom flaps need to meet perfectly (or pretty near to perfect) together in the centre of the front of the card. Sounds like its difficult but it really isn’t. I cut Whisper White card for the panels on the front of the card and embossed them using the Old World Paper3D Embossing Folder.  I stamped the flower from the Celebrate Sunflowers stamp set onto Whisper White card using Crushed Curry ink and cut it out using the co-ordinating Sunflowers Die. I cut Crushed Curry card using the detailed sunflower die and the flower centre from Soft Suede card. I attached the flower centre and the detailed flower on top of the stamped and die cut flower. I stamped the leaf from the Celebrate Sunflowers stamp set onto Whisper White card three times using Old Olive ink. I cut three detailed leaves from Old Olive card using the Sunflowers Die. I attached the leaves to the back of the flower before attaching the flower to the card front.
  You only attach the flower to the top flap using dimensionals. So you need to be careful where you place the dimensionals on the back of the flower.
To decorate the inside panel I stamped a greeting from the Celebrate Sunflowers stamp set using Basic Gray ink. I attached a narrow strip of Basic Gray card behind one long edge of Whisper White card embossed using the Old World Paper 3D Embossing Folder. The panel is attached to the bottom of the stamped Whisper White card.
So happy with the way this card turned out, it’s such a great way to show off large images like this one from the Celebrate Sunflowers stamp set. Don’t you agree?
Bye for now,
Kris
Product Used:


Birds & Branches
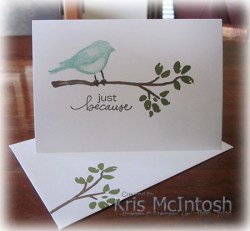
Yesterday on my Facebook Live I shared the Birds & Branches Bundle. This is a lovely stamp set and co-ordinating dies. As usual I shared a beginner, casual and avid stamper card. My simple stamping card was done onto a Whisper White Note Card which is an easy way for a beginner or new stamper to get started, you get 20 Notecards and envelopes for a really low price. I began by stamping the branch from the Birds and Branches stamp set onto the Whisper White Note Card using Soft Suede ink. I added the leaves from the stamp set using Old Olive ink. The leaves fit neatly around the ends of the branch. I stamped the bird feet onto the branch using Early Espresso ink before stamping the solid bird image using Pool Party ink. I stamped the detailed bird image over the top using Bermuda Bay ink.  Lastly I added a greeting from the Lovely You stamp set using Early Espresso ink.
For my Casual Stamper I embossed Old Olive card using one of the folders from the Greenery Embossing Folders and attached it across the bottom of Whisper White card. The Whisper White panel is attached to scored and folded Soft Suede card. I created the image panel in exactly the same way as I did for the Note Card using the Birds & Branches stamp set. I stamped the branch using Early Espresso ink, the leaves using Old Olive ink and the bird using firstly Pool Party ink with the detailed image over the top using Bermuda Bay ink.
  I also added the greeting from the Lovely You stamp set using Early Espresso ink. I decorated the inside of the card by embossing a narrow strip of Old Olive card using the same folder from the Greenery Embossing Folders and attached it to the bottom of Whisper White card.
 For my Avid Stamper card, I cut one long edge of a piece of Old Olive card using the border image from the Birds & More Dies. After I cut the edge, I placed the Old Olive card inside the same Greenery Embossing Folder I used on the Casual card to give some more texture. I attached the embossed and die cut Old Olive card to the bottom of Whisper White card and then scored and folded Soft Suede card.
 I stamped the tree branch, leaves bird feet and greeting onto Whisper White card as before using the same inks. However, this time, I stamped the bird onto scrap Whisper White card using Bermuda Bay ink for the detailed image and Pool Party ink for the solid bird image.
  I cut out the bird using the co-ordinating Birds & More Die and attached it to the stamped panel using dimensionals. The stamped panel is attached to Soft Suede card and then the card front using dimensionals. To decorate the inside of the card, I cut Old Olive card using the border image from the Birds & More Dies, leaving a narrow straight edge and attached it across the bottom of Whisper White card. I stamped the bird as before onto scrap Whisper White card, cut it out using the Birds & More Die and attached it to the left hand side of the Old Olive border.
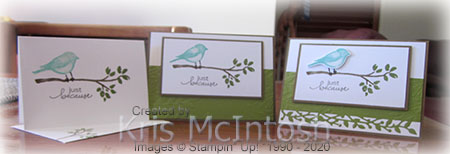
Don’t they all look pretty! I truly love the beautiful images in the Birds & Branches stamp set and the co-ordinating Birds & More Dies. I know that I am going to have a lot of fun creating with this great bundle.
Bye for now,
Kris
Product Used:


