Sunday Stamps SSC288

I was inspired to create today’s card after seeing the current challenge at Sunday Stamps. I cut one of the designs from the Ornate Garden Specialty Designer Series Paper into card front sized pieces. I took one of these panels and trimmed .5cm from the bottom of the panel. I cut the remaining panel in half diagonally and attached it to scored and folded Thick Whisper White card. I cut Whisper White card using one of the squares from the Layering Squares Dies. I used post it notes to create a narrow central panel and stamped the greeting from the Ornate Thanks stamp set using Memento Tuxedo Black ink. With the masks still in place, I lightly sponged over the area using a sponge and Petal Pink ink. I replaced the masks so that the stamped panel was covered and stamped the single daisy from the Ornate Style stamp set using Memento Tuxedo Black ink. I stamped one image and covered it with a post-it-note mask and then stamped the second image. I covered the second image with a post-it-note mask and stamped the third image. I coloured the flowers using Petal Pink and Light Mango Melody Stampin’ Blends. I removed the mask rotated the image panel and once more covered the greeting panel. I stamped the single daisy from the Ornate Style stamp set twice using Memento Tuxedo Black ink and coloured the images using the same Stampin’ Blends.
  I cut a scalloped square from Gold Foil card using the Layering Squares Dies and attached the stamped image panel. The whole piece is attached to the card front using dimensionals.
To decorate the inside of the card, I placed a post-it-note across the bottom of Whisper White card. I stamped and masked the daisy image from the Ornate Style stamp set three times using Memento Tuxedo Black ink. I coloured the images using Petal Pink, Mint Macaron and Light Mango Melody Stampin’ Blends. The narrow .5cm piece of Designer Series Paper I trimmed from the piece on the front of the card, is attached across the bottom of the stamped flowers.
I love this piece of the Ornate Garden Specialty Designer Series paper. The Mint Macaron colour looks amazing with the gold embossing. I’d love to know what you think.
Bye for now,
Kris
Product Used:


Happy Easter
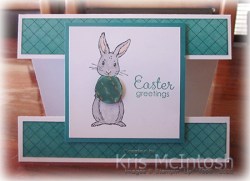
Today’s fancy fold card is a floating front card. This card was created using the instructions I purchased from Elizabeth Shannon. I cut the pieces for the base of the card from Thick Whisper White card. I cut pieces of the Golden Honey Specialty Designer Series Paper (now retired) and used my Sponge Brayer to add Bermuda Bay ink to the paper. The paper gets pretty wet when you add so much ink, so I waited for it to dry before attaching it to the card base and the floating panel for the bottom of the card front. I stamped the bunny from the Fable Friends stamp set onto Whisper White card using Memento Tuxedo Black ink. I coloured the image using Light Bermuda Bay, Light Smoky Slate and Dark Petal Pink Stampin’ Blends. I also used the colour lifter to lighten the belly area of the bunny.  I stamped the greeting from the Fable Friends stamp set beside the bunny using Bermuda Bay ink. I punched a 3/4″ circle from the same Golden Honey Designer Series Paper, re-inserted into the punch to give it a slight oval shape and punched again (3/4″ Circle Punch is now retired). I coloured the punched piece using the Dark Bermuda Bay Stampin’ Blend before attaching it to card front using dimensionals so that it looked like the bunny is holding an Easter Egg. I attached the stamped panel to Bermuda Bay card and attached it to the card base using dimensionals. Making sure to line up the floating panel with the card base, I attached the image panel to the floating panel also using dimensionals. I didn’t add anything to the inside of the card so that I could write my message. I had my grandchildren in mind when I created this card, so I created another card in Bermuda Bay ink, two using Flirty Flamingo ink and two using Cherry Cobbler ink.

I think they look great don’t you? I hope my grandchildren love them too.
Bye for now,
Kris
Product Used:


Cased Sailing Home

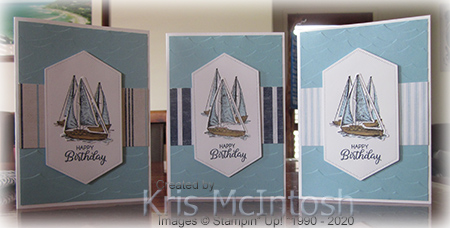
Today’s card is one that was emailed to me in a newsletter by another demonstrator. It was created by Deborah Woodby and I do not have a blog or facebook page for this lady, however, you can find her on Pinterest. Anyway, I loved her card and decided that I would recreate it. I embossed Balmy Blue card using the High Seas 3D Embossing Folder before adding a strip of the Come Sail Away Designer Series Paper.  The whole panel is attached to scored and folded Thick Whisper White card. I cut Whisper White card using the Stitched Nested Labels Dies. I stamped “happy birthday” from the Beautiful Bouquet stamp set onto the bottom of the die using Night of Navy ink.
  I stamped the small sailing ship from the Sailing Home stamp set twice above the greeting using Memento Tuxedo Black ink. I coloured the images using the Soft Suede and Balmy Blue Stampin’ Blends. I attached the panel to the card front using dimensionals. I stamped the large sailing ship onto scrap Whisper White card using Memento Tuxedo Black ink and coloured the image using the same Stampin’ Blends. I cut out the image using the co-ordinating Sailing Home Die and attached it to the card front. I kept the inside of the card very simple. I simply stamped the anchor image from the Sailing Home stamp set onto the lower left hand corner using Night of Navy ink.
I liked the layout of this card, so I had to create more than one. I used three different paper patterns from the Come Sail Away Designer Series Paper. Don’t they look great?
I don’t make male cards very much, so it will be handy to have a few on hand. Thanks Deborah so much for the inspiration.
Bye for now,
Kris
Product used:


Bird Ballard Birthday

I needed to make a birthday card for a friend of mine so I dusted off my neglected (of late) Bird Ballard Designer Series Paper. I also used the sketch challenge at Freshly Made Sketches. Although the challenge has already well and truly ended, I wanted to use the sketch to create my card. I began by attaching a piece of the Bird Ballard Designer Series Paper to Whisper White card. I embossed the combined Designer Series Paper/Whisper White card using the Subtle 3D Embossing Folder. I love doing this technique it kind of “welds” everything together. I attached the embossed card to scored and folded Early Espresso card.  I cut Whisper White card using the Stitched Shapes Dies and attached it to an Early Espresso scalloped circle cut using the Layering Circles Dies. I cut the birds and flowers for the front of the card from one of the designs in the Bird Ballard Designer Series Paper and attached it to the Whisper White stitched circle.
  The whole panel is attached to the card front using dimensionals. I stamped the greeting from the Itty Bitty Greetings stamp set onto Whisper White card using Early Espresso ink. I punched out the greeting using the Classic Label Punch. I punched the greeting twice so that it just fitted around the greeting. I inked the edges of the label using Early Espresso ink and attached it to the card front using dimensionals where necessary.
To decorate the inside of the card, I stamped the greeting from the Perennial Birthday stamp set using Early Espresso ink. I fussy cut the bird from the Bird Ballard Designer Series Paper and attached it to the lower left hand corner.
I love this card. Thanks so much to Freshly Made Sketches for the inspiration and for a reason to use this beautiful Designer Series Paper.
Bye for now,
Kris
Product Used:


First Christmas
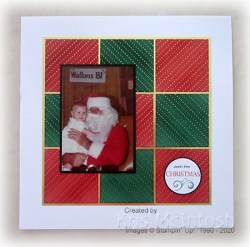
Today’s page shows off Sarah’s first visit to Santa. It was taken at Walton’s in Dubbo, a store which is now long gone. I don’t have any current Christmas Paper on hand and wanted to co-ordinate with Santa’s suit, so I improvised. I cut 3″ squares from the Golden Honey Specialty Designer Series Paper (unfortunately no longer available now that Sale-a-Bration is over). I coloured half the squares using a Sponge Brayer and Real Red ink and the other half using a Sponge Brayer and Shaded Spruce ink. By adding the colour I think the gold embossing on the paper shows up really well. To keep with the gold theme, I layered all the squares onto a piece of Gold Foil before attaching it to a 12″ x 12″ Whisper White page. I added a Basic Black mat to the photo before attaching it to the left hand side of the page.  I used the computer to create “Sarah’s First” and printed it onto Whisper White card. I stamped “Christmas” from the Merry Christmas To All stamp set using Real Red ink. I added the filigree image also from the same stamp set using Shaded Spruce ink. The title is punched out using the 2″ Circle Punch and attached to Basic Black card punched using the Starburst Punch. The panel is attached to the lowest right hand Designer Series Paper square. Another simple page but I love how the sponged colour adds so much interest to the Designer Series Paper. I made sure to attached each colour with the gold embossing running in a different direction for a little more interest.
This photo was one that I found when leafing through my box of photos removed from old albums and picture frames. I am glad that it is now on a page so my grandchildren can share the memory with me.
Bye for now,


Buy The Shoes

Today’s card is one that I CASED from a design which was shared on a Demonstrator only facebook page by Paper Blossom Designs using some of the product from the Best Dressed Product Suite. I attached a piece of the Best Dressed 6″ x 6″ Designer Series Paper across the bottom of Whisper White card. The top of the Designer Series Paper is wrapped with Pretty Peacock 1/2″ Scalloped Linen Ribbon before attaching the panel to scored and folded Pretty Peacock card. I cut Whisper White card using the largest square in the Stitched Shapes Dies. I stamped the greeting from the Dressed to Impress stamp set across the bottom of the square using Pretty Peacock ink. I stamped the shoe image from the same stamp set using Pretty Peacock ink, masked it with a post-it-note image and then stamped the shoe again. I removed the mask and then stamped the background image over the top using Pretty Peacock ink. I did stamp the background image onto scrap paper twice before stamping over the shoes. I cut the button from Pretty Peacock card using the die from the All Dressed Up Dies and attached it to the top right hand corner of the stamped panel. I tied a bow in Whisper White Baker’s Twine and attached it to the centre of the button.
  The image panel is attached to the card front using dimensionals.
To decorate the inside of the card, I stamped the shoes, as before, using a mask and added the greeting from the Beautiful You stamp set onto Whisper White card using Pretty Peacock ink.
Such a simple card really but I absolutely love it and know that the ladies in my classes will love it too. Thanks so much to Paper Blossom Designs for sharing this lovely card.
Bye for now,
Kris
Product Used:


Colour Reveal

Today’s card is a fancy fold that I learned from a tutorial I purchased from Elizabeth Shannon (a UK Stampin’ Up! demonstrator). I think this tutorial is only available to demonstrators but please check with Elizabeth. My first card is made following Elizabeth’s instructions. I have used stamp sets and Designer Series Paper which was only available during Sale-A-Bration, but I know that you will all have these in your stash and I really needed to share these cards. I cut my card base and inside panel from Whisper White card. I stamped the cake image from the Happy Birthday To You stamp set onto Window Sheet using Stazon ink. I stamped the same image onto Whisper White card using Memento Tuxedo Black ink.  To make this work you need to stamp both images in exactly the same position, so I used my Stamparatus (lifesaver!). I coloured the image on Whisper White card using Poppy Parade, Dark Old Olive, Dark Daffodil Delight and Smoky Slate Stampin’ Blends. I punched Poppy Parade card using the Everyday Label Punch, folded it in half and attached one half to the Window Sheet image and one half to the coloured image. When you slide them inside the card, you only see the Window Sheet image, pull on the Everyday Label and you get to see the magic changing to colour.
  I stamped the greeting from the Happy Birthday To You stamp set onto Whisper White card using Poppy Parade ink, attached it to Poppy Parade card and then the card front.
I just loved this and needed to make a special card for my granddaughter Elyssa who recently celebrated her birthday. So, I changed things up a bit to create my second card.
This time, I cut my base from Whisper White card and before I cut the window in the front panel, I attached a piece of the Golden Honey Specialty Designer Series Paper which is free with a qualifying order during Sale-A-Bration. Once I created the piece for the front of the card, I attached it to scored and folded Basic Black card. I once more stamped the cake image onto Window Sheet using Stazon ink and also onto Whisper White card using Memento Tuxedo Black ink. I loved the colours on my first card, so I used Poppy Parade, Dark Old Olive, Dark Daffodil Delight and Smoky Slate Stampin’ Blends to colour the image.  This time I punched Basic Black card using the Everyday Label Punch to attach the two image panels together. I stamped “happy birthday” from the Happy Birthday To You stamp set onto Whisper White card using Poppy Parade ink, attached it to Basic Black card and then the card front. To decorate the inside of the card, I stamped the cake image from the Happy Birthday To You stamp set onto scrap Whisper White card using Memento Tuxedo Black ink.
  I coloured the flowers and leaves only using Poppy Parade, Dark Daffodil Delight and Dark Old Olive Stampin’ Blends. I used the Birthday Dies, which you can purchase during Sale-A-Bration, to cut out the flowers and atttached them to the lower left hand corner of Whisper White card.
I am so happy with these cards and just had to make one more for my other granddaughter Ava who also celebrated her birthday during March. I used the Lady Bug stamp set and the Golden Honey Specialty Designer Series Paper which again are no longer available. I coloured the images using various Stampin’ Blends and followed exactly the same technique as in the previous cards.
Sometimes, you get put off when you see a fancy card, but they are not always as difficult as you might think.
Bye for now,
Kris
Product Used:


Something a little different

Today is the last day of Sale-a-Bration and I can honestly say I am really going to miss the Happy Birthday To You stamp set. If you haven’t received this stamp set for FREE yet, you need to place a qualifying order today or it will be gone forever! Don’t forget to add the co-ordinating Birthday Dies to your order and you are well on the road to earning this stamp set for FREE.  The card I made to share today is just a little different to the usual card, the front flap on this card is cut almost in half! I used Highland Heather for the card base and added a layer of Whisper White to the front which I embossed using the Coastal Weave 3D Embossing Folder.
  I attach a Whisper White panel to the inside of the card and stamped the greeting from the Happy Birthday To You stamp set using Highland Heather ink. I stamped the cake image from the Happy Birthday To You stamp set onto Whisper White card three times using Memento Tuxedo Black ink.
  I coloured the flowers and leaves using Highland Heather and Granny Apple Green Stampin’ Blends. I cut out the flowers using the co-ordinatingand Birthday Die and trimmed away the single flower. I attached two double flowers and one single flower across the top of the shortened front panel. I added one additional single flowers on top to add more dimension before I added a Basic Rhinestone to the flower centres. I also added one single flower onto the lower left hand corner of the inside Whisper White panel.
I think this is a fun card don’t you?
Bye for now,
Kris


Kerchief Card Kit

One of the often overlooked things in any catalogue are card kits. The Kerchief Card Kit is one of the things you can earn for FREE during Sale-a-bration (only two days to go) with a qualifying order. I have had this kit for a while and I have decided that I am going to share it with some friends of mine who are not stampers as such but who do enjoy making the occasional card.  You get enough product in the kit to create four cards each of two different designs with co-ordinating envelopes. I created one each of the cards as per the instructions in the kit and then I had a play with one of the cards. I actually cut the blue card from the kit in half and then I cut the patterned front panel with one of the Stitched Rectangle Dies.
  I stamped the cake from the Happy Birthday To You stamp set onto Whisper White card using Memento Tuxedo Black ink. I coloured the image using Light Petal Pink, Dark Daffodil Delight, Poppy Parade and Old Olive Stampin’ Blends.
  I attached the stamped panel behind the rectangle frame I created before attaching it to scored and folded Night of Navy card. Lastly I attached one of the pre-stamped greetings to the card front using dimensionals.
For the second card, I embossed Whisper White card using the Coastal Weave 3D Embossing Folder and attached it to the back panel of the card I cut in half. The whole piece is attached to scored and folded Night of Navy card. I attached the rectangle I cut from the card front and also the gold embossed Vellum from the card kit. I used the twine provided to attach to the back of the die cut Night of Navy oval. I attached some leaves to the flower die cut (all from the kit) before attaching it to the Night of Navy oval and then the card front using dimensionals.

It’s kind of fun to play with card kits and use the pieces in a way other than the intended. I haven’t created anything to decorate the inside of the cards yet but I will. Remember you only have a couple of days to get your order in to receive this Kerchief Card Kit for Free.
Bye for now,
Kris
Product Used:


Emma
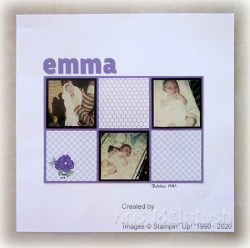
Today’s page shares photos of my youngest daughter taken not long after she was born. We lived in Dubbo at the time but moved to the mid north coast of New South Wales when she was just five months old. These photos had been pulled from an old album and were sitting in a box with lots of other photos. I am glad to be able to get them out of the box and onto a page. It’s a simple page but as you know that’s my style. I attached the photos to Basic Black card before attaching them to a piece of Highland Heather card. I cut squares of the Golden Honey Specialty Designer Series Paper where are also attached to the Highland Heather card. Don’t forget this gorgeous Specialty Designer Series Paper is available FREE with a qualifying order until the end of the month. The whole panel is attached to a 12″ x 12″ Whisper White page.
 I cut the heading from Highland Heather card using the Layering Alphabet Dies. These dies do not cut out the letters fully but it is a relatively easy task to finish cutting them out completely. I had been using the Happy Birthday To You stamp set to create a card and had one flower left over which had been coloured using the Highland Heather, Granny Apple Green and Dark Daffodil Delight Stampin’ Blends. I attached the flower to the lower left hand piece of the Golden Honey Specialty Designer Series Paper. I used the 0.5 Journaling Pen to add the place and year. It doesn’t seem so long ago that Emma was that cute little baby and now she is all grown up with a family of her own!
Bye for now,
Kris
Product Used:


