Tri-Shutter Birthday

Today’s Fancy Fold is a Tri-Shutter card and you can find instructions for this card on Splitcoast Stampers if you need them. I cut the card base from Night of Navy card. The layers are Whisper White and the Designer Series Paper is from the Country Club Designer Series Paper. I used both sides of the one paper.  To decorate the long central panels on the top and the bottom of the card, I cut a strip of Garden Green card using my retired Fringe Scissors to give a grass effect. The cut strip is attached to Whisper White card before being attached to the card base. I cut a rectangle from Whisper White card and stamped the golfer image from the Clubhouse stamp set using Memento Tuxedo Black ink.
  I coloured the image using Night of Navy, Sahara Sand and Ivory Stampin’ Blends. I used a Blender Pen and Garden Green ink to colour the grass. I attached the images to the card front, making sure to only add adhesive in the appropriate places. For the middle panel I stamped the gold ball image from the Clubhouse stamp set using Memento Tuxedo Black ink.
 I coloured the image using Sahara Sand, Light Night of Navy Stampin’ Blends. I used the Blender Pen and Garden Green ink to colour the grass. I stamped the golf stick using Memento Tuxedo Black ink. I didn’t add any additional colour to the golf stick image. For the last panel I stamped the greeting from the Clubhouse stamp set using Night of Navy ink. I also stamped the flag image using Memento Tuxedo Black ink. I coloured the flag using the Light Night of Navy Stampin’ Blend.
  I stamped the balloon image from the Bonanza Buddies stamp set over the grass part of the image using Garden Green ink which I had stamped onto scrap paper first. I stamped the “happy birthday” from the Clubhouse stamp set onto Whisper White card using Night of Navy ink. I punched both short ends using the Triple Banner Punch and sponged Night of Navy ink around the edges before attaching the greeting to the front panel.
It’s been a while since I made one of these cards but I do love this fancy fold. This type of card looks very special when it is open with all the different sections and folds. However, as you can see from the last photo it folds up to fit inside a standard envelope. Isn’t that great, I’d love to know if you have made one of these fancy folds.
Bye for now,
Kris
Product Used:


Facebook Live
Hello everyone, just a quick post today to let you know that since I am unable to have in-person classes, I have started doing Facebook Lives! I know, amazing what you can learn even at my age! I did my first one last week and I will be doing one today at 10am. The purpose of these Facebook Lives are to keep interacting with all of you and to keep you crafting and especially sending all of the cards you make. With Social Isolation we all have a lot of time on our hands, so, for me, I have been finishing lots of projects, using up lots of DSP and generally making lots and lots of cards. Last week I shared a card sketch and some examples I had made and I thought you might be interested to see them.
Anyway, if you have the time, pop in and see what I am up to today and if you can’t make the live you can always pop in later and have a look. So just go to my Facebook Business page – Stamping with Kris – and you can see my very simple attempts at keeping in touch. I must give a big shout out to my son-in-law who made the stand for me so that I am not quite so clumsy with the camera (thank you Sean) and my daughter (Sarah) and her children (Abigail and Ethan) who have been amazing at helping me learn all the technical parts!
Bye for now,
Kris
Product Used:
For my Hubby

Today is my husband’s birthday and I thought I would share the card I made for him with you. I found this card on Pinterest by a French Demonstrator and absolutely loved it. Of course I did make some changes but that’s what happens when we CASE something isn’t it. I began by attaching Night of Navy card to Whisper White card. I embossed the whole panel with the Absolutely Argyle 3D Embossing Folder. I wrapped the top of the Night of Navy card with a length of the Crumb Cake Bakers Twine from the Nature’s Twine combo pack.  I attached the embossed panel to scored and folded Smoky Slate card using dimensionals. I stamped the hat image from the retired Well Dressed stamp set onto Whisper White card using Smoky Slate ink. I coloured each hat using Dark Pool Party, Dark Balmy Blue and Light Night of Navy Stampin’ Blends. I cut each of the hats out and attached them to the card front using Mini Dimensionals. I stamped “world’s best husband” from the retired Guy Greetings stamp set onto Whisper White card using Night of Navy ink.
  I cut out the greeting using the Layering Ovals Dies. I attached the greeting to a Smoky Slate scalloped oval cut using the same dies before attaching to the card front using dimensionals.
To decorate the inside of the card, I attached a narrow strip of Crumb Cake card behind one long edge of Night of Navy card which I embossed using the Absolutely Argyle 3D Embossing Folder. The whole panel is attached to the bottom of Whisper White card. I love the way this turned out, so thank you for the inspiration mes ateliers de papier. (Apologies for the quality of the photo of the inside of the card, I have taken quite a few and this is the best that I could get, sorry.)
Bye for now,
Kris
Product Used:


Using up Kits

When I prepare for a class, I cut all the product needed to create the card and place them in a plastic sleeve so my customers have everything they need to create their project. Often I have kits left over and mostly I disassemble them and re-use the card pieces for another project. I had quite a few kits left over from my March classes and today I am sharing a card I created using the pieces to create something completely different. I embossed Poppy Parade card using the Subtle 3D Embossing Folder and attached it to scored and folded Thick Whisper White card. I cut Whisper White card using the largest scalloped rectangle from the Stitched So Sweetly Dies.  I stamped the background stamp from the Love What You Do stamp set onto the Whisper White rectangle using Soft Sea Foam ink. I stamped the flower from the same stamp set using Pear Pizzazz ink. I stamped the flower once more onto scrap Whisper White card using Poppy Parade ink. I stamped the flower fill image from the Love What You Do stamp set using Poppy Parade ink which I stamped onto scrap paper first.
  I cut out the flowers and attached them over the Pear Pizzazz image. Lastly I stamped “thank you” from the Love What you Do stamp set using Memento Tuxedo Black ink.
To decorate the inside of the card I stamped the greeting from the Well Said stamp set using Poppy Parade ink. I also stamped the image from the Love What You Do stamp set three times without re-inking using Pear Pizzazz ink.
It doesn’t take much imagination (luckily!) to use a pre-cut kit to create a completely different card than the one for which it was created. It also makes me happy that I used a stamp set which I love but has been a little neglected of late.
Bye for now,
Kris
Product Used:


Happy Day
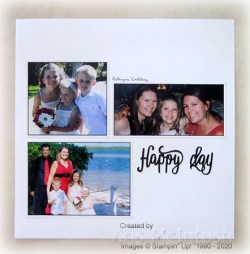
Today I am sharing more photos from the box of old photos. I found the photo of Sarah and Emma with Abigail first and thought how gorgeous all three girls look. Then I found two more photos from the same event. One of Sarah with her husband and children and one of the three children. The photos were taken at my niece’s wedding and Abigail was flower girl. This page couldn’t be more simple. The photos all had a black line around them to give depth, so I just attached each of the photos to a 12″ x 12″ Whisper White page. I cut “happy birthday” from Basic Black card using the retired Happy Birthday Die. I trimmed down “birthday” to give me “day”. I attached the title to the page on the right hand side and used a 0.5 Journaling Pen to add the event.
I hope you are enjoying these super simple pages. Sometimes it doesn’t take much to get your photos onto a page to share with family and friends.
Bye for now,
Kris
Product Used:


Sunday Stamps SSC288

I was inspired to create today’s card after seeing the current challenge at Sunday Stamps. I cut one of the designs from the Ornate Garden Specialty Designer Series Paper into card front sized pieces. I took one of these panels and trimmed .5cm from the bottom of the panel. I cut the remaining panel in half diagonally and attached it to scored and folded Thick Whisper White card. I cut Whisper White card using one of the squares from the Layering Squares Dies. I used post it notes to create a narrow central panel and stamped the greeting from the Ornate Thanks stamp set using Memento Tuxedo Black ink. With the masks still in place, I lightly sponged over the area using a sponge and Petal Pink ink. I replaced the masks so that the stamped panel was covered and stamped the single daisy from the Ornate Style stamp set using Memento Tuxedo Black ink. I stamped one image and covered it with a post-it-note mask and then stamped the second image. I covered the second image with a post-it-note mask and stamped the third image. I coloured the flowers using Petal Pink and Light Mango Melody Stampin’ Blends. I removed the mask rotated the image panel and once more covered the greeting panel. I stamped the single daisy from the Ornate Style stamp set twice using Memento Tuxedo Black ink and coloured the images using the same Stampin’ Blends.
  I cut a scalloped square from Gold Foil card using the Layering Squares Dies and attached the stamped image panel. The whole piece is attached to the card front using dimensionals.
To decorate the inside of the card, I placed a post-it-note across the bottom of Whisper White card. I stamped and masked the daisy image from the Ornate Style stamp set three times using Memento Tuxedo Black ink. I coloured the images using Petal Pink, Mint Macaron and Light Mango Melody Stampin’ Blends. The narrow .5cm piece of Designer Series Paper I trimmed from the piece on the front of the card, is attached across the bottom of the stamped flowers.
I love this piece of the Ornate Garden Specialty Designer Series paper. The Mint Macaron colour looks amazing with the gold embossing. I’d love to know what you think.
Bye for now,
Kris
Product Used:


Happy Easter
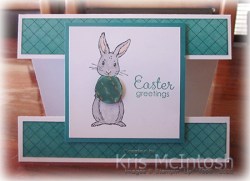
Today’s fancy fold card is a floating front card. This card was created using the instructions I purchased from Elizabeth Shannon. I cut the pieces for the base of the card from Thick Whisper White card. I cut pieces of the Golden Honey Specialty Designer Series Paper (now retired) and used my Sponge Brayer to add Bermuda Bay ink to the paper. The paper gets pretty wet when you add so much ink, so I waited for it to dry before attaching it to the card base and the floating panel for the bottom of the card front. I stamped the bunny from the Fable Friends stamp set onto Whisper White card using Memento Tuxedo Black ink. I coloured the image using Light Bermuda Bay, Light Smoky Slate and Dark Petal Pink Stampin’ Blends. I also used the colour lifter to lighten the belly area of the bunny.  I stamped the greeting from the Fable Friends stamp set beside the bunny using Bermuda Bay ink. I punched a 3/4″ circle from the same Golden Honey Designer Series Paper, re-inserted into the punch to give it a slight oval shape and punched again (3/4″ Circle Punch is now retired). I coloured the punched piece using the Dark Bermuda Bay Stampin’ Blend before attaching it to card front using dimensionals so that it looked like the bunny is holding an Easter Egg. I attached the stamped panel to Bermuda Bay card and attached it to the card base using dimensionals. Making sure to line up the floating panel with the card base, I attached the image panel to the floating panel also using dimensionals. I didn’t add anything to the inside of the card so that I could write my message. I had my grandchildren in mind when I created this card, so I created another card in Bermuda Bay ink, two using Flirty Flamingo ink and two using Cherry Cobbler ink.

I think they look great don’t you? I hope my grandchildren love them too.
Bye for now,
Kris
Product Used:


Cased Sailing Home

Today’s card is one that was emailed to me in a newsletter by another demonstrator. It was created by Deborah Woodby and I do not have a blog or facebook page for this lady, however, you can find her on Pinterest. Anyway, I loved her card and decided that I would recreate it. I embossed Balmy Blue card using the High Seas 3D Embossing Folder before adding a strip of the Come Sail Away Designer Series Paper.  The whole panel is attached to scored and folded Thick Whisper White card. I cut Whisper White card using the Stitched Nested Labels Dies. I stamped “happy birthday” from the Beautiful Bouquet stamp set onto the bottom of the die using Night of Navy ink.
  I stamped the small sailing ship from the Sailing Home stamp set twice above the greeting using Memento Tuxedo Black ink. I coloured the images using the Soft Suede and Balmy Blue Stampin’ Blends. I attached the panel to the card front using dimensionals. I stamped the large sailing ship onto scrap Whisper White card using Memento Tuxedo Black ink and coloured the image using the same Stampin’ Blends. I cut out the image using the co-ordinating Sailing Home Die and attached it to the card front. I kept the inside of the card very simple. I simply stamped the anchor image from the Sailing Home stamp set onto the lower left hand corner using Night of Navy ink.
I liked the layout of this card, so I had to create more than one. I used three different paper patterns from the Come Sail Away Designer Series Paper. Don’t they look great?
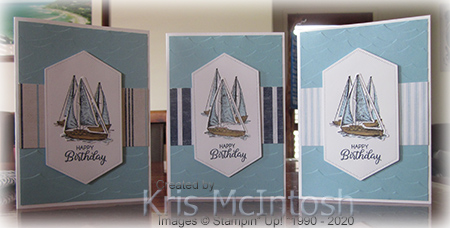
I don’t make male cards very much, so it will be handy to have a few on hand. Thanks Deborah so much for the inspiration.
Bye for now,
Kris
Product used:


Bird Ballard Birthday

I needed to make a birthday card for a friend of mine so I dusted off my neglected (of late) Bird Ballard Designer Series Paper. I also used the sketch challenge at Freshly Made Sketches. Although the challenge has already well and truly ended, I wanted to use the sketch to create my card. I began by attaching a piece of the Bird Ballard Designer Series Paper to Whisper White card. I embossed the combined Designer Series Paper/Whisper White card using the Subtle 3D Embossing Folder. I love doing this technique it kind of “welds” everything together. I attached the embossed card to scored and folded Early Espresso card.  I cut Whisper White card using the Stitched Shapes Dies and attached it to an Early Espresso scalloped circle cut using the Layering Circles Dies. I cut the birds and flowers for the front of the card from one of the designs in the Bird Ballard Designer Series Paper and attached it to the Whisper White stitched circle.
  The whole panel is attached to the card front using dimensionals. I stamped the greeting from the Itty Bitty Greetings stamp set onto Whisper White card using Early Espresso ink. I punched out the greeting using the Classic Label Punch. I punched the greeting twice so that it just fitted around the greeting. I inked the edges of the label using Early Espresso ink and attached it to the card front using dimensionals where necessary.
To decorate the inside of the card, I stamped the greeting from the Perennial Birthday stamp set using Early Espresso ink. I fussy cut the bird from the Bird Ballard Designer Series Paper and attached it to the lower left hand corner.
I love this card. Thanks so much to Freshly Made Sketches for the inspiration and for a reason to use this beautiful Designer Series Paper.
Bye for now,
Kris
Product Used:


First Christmas
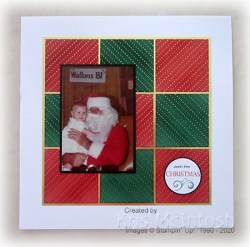
Today’s page shows off Sarah’s first visit to Santa. It was taken at Walton’s in Dubbo, a store which is now long gone. I don’t have any current Christmas Paper on hand and wanted to co-ordinate with Santa’s suit, so I improvised. I cut 3″ squares from the Golden Honey Specialty Designer Series Paper (unfortunately no longer available now that Sale-a-Bration is over). I coloured half the squares using a Sponge Brayer and Real Red ink and the other half using a Sponge Brayer and Shaded Spruce ink. By adding the colour I think the gold embossing on the paper shows up really well. To keep with the gold theme, I layered all the squares onto a piece of Gold Foil before attaching it to a 12″ x 12″ Whisper White page. I added a Basic Black mat to the photo before attaching it to the left hand side of the page.  I used the computer to create “Sarah’s First” and printed it onto Whisper White card. I stamped “Christmas” from the Merry Christmas To All stamp set using Real Red ink. I added the filigree image also from the same stamp set using Shaded Spruce ink. The title is punched out using the 2″ Circle Punch and attached to Basic Black card punched using the Starburst Punch. The panel is attached to the lowest right hand Designer Series Paper square. Another simple page but I love how the sponged colour adds so much interest to the Designer Series Paper. I made sure to attached each colour with the gold embossing running in a different direction for a little more interest.
This photo was one that I found when leafing through my box of photos removed from old albums and picture frames. I am glad that it is now on a page so my grandchildren can share the memory with me.
Bye for now,


