Wishing You The Best
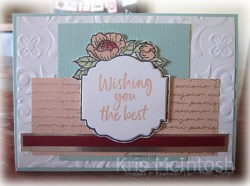
I bought a tutorial recently from Connie and Mary which showcased the Tags in Bloom stamp set. One of the items in the tutorial was a set of note cards. I decided that I liked the layouts on the note cards but wanted to create full sized cards, so I altered the dimensions and added another layer to create the cards I am sharing with you today. The cards are the same but use different colours and patterns of designer series paper. I embossed Whisper White card using the Parisian Flourish 3D Embossing Folder and attached it to scored and folded Pool Party card. I embossed a piece of Pool Party card using the Subtle 3D Embossing Folder and attached it to the card front.  I cut a piece of the Parisian Blossoms Specialty Designer Series Paper and attached it to the card front, partially covering the embossed Pool Party card. I also added strips of Silver Foil and Cherry Cobbler card. I stamped the tag image from the Tags in Bloom stamp set onto scrap Whisper White card. I coloured the image using Petal Pink, Soft Sea Foam and Cherry Cobbler ink. The Cherry Cobbler ink was stamped onto scrap paper first to give a lighter image. I cut out the image and attached it to the card front using dimensionals. I stamped the greeting from the Tags in Bloom stamp set onto scrap Whisper White card and punched out the greeting using the Label Me Lovely Punch.
  I attached the greeting to the centre of the tag using dimensionals.
To decorate the inside of the card, I embossed a strip of Whisper White card using the Parisian Flourish 3D Embossing Folder. I attached a strip of Pool Party card behind one long edge before attaching it to the bottom of Whisper White card.
The second card uses Petal Pink card for the card base. I also embossed Petal Pink card using the Subtle 3D Embossing Folder and a different design from the Parisian Blossoms Specialty Designer Series Paper. The flowers are coloured with Pool Party ink and the greeting is stamped in the same ink.
These cards are so pretty, don’t you think? I was a little hesitant to begin with about this stamp set but I really love it and I know that I am going to miss it when Sale-A-Bration ends.
Bye for now,
Kris
Product Used:


Pull Tab & Front Flip

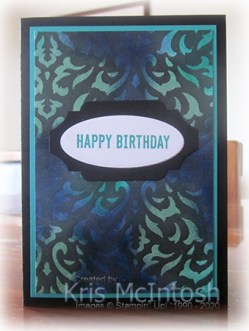
This is another fancy fold card from the tutorial I purchased from Elizabeth Shannon. The name sounds complicated but once you create it, it really isn’t. My card base is Thick Whisper White card and I have added a layer of Night of Navy card. The designer series paper is from the Country Club Designer Series Paper pack. I have used the Scalloped Tag Topper to create the pull part of the card front. To decorate the pull panel I stamped the hat image from the Well Dressed stamp set using Night of Navy ink. I added the greeting from the Perennial Birthday stamp set using Night of Navy ink.  I wrapped the stamped Whisper White card with Night of Navy Twine from the Country Club Twine Combo Pack. I used the same twine to add to the pull mechanism. The panel is attached to Night of Navy card using dimensionals before being attached to the mechanism.
  To decorate the inside of the mechanism, I stamped another of the greetings from the Perennial Birthday stamp set using Night of Navy ink. The greeting panel is attached to Night of Navy card and then the mechanism.
To decorate the inside of the card, I stamped the greeting from the Perennial Birthday stamp set using Night of Navy ink. I stamped the shoe image from the Well Dressed stamp set onto the lower left hand corner using Night of Navy ink, covered it with a post-it-note mask and stamped it again to give me a pair of shoes!
Simple but I really love this card.
Bye for now,
Kris
Product Used:


Colourful Technique
Today’s card was created after watching a video by Lisa Curcio. It is a bit of a spin on an old technique. I used different colours than Lisa did in her video to create a “male” and “female” version of the card. For the “male” version I used Pool Party, Bermuda Bay and Night of Navy ink which I sponged onto Whisper White card. Following Lisa’s instructions, the card was slightly larger than I knew I would need. Once the ink has dried I attached the Basic Pattern Decorative Mask over the inked card. I used some retired Washi Tape on the back of the Whisper White card to hold the mask in place. I used my Versamark ink pad to add ink all over the coloured Whisper White card. I removed the mask, sprinkled the card with Clear Embossing Powder and heat set it. I let the card sit for a minute before using a Sponge Bayer to add Memento Tuxedo Black ink all over the image. A quick rub with a tissue to remove any Black ink on the embossing and the card was ready to use. I cut the card down to the size I wanted and attached it to Bermuda Bay card and then scored and folded Basic Black card. I stamped “happy birthday” from the Itty Bitty Greetings stamp set onto Whisper White card using Bermuda Bay ink. I cut out the image using the oval die from the Detailed Bands Dies. I
 attached the greeting to Basic Black card cut with another of the Detailed Bands Dies and then the card front. To decorate the inside of the card, I stamped another greeting from the Itty Bitty Birthday stamp set onto Whisper White card using Bermuda Bay ink. I also attached the pieces of card that I trimmed from the sponged and embossed Whisper White card across the bottom of the Whisper White card.
The “female” version of the card follows exactly the same procedure but uses Petal Pink, Flirty Flamingo and Poppy Parade ink sponged onto the Whisper White card. The greetings are stamped using Poppy Parade ink. I used the same Detailed Bands Dies for the greeting and the Basic Black label.
I love how these cards turned out and I am sure that you will love giving this technique a try. Thanks Lisa for your simple instructions which produce a big WOW.
Bye for now,
Kris
Product Used:


Tags in Bloom

Today I am sharing another of the stamp sets which have been added to those that are available for FREE with a qualifying order during Sale-a-bration. These additional sets are only available during this month. I embossed Whisper White card using the Coastal Weave 3D Embossing Folder and attached it to scored and folded Basic Black card. I cut Basic Black card with the largest scalloped oval from the Layering Ovals Dies and attached it to the card front. I stamped the image from the Tags in Bloom stamp set onto Whisper White card using Memento Tuxedo Black ink. I stamped the stitched image inside the frame using Mossy Meadow ink.  I stamped the fill images for the flowers using Calypso Coral, Daffodil Delight and Mossy Meadow ink. I also stamped the greeting from the Tags in Bloom stamp set using Calypso Coral ink.
  I fussy cut the image and attached it to the card front.
To decorate the inside of the card, I stamped another of the greetings from the Tags in Bloom stamp set onto Whisper White card using Calypso Coral ink. I embossed a narrow strip of Whisper White card using the Coastal Weave 3D Embossing Folder, attached a narrow strip of Basic Black card behind one long edge before attaching it to the bottom of the stamped card.
This is a fun set and I am sure will find its way into many craft rooms over this month.
Bye for now,
Kris
Product Used:


21st Birthday
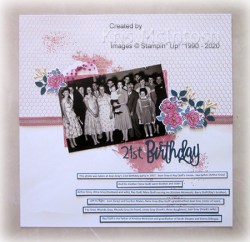
This page showcases a group shot taken at my dad’s cousin’s 21st birthday. I am the baby in the photo! I love scrapping these old photos. When I ask my Mum and Dad to help me out with the people in the photos, I often get told some stories from around the time the photo was taken. It helps me remember things to tell my grandchildren. I attached a piece of the Golden Honey Specialty Designer Series Paper across the top of the Whisper White 12″ x 12″ page. I stamped a couple of the images from the Artisan Textures stamp set across the page using Rococo Rose ink. I wrapped the bottom of the Designer Series Paper with a length of the Rococo Rose 1/2″Scalloped Linen Ribbon. I attached a piece of Rococo Rose Designer Series Paper from the 2019-2021 In-Colour Designer Series Paper Pack to create a kind of photo mat. I punched one end of a piece of Whisper White card using the Scalloped Tag Topper Punch and attached it behind the upper left hand corner of the photo mat before attaching it to the page. I coloured a length of Polka Dot Tulle ribbon using the Dark Rococo Rose Stampin’ Blend, tied a knot and attached it to the top of the Whisper White tag. I stamped the cake image from the Happy Birthday To You stamp set twice onto Whisper White card using Memento Tuxedo Black ink and coloured the flowers and leaves using the Rococo Rose, Dark Daffodil Delight and Dark Pretty Peacock Stampin’ Blends. I cut out the images using the co-ordinating Birthday Die. I trimmed one of the die cuts to just one flower.
  I cut Pretty Peacock card using the three leaf die from the Birthday Dies four times in all. I also cut Gold Foil card using the berry die from the Birthday Dies. I attached one Pretty Peacock set of leaves and one Gold Foil die cut to the single flower and attached it to the top left hand corner of the page. I attached three Pretty Peacock leaves and two Gold Foil die cuts to the three flower image and attached it to the right of the photo. I cut “birthday” from Pretty Peacock card using the retired Happy Birthday Die. The numbers and letters for “21st” were cut from Pretty Peacock using some old Sizzix dies in my stash.
I printed my journalling onto Whisper White card using my computer. I cut the card into strips, attached them to Pretty Peacock card and attached them across the bottom of the page.
The inspiration for this page came from a scrap layout used on Scrapbooking Global – Stampin’ Up!, a Facebook page of which I am a member. If you love scrapbooking, you don’t have to be a demonstrator to join this page however, they do use only Stampin’ Up! products. The pages shared are so inspiring.
Bye for now,
Kris
Product Used:


Same Design 2 Ways

Today I am sharing two cards I made using the Flowering Foils Designer Series Paper which is a second release item FREE with a qualifying order until the end of this month. The instructions for each card are the same, I just create one in the portrait style and one in the landscape style. I attached a piece of the Flowering Foils Designer Series Paper to Basic Black card and then scored and folded Cherry Cobbler card.  I cut Basic Black card using the largest of the scalloped circles from the Layering Circles Dies and attached them to the card front. I used the single flowers in the Flowering Foils Designer Series Paper and coloured them with Dark Cherry Cobbler, Dark Old Olive and Dark Daffodil Delight Stampin’ Blends.
  I cut out the flowers and attached them to the Basic Black scalloped circles.
To decorate the inside of the card I cut a narrow strip of Designer Series Paper in each style and attached a narrow strip of Basic Black card behind one long edge. I attached the designer series paper panel to the bottom of Whisper White card. I didn’t add any greetings to these cards because I felt they could be used for many occasions, so I will just add a greeting when I need to use them.
Let me know which version do you prefer? Landscape? Portrait?
Bye for now,
Kris
Product Used:


Golden Honey Birthday

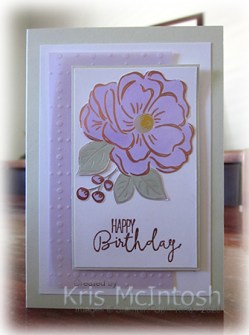
This card uses the gorgeous Golden Honey Specialty Designer Series Paper which you can obtain for FREE with a qualifying order during Sale-A-Bration. It is truly beautiful with black and white designs one side and the other side has gold foil accents. So lovely! Today’s card grew from one I saw somewhere (sorry I can’t remember where, if it’s your design, please let me know) and couldn’t resist casing. I cut a standard card base from Thick Whisper White card and cut down the front panel. I attached Golden Honey Specialty Designer Series Paper to the front and the right hand side of the inside of the card (sounds like double dutch but the pictures make it clear). I cut Whisper White card using the die from the Painted Labels Dies. I also cut Basic Black card using one of the dies from the Stitched So Sweetly Dies. I stamped “happy birthday” from the Itty Bitty Birthday’s stamp set onto Whisper White card using Memento Tuxedo Black ink and cut it out also using one of the Stitched So Sweetly Dies. I stamped the leaf image from the Thoughtful Blooms stamp set using Old Olive ink above and below the greeting. I attached the three die cuts together and then attached them to the front of the card.
 (You need to make sure where you are putting adhesive because you don’t want any where the labels overhang the front panel.) I stamped the the solid single flower from the Thoughtful Blooms stamp set onto scrap Whisper White using Flirty Flamingo ink. I stamped the smaller flower on top using Calypso Coral ink. I used the Small Bloom Punch to punch out the flowers and attached them to the greeting label.
To decorate the inside of the card, I stamped one of the flower stem images from the Thoughful Blooms stamp set onto the lower left hand corner using Old Olive ink. I stamped the co-ordinating flower image from the same stamp set using Calypso Coral ink. This is such a fun card and I know that the ladies in my Beachmere classes will love this one.
Bye for now,
Kris
Product Used:


More Foiled Flowers

Today’s card again uses the Flowering Foils Specialty Designer Series Paper. I haven’t progressed past the floral patterned paper but I will. This truly is beautiful paper! This time I coloured a double flower image from the Designer Series Paper using Dark Highland Heather, Dark Old Olive and Dark Daffodil Delight Stampin’ Blends. I embossed Whisper White card using the Coastal Weave 3D Embossing Folder which I attached to Highland Heather card and then scored and folded Thick Whisper White card. I cut out the flowers and attached them to the embossed card.  I stamped “happy birthday” from the Beautiful Bouquet stamp set onto Whisper White card using Highland Heather ink. I cut out the greeting with one of the ovals from the Layering Ovals Dies and attached it to a Highland Heather scalloped oval cut using the same dies.
  The greeting is attached to the card front using dimensionals.
To decorate the inside of the card, I coloured an image on the corner of the Flowering Foils Specialty Designer Series Paper using the same Stampin’ Blends. I cut out the image and attached it to the lower left hand corner of Whisper White card. The whole panel is attached to the inside of the card.
I really am loving this paper and I know you will too especially it is FREE with a qualifying order until the end of the month.
Bye for now,
Kris
Product Used:


Flowering Foils Birthday
Have you seen the news? Stampin’ Up! has a second release of more Freebies you can earn during the last month of Sale-A-Bration. One of the products to be released is the beautiful Flowering Foils Specialty Designer Series Paper. This paper has three sheets of four beautiful embossed designs using Rose Gold Foil, and Silver Foil on White paper. So you can add colour, any colour you like to the paper to create your own one of a kind cards or scrapbook pages. One of the other new releases is the So Vellum Specialty Designer Series Paper. This pack includes 6 sheets of embossed vellum two each of three different colours – Pool Party, Purple Pose and Soft Sea Foam.  I decided to feature these beautiful papers on today’s card which I created for a friend who recently celebrated her birthday. I attached a piece of the Purple Posy Vellum paper from the So Vellum Specialty Designer Series Paper to the left hand side of Whisper White card and attached it to scored and folded Soft Sea Foam card. I stamped “happy birthday” from the Special Celebration stamp set onto the bottom of a piece of Whisper White card using Versamark ink. I sprinkled the greeting with Copper Embossing Powder and heat set it before I attached it to Soft Sea Foam card. The panel is attached to the card front using dimensionals.
  I selected a flower from one of the papers in the Flowering Foils Specialty Designer Series Paper and coloured the image using Light Purple Posy, Dark Soft Sea Foam and Dark Daffodil Delight Stampin’ Blends. I fussy cut the image and attached it to the card front above the embossed greeting.
To decorate the inside of the card, I chose another flower from the same paper and coloured the image using the same Stampin’ Blends before cutting it out. The image was right on the edge of the paper and so not a complete flower which I figured would normally not be used but which works well for the edge of the Whisper White card.
I hope you are inspired to take another look at these beautiful papers when you place your next order. Remember they are FREE with a qualifying order. I do hope my friend likes her card.
Bye for now,
Kris
Product Used:


Penang
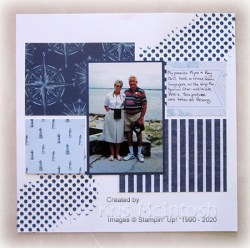
Today’s page is one that showcases a photo of my Mum and Dad taken in Penang on one of their overseas trips. I mixed some Night of Navy re-inker with Shimmer White Embossing Paste and used one of the Basic Pattern Decorative Masks to add some texture to the upper right and lower left hand corners of the Whisper White 12″ x 12″ page. I attached two 6″ x 4″ cards from the Come Sail Away Memories and More Card Pack to the page.  I cut down two of the 4″ x 3″ cards from the same Memories and More Card Pack to be slightly smaller and attached them to the page. I attached my photo to Night of Navy card before attaching it to the centre of the page. I love how using the Memories and More Card Packs makes creating great layouts so easy. I hand wrote my journaling after getting a few details from Mum and Dad.
Bye for now,
Kris
Product Used:


