Birthday Celebration

Today’s page shows off a few photos from a celebration lunch we had for Sarah for her 40th birthday. I decided to use the Golden Honey Specialty Paper which is FREE during Sale-a-Bration with a qualifying order. This paper has a gold embossed pattern on one side and the other is basically black and white in various patterns. I cut a sheet of this paper in half and attached it to the top of each page 12″ x 12″ Whisper White page. I cut a 2″ strip of the gold/black stripe pattern and attached it below the 6″ piece. The last strip of Designer Series Paper is also 2″ wide – I used the same paper as the 6″ strip but swapped over the pages, so each page has three different designs.  The photos for both pages are attached to Basic Black card before being attached to the pages. On the first page I cut Basic Black card using the retired Happy Birthday Dies and used this as my title. I stamped the greeting from the Strong and Beautiful stamp set onto Whisper White card and cut it out using one of the Stitched So Sweetly Dies. I also cut Basic Black card using the largest rectangle from the Stitched So Sweetly Dies. The greeting is attached to the Basic Black rectangle and then the page. For the second page I cut “celebrate” and “you” from Basic Black card using the retired Celebrate You Dies. After I attached the words to the second page I used a jounaling pen to add the date.
These are simple pages but I know they will always bring back happy memories of a happy day.
You might have noticed that I often use retired product on my Memory Keeping Pages. Well. That’s because I don’t give up any stamp set or die which I know has a potential use in Memory Keeping. These pages are for me and not really to promote my business but rather to promote Memory Keeping as such. It is so easy to forget what your photos relate to and now that we are all using digital photos we have so many photos to choose from, its easy to be overwhelmed. For me the most important thing is to try and create memories of the events that happen in our daily life and for this you don’t have to use very photo you have, just ones that you know will bring the event to life. I’d love to hear your thoughts on this.
Bye for now,
Kris
Product Used:


Another Poppy Birthday
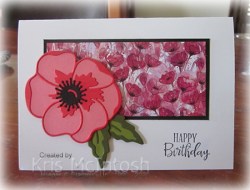
Today’s card is another using the beautiful products in the Peaceful Poppies Product Suite which can be found on pages 24-27 of the 2020 Handmade For You Mini Catalogue. This is truly an amazing product suite. It contains Designer Series Paper, two stamp sets with co-ordinating dies, sequins, ribbon and some pre-stamped elements. Everything you could possibly want to create gorgeous cards and scrapbook pages. Anyway, today’s card grew from a design I saw somewhere using a different panel of designer series paper. I attached a piece of the Peaceful Poppies Designer Series Paper to Basic Black card and then scored and folded Thick Whisper White card. I stamped “happy birthday” from the Peaceful Moments stamp set onto the lower right hand corner of the card front using Memento Tuxedo Black ink. I cut the large solid poppy from Flirty Flamingo card using he Poppy Moments Dies. I cut the large detailed poppy from Poppy Parade card using the same dies. Using the Poppy Moments Dies I cut two solid leaves from Old Olive card and two detailed leaves from Mossy Meadow card as well as one flower centre from Basic Black card. I attached the flower pieces and the leaf pieces together. I attached the leaves to the back of the flower before attaching to the card front using dimensionals.
 Lastly adding the Basic Black flower centre.
To decorate the inside of the card, I stamped another greeting from the Peaceful Moments stamp set using Memento Tuxedo Black ink. Using the Poppy Moments Dies, I cut the small solid flower from Flirty Flamingo card, the small detailed flower from Poppy Parade card and the flower centre from Basic Black card. I attached the die cuts together and attached them to the inside of the card to the left of the sentiment.
I love this card, it is so pretty. If you haven’t purchase these products yet, don’t wait, I think this one will be very popular.
Bye for now,
Kris
Product Used:


Joyful Poppies

Today’s card is a favourite fancy fold of mine – a Joy Fold card. I’ve combined the fancy fold with the Painted Poppies Product Suite to create the card. I cut my card base 21cm x 10.5cm from Basic Black card, scored along the 21cm length at 14.8cm. The small flap is on the left hand side of the card. I attached a piece of the Peaceful Poppies Designer Series Paper (14.3cm x 10cm) onto the right hand inside of the card. I attached another piece of Peaceful Poppies Designer Series Paper (5.5cm x 10cm)onto the front of the small flap on the left hand side. The smaller folding card 20cm x 8cm is cut from Basic Black card and scored along the 20cm length at 10cm. To decorate the front panel of this smaller folding card, I stamped the image from the Painted Poppies stamp set onto Whisper White card 9.5cm x 7.5cm using Memento Tuxedo Black ink.  I stamped the image 4 times, the first image on the left with the bottom of the image sitting flush with the bottom of the Whisper White card. The second image is stamped slightly lower so that it fits close to the first image and so on for the other two images. I coloured the images using Poppy Parade and Old Olive Stampin’ Blends. I wrapped the bottom of the stamped panel with Whisper White 1/4″ Crinkled Seam Binding Ribbon and attached it to the front of the smaller card, making sure that the fold is on the right hand side. I attached the panel on top of the right hand Designer Series Paper panel with the fold on the right hand side. I tied a bow in a length of Whisper White 1/4″ Crinkled Seam Binding Ribbon and attached it to the panel using MIni Glue Dots.
 To decorate the inside of the card, I stamped the greeting from the Peaceful Moments stamp set onto Whisper White card 9.5cm x 7.5cm using Memento Tuxedo Black ink. This panel is attached inside the smaller folding card.
I stamped the large flower from the Painted Poppies stamp set onto Whisper White card using Memento Tuxedo Black ink. The image is coloured using Poppy Parade and Dark Daffodil Delight Stampin’ Blends. I cut out the image using the co-ordinating Painted Labels Die. The large poppy is attached to the small panel on the left hand side using dimensionals so that the image panel can slide underneath and keep the card closed.
There is a tutorial with video on the Splitcoast Stampers website here. You will notice that the dimensions of the card pieces I used at different but that is to accommodate the size of a standard Australian card.
I hope you like this card as much as I do.
Bye for now,
Kris
Product Used:


Poppy Birthday
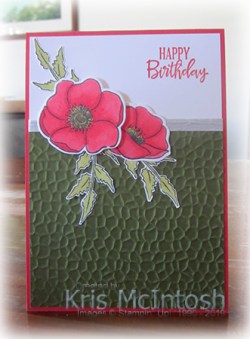
Today’s card uses some of the product from the Peaceful Poppies Product Suite which can be found on pages 24-27 of the 2020 Handmade For You Mini Catalogue. I stamped the greeting from the Peaceful Moments stamp set onto the upper right hand corner of Whisper White card using Poppy Parade ink. I embossed Mossy Meadow card using the Hammered Metal 3D Embossing Folder and attached it to the bottom of the stamped Whisper White card. I wrapped the top of the embossing with the Whisper White 1/4″ Crinkled Seam Binding Ribbon and attached the whole panel to scored and folded Poppy Parade card.  I stamped the large flower and the small flower from the Painted Poppies stamp set onto Whisper White card using Memento Tuxedo Black ink. I coloured the flowers using the Poppy Parade and Dark Daffodil Delight Stampin’ Blends. I cut out the flowers using the co-ordinating Painted Labels Dies. I stamped the leaf image from the Painted Poppies stamp set onto Whisper White card three times using Memento Tuxedo Black ink.
  I coloured the leaves using the Light Old Olive Stampin’ Blend and cut them out. I laid the flowers and leaves onto the card front to get the placement right before attaching them. The small flower is attached flat to the card front and the large one is attached using dimensionals.
To decorate the inside of the card, I stamped a greeting from the Peaceful Moments stamp set using Poppy Parade ink. I embossed a narrow strip of Mossy Meadow card using the Hammered Metal 3D Embossing Folder and attached it to the bottom of the stamped card. I wrapped the top of of the embossed card using the Whisper White 1/4″ Crinkled Seam Binding Ribbon before attaching the panel to the inside of the card.
I just love how the Mossy Meadow card makes the Poppy Parade flowers just “pop” off the card front. What do you think?
Bye for now,
Kris
Product Used:


Case this sketch #353

I used the sketch at Case This Sketch to create the card I am sharing with you today. Unfortunately I missed the deadline by a mile, so I am only just posting the card. I attached a piece of the Golden Honey Specialty Designer Series Paper (which is FREE during Sale-A-Bration) to a piece of Basic Black card. The whole panel is attached to scored and folded Thick Whisper White card. I stamped the piano image from the Music From The Heart stamp set onto Whisper White card and cut it out using the Layering Ovals Dies. The image oval is attached to a Basic Black scalloped oval cut using the same dies and then the card front.  I stamped the greeting from the Music From The Heart stamp set onto Basic Black card using Versamark ink. I sprinkled the image with White Embossing Powder and heat set it. The greeting is attached to the card front with dimensionals under each end.
  I stamped the “clef” image onto scrap Whisper White card using Memento Tuxedo Black ink and hand cut the image. I attached the image to the left of the greeting using dimensionals where necessary.
To decorate the inside of the card I stamped the keyboard image from the Music From The Heart stamp set using Memento Tuxedo Black ink. I stamped the greeting which is also from the Music From The Heart stamp set next to the keyboard image using Memento Tuxedo Black ink.
This is a great stamp set for the musicians in your life but of course can be used for any type of card you wish. So while I missed the challenge deadline, thanks to CASE This Sketch for the inspiration to create my card.
Bye for now,
Kris
Product Used:


Surprise Birthday

My Mum celebrates her birthday on the 2nd January and in all her life I don’t think she ever had a birthday party. So we had a surprise one for her on the Saturday after her birthday. I am pleased to say that she really enjoyed herself and certainly was “surprised”. I have two sisters, one who lives in Perth and one who lives in Sydney and they were both able to attend, despite my sister in Sydney still at risk from bushfires. I used some of the photos on the pages I am sharing with you today. I began with Whisper White 12″ x 12″ pages and attached all of my photos to Basic Blackcard.  I cut circles from Real Red, Daffodil Delight, Pacific Point and Shaded Spruce card using the Layering Circle Dies. I embossed the cardstock circles using the retired Dot to Dot Embossing Folder. I attached the photos and the circles to the pages and then punched balloons from Pacific Point and Shaded Spruce card using the Balloon Builder Punch. I also cut the title from Pacific Point card using the retired Little Letters Dies (I know I use these a lot but they are often just the right size). I embossed the balloons and the letters using the Subtle 3D Embossing Folder. I attached the balloons together and added a length of Whisper White Bakers’ Twine to the back of the balloons. I tied the Baker’s twine into a knot and attached the balloons to the page using dimensionals.

I love how these pages turned out and I love the absolute look of surprise on Mum’s face. We had a lovely afternoon and I know that Mum will treasure the memory.
Bye for now,
Kris
Product Used:


Bonanza Celebration

Today I am sharing with you a card which was inspired by the tags on page 34 of your 2020 Handmade for You Mini Catalogue. I punched a narrow strip of Bermuda Bay card using the Decorative Ribbon Border Punch. I attached the punched strip behind one edge of a piece of Birthday Bonanza Designer Series Paper before attaching it to Whisper White card. The whole panel is attached to scored and folded Bermuda Bay card. I cut Bermuda Bay card using the tag shaped die in the Bonanza Dies. I also cut a smaller rectangle in the centre of the tag using the Stitched Rectangle Dies. I attached a piece of the same Birthday Bonanza Designer Series Paper behind the open area of the tag.  I tied a length of Whisper White Baker’s Twine through the top of the tag before attaching to the card front. I fussy cut the koala from the Birthday Bonanza Designer Series Paper and attached it to the centre of the tag.
  I stamped the greeting from the Bonanza Buddies stamp set onto Basic Black card using Versamark ink, sprinkled it with White Embossing Powder and heat set it. I punched the greeting using the Classic Label Punch and attached it to the card front using dimensionals.
To decorate the inside of the card, I attached a piece of Bermuda Bay card punched using the Decorative Ribbon Border Punch behind one edge of a narrow strip of the Birthday Bonanza Designer Series Paper. The Designer Series Paper Panel is attached to the bottom of Whisper White card.
Isn’t this cute? If you love animals you have got to love the cute images in the Bonanza Buddies stamp set.
Bye for now,
Kris
Product Used:


Happy Birthday Sarah
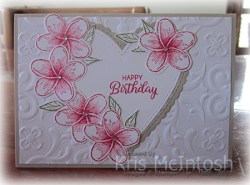
Yesterday my eldest daughter celebrated a special birthday and I thought you might like to see the card I made for her. I began by embossing Whisper White card using the Parisian Flourish 3D Embossing Folder before attaching it to scored and folded Sahara Sand card. I cut Sahara Sand card using the outline scalloped heart die from the Be Mine Stitched Dies and attached it to the card front. I cut the inside heart from Whisper White card using the same dies and stamped it with the greeting from the Beautiful Bouquet stamp set using Melon Mambo ink. I attached the stamped heart inside the heart frame. I stamped the frangipani flower from the Timeless Tropical stamp set five times onto Whisper White card using Melon Mambo ink. I cut out the frangipani flowers using the co-ordinating In The Tropics Die. I stamped the leaf image from the Free As A Bird stamp set onto Whisper White card using Old Olive ink several times and hand cut the leaves. I attached some of the leaves to four of the flowers and then attached them to the left hand side of the stamped heart. I attached another one of the leaf images to the last frangipani flower before attaching it to the right hand side of the heart. Lastly I added a small Basic Rhinestone to the centre of each flower
 To decorate the inside of the card I cut Melon Mambo card using the filigree heart from the Be Mine Stitched Dies and attached it to the left hand side of Whisper White card. I cut the numbers from Sahara Sand card using some old Sizzix Dies I have in my stash.
I can’t believe how quickly the years have gone since Sarah was a newborn, however, it has been a pleasure to watch her grow into the remarkable woman she is today. A beautiful daughter, wife, mother and friend. Happy Birthday Sarah.
Bye for now,
Kris
Product Used:


Lace and Beautiful Moments
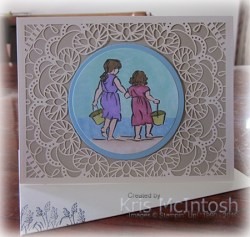
For the last card I made when using the Beautiful Moments stamp set for the first time, I wanted to do something a little different. I still have quite a few of the Bird Ballard Laser-cut Cards in my stash and thought they would go well with this lovely stamp set. I carefully cut the centre medallion from the Bird Ballard Laser-Cut card, which is not quite as easy as you would think. I managed but not as perfectly as I would have wished. I attached a panel of Sahara Sand card to the back of the Laser Cut Panel to give a little more depth to the card front.  I stamped the image from the Beautiful Moments stamp set onto Whisper White card using Memento Tuxedo Black ink and coloured the image using Crumb Cake, Balmy Blue, Pool Party, Highland Heather, Rich Razzleberry, Old Olive, Ivory and Bronze Stampin’ Blends. I cut out the image using the Layering Circles Dies and attached it to a circle cut from Balmy Blue card using the same dies.
  The panel is attached to the card front inside the cut out space. It fits perfectly! and I think looks lovely surrounded by the lace.
To decorate the inside of the card, I stamped the small floral image from the Beautiful Moments stamp set onto the lower left hand corner of Very Vanilla card using Memento Tuxedo Black ink. I coloured the image using the Balmy Blue and Old Olive Stampin’ Blends.
I am so very pleased with the way this card and the other two cards I made using this set turned out.

Don’t you think they are lovely? I hope I have inspired you to take a look at this gorgeous stamp set.
Bye for now,
Kris
Product Used:


You’re Someones Blessing

This is the second card that I made when I first used the Beautiful Moments stamp set. I began by cutting Whisper White card using the Stitched So Sweetly Dies before stamping the greeting from the Beautiful Moments stamp set using Balmy Blue ink. I attached the die cut and stamped Whisper White card to scored and folded Balmy Blue card. I cut Whisper White using the Stitched So Sweetly Dies and attached it to the card front. I stamped the image from the Beautiful Moments stamp set onto Whisper White card using Memento Tuxedo Black ink.  I coloured the image using Lovely Lipstick, Balmy Blue, Old Olive, Ivory and Bronze Stampin’ Blends. I die cut the image using another of the Stitched So Sweetly Dies and attached it to the card front.
 To decorate the inside of the card, I stamped the small floral image from the Beautiful Moments stamp set several times onto the lower left corner of Whisper White card using Memento Tuxedo Black ink. I coloured the image using Balmy Blue and Old Olive Stampin’ Blends.
I really love the layered dies on this card, as well as that gorgeous image. What about you?
Bye for now,
Kris
Product Used:


