A Rosey Christmas

There is an amazing new product suite to be released on the 1st November – Christmastime is Here. This product suite is absolutely fabulous. There is a beautiful stamp set containing a full sized floral and leafy image which is cling mount and a photopolymer stamp set with images which can be used to colour the cling image. It also has a co-ordinating die set. There is the most stunning Specialty Designer Series Paper, which has the most amazing imagery and one side of the paper has gold embossing. There are also co-ordinating Gold Glitter Enamel Dots and a beautiful Gold 1/4″ Shimmer Ribbon. To complete the product suite, there is even a really gorgeous bracelet with two charms, one of the beautiful rose and one Stampin’ Up!. This amazing product suite will be available for customers from the 1st November while stocks last.  So if you need these products you need to place your order as soon as possible. Of course, demonstrators were able to purchase this one earlier, Yay! One of the things which appealed to me straight away was the fact the you can die cut one of the Designer Series Papers using the large flower die. So today’s card features very little stamping. I embossed Whisper White card using the Layering Leaves 3D Embossing Folder and attached it to scored and folded Cherry Cobbler card. I cut a strip Christmastime is Here Specialty Designer Series Paper and attached it to Gold Foil card and then the card front.
  I cut the beautiful floral arrangement from the Designer Series Paper using the Rose Die and attached it to the card front using dimensionals. I stamped the greeting from the Christmas Rose stamp set onto scrap Whisper White card using Cherry Cobbler ink. I cut out the greeting using one of the dies from the Rose Dies. The greeting is attached to the card front using dimensionals.
To decorate the inside of the card I embossed a narrow strip of Whisper White card using the Layering Leaves 3D Embossing Folder. I attached a narrow strip of Cherry Cobbler card behind one long edge and attached it to Whisper White card.
I think this card turned out amazingly gorgeous (even if I do say so myself). What about you? What do you think? Bet you can’t wait to get your hands on this one.
Bye for now,
Kris
Product Used:


50th Wedding Anniversary

Today’s page showcases a couple of photos from my husband’s grandparents 50th Wedding Anniversary. One of the photos show his Grandparents with their four daughters and the second one with their daughters, grandchildren and one great grandchild. It’s a really good record of my husband’s family for our children and grandchildren. I wanted to keep the page really simple but thought that it needed something to embellish the page. I decided that I would stamp the large flower from the Good Morning Magnolia stamp set onto the lower left hand corner using Memento Tuxedo Black ink.  I coloured the image using Cherry Cobbler, Mossy Meadow, Soft Suede and Dark Daffodil Delight Stampin’ Blends. The journaling for this page was created on my computer and printed onto Whisper White card. I attached the journaling and the photos to Crumb Cake card before they were attached to the page. I stamped the smaller flower from the Good Morning Magnolia stamp set onto scrap Whisper White card using Memento Tuxedo Black ink.
  I used the Cherry Cobbler and Mossy Meadow Stampin’ Blends to colour the image before cutting it out using the co-ordinating Magnolia Memory Die. I attached the smaller flower onto the top right hand corner of the journaling panel.
Another very simple page but one that I know my daughters will love. I thought that using Cherry Cobbler for the flower brought a little more colour to the page. What do you think?
Bye for now,
Kris
Product Used:


With Sympathy

Today’s card was made for a friend who recently lost her daughter. I decided to break out the Painted Harvest stamp set and use a very simple layout. I stamped the larger of the flowers from the Painted Harvest stamp set randomly onto Whisper White card using Blushing Bride ink. I stamped the second flower over the top using Calypso Coral ink. I stamped the centre of the flowers using So Saffron ink. I stamped the solid leaf image using Soft Sea Foam ink and the detailed image over the top using Pear Pizzazz ink. I attached the stamped panel to Blushing Bride card and then scored and folded Thick Whisper White card.  I cut Blushing Bride card using the die from the Detailed Bands Dies. I stamped “with sympathy” from the Flourishing Phrases stamp set onto Whisper White card using Pear Pizzazz ink.
  The greeting is cut out using a die from the Detailed Bands Dies. I attached the greeting to the centre of the Blushing Bride band before attaching it to the card front.
To decorate the inside of the card I stamped the greeting from the Lilypad Lake stamp set using Pear Pizzazz ink. I stamped the flower from the Painted Harvest stamp set using Blushing Bride, Calypso Coral and So Saffron ink.
The Painted Harvest stamp set has been neglected for quite a while and I really don’t know why, it is such a pretty stamp set. Don’t you think?
Bye for now,
Kris
Product Used:


Celebrate with Flowers
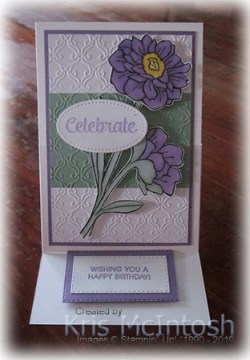
Last week I shared an easel card made with a Christmas theme and I told you I had another idea for this card. Well this is the card. I attached Mint Macaron card across the centre of a piece of Whisper White card (9cm x 13.3cm) and then embossed the panel using the Stylish Scroll Embossing Folder. I attached the embossed card to Highland Heather card (9.5cm x 13.8cm) and then Thick Whisper White card (10.5cm x 14.8cm). The base card is Thick Whisper White card (10.5cm x 29.6cm), which is scored along the long side at 7.2cm and then 14.8cm. The embossed panel is attached to the 7.2cm section of the card base.  I stamped the flower from the Band Together stamp set onto scrap Whisper White card using Memento Tuxedo Black ink and coloured it using Mint Macaron, Highland Heather and Daffodil Delight Stampin’ Blends. I cut out the flower image and attached it to the embossed panel using dimensionals.
  I inked “celebrate” from the Band Together stamp set using a Highland Heather Stampin’ Write Marker and stamped the greeting onto Whisper White card. I cut out the greeting using one of the ovals from the Stitched Shapes Dies. The greeting is attached to the card front using dimensionals. I stamped “wishing you a happy birthday” from the Band Together stamp set onto scrap Whisper White card and cut it out using the Stitched Rectangle Dies. The greeting is attached to one size larger stitched rectangle cut from Highland Heather card before being attached to the inside of the card base using dimensionals.
I really am loving creating these standard sized cards but with a twist. Here they are together.
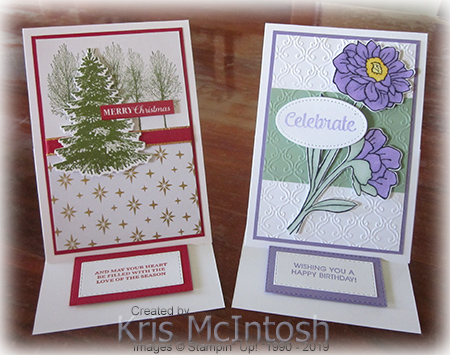
Same but different and both really lovely don’t you think.
Bye for now,
Kris
Product Used:


‘Tis The Season

For today’s card, I CASED one of the examples in the Holiday Catalogue for the Night Before Christmas product suite. I have varied mine just a little but I love the finished result. I attached a piece of Cherry Cobbler card to the centre of Crumb Cake card and embossed the panel using the Bricks & Mortar 3D Embossing Folder. The whole panel is attached to scored and folded Crumb Cake card.  I attached a piece of the Night Before Christmas Designer Series Paper across the embossed panel using dimensionals. I stamped the Santa image from the Holly Jolly stamp set onto scrap Whisper White card using Memento Tuxedo Black ink. I coloured the image using Stampin’ Blends – Cherry Cobbler, Basic Black, Crumb Cake, So Saffron, Old Olive, Night of Navy and Ivory. I cut out the image using the co-ordinating Jolly Season Dies and attached it to the left hand side of the card front. I used the die from the Jolly Season Dies to cut “Tis the Season” from Cherry Cobbler card twice and from Whisper White once.
 I attached the die cuts together with the White one on top and then to the card front.
I stamped the tree image from the Holly Jolly Christmas stamp set onto Whisper White card using Memento Tuxedo Black ink and coloured them using the Old Olive Stampin’ Blends. I stamped the greeting from the Itty Bitty Christmas stamp set to the right of the trees using Memento Tuxedo Black ink.
This card will be used in one of my upcoming classes and I think the ladies will love it.
Bye for now,
Kris
Product Used:


Beauty and Joy

The card I am sharing with you today is the first one I created using the Beauty and Joy stamp set from the Holiday Catalogue, although I have shared another card using this Stamp Set previously. This is a distinctive style stamp set, which I love. I embossed Terracotta Tile card using the Hammered Metal 3D Embossing Folder and attached it to Whisper White card. I stamped the greeting from the Beauty and Joy stamp set using Terracotta Tile ink onto the right hand side of the Whisper White card.  I wrapped the top of the embossed card with Gold 3/8″ Metallic Edge Ribbon and tied a knot. The whole panel is attached to scored and folded Pretty Peacock card, I stamped the “flower pot” image from the Beauty and Joy stamp set onto scrap Whisper White card using Terracotta Tile ink. I stamped the tree stem using Early Espresso ink and the leaf image using Pretty Peacock ink. I cut out the image using one of the ovals from the Layering Ovals Dies and attached it to a Pretty Peacock oval cut using the same dies.
  The image panel is attached to the card front using dimensionals.
To decorate the inside of the card, I embossed a narrow strip of Terracotta Tile card using the Hammered Metal 3D Embossing Folder and attached it to Whisper White card. The top of the embossed card is wrapped with Gold 3/8″ Metallic Edge Ribbon.
This is really a very pretty card and I am sure you will love this stamp set too.
Bye for now,
Kris
Product Used:


Panania

I spent some time going through a box of photos that I had extracted from the old style photo albums. You know the ones, you opened the plastic cover and the photos stuck onto the sticky page and you closed the plastic cover to keep them in place. I removed them from the albums quite some time ago and I haven’t really done anything with the photos. These photos of my two girls at my Mum and Dad’s house in Sydney were taken over a period of three years. I used a layout for a challenge on a Facebook page – Scrapbooking Global – I belong to as inspiration. I cut all the photos down to 3″ x 3″, except the one of the girls in the bath it is 3″ x 2-3/4″. All of the photos are mounted onto Basic Black card. To create the panel in the centre at the top, I cut down the 3″ x 4″ Magnolia Lane Memories and More Card to 3″ x 3″.
  I cut the “Love This” from another 3″ x 4″ Magnolia Lane Memories and More Card and trimmed it to fit across the panel. I wrapped the panel with the White 3/8″ Linen Ribbon from the Magnolia Lane Ribbon Combo and attached it to Basic Black card. I tied a bow in another length of the Magnolia Lane White 3/8″ Linen Ribbon and attached it using a Glue Dot. The photo of the girls in the bath is attached to a 3″ x 4″ Magnolia Lane Memories and More Card and then Basic Black card.
  To create the panel in the bottom right hand corner I cut down a 3″ x 4″ Magnolia Lane Memories and More card and attached it to Basic Black card. I stamped the greeting from the retired Sale-A-Bration stamp set – Part of My Story – using Memento Tuxedo Black ink. I cut out the greeting using one of the squares from the Stitched Shapes Dies. The journalling panel is a 6″ x 4″ Magnolia Lane Memories and More Card. The card is attached to a piece of Basic Black card to fit into the space between all of the other panels and it left a blank section on the right hand side.
  The 3″ x 4″ Magnolia Lane Memories and More Card that I cut the “love this” from also had two flowers on the corners. So I fussy cut them and attached them to the corners on the right hand side of the panel. The title is cut from Basic Black card using the retired Little Letters Dies. I also stamped “sweet moments” which comes from the retired Remember This Project Life stamp set. I hand wrote my journalling, not something I love doing, but hopefully my grandchildren will be able to read it ok.
I love these photos, they are not pretty or expertly styled but each one brings a smile to my face as I remember the fun we had when visiting Mum and Dad. To me that’s what “everyday life” is all about.
Bye for now,
Kris
Product Used:


Natures Beauty
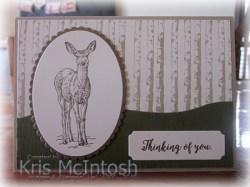
You might have missed the Natures Beauty stamp set in the Holiday Catalogue. It is on the inside of the back cover and this stamp set has a special significance. For every one of this stamp set purchased in Australia $4.25 will be donated to Australian Metal Health Organisations. That in itself is a good reason to purchase the stamp set, but, it is a truly lovely set and one that will be useful for many different occasions. When I receive a new stamp set, I like to stamp all of the images onto a sheet of A4 Whisper White. If the stamp set has any co-ordinating dies, I cut them and attach them to the page also.  I store these in a A4 folder and as well as being a visual reminder of what each stamp set contains, whilst I am stamping the images, I start to get ideas of how I want to use them. This card was made immediately after creating my reference card. I stamped the tree trunk image from the Winter Woods stamp set onto Very Vanilla card using Crumb Cake ink. I used the die from the In The Woods Dies to cut the top of a piece of Mossy Meadow card before embossing it using the Subtle 3D Embossing Folder (I can’t believe how much I use this folder!). I attached the embossed card to the stamped Very Vanilla card and then scored and folded Crumb Cake card. I stamped the deer image from the Natures Beauty stamp set onto Very Vanilla card using Soft Suede ink and cut it out using the Layering Ovals Dies. I attached the image to a Soft Suede scalloped oval cut using the same dies and then the card front using dimensionals. I stamped “thinking of you” from the Colourful Seasons stamp set onto Very Vanilla card using Soft Suede ink.
  I cut out the greeting using the Merry Christmas Dies before attaching to the card front.
To decorate the inside of the card, I stamped the tree trunk image from the Winter Woods stamp set across a narrow strip of Very Vanilla card using Crumb Cake ink. I attached a narrow strip of Mossy Meadow card behind the top edge before attaching to Very Vanilla card.
I am really pleased with my first use of this stamp set and I have a few more ideas to use these images. I hope I have inspired you to take another look at this stamp set to add to your collection.
Bye for now,
Kris
Product Used:


Christmas Easel Card
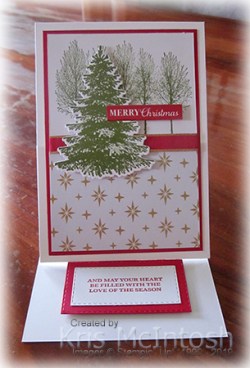
Today’s fancy fold is a very simple one to create but one that is also every effective. I love the fact that it folds flat to go in a standard envelope and my family love this style of card because it is so easy to display. I created the card base from Thick Whisper White card by cutting the A4 panel in half on the short end. I scored along the long edge at 7.2cm and 14.8cm. I stamped the row of trees from the Winter Woods stamp set across Whisper White card using Old Olive ink. I attached a piece of Gold Foil card from the Most Wonderful Time Product Medley to the bottom the stamped card. I coloured a piece of Gold Metallic Edge 3/8″ Ribbon using the Dark Real Red Stampin’ Blend. Once it was dry, which doesn’t take long, I attached it across the top of the Gold Foil card.  The Whisper White panel is attached to Real Red card and then Thick Whisper White card. To create the easel you attach the bottom of the stamped panel to the small 7.2cm wide panel on the card base. I stamped the single tree from the Winter Woods stamp set onto scrap Whisper White card using Old Olive ink. I cut out the tree using the co-ordinating In The Woods Die and attached it to the card front using dimensionals.
  I stamped the greeting from the Christmas Gleaming stamp set onto Whisper White card using Real Red ink. I punched out the greeting using the Classic Label Punch and then trimmed away the small section of unstamped card on each end. I attached the greeting to the card front using dimensionals where necessary. To hold the easel in place, I stamped the greeting from the Holly Jolly Christmas stamp set onto Whisper White card using Real Red ink. I cut out the greeting using a Stitched Rectangle Die and attached it to Real Red card cut using the next size Stitched Rectangle Die. The greeting is attached to the inside of the card using dimensionals.
I love the way this turned out and I have an idea for another Easel Card which I will share next week.
Bye for now,
Kris
Product Used:


Seasons Greetings
 Today’s card is a CASE of one by Jo Anne Hewins that I found on Pinterest. I didn’t have the Designer Series Paper that Jo Anne used so I changed it up a little. I attached a piece of Merry Merlot card to the centre of Mossy Meadow card before embossing using the Stylish Scroll Embossing Folder. I attached the embossed panel to Whisper White card and then scored and folded Merry Merlot card. I stamped the flower pot from the Beauty & Joy stamp set using Crumb cake card. I stamped the stem image from the same stamp set using Early Espresso ink. I stamped the greenery image using Mossy Meadow ink.
  I cut out the image using the largest oval from the Stitched Shapes Dies and attached it to the card front using dimensionals. I added some Red Rhinestones to simulate baubles on a Christmas Tree and also a bow tied from 1/4″ Copper Trim. I did fray the ends of the ribbon just a little.
  I stamped “Seasons Greeting” from the Itty Bitty Christmas stamp set onto scrap Whisper White card using Merry Merlot ink and punched it out using the Classic Label Punch. I attached the greeting over the image oval using dimensionals on the outside of the label only. To decorate the inside of the card I stamped the greeting from the Beauty & Joy stamp set onto Whisper White card using Merry Merlot ink. I also stamped the tree image onto the lower right hand corner using Crumb Cake, Early Espresso and Mossy Meadow ink. This time I used the image from the Beauty & Joy stamp set to add some baubles using Merry Merlot ink.
So thanks very much to Jo Anne for sharing her beautiful card. I’d love to hear what you think.
Bye for now,
Kris
Product Used:


