Welcome Baby
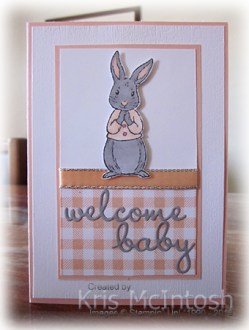
Friends of my husband and I were recently blessed with a beautiful new granddaughter and I thought I would share the card I made for them. I must admit to not having many “baby” type stamp sets but I thought that the bunny rabbit from Fable Friends would do the trick. I stamped the check image from the Tiny Keepsake stamp set onto Whisper White card using Petal Pink ink. I wrapped the top of the stamped image using Silver 3/8″ Metallic Edge Ribbon which I coloured using the Dark Petal Pink Stampin’ Blend. I attached the stamped card to Petal Pink card and then Whisper White card which is embossed using the Subtle 3D Embossing Folder.  I stamped the bunny rabbit from the Fable Friends stamp set onto scrap Whisper White card using Memento Tuxedo Black ink. I coloured the image using the Petal Pink, Smoky Slate, Dark Flirty Flamingo Stampin’ Blends. I cut out the image and attached it to the card front using dimensionals.
  I cut “welcome” and “baby” from Smoky Slate using the Well Written Dies and attached the greeting over the stamped check image.
To decorate the inside of the card I stamped “congrats” and “So Happy For You” from the now retired Sunshine Sayings stamp set onto Whisper White card using Smoky Slate ink.
I am very pleased with this card, considering I didn’t think I had anything to make a baby card with! I’d love to know what you think?
Bye for now,
Kris
Product Used:


Open Book Card
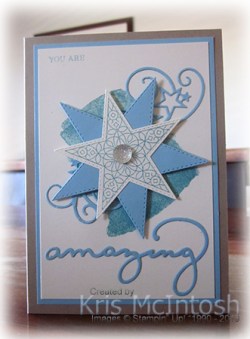
Now that sounds interesting doesn’t it. I have seen these cards in different forms on Pinterest and thought they would be too complicated to create. However, with my instructions from Elizabeth Shannon, it was fairly easy to do! I needed to create a couple of cards for my eldest two grandchildren who had their school presentation night recently. They both did very well, achieving academic awards as well as one retiring from the Junior School Council and one being elected for next year’s Junior School Council. I couldn’t be more proud of their achievements. So we have a Balmy Blue and a Blushing Bride version of this card. My card base is Crumb Cake card and I cut Very Vanilla for the inside of the card. I decorated the front of the card by stamping the background image from the Love What You Do stamp set onto Very Vanilla card using Balmy Blue ink.  I also inked the “you are” from the “you are wonderful” stamp from the Rooted in Nature stamp set using a Balmy Blue Stampin’ Write Marker and stamped it onto the top left hand corner of the Very Vanilla card. I stamped the star image from the So Many Stars stamp set onto scrap Very Vanilla card using Balmy Blue ink. I cut out the image using the co-ordinating Stitched Stars Die. I also cut Balmy Blue card using the star die one side larger than the stamped image, and, the filigree starry image, both from the Stitched Stars Dies. I also cut “amazing” from Balmy Blue card using the retired Celebrate You Dies.
  I attached “amazing” across the bottom of the stamped Very Vanilla card and the filigree star image across the stamped background. I attached the stamped panel to Balmy Blue card and then the card front. I attached the stamped star to the Balmy Blue star and then the card front using dimensionals. Lastly I added a Clear Faceted Gem to the centre of the star.
To decorate the book panels on the inside of the card, I stamped the greeting from the Strong and Beautiful stamp set onto Very Vanilla card using Balmy Blue ink. I added three of the stars which actually come from the filigree die cut to the panel before attaching it to Balmy Blue card. This panel is attached to the left hand side of the book panel. I attached a piece of Balmy Blue card to the right hand side of the book panel but I didn’t add the Very Vanilla layer yet. I wanted to write on it before I attach it to the card.
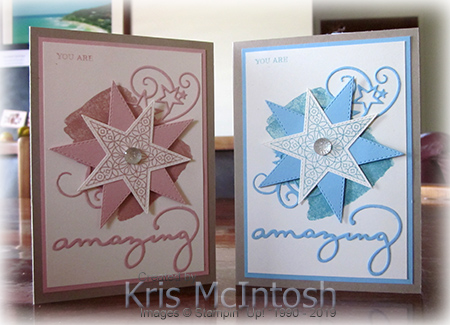
I love how these cards turned out and I think they are special enough to mark special achievements. Which version do you like, the Balmy Blue or the Blushing Bride one? Let me know what you think?
Bye for now,
Kris
Product Used:


24 hour Stamp Sale
And it’s already off and running. Stampin’ Up! are having a sale all day today right up until 11.50pm tonight. Lots of stamp sets at 15% off. 
You can download this brochure to take a look and see what’s on offer. There are so many great stamp sets available, so don’t delay. Check it out and place your order, you never know, the stamp set you love may also loved by everyone else and you might miss out.
Happy shopping.
Bye for now,
Kris
Wishing You…

Today’s card is another I made using the Christmastime is Here Product Suite. This card is created using a tutorial from Create with Connie and Mary and I love it. A piece of Whisper White card is attached to scored and folded Poppy Parade card. Gold Foil card is cut twice using the die from the Rose Dies and they are attached to the left hand side of the card front. The flower image from the Christmas Rose stamp set is stamped onto Whisper White card using Memento Tuxedo Black ink. The image is coloured using Poppy Parade, Mossy Meadow and Soft Suede ink and then cut out using the co-ordinating Rose Die.  The flower is attached to the card front using dimensionals. The greeting from the Christmas Rose stamp set is stamped onto Soft Sea Foam card using Memento Tuxedo Black ink and cut out using the label from the Rose Dies.
  A length of the Gold 1/4″ Shimmer Ribbon is attached to the back of the label before being attached to the card front using dimensionals.
To decorate the inside of the card, I stamped the flower image from the Christmas Rose stamp set using Memento Tuxedo Black ink. I stamped the fill images using Poppy Parade, Mossy Meadow and Soft Suede ink.
Isn’t this just so pretty? I love using a tutorial every now and then just to get me thinking about new ideas and Connie and Mary have some fabulous ideas.
Bye for now,
Kris
Product Used:


Special Birthday Celebration

I had a friend celebrate one of those “0” birthday’s, not telling which one, but I wanted to create a special card for her and this is what I came up with. I stamped “happy birthday” from the Special Celebration stamp set onto the lower right hand corner of Whisper White card using Blackberry Bliss ink. I cut a strip of Blackberry Bliss card using the border die from the Be Mine Stitched Dies and attached it to a piece of Whisper White card I had embossed using the Corrugated 3D Embossing Folder. The embossed panel is attached to the stamped Whisper White card and the whole panel is attached to scored and folded Blackberry Bliss card.  I stamped the large flower from the Good Morning Magnolia stamp set onto Whisper White card three times using Memento Tuxedo Black ink. I coloured the leaves on one image using the Old Olive Stampin’ Blends. I also coloured the outside edge of the flower using the Light Blackberry Bliss Stampin’ Blend before cutting out the image using the co-ordinating Magnolia Die.
  I coloured the whole of the flower on the second image using the Blackberry Bliss Stampin’ Blends and hand cut the flower. I only coloured the central four petals on the third image, again using the Blackberry Bliss Stampin’ Blends and the Dark Daffodil Delight Stampin’ Blend. I attached the images on top of each other using dimensionals. I used a spritzer to spray the flower with a mix of Rubbing Alcohol (Isopril – available at Woolies and Coles) and Champagne Mist Shimmer Paint. I let the flower dry before attaching it to the card front. I tied a bow in a length of Gold 5/8″ Metallic Edge Ribbon and attached it to the flower stem.
To decorate the inside of the card, I stamped the border image from the Good Morning Magnolia stamp set using Blackberry Bliss ink.
I love this card and I hope my friend did too.
Bye for now,
Kris
Product Used:


Happy Day

Today’s page again features a photo from the collection that my Dad gave to me. This one shows my Mum and Dad with his sister and his parents. It was taken inside the house at Bass Avenue, East Hills, but I do not know when. I will have to ask my Dad that question. I also used a sketch challenge on a Facebook page (Scrapbooking Global) I belong to for the layout of my page. I used a Very Vanilla 12″ x 12″ page and stamped the scripty image from the Very Versailles stamp set onto the top left and bottom right hand corners using Crumb Cake ink. I also stamped the leaf image from the same stamp set over the top using Old Olive ink. To give the page a bit of an aged feel I sponged around the edges of the Very Vanilla card using Crumb Cake ink.  I cut two pieces of Soft Sea Foam card 2-1/4″ x 6″, two pieces of Pear Pizzazz 2-1/4″ x 6″ and one Old Olive piece the same size. I embossed each of these pieces using the Layering Leaves 3D Embossing Folder. Using the co-ordinating ink I sponged around the edges of each embossed piece and then lightly sponged ink over the embossed pattern before attaching them across the Very Vanilla card. I attached the photo to Early Espresso card. I stamped the leafy image from the Very Versailles stamp set onto scrap Very Vanilla card using Old Olive ink.
 I fussy cut the leafy images and attached them to the back of the photo before attaching it to the page. To create the title I cut “happy” and “birthday” from Early Espresso card using the Well Written Dies. I trimmed “birthday” so I was left with “day” and attached the title above the embossed panels. I printed my journaling onto Very Vanilla card, cut it into strips and sponged the edges using Early Esspresso ink before attaching them to the page.
I am really happy with this page, it has a Vintage feel but as the photo is quite dark, I wanted to add a little lightness and I think the embossed panels do just that. Don’t you?
Bye for now,
Kris
Product Used:


Birthday Wishes

Today’s card is one that I made for a friend who recently celebrated her birthday. I stamped the tall leaf image from the First Frost stamp set three times onto Whisper White card using Soft Sea Foam ink. I stamped the large floral image from the First Frost twice onto Whisper White card, inking the image using a Blushing Bride and a Pear Pizzazz Stampin’ Write Marker. I cut out the images using the co-ordinating Frosted Bouquet Dies before attaching them to the stamped card. I also cut the smaller leafy image from the Frosted Bouquet Dies twice from Silver Foil card and attached them over the other images on the card front.  I stamped the greeting from Itty Bitty Birthdays onto the top right hand corner using Pear Pizzazz ink before attaching the stamped card to Blushing Bride card. The whole panel is attached to scored and folded Thick Whisper White card. I stamped the large single flower once onto scrap Whisper White card using Blushing Bride ink and cut it out using the co-ordinating Frosted Bouquet Die.
 I stamped the small single flower twice onto scrap Whisper White card using Blushing Bride ink and cut them out using the co-ordinating Frosted Bouquet Die. I attached the flowers to the card front using dimensionals. I tucked small lengths of Silver 3/8″ Metallic Edge Ribbon behind the flowers, using Mini Glue Dots to hold them in place. I also tied a bow in the same ribbon and attached it below the flowers using a Mini Glue Dot.
To decorate the inside of the card, I stamped the large floral image from the First Frost stamp set onto the lower left hand corner. I inked the image using a Blushing Bride and a Pear Pizzazz Stampin’ Write Marker.
This card is so soft and pretty and I love it. I hope my friend did too. What about you? Would you like to receive this card?
Bye for now,
Kris
Product Used:


Pull Tab Flap Card
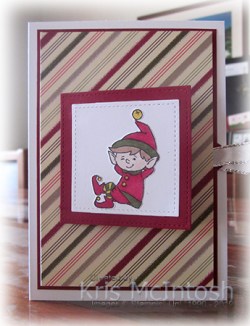
Today I am sharing a fancy fold card that I have seen in many forms on the internet. I watched a video by Lisa Curcio to create my card today. You will find the video in this post. I cut a piece of Night Before Christmas Designer Series Paper and attached it to Whisper White card for a bit of strength before punching the panel with the Classic Label Punch to create the slide for the pull mechanism. I cut my card using the squares from the Stitched Shapes Dies as per Lisa’s instructions.  To decorate the front panel, I stamped the image from the Elfie stamp set onto scrap Whisper White card and coloured the Image using Stampin’ Blends in the following coloures – Cherry Cobbler, Mossy Meadow, Daffodil Delight, Ivory and Bronze. I hand cut the image so that I was left with only the elf and attached it to the card front panel.
  On the pull for the inside, I stamped the greeting from the Elfie stamp set using Memento Tuxedo Black ink. I also stamped the parcel image from the Elfie stamp set using the same ink and coloured it using the Cherry Cobbler and Daffodil Delight Stampin’ Blends.
  Once I had assembled the pull tab and panels on the Designer Series Paper panel, it is attached to Cherry Cobbler card using dimensionals, making sure not to impede the pull mechanism. The whole piece is attached to scored and folded Thick Whisper White card. I stamped another of the greetings from the Elfie stamp set onto the inside of the card base using Cherry Cobbler ink. I attached a length of Silver 5/8″ Metallic Edge Ribbon through the pull mechanism to make it easier to use.
I love the way this came together and seriously it was not as hard as you might think, thanks to Lisa and her video, it is really quite easy. I hope you give it a try.
Bye for now,
Kris
Product Used:


Casing Nature

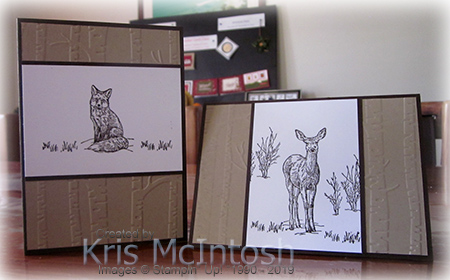
I saw a couple of cards on Pinterest created by Fiona Whitten, a Stampin’ Up! demonstrator from the UK. She created two beautiful cards with stamping and cardstock alone. Since I struggle with #simple stamping I had to add some embossing also. For the first card, I embossed Crumb Cake card using the Woodland Embossing Folder and attached it to scored and folded Early Espresso card. I stamped the fox image from the Natures Beauty stamp set onto Whisper White card using Early Espresso ink.  I stamped the grass image from the same stamp set on either side of the fox also using Early Espresso ink. I attached the stamped Whisper White card to Early Espresso card and then the card front.
 The second card also has Crumb Cake card embossed using the Woodland Embossing Folder attached to scored and folded Early Espresso card.
  This time I stamped the deer image from the Natures Beauty stamp set onto Whisper White card using Early Espesso ink. I stamped the double tree image from the same stamp set on either side of the deer using Early Espresso ink.
  I also added the grass image on either side of the deer using the same ink. The panel is attached to Early Espresso card and then the card front.
To decorate the inside of the card, I embossed a narrow strip of Crumb Cake card using the Woodland Embossing Folder. I attached a narrow strip of Early Espresso card behind one long edge before attaching to Whisper White card. Fiona didn’t add any greetings to her cards and neither did I because I think you could use these cards for lots of different reasons, don’t you?
I love how beautiful these cards look. Thank you so much Fiona for the inspiration.
Bye for now,
Kris
Product Used:


A Rosey Christmas

There is an amazing new product suite to be released on the 1st November – Christmastime is Here. This product suite is absolutely fabulous. There is a beautiful stamp set containing a full sized floral and leafy image which is cling mount and a photopolymer stamp set with images which can be used to colour the cling image. It also has a co-ordinating die set. There is the most stunning Specialty Designer Series Paper, which has the most amazing imagery and one side of the paper has gold embossing. There are also co-ordinating Gold Glitter Enamel Dots and a beautiful Gold 1/4″ Shimmer Ribbon. To complete the product suite, there is even a really gorgeous bracelet with two charms, one of the beautiful rose and one Stampin’ Up!. This amazing product suite will be available for customers from the 1st November while stocks last.  So if you need these products you need to place your order as soon as possible. Of course, demonstrators were able to purchase this one earlier, Yay! One of the things which appealed to me straight away was the fact the you can die cut one of the Designer Series Papers using the large flower die. So today’s card features very little stamping. I embossed Whisper White card using the Layering Leaves 3D Embossing Folder and attached it to scored and folded Cherry Cobbler card. I cut a strip Christmastime is Here Specialty Designer Series Paper and attached it to Gold Foil card and then the card front.
  I cut the beautiful floral arrangement from the Designer Series Paper using the Rose Die and attached it to the card front using dimensionals. I stamped the greeting from the Christmas Rose stamp set onto scrap Whisper White card using Cherry Cobbler ink. I cut out the greeting using one of the dies from the Rose Dies. The greeting is attached to the card front using dimensionals.
To decorate the inside of the card I embossed a narrow strip of Whisper White card using the Layering Leaves 3D Embossing Folder. I attached a narrow strip of Cherry Cobbler card behind one long edge and attached it to Whisper White card.
I think this card turned out amazingly gorgeous (even if I do say so myself). What about you? What do you think? Bet you can’t wait to get your hands on this one.
Bye for now,
Kris
Product Used:


