Daly Waters
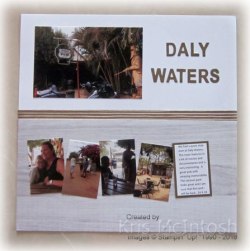
I’m back on track to share a Memory Keeping page on Saturdays. I didn’t quite follow the plan over the last couple of weeks as I had so many Christmas projects to share with you. Today’s page was created to remember our quick stop at Daly Waters on our way from the Devils Marbles to Katherine. This town is just off the highway and has an airfield which was used in WWII and a great little pub with a caravan park attached. We stopped in an had a quick look around town and a drink at the pub. Oh My Goodness what a lot of memorabilia this pub holds. It also has a great beer garden with a stage and during the peak season they have lots of entertainment.  Ron and I have already decided to make this a stop over when we head up to Darwin again. Anyway, the base for the page is 12″ x 12″ Whisper White. I added the striped piece of Frosted Boutique Designer Series paper behind the top edge of the Festive Farmhouse Designer Series Paper before attaching to the Whisper White card. I printed a few photos at 2″ x 3″ and attached them across the designer series paper. I printed the journalling on the computer, attached it to Soft Suede card and then to the page. The larger photo is 6″ x 4″ and attached to the top left hand corner. I cut the title from Soft Suede card using the retired Little Letters Framelits Dies.
As you can see, a simple page, but one that will always bring a smile to my face as I remember our first visit to this town.
Bye for now,
Kris
Product Used:


Simple Sale-A-Bration
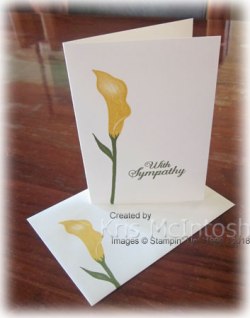
Today’s cards again focus on simple or beginner stamping. I have used the Lasting Lilly stamp set which is one that you can earn FREE during Sale-A-Bration. The card bases are once more note cards. I have stamped the leaf images using Old Olive ink and the small flower using Daffodil Delight ink and the larger flower using Flirty Flamingo ink. The greetings which are also from the Lasting Lilly stamp set are stamped using Old Olive ink. These images are Distinktive which means that you need to add your ink carefully so that it is not overloaded.  If there is too much ink on your stamp you won’t get the wonderful detail that is present in each of the stamps. If your pad is really wet and leaves bubbles on your stamp, use a spoon to push the ink back into the pad, to make sure that you get a great image.
I have decorated the envelopes for each card using the same inks and images to co-ordinate. I do think these cards really suit simple or beginner stamping, don’t you?
 This is a really lovely stamp set with some great sayings for sympathy or get well type cards, but not exclusively so.
Make sure that during the Sale-A-Bration period you place your orders so that you can qualify for something free every time. There is a wonderful selection of stamp sets and accessories to choose from. If you don’t have a demonstrator and you live in Australia, please contact me so we can organise to get the catalogues to you.
Bye for now,
Kris
Product Used:


Simple Incredible Like you

When we were are our Onstage Local event in November, Stampin’ Up! issued a challenge to try more simple stamping. Now this is harder than you think to do once you have been stamping for a while. But I thought about the idea behind simple stamping – to showcase Stampin’ Up!’s wonderful products to new, beginner stampers. The first thing you need is something to stamp on and our note cards with envelopes are a great starting point for a new stamper. You get 20 pre-scored cards and envelopes in the pack at a really good price. So I created both of the cards I am sharing with you today on note cards. I am excited to be sharing a stamp set that is being released in the Occasions Catalogue and will be available for purchase on the 3rd January. For the first card, I stamped the striped image from the Incredible Like You stamp set using Daffodil Delight ink. I did use a post-it-note to cover the striped image before stamping the flower and leaves. The flower is stamped using Blushing Bride ink and Calypso Coral ink. I stamp the darkest colour first as it makes it easier to add the lighter solid image exactly where you want it. I stamped the solid leaf using Mint Macaron ink and the detailed leaf image using Pear Pizzazz ink.
  I removed the post it note and stamped the greeting from the same stamp set using Pear Pizzazz ink. I also decorated the envelope in the same manner. Because it is a note card, I didn’t add any stamping to the inside of the card. Simple enough and it doesn’t take too many supplies.
For the second card, I used post-it- notes to mask across the card on an angle. I stamped the flower and leaves using the same inks as the first card. I removed the post-it-notes, rotated the card 180 degrees and attached the post-it-notes again.  Once more I stamped the flower and leaves using the same inks as for the first card. To make this work and keep it simple I use my grid paper to align the card and I mark the positions for the edges of the post-it-notes. This makes it simple to leave about a 1″ gap between the stamped flowers by moving the card downwards from the top position to add the post-it-notes the second time. Anyway once the stamping is done, I removed the post-it-notes and stamped the greeting from the Incredible Like You stamp set using Pear Pizzazz ink. I also decorated the envelope for this card to match.
What do you think, have I created simple stamping or are there too many colours for a beginner stamper? I’d love to know what you think.
bye for now,
Kris
Product Used:


Merry Christmas

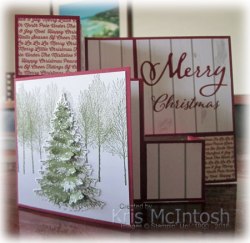
Wishing you all a very Merry Christmas and a Happy New Year. It’s very quiet here at the moment. I still have a little preparation to do before the family arrives, but I thought I would share a page I made to showcase a photo of my tree with the presents underneath. Of course there will be more when everyone arrives but for the moment these are from Ron and I to the members of our family. I attached pieces of the Festive Farmhouse Designer Series paper across the bottom of a Whisper White 12″ x 12″ page. The pieces are random in width but all the same height. I attached piece of the 5/8″ Striped Burlap Ribbon across the top of the Designer Series Paper. I stamped the row of trees from the Winter Woods stamp set on the right hand side of the page above the Designer Series Paper using Mossy Meadow ink. I stamped the single tree from the same stamp set twice onto Whisper White card using Mossy Meadow ink and cut them out using the outline die and the intricate die from the In The Woods Framelits Dies. I attached the intricate tree onto the full tree and then attached them over the stamped trees. I cut “Merry” and “Christmas” three times from Cherry Cobbler ink using the Merry Christmas Thinlits Dies. The dies are attached on top of each other and then to the page which gives the title lots of dimension. I attached the photo to Cherry Cobbler card before attaching the panel to the left hand side of the page. I used the Tabs for Everything stamp to add the date. Simple I know, but I love the way the page has come together.
Anyway, have a wonderful time over this Christmas Season, and if you are on the road, please travel safe.
Bye for now,
Kris
Product Used:


For My Sister

This Christmas card is one that I have wanted to make for a while, however, you need to know the person you are giving it to will take it in spirit it is intended. This is the last Christmas card I am going to share with you using the template that Julie Burt shared on a Demonstrator only Facebook page. She gave me permission to share this with you and you can find the template in the Fancy Fold card on my Free Tutorials page. I used Basic Black to cut the base card and additional small card which fits on the left. To decorate the front panel, I stamped the Buffalo Check background using Granny Apple Green ink onto Whisper White card. I used my Basic Black marker to add the Black lines, which is such an easy thing to do and really takes this stamp to another dimension.  I cut a strip of Basic Black card using one of the Delicate Lace Thinlit Dies and attached it to the back of the Buffalo Check panel. The whole piece is attached to another piece of Whisper White card and then to the front of the small folded card. I stamped the lady from the You’ve Got Style stamp set onto Whisper White card using Memento Tuxedo Black ink. I coloured the image using Dark Poppy Parade, Dark Daffodil Delight and Ivory Stampin’ Blends. The image is cut using one of the Layering Ovals Framelits Dies and attached to a Basic Black scalloped oval cut using the same dies. To decorate the inside of the small card, I stamped the row of wine glasses from the Half Full stamp set across the bottom of Whisper White card using Memento Tuxedo Black ink. I coloured the image using Dark Daffodil Delight and Dark Poppy Parade Stampin’ Blends.
  The top left and bottom right corners of the card are decorated with the Buffalo Check Background, stamped in Granny Apple Green and once more with Basic Black lines drawn by hand. The second panel in on the top and bottom of the card are stamped using three of the glasses from the image in the Half Full stamp set using Memento Tuxedo Black ink. I inked the grape image from the label in the Half Full stamp set using a Basic Black Stampin’ Write Marker and stamped in the top right hand corner of these panels. One image is coloured using Dark Daffodil Delight and Dark Granny Apple Green Stampin’ Blends and the other using Dark Poppy Parade and Dark Granny Apple Green Stampin’ Blends. These images are attached to Granny Apple Green card before being attached to the card base.
  The middle images on the top and bottom rows are stamped using the row of glasses and a greeting from the Half Full stamp set onto Whisper White card using Memento Tuxedo Black ink. Again one image is coloured using the Dark Daffodil Delight Stampin’ Blend and the other using Dark Poppy Parade Stampin’ Blend. These panels are also attached to Granny Apple Green card before being attached to the card base. The middle panel on the card has the holly image and another greeting from the Half Full stamp set. The images are stamped using Memento Tuxedo Black ink and coloured using the Dark Poppy Parade and Dark Granny Apple Green Stampin’ Blends. This panel is also attached to Granny Apple Green card before being attached to the card base. The large panel on the card has the wine bottle, glass (stamped in Memento Tuxedo Black ink) and grape images (inked using the Basic Black Stampin’ Write Marker) from the Half Full stamp set along with one of the greetings (also stamped in Memento Tuxedo Black ink). The images are coloured using the Dark Poppy Parade, Dark Granny Apple Green and Ivory Stampin’ Blends.
This was such a fun card to make. Do you know someone who would appreciate this card? Thank goodness my sister did!
Bye for now,
Kris
Product Used:


For my Daughters
I made this card for each of my daughters using the template that you can find in the Fancy Fold card on my Free Tutorials page. I cut the card base from Night of Navy card using the aforementioned template. The large panel on the right is stamped using the multiple bauble image from the Beautiful Baubles stamp set and Night of Navy ink. I stamped the greeting from the same stamp set below the baubles using the same ink before attaching the panel to the card base.  I attached Night of Navy card to Silver Glimmer paper and attached the panels to the top left and bottom right of the card base. I stamped the same multiple bauble image onto Whisper White card using Night of Navy ink and used the co-ordinating Detailed Baubles Thinlits Die to cut out the image. I attached one bauble to each of the Night of Navy squares. I embossed Whisper White card using the Tin Tile Dynamic Embossing Folder and then cut out two of the “tiles”.
  These are attached to Night of Navy card and Whisper White card before being attached to the card base. I attached two Whisper White panels to the card base, one in the centre of the top of the card and one in the centre of the bottom of the card. I cut Night of Navy card using the Detailed Baubles Thinlits Die and attached one bauble to each of the panels. I stamped the greeting from the Beautiful Bauble stamp set onto Whisper White card and attached it to the centre panel of the card base.
  To decorate the front of the small card, I cut the large “doily” from Night of Navy card using the Detailed Baubles Thinlits Dies. The die is attached to Whisper White card and then the card front. I cut the bauble image from Night of Navy card using the same dies and attached it to the centre of the “doily”. To decorate the inside of the card, I stamped a small part of the bauble image onto the top left hand corner using Night of Navy ink. Lastly I tied bows in Silver Bakers Twine and attached the bows to each of the baubles.
I am really happy with this card and of course, it is in my favourite colour combination for Christmas.
Bye for now,
Kris
Product Used:


For my Grandsons

The card base for this card is cut from Gray Granite card following the template you can find under Fancy Fold card on my Free Tutorials page. I cut four pieces of Festive Farmhouse Designer Series paper and attached them to the card base. I stamped the tree from the Timeless Tidings stamp set onto Whisper White card using Mossy Meadow ink. I stamped “joy” from the retired Snow is Glistening stamp set using Memento Tuxedo Black ink. The stamped Whisper White card is attached to Mossy Meadow card and then the card base. I stamped the christmas lights image from the Farmhouse Christmas stampset onto Whisper White card using Memento Tuxedo Black ink.  I coloured the lights using the Dark Real Red Stampin’ Blend. I stamped “Merry and Bright” from the Hearts Come Home stamp set using Memento Tuxedo Black ink. The stamped panel is attached to Mossy Meadow card and then the card base. I stamped the greeting from the Farmhouse Christmas stamp set onto Whisper White card using Memento Tuxedo Black ink. I stamped the house image from the Hearts Come Home stamp set using Gray Granite ink below the greeting.
 The stamped panel is attached to Mossy Meadow card and then the card base. The panel on the right has a piece of Festive Farmhouse Designer Series Paper attached to Mossy Meadow card and then the card base. I stamped the greeting from the Farmhouse Christmas stamp set onto Whisper White card using Mossy Meadow ink. The greeting is cut out using one of the Layering Circle Framelits Dies and attached to a Mossy Meadow scalloped oval cut using the same dies. I stamped the greeting once more onto Whisper White card using Real Red ink. The “Merry Christmas” is cut out using one of the co-ordinating Farmhouse Framelits Dies.
  The “Merry Christmas” is attached over the stamped greeting using dimensionals. To decorate the small card front, I stamped the row of trees from the Winter Woods stamp set onto Whisper White card using Mossy Meadow ink. I cut the fence image from Crumb Cake card using the Farmhouse Framelit Die. The fence is attached across the tree image. I stamped the car image from the Farmhouse Christmas stamp set onto Whisper White card using Memento Tuxedo Black ink. I coloured the image using Real Red, Dark Smoky Slate Stampin’ Blends and Basics Black and Mossy Meadow Stampin’ Write Markers. The image is cut out using the co-ordinating Farmhouse Framelit Die and attached to the card front. To decorate the inside of the card, I stamped a small portion of the row of trees image from the Winter Woods stamp set onto the lower left hand corner of Whisper White card using Mossy Meadow ink.
This card has a kind of “boy” feel to it, don’t you think? In any cases, my grandson’s loved it.
Bye for now,
Kris
Product Used:


Another one for the Grandchildren
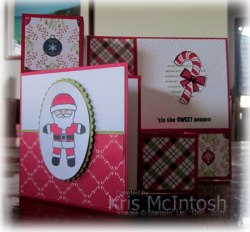
This card is made for Elyssa and Jae and uses the same template which you can find in the Fancy Fold card on my Free Tutorials page. I cut the base from Real Red card and added four small pieces of Under the Mistletoe Designer Series Paper. I stamped the double candy cane image from the Candy Cane Season stamp set onto Whisper White card using Real Red ink and attached it to Old Olive card and then the card base. I stamped the leaf image from the same stamp set onto Whisper White card using Old Olive ink, add the berries using Real Red ink and stamped the greeting using Memento Tuxedo Black ink. This panel is also attached to Old Olive card and then the card base.  The middle panel is stamped using the greeting from the Half Full stamp set and the holly image from the same stamp set using Memento Tuxedo Black ink. The holly is coloured using the Dark Real Red and Dark Old Olive Stampin’ Blends. Once more this panel is attached to Old Olive card before being attached to the card base. The large panel on the right hand side is stamped with the greeting from the Candy Cane Season stamp set using Memento Tuxedo Black ink and then embossed using the Softly Falling Embossing Folder.
  I stamped the “ho ho ho” stamp from the Candy Cane Season onto Whisper White card using Old Olive ink and punched out the image using the 1-3/4″ circle punch. I stamped the candy cane and the bow, firstly using Memento Tuxedo Black ink for the outline images and then Real Red ink for the fill images. The candy cane and bow are punched out using the co-ordinating Candy Cane Builder Punch. To decorate the front of the small card, I punched attached a narrow strip of Old Olive card behind one long edge of a piece of the Under The Mistletoe Designer Series Paper.
  I stamped the Santa image from the Cookie Cutter Christmas stamp set onto Whisper White card using Memento Tuxedo Black ink and coloured the image using the Dark Real Red, Ivory and Light Smoky Slate Stampin’ Blends, as well as the Basic Black Stampin’ Write Marker. The image is cut out using one of the Layering Ovals Framelits Dies. The image panel is attached to an Old Olive scalloped oval cut using the same dies and then the card front using dimensionals. To decorate the inside of the card, I stamped the holly image from the Detailed Poinsettia stamp set using Memento Tuxedo Black ink. The image is coloured using the Dark Real Red and Dark Old Olive Stampin’ Blends.
Another card I am really happy with. What do you think?
Bye for now,
Kris
Product Used:


For my Grandchildren
When it comes to making cards for my grandchildren, I go the extra mile and make them something special. They love receiving cards from me and always like it when it “does something”, pop, slide, stand up! Anyway this year I created two each of three different cards. Today I will share the first one with you. This card has a base of Cherry Cobbler and uses the template which you can find under Fancy Fold card on my Free Tutorials Page. I cut four small pieces of Festive Farmhouse Designer Series Paper and attached them to the card base. I stamped the tree trunk image from the Winter Woods stamp set onto Whisper White card using Gray Granite ink.  I embossed the stamped pieces with the Corrugated Dynamic Embossing Folder, attached them to Gray Granite card and then the card base. I stamped the small branch image from the Winter Woods stamp set onto Whisper White card using Mossy Meadow ink several times. I stamped the pine cone image onto Whisper White card using Gray Granite card and cut them out using the co-ordinating In the Woods Framlites Die. The pine cone image is attached over the ends of the stamped branches.
  The stamped card is attached to Gray Granite card and then the card base. For the large panel on the right hand side of the card, I cut a piece of the Festive Farmhouse Designer Series paper and stamped “Christmas” from the Merry Christmas to All stamp set using Cherry Cobbler ink. I cut “Merry” from Cherry Cobbler card using the Merry Christmas Thinlits Dies.
 To decorate the front of the small folding card, I stamped the multiple tree image from the Winter Woods stamp set using Mossy Meadow ink. I stamped the single tree image twice onto Whisper White card using Mossy Meadow ink. I cut out one complete tree and then one detailed tree using the In the Woods Framelits Die. I attached the complete tree over the stamped trees and then attached the detailed tree over the top. To decorate the inside of the card, I stamped the small branch image using Mossy Meadow ink. I stamped and cut out one pine cone as before and attached it over the ends of the stamped branches.
I love the way this card turned out and I am sure so will the granddaughters who receive it.
Bye for now,
Kris
Product Used:


Framed Art – Last One
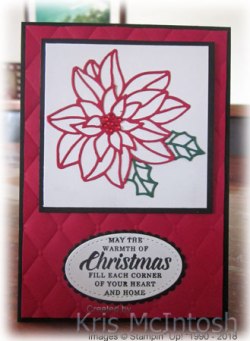
This card uses the last panel from the Framed Art piece for this year’s Christmas classes. You can get your copy of the free tutorial here. For this card, I embossed Real Red card using the Tufted Dynamic Embossing Folder before attaching it to scored and folded Basic Black card. I cut the detailed poinsettia image from Real Red card using the Detailed Poinsettia Thinlit Dies. I also cut the leaf image from the same dies from Shaded Spruce card. I trimmed the leaf into two smaller leaves and attached them to the back of the flower.  I trimmed away any of the leaf that showed in the wrong place. The flower/leaf is attached to Whisper White card card and then Basic Black card. The panel is attached to the card front using dimensionals. I stamped the greeting from the Timeless Tidings stamp set onto Whisper White card using Memento Tuxedo Black ink and cut it out using one of the ovals from the Stitched Shapes Framelits Dies.
  The greeting is attached to a Basic Black scalloped oval cut using the Layering Ovals Framelits Dies. The greeting is attached to the card front below the flower panel.
To decorate the inside of the card, I stamped the poinsettia flower from the Timeless Tidings stamp set onto the lower left hand corner of Whisper White card using Memento Tuxedo Black ink. The images is coloured using the Real Red Stampin’ Blends and the Dark Daffodil Delight Stampin’ Blends.
Well that’s the end of this series of cards. I hope you have enjoyed seeing how to use the panels from this Framed Art piece in a different way. Just to refresh your memory here is a photo of all six cards. Which one is your favourite?
Bye for now,
Kris
Product used:


