Freshly Made Sketch 351

Today I am sharing a a card I made using the sketch at Freshly Made and some new product from the soon to be released Holiday Catalogue. Firstly I embossed Whisper White card using the Tin Tile Dynamic Embossing Folder – such a gorgeous background. Before attaching it to scored and folded Mossy Meadow card, I sponged Mossy Meadow ink over the embossing to add a little more dimension.  I attached a strip of Blackberry Bliss card across the embossed panel. I stamped the flower image from the First Frost stamp set onto Whisper White card using Blackberry Bliss ink and cut it out using the co-ordinating Frosted Bouquet Framelits Dies. I also stamped the large floral/leaf image onto Whisper White card using Mint Macaron ink and cut it out using the co-ordinating Frosted Bouquet Framelits Dies. Lastly I cut one leaf image from Soft Sea Foam card using the same Framelits Dies.
  The images are attached, one on top of the other, to the card front. I stamped the greeting from the First Frost stamp set onto Whisper White card using Blackberry Bliss ink and fussy cut it before attaching to the card front.
To decorate the inside of the card, I stamped the large floral/leaf image onto the lower left hand corner of Whisper White card using Mint Macaron ink.
I think the First Frost stamp set will be a big hit when this catalogue is launched because the images can be used for Christmas but so many other occasions as well.
Bye for now,
Kris
Product Used:
I can’t share the links for the new product until the catalogue goes live in September.


Gorgeous Birthday
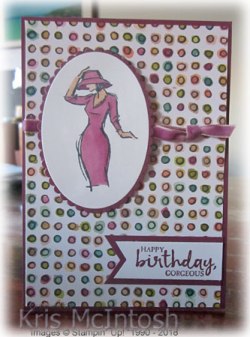
Here is another card using the Share What You Love Specialty Designer Series paper. I wrapped the Designer Series paper with the Rich Razzleberry 1/4″ Velvet Ribbon and tied a knot before attaching to scored and folded Rich Razzleberry card. I stamped the “happy birthday gorgeous” from the Beautiful You stamp set onto Whisper White card using Rich Razzleberry ink. I punched one short end using the Triple Banner Punch before attaching to Rich Razzleberry card, trimmed to match.  The banner is attached to the lower right hand corner of the card front. I stamped the focal image from the Beautiful You stamp set onto Whisper White card using Memento Tuxedo Black ink. I coloured the image using the Rich Razzleberry and Ivory Stampin’ Blends.
  I cut out the image using one of the Layering Oval Framelit Dies before attaching to a Rich Razzleberry scalloped oval cut using the same dies. The image is attached to the card front using dimensionals.
To decorate the inside of the card I stamped another of the greetings from the Beautiful You stamp set onto Whisper White card using Rich Razzleberry ink.
I am having fun using the template and the Love What You Do Specialty Designer Series Paper to create these cards, I have two more to share with you soon.
Bye for now,
Kris
Product Used:


Freshly Made Sketch #350
Today’s card uses this week’s sketch challenge at Freshly Made, for which, unfortunately, I missed the deadline. I find it a great source of inspiration if I am struggling to create to browse the many challenges on the net and find one that suits my purpose. For today’s card, I embossed Whisper White card using the Tufted Dynamic Embossing Folder. These folders give a wonderful deep and “dynamic” impression but you do need to learn how to use them properly. This video by Donna from the Training Team at Stampin’ Up! gives some great tips for using these folders.
Great tips aren’t they? If you haven’t tried spritzing with water, then you really must. The difference is quite amazing. Anyway, once I had embossed the folder I attached the Whisper White card to scored and folded Calypso Coral card.  I attached a piece of the Garden Impressions Designer Series paper across the embossed card. I stamped the flower from the Healing Hugs stamp set onto Whisper White card using Calypso Coral ink and cut it out. I stamped two sets of the leaves from the Healing Hugs stamp set onto Whisper White card using Soft Sea Foam ink and cut them out. I attached the leaves to the back of the flower before attaching the whole piece to the card front using dimensionals. I stamped the greeting from the Hand Delivered stamp set onto Soft Sea Foam card using Shaded Spruce ink and punched it out using the Classic Label Punch.
  The greeting is attached over the flower using mini dimensionals under the right hand edge.
To decorate the inside of the card, I embossed a narrow strip of Whisper White card using the Tufted Dynamic Embossing Folder. (You can probably see the difference in this piece to the card front, because I forgot to use my spritzer! I decided to use this piece anyway so you could see that it is worth taking the time to spritz with water before using these types of Embossing Folders.) I attached a narrow strip of Shaded Spruce card behind the embossed card, before attaching to Whisper White card.
I had fun creating this card, thanks Freshly Made for the inspiration.
Bye for now,
Kris
Product Used:


Live, Laugh Love

I love this saying from the Beautiful You stamp set and just had to use it on this card, created using the One Sheet Wonder template and left over pieces from the Share What You Love Specialty Designer Series paper. For this card, I punched a narrow strip of Basic Black card using the Decorative Ribbon Border Punch and attached it behind one long edge of the Share What You Love Specialty Designer Series Paper.  I attached the Designer Series Paper across the bottom of Whisper White card and stamped the greeting from the Beautiful You stamp set onto the top right hand corner of the Whisper White card using Memento Tuxedo Black ink. I stamped the image from the Beautiful You stamp set onto Whisper White card and coloured it using the Rich Razzleberry, Mint Macaron and Ivory Stampin’ Blends.
 The image is cut using one of the Layering Squares Framelits Dies and attached to a Basic Black scalloped square cut using the same dies. The image panel is attached to the card front using dimensionals.
To decorate the inside of the card, I attached a narrow strip of the same Share What You Love Designer Series Paper across the bottom of Whisper White card.
I have one more card using this template and the Beautiful You stamp set. I’ll share it soon.
Bye for now,
Kris
Product Used:


Day 2

Today’s scrapbook page is a pocket page using the Delightfully Detailed Memories and More cards. This page is all about Day 2 of our trip to Cooktown. We travelled from Emerald through Clermont and Balyando Crossing to Charters Towers. Not such a long day but it was nice to know when we arrived that the local Lions Club was running a dinner that night. No cooking for me! The train in Clermont with all the paintings is pretty special too. The paintings depict the history of the town and is definitely worth a stop. Unfortunately, we were on a tight schedule and didn’t have time to stay the night. I used some retired Stampin’ Up! dies to create the “Day 2” using Blackberry Bliss card. The saying comes from the Colourful Seasons stamp set. Pretty simple page but the pocket pages make it easy to document our holiday quickly and easily and they co-ordinate with 12″ x 12″ pages so well. S
Bye for now,
Kris
Product Used:


Congrats

Today’s card was inspired by one I saw on Pinterest with a few modifications. I cut the medium sized label framelit die from Whisper White card using the Stitched Seasons Framelits Dies. I embossed the outside panel using the Basket Weave Dynamic Embossing Folder and attached it to scored and folded Thick Whisper White card using dimensionals. I cut the smallest label from Whisper White card using the Stitched Seasons Framelits Dies.  I stamped “Congrats” from the Blended Seasons stamp set onto the label using Versamark ink, sprinkled it with Silver Embossing Powder and heat set it. I cut the bow from Silver Foil card using the Stitched Seasons Framelits Dies and attached it to the top of the stamped label. The label is attached to the card front inside the embossed panel also using dimensionals.
  I stamped the bell image from the Blended Seasons stamp set twice onto scrap Whisper White card using Versamark ink, sprinkled it with Silver Embossing Powder and heat set it. The bells are cut out using the co-ordinating die from the Stitched Seasons Framelits Dies. One bell is attached over the bow on the front of the card using Mini Dimensionals and the second one is attached to the inside of the card.
This card is really quite pretty and pretty simple to make. It was one of the cards we made at this months card class and everyone loved it. Don’t forget that this stamp set and the co-ordinating framelits dies are only available until the end of the month on a While Stocks Last basis, so don’t delay placing your order.
Bye for now,
Kris
Product Used:


Brighter Days
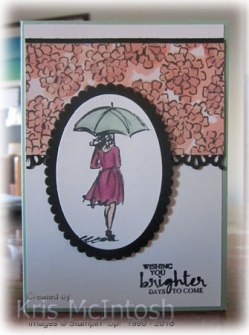
Continuing on with my cards created using a One Sheet Wonder template and assorted left-over pieces of Share What You Love Specialty Designer Series Paper, today’s card features the Beautiful You stamp set. I attached a narrow strip of Basic Black card behind one long edge of the the Share What You Love Specialty Designer Series paper. I punched a narrow strip of Basic Black card using the Decorative Ribbon Border Punch and attached it behind the other long edge of the Designer Series paper before attaching to Whisper White card. I stamped the greeting from the Beautiful You stamp set onto the lower right hand corner of the Whisper White card using Memento Tuxedo Black ink.  The whole panel is attached to scored and folded Mint Macaron card. I stamped the image from the Beautiful You stamp set onto Whisper White card and cut it out using one of the Layering Ovals Framelits Dies. I coloured the image using Rich Razzleberry, Mint Macaron and Ivory Stampin’ Blends before attaching to a Basic Black scalloped oval cut using the same Layering Dies.
  The image panel is attached to the card front using dimensionals.
To decorate the inside of the card, I punched a strip of basic Black card using the Decorative Ribbon Border Punch and attached it behind one long edge of a narrow strip of the same Share What You Love Designer Series Paper I used on the front of the card. The Designer Series Paper piece is attached to the bottom of Whisper White card.
I must admit that I love using the Stampin’ Blends and the Beautiful You stamp set has perfect images for colouring. I have several more of these cards to share with you over the coming weeks. I hope you enjoy them.
Bye for now,
Kris
Product Used:


Just Add Ink #421
Today’s card is loosely based on the sketch challenge at Just Add Ink this week. I have a friend who owns the Eastern Medallion Thinlits Dies and I like to find ideas for her to use them. I started by embossing a piece of Whisper White card using the Softly Falling Embossing Folder. The embossed card is attached to Real Red card and then to scored and folded Thick Whisper White card. I stamped “Merry Christmas” from the Star of Light stamp set onto a narrow strip of Whisper White card using Real Red ink. The greeting is attached to a strip of Real Red card and then the card front.  I cut the large medallion from Real Red card using the Eastern Medallion Thinlits Dies and a circle die from the Layering Circles Framelits Dies. I cut a smaller circle from Gold Glimmer Paper using the same Layering Circles Framelits Dies and attached it to the centre of the medallion. I cut two of the “flower” pieces from Real Red card. If you cut the piece it is still attached around the “centre”, a quick snip and it comes free. I used my bone folder to give the petals a little dimension and attached one flower on top of the other. The flower is attached to the centre of the Gold Glimmer paper.
  I punched a 1/2″ circle of Gold Glimmer Paper and attached it to the centre of the flower. The whole medallion is attached to the left hand side of the card front.
To decorate the inside of the card, I attached a narrow strip of Real Red card to one long edge of Whisper White card which I embossed using the Softly Falling Embossing Folder.
I think these two colours together the Red and the Gold make this card really Christmassy, even though the dies used are not really for Christmas, don’t you think?
Bye for now,
Kris
Product Used:


A Little Twist
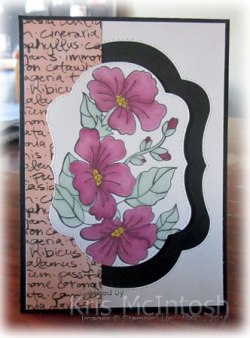
I love using One Sheet Wonder templates to create cards, however, this time instead of cutting one sheet of designer series paper, I decided to use the template (thanks Alison and Patsy) and some of the smaller pieces of the Share What You Love Designer Series Paper left over from other projects. This card uses one of those strips. I cut the label die from Whisper White card using the Stitched Seasons Framelits Dies. I attached the outside piece of the Whisper White card to scored and folded Basic Black card. I attached the Share What You Love Designer Series Paper to the left hand side of the Whisper White card. I stamped the floral image from the Blended Seasons stamp set onto Whisper White card using Memento Tuxedo Black ink. I coloured the image using Rich Razzleberry, Dark Daffodil Delight and Mint Macaron Stampin’ Blends. I cut the image using the medium label from the Stitched Seasons Framelits Dies and attached it to the centre of the card front using dimensionals.
 To decorate the inside of the card, I stamped the floral image from the Blended Seasons stamp set onto scrap Whisper White card using Memento Tuxedo Black ink, coloured it using the same Stampin’ Blends and cut out one flower and a couple of leaves. The flower and leaves are attached to the top right hand corner of Whisper White card.
Remember that the Blended Seasons stamp set and the Stitched Seasons Framelits Dies are only available for purchase until the 31st August – while stocks last. So don’t forget to place your order soon, so you won’t miss out. I will pop back with some of the other cards made using the pieces of Share What You Love Designer Series Paper using this template.
Bye for now,
Kris
Product Used:

Road Trip

My husband and I were lucky enough to take our two eldest granddaughters on a trip in our caravan to Cooktown during the last school holidays. We had an amazing time, saw lots and spent a lot of time together on our long travel days. I thought I should scrap these memories before I forgot all the details. Today’s pages show the title page and the first day of our trip.
The title page is pretty simple. I selected photos to show an overview of the trip and printed them 8 to a page. I am lucky enough to have an Epson Picturemate printer so I can easily print only the photos I want. I attached all of the photos to a piece of Basic Black card. I stamped “July 2018” onto Whisper White card using the retired Date It stamp set and Memento Tuxedo Black ink. The date is punched out using the Everyday Label Punch.  I punched Basic Black card using the same punch and attached it to the back of the stamped punch shape. The punched piece is attached to the back of the Basic Black card before attaching it to the Whisper White 12″ x 12″ page. I cut the letters for the title from Basic Black card using the retired Little Letters Thinlits Dies.
The second page depicts the first day of our trip. A really long drive from Brisbane to Emerald. We made two quick stops on the way one for morning tea at Gayndah and the second for lunch at Bileola. We arrived mid afternoon at Emerald and had a quick walk around town, the railway station being the most beautiful building we saw. The photos and journalling block are attached to a piece of Natures Poem Designer Series Paper before being attached to a Whisper White 12″ x 12″ page. I stamped the images from the Waterfront stamp set onto the lower right hand corner using Blackberry Bliss, Old Olive and Crumb Cake ink. Since most of Queensland is in drought it is hard to find too much really green grass. I cut the letters for “day” from Blackberry Bliss card using the Large Letters Thinlits Dies. The number “1” is cut from Basic Black card using the retired Large Numbers Framelits Dies. I also stamped the images from the retired Let’s Get Away stamp set onto the journaling card using Basic Black ink.
Creating these two pages brought back lots of great memories, I can’t wait to create more pages from our holiday.
Bye for now,
Kris
Product Used:


