More Fish

Here is another card I made using the All The Good Things stamp set. The layout is similar to the card I shared with you yesterday but I changed the orientation. I stamped the bokeh background from the Bokeh Dots stamp set onto Whisper White card using Balmy blue ink. I stamped the greeting from the All The Good Things stamp set over the top using Memento Tuxedo Black ink. I cut an oval from another piece of Whisper White card using the Layering Ovals Dies and attached the two Whisper White cards together so that the greeting showed through the oval cut out.  I attached the Whisper White panel to Balmy Blue card and then scored and folded Night of Navy card. I stamped two of the small fish from the All Good Things stamp set onto Whisper White card using Night of Navy ink and cut them out.
  The fish are attached around the oval cut out using Tombow Multi-purpose Glue on the outside of the images only.
To decorate the inside of the card I stamped one small fish onto the top left and bottom right hand corners of Whisper White card using Night of Navy ink. I also stamped the greeting from the All The Good Things stamp set onto the centre of the card using Night of Navy ink.
I think I like this version of the card better, mostly because I think it is better aligned with the greeting centred within the oval cut out. What do you think?
Bye for now,
Kris
Product Used:


All The Good Things

Today I am sharing a card with you that I made using the All The Good Things stamp set from the Annual Catalogue. This is a Distinktive stamp and gives you lots of detail and colour variation using just one ink. I stamped one of the background stamps from the Bokeh Dots stamp set onto Whisper White card using Balmy Blue ink. The Bokeh Dots stamp set is also a Distinktive stamp and you can see the variation and depth of colour that this stamp has created. I stamped the greeting from the All The Good Things stamp set over the top of the bokeh background using Memento Tuxedo Black ink.  I cut an oval from another piece of Whisper White card using the Layering Ovals Framelits Dies and placed this over the stamped Whisper White card using dimensionals before attaching the whole panel to scored and folded Balmy Blue card. I stamped the large fish image from the All The Good Things stamp set twice onto Whisper White card using Basic Gray ink and cut them out. I attached the fish around the outside of the oval using Tombow Multipurpose Glue on the outside of each image only.
 To decorate the inside of the card, I stamped the fish once more onto the right hand side of Whisper White card. The tricky thing about this large fish is that the greeting which I used on this card and the large fish is one stamp. To ink only the fish I used a sponge dauber so that I could control where I placed the ink. This was not so important for the image I cut out but for the image on the inside of the card, I didn’t want any of the greeting to show.
I hope you like my first attempt using this stamp set. I really love the Distinktive style of stamps and hope that we get more in our Holiday Catalogue.
Bye for now,
Kris
Product Used:


Magical Mermaids

I recently bought the Magical Mermaid stamp set because I think it has some amazing possibilities. Today is the first time it has been inked. I started by embossing Shaded Spruce card using the Seaside Embossing Folder. The embossed card is attached to scored and folded Thick Whisper White. I stamped the Marbled Background onto Whisper White card using Soft Sea Foam ink. I stamped the seaweed image from the Magical Mermaid stamp set over the top of the Marbled Background using Shaded Spruce ink. The greeting from the Magical Mermaid stamp set is stamped using Memento Tuxedo Black ink.  I stamped the mermaid image onto Whisper White card using Memento Tuxedo Black ink and coloured it using Stampin’ Blends – Light and Dark Rich Razzleberry, Dark Daffodil Delight, Bronze and Ivory. I cut out the mermaid and attached her over the stamping.
  The Whisper White card is attached to Soft Sea Foam card and then the card front.
To decorate the inside of the card, I stamped the small mermaid image from the Magical Mermaid stamp set using Memento Tuxedo Black ink onto the lower left hand corner of Whisper White card. I stamped the seaweed image multiple times, some without re-inking, across the bottom of the Whisper White card using Shaded Spruce ink.
I am pretty happy with the way this card turned out, but would love to know what you think.
Bye for now,
Kris
Product Used:


Blended Seasons
 My card today is created using a stamp set which is going to be released during the month of August. The promotion includes the Blended Seasons stamp set and Stitched Seasons Framelits Dies and a selection of 10 new Watercolour Pencils in some gorgeous colours which will be a great addition to the ones we already have. I am a little late sharing this with you and you may have already seen the promotion elsewhere but I didn’t want to share too early. I will probably pop in over the next week or so with some other creations using the stamp set and framelits dies.
The stamp set is truly versatile with images and sentiments to cover many occasions. Also available during the promotion period is a set of 10 Watercolour Pencils in some of the gorgeous new colours released in this year’s annual catalogue. There is a possibility (but not confirmed) that these markers may be available in a future catalogue.
 Anyway today I decided to case one of the cards in the flyer below. I embossed Whisper White card using the Softly Falling Embossing folder, before attaching a piece of Under the Mistletoe Designer Series Paper across the bottom half (This Designer Series Paper is available this month as part of the Buy 3 get one Free Designer Series paper promotion). I wrapped the top of the designer series paper with a length of Gold 3/8″ Metallic Edge Ribbon and attached the whole panel to scored and folded Real Red card. To create the focal piece I used my Stamparatus. I cut out one of the label dies from Whisper White card using the Stitched Seasons Framelits Dies. I placed the outside piece into the Stamparatus and then lined up the holly image so that it fitted into the top part of the label. I placed the label die inside the frame and stamped the holly image using Memento Tuxedo Black ink. I removed the label, rotated it 180 degrees and placed it back into the template and stamped the holly image once more.
  This gives me an image at the top and the bottom of the label piece which are both perfectly aligned and completely symmetrical. Gotta love your Stamparatus! I coloured the holly image using Stampin’ Blends – Light and Dark Old Olive, Dark Daffodil Delight and Dark Cherry Cobbler. The label is attached to the card front using dimensionals. I stamped the greeting from the Blended Seasons stamp set onto Real Red card using Memento Tuxedo Black ink, punched the ends using the Triple Banner Punch and attached it to the label between the stamped images. I cut out two sets of leaves from Old Olive card and two sets of leaves from Gold Foil using the die from the Stitched Seasons Framelits Dies. I actually cut the leaves into two pieces and attached the pieces behind the top right and lower left corners of the labels.
To decorate the inside of the card I attached a narrow strip of the same Under the Mistletoe Designer Series Paper across the bottom of Whisper White card.

Well, what do you think? Personally I am in love with the way this card turned out. I can’t wait to share another creation using the Blended Seasons stamp set and co-ordinating Stitched Seasons Framelits Dies.
Don’t forget you can only purchase the stamp set and co-ordinating dies from the 1-31st August. You can purchase them as a bundle or individually. Once they finish on the 31st August, they will no longer be available.
Bye for now,
Kris
Product Used:


Elyssa

I am slowly working my way through the photos from my loungeroom wall – I have two to go. Today’s photo showcases my granddaughter Elyssa. I think I am blessed to have such gorgeous grandchildren. I found a similar layout somewhere on the internet using different designer series paper and thought that I would adapt it to suit my photo. If you recognise this layout as your own please let me know so that I can give you credit.  I cut the Share What you Love Specialty Designer Series paper into 3″ squares and attached them to the Basic Black card. I attached my photo to Basic Black card before attaching it over the Designer Series Paper.
 I cut my title from Petal Pink card using the retired Little Letters Thinlits Dies. I cut various leaves and flowers from the Share What you Love Specialty Designer Series Paper and attached them to the top right hand corner. I also cut a smaller piece to add to the corner of the photo.
I am absolutely loving creating these pages. I get to look at the photos on the wall every day and when they are replaced I can look at the ones I have scrapped. Lucky me.
I’d love to know what you think.
Bye for now,
Kris
Product Used:


Simple Masking
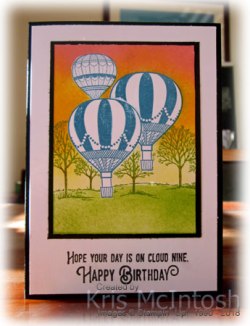
One of the techniques for this months class is Simple Masking. I love how you can create depth on your cards by simply masking an image and stamping partially over the top. Well we took the technique a little further and created a great card using the Lift Me Up stamp set. Firstly we stamped the greeting from the Lift Me Up stamp set onto Whisper White card using Memento Tuxedo Black ink. We attached the stamped card to scored and folded Basic Black card. To create the focal image piece we started by stamping the large balloon from the Lift Me Up stamp set onto Whisper White card using Pacific Point ink. We covered the image using a post-it-note mask and stamped the second large balloon using the same ink.  Leaving the first mask in place we covered the second balloon with a post-it-note mask and stamped the small balloon using Pacific Point ink. We covered the small balloon with a post-it-note mask and stamped the trees from the Lovely As a Tree stamp set using Granny Apple Green ink. Leaving all of the masks in place we added a mask to cover the balloons and sky from the tree line up. The bottom part of the card is sponged with Granny Apple Green ink. Removing the mask that covers from the tree line up, we then added a mask to cover the area where we sponged the Granny Apple Green ink. This time we sponged Daffodil Delight ink at the base of the trees, followed by Mango Melody ink and lastly Flirty Flamingo ink. Once we removed all of the masks we were left with a fantastic scene of hot air balloons on a gorgeous sky-line.
  The image panel is attached to Basic Black card before being attached to the card front.
To decorate the inside of the card, we stamped a small balloon onto the lower left hand corner using Pacific Point ink and covered it with a post-it-note mask. We stamped another small balloon and covered it with a post-it-note mask before stamping the third balloon.
I love the way this technique works. Every time you mask an image and stamp the image is one layer behind. In this case we were able to create three background layers before adding the colour to the ground and sky. One tip I will give you is that when I cut out my masks, I cut on the inside of the outside line of the image. This leaves enough gap so that if you stamp carefully and give a little extra pressure along the edge of the post-it-note mask you are not left with a “gap” between the images.
The ladies in yesterday’s class loved this technique and I hope I have inspired you to get busy with some masks on your creations.
Bye for now,
Kris
Product Used:


In{k}spire Me Challenge 359
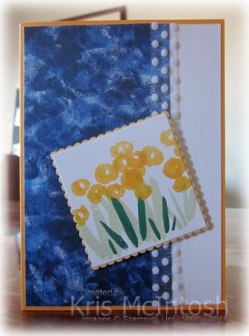
Today I am playing along with the challenge at In{k}spire Me. I took advantage of the buy 3 get one free Promotion this month to purchase the Garden Impressions 6″ x 6″ Designer Series Paper and the sketch gave me an opportunity to use some. I embossed Whisper White card using the Subtle Dynamic Impressions Embossing Folder. This folder isn’t one that is going to jump off the page at you but it just takes the flat look off the Whisper White card. I attached a piece of the Garden Impressions Designer Series paper to the left hand side of the embossed card and wrapped the join with the Whisper White 5/8″ Polka Dot Tulle Ribbon.  The panel is attached to scored and folded Mango Melody card. I stamped the stem images from the Abstract Impressions stamp set firstly using Soft Sea Foam ink and then the second image using Shaded Spruce ink. I stamped the solid flower heads using Mango Melody ink and stamped the detailed flower head image over the top using the same ink.
  This gives a subtle difference in the texture of the flowers. I cut out the image using one of the Layering Squares Framelits Dies and attached it to a So Saffron scalloped square cut using the same dies. The image panel is attached to the card front using dimensionals.
To decorate the inside of the card I stamped the flower stem images once more using Soft Sea Foam and Shaded Spruce inks. The flowers are again stamped using Mango Melody ink.
I am loving using this stamp set. I don’t have to be precise and line everything up to create the images and every time, they look gorgeous. Have you tried this stamp set yet? I hope I have inspired you to take another look.
Don’t forget to take advantage of the buy 3 get one free promotion this month and stock up on your favourite designer series papers.
Bye for now,
Kris
Product Used:


Babywipe Technique

Today’s card is one that we will be making in class this month. We are going to be learning some more techniques and this card uses the Babywipe Technique, which, I don’t think I have every done before! To do this technique you need a plain baby wipe, one that doesn’t have any image imprint and a few Classic Stamp Refills of your choice.
I started by cutting Crushed Curry card using the Detailed Floral Thinlit Dies. I attached the die cut panel to the front of scored and folded Thick Whisper White card. I stamped the greeting from the Floral Phrases stamp set onto the lower right hand corner of the card front using Garden Green ink.  I placed my babywipe inside one of the Clear Mount Stamp cases that Stampin’ Up! sells and added Pumpkin Pie, Crushed Curry and Garden Green Classic Stamp Refills to the babywipe. I inked the beautiful flower from the Floral Phrases stamp set and stamped onto Whisper White Card. I cleaned the stamp and re-inked and stamped again. I rotated the stamp so that it kind of forms a circle. I cut the image using one of the Layering Circle Framelits Dies and attached it to a Crushed Curry scalloped circle cut using the same dies. The image panel is attached to the card front using dimensionals.
 To decorate the inside of the card, I used a post it note to mask the top left hand edge of the card and stamped the border image which I inked from the baby wipe. I love this technique and I am very happy with the way the ink transferred from the babywipe to the stamp and then the card. I believe that I could re-use this baby wipe a number of times, with each image getting every so slightly lighter.
What do you think? Have you tried this technique. Maybe you would like to attend this class, please visit my Classes and Workshop page to get the details and let me know as soon as possible if you would like to attend as space is limited.
Bye for now,
Kris
Product Used:


New Demonstrator Promotion
I have already shared with you the fabulous promotion for new demonstrators who sign up during the month of July. However, Stampin’ Up! have released this fun video and I thought I would share it with you.
If you would like to join as part of my team please contact me so that we can discuss your situation. I promise you will never be sorry you have joined. You get an instant discount on your orders and you get the support of your fellow demonstrators and an amazing company. You can also work towards earning a free holiday each year. This year Stampin’ Up! is taking eligible demonstrators on an all expenses paid holiday to Alaska. Imagine that!
Bye for now,
Kris
Noah

Today’s page showcases a photo of my other grandson Noah. Another gorgeous photo which decorates my lounge room wall. Isn’t that smile just gorgeous? Recently Jessica Taylor shared some colours that she uses to create a rainbow effect and I thought these colours were perfect for a “boy” layout. I cut strips of card 6″ x 2-1/4″ or 2-1/2″ strips to cover the top half of my 12″ x 12″ Whisper White page.  The colours are Pool Party, Coastal Cabana, Bermuda Bay, Pacific Point and Blueberry Bushel which creates a rather beautiful rainbow effect, don’t you think? Each piece of card is embossed using the Basics Polka Dot Embossing Folder before they are attached to the Whisper White card.
 I attached a strip of Blueberry Bushel card across the bottom of the cardstock pieces to create a border. I attached a Blueberry Bushel cardstock mat to the photo before attaching it to the page. I stamped the Playful Backgrounds stamp set to decorate the right hand side of the page using Pacific Point ink. I cut the letters for the title from Blueberry Bushel card using the Large Alphabet Dies. I added the date using the one of the Journaling Pens. Another simple page, but I do love the combination of colours with the black and white photo. A big thank you to Jessica for the colour inspiration. I’d love to know what you think.
Bye for now,
Kris
Product Used:


