No Memory Keeping
Today is the day in the week I usually try to share some of my Memory Keeping. Unfortunately I haven’t had a chance to do any for a little while and so I do not have a page to share today. However I would like to share with you some more information on the next Annual Catalogue. I have already shared the retired lists with you but I thought that I would touch on the Colour Revamp that will take place with the new catalogue. We will be losing 13 colours from the existing colour families as well as four of this year’s retiring In-Colours. However, we have six returning In-colours including Flirty Flamingo and ten new colours.
So here are the retiring colours –

And here are the new colour families –

As you can see we now have a Basics Family which includes Whisper White, Very Vanilla and Basic Black as well as the Neutrals, Brights, Subtles and Regals. Some colours have shifted family groups but I have to say I love the new colour combinations and have been very busy relocating and clearing out anything that will be retiring, so that I can focus on using it up before the end of May.
You may have already heard that with the colour revamp we are also getting a new style ink pad. These pads are slightly thinner and shorter than the old pads but are much easier to open and they are designed to stack, so they will save space (and you know we all need more space!). As well as changing the ink pad design, Stampin’ Up! have reformulated the ink so that it contains an antifoam agent to help stop the problem of uneven stamping if your ink pad is new and very juicy.
I can’t wait until I can share more about what’s new over the coming weeks. Stay tuned for a real bargain coming your way on the 1st May. I look forward to sharing that with you soon. While I am here, just a quick reminder that most of the items on the retired list are while stocks last, so don’t delay if there is something that you want/need from the current catalogues, I would hate you to miss out.
Bye for now,
Kris
Technique Class

Today is the first of my classes this month and we are learning techniques. I thought I would share a very quick card we made using the split negative technique. I attached two pieces of Pick a Pattern Washi Tape across the front of scored Thick Whisper White. I stamped the greeting from the Thoughts and Prayers stamp set onto the lower right hand corner using Memento Tuxedo Black ink. I decided to use the table image from the Mediterranean Moments stamp set. I had been thinking about this technique for a while and once I saw the Stamparatus in action I knew it would be perfect for this technique.  I cut a circle the size I wanted to stamp on from scrap card using one of the Layering Circle Framelit Dies and placed the template onto the Stamparatus. I lined up the image I wanted to stamp and attached it to one of the windows. I cut a Whisper White and a Basic Black circle the same size. I placed the Whisper White circle onto my template, inked the image with Memento Tuxedo Black ink and stamped onto the Whisper White card.
  I removed the Whisper White circle and replaced it with the Basic Black circle. I cleaned the stamp and this time stamped the image using Versamark. I sprinkled the image with White Embossing Powder and heat set it. I lined up the images on my Stampin’ Trimmer and cut them in half. I attached one half of the Whisper White image to a Basic Black scalloped circle and then added one half of the Basic Black image. This looks so stunning and is so simple to create.
To decorate the inside of the card, I attached two strips of the same Washi Tape across the bottom of the card.
I absolutely love this card and love this technique, have you tried it? It really is quite simple, especially using the Stamparatus. A word of warning if you love the sentiment on this card, then you need to check out the Last Chance products here because unfortunately this stamp set won’t be in the next catalogue.
Bye for now,
Kris
Product Used:


A Birthday with Flourish

A very talented Aussie demo, Lynda Shrimpton, shared a gorgeous card on a Demonstrator only Facebook page I belong to. This is my version of her beautiful card. I cut the large flourish from the Flourish Thinlits Dies from Whisper White card and attached to Whisper White card. The panel is attached to scored and folded Sweet Sugarplum card. I cut two squares, one from Whisper White card and one from Smoky Slate card using the Stitched Shapes Framelits Dies. I cut the centre from the Smoky Slate square using one of the squares from the Layering Squares Framelits Dies and attached it on top of the Whisper White square. The panel is attached to the card front using dimensionals. I stamped the large flower from the Flourishing Phrases stamp set onto Whisper White card twice using Sweet Sugarplum ink and once using Powder Pink card. I cut out the flowers, the whole flower from Sweet Sugarplum, the middle from the Powder Pink flower and the very centre from the second Sweet Sugarplum flower. I attached the flowers one on top of the other using dimensionals and then to the card front, inside the Smoky slate frame also using dimensionals.
  I cut two leaves from Emerald Envy card using the Flourish Thinlits Dies. The leaves are attached behind the flower. Lastly I added a medium Basic Pearl to the centre of the flower.
To decorate the inside of the card, I cut the small flourish from Whisper White card. The image is attached to Whisper White card and the greeting from the Picture Pefect Party stamp set is stamped next to the die cut using Sweet Sugarplum ink.
This card is for my very lovely upline Stephanie who celebrated her birthday recently.
Bye for now,
Kris
Product Used:


Thank You

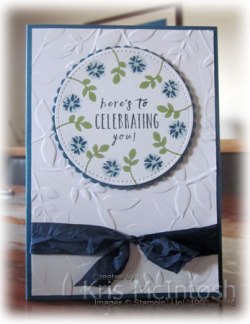
While I was playing with the Stamparatus and creating wreaths, I thought I would try something slightly different. I embossed Whisper White card using the Petal Burst Embossing Folder and attached it to scored and folded Pool Party card. I used the template I created following Ruth’s video instructions. This time I used the Daisy Delight stamp set. I stamped the solid flower using Pool Party ink but instead of stamping the whole 8 images, I stamped three, missed one and then stamped another three.  The detailed flower is stamped over the solid flowers using Dapper Denim ink. I cut the image using a circle from the Stitched Shapes Framelits Dies and attached it to a Pool Party scalloped circle cut usng the Layering Circle Framelits Dies. The panel is attached to the card front using dimensionals. I stamped “thank you” from the Daisy Delight stamp set onto Whisper White card using Dapper Denim ink. I punched each end of the Whisper White card using the Triple Banner Punch. The banner is attached to Dapper Denim card and the ends trimmed to match the Whisper White banner. The greeting is attached to the card front using dimensionals under each end.
 To decorate the inside of the card, I stamped the stem image onto the lower left hand corner of Whisper White card using Old Olive ink. The flower was stamped in the same manner as the ones on the card front.
How versatile is this tool going to be? My stamping is maybe a little off, so I am thinking of adding a couple of circle images to my template to help me line them up a little better.
Bye for now,
Kris
Product Used:


Hostess Set

We are nearing the end of this Annual Catalogue and already getting excited for the next one but I must take a moment to say that I will miss the Tranquil Tulips stamp set which is a Hostess only stamp set from the 2017-2018 Annual Catalogue. Since this is a two step stamp set, I decided to use my Stamparatus to stamp the images. I also wanted to focus on the In-colours which will be retiring with the end of the catalogue this year.  Such pretty colours and using the Stamparatus made it so easy for me to complete the same card in each of the colours. I cut Whisper White card 6.5cm wide and the length of the card front. I placed each of the pieces into the Stamparatus and stamped the three stem image using Emerald Envy ink. I was able to place the three “leaf” images onto the other window and stamp them using Emerald Envy ink. I cleaned and removed the leaf and stem images and placed the flower images onto the stamping windows.
  Since I have four faces, I was able to position the first image and second images of the large and small flower and then just change out the colours to stamp the flowers in Dapper Denim, Flirty Flamingo, Sweet Sugarplum and Peekaboo Peach ink. I removed the large flower images and replaced them with the flower centres, which I was able to stamp at the same time using Early Espresso ink. While the small flower images were still in place, I stamped the small flower once more in each colour and added the flower centre so they could be cut out by hand and attached to the card front using dimensionals.
  I stamped the greeting from the Best Birds stamp set onto a strip of Whisper White card using each of the same colours used for the flowers. It’s easy to do this because you can lift the window and move it down one notch or two so that the images are spaced evenly with enough room to use one of the Layering Oval Framelits Dies to cut them out. Each of the greetings is attached to co-ordinating cardstock cut using one of the scalloped ovals from the same set of dies.
To assemble the cards, I attached the stamped image panel to co-ordinating cardstock and then scored and folded Thick Whisper White. The small hand cut flower is attached using dimensionals as is the greeting panel.
 To decorate the inside of the card, I used two designs, the first one in Dapper Denim, shows the small flower from the Tranquil Tulip stamp set, with the small detail flower stamped over the top. The two leaf images are designed to be stamped on top of each other but I decided to use them as separate images and stamp around the flower. To create this design you need to lift the hinge and move it one notch and re-stamp. For the decoration on the Flirty Flamingo card, I didn’t use the Stamparatus but simply stamped a portion of the three leaf image and some of the single leaves in Emerald Envy ink. I stamped the solid and detailed flower images using Flirty Flamingo ink.
I have to tell you, the more I use the Stamparatus, the more in love I become. If you are still undecided, a search on You Tube will find lots of ideas for getting the most from this amazing tool. If you haven’t already purchase one, they will be available when the next Annual Catalogue goes live in June. However, you need to remember that if you love these colours as much as I do, then you need to get in quick and order the cardstock, ink and also the ink refills before they sell out.
Bye for now,
Kris
Product Used:


Brothers & Sisters
 Here is my Memory Keeping page for this week. This page documents a photo of my Great Grandparents along with his brothers and Sister. The photo is not great quality but it is a fantastic thing to have a wonderful photo of so many family members. The photo was taken in 1923 when my grandmother was 16.
I used the gorgeous brick wall Pattern Party Decorative Mask to create a background across the top of 12″ x 12″ Very Vanilla card. I used the Shimmery White Embossing Paste and boy does it shine. Once the embossing paste was dry, I used a very light touch to add some Crumb Cake ink across the embossing. I cut a piece of Daffodil Delight card using an old Stampin’ Up! Bigz Die and embossed it using the Basic Polka Dot Embossing Folder. I attached a piece of Delightful Daisy Designer Series paper across the bottom of the page.  I punched a strip of Calypso Coral card using the Decorative Ribbon Border Punch which of course is only A4 length, so I cut it in half and attached it across the top of the designer series paper. I attached my photo to a piece of Tranquil Tide card , leaving enough room to add the description of the families below it. I cut two hearts from the same Designer Series Paper pack and attached them, the green striped heart is on dimensionals. The printing was all done on my computer and cut into strips and attached to the top of the page. The title has one end punched using the Triple Banner Punch. I am loving how these pages are all coming together and that my children and grandchildren are gaining some insight into their ancestors. It probably helps that my Dad lives close by, and so it is easy to relate that this is Dad’s Grandfather and family.
I hope you have a wonderful weekend and that you get some Memory Keeping done yourself.
Bye for now,
Kris
Product Used:


Wreath stamping
Sometimes when searching on the net, Pinterest or just a google search, you will see beautiful wreath style cards, which are so perfectly aligned it is amazing. Well I found a You Tube video by Ruth from Artful stamping which shows you how to create a template and her second video shows you how to use the template to get this kind of stamping perfect every time. I’m also using a much neglected stamp set called Lovely Friends. I created my template following her instructions and cut some Whisper White card into squares and started experimenting.  I embossed Whisper White card using the Layering Leaves Embossing Folder and wrapped it with a length of Dapper Denim 5/8″ Crinkled Seam Binding which I tied in a knot. The embossed card is attached to scored and folded Dapper Denim card.
 I used an 8cm square piece of Whisper White card and stamped the small leaf image from the Lovely Friends stamp set using Old Olive ink. I stamped the solid small flower from the same stamp set using Pool Party ink and the detailed small flower over the top of the solid image using Dapper Denim ink. I stamped the greeting from the Perennial Birthday stamp set into the centre of the image using Memento Tuxedo Black ink. I cut the image using the largest circle from the Stitched Shapes Framelits Dies and attached it to a Dapper Denim scalloped oval cut using the Layering Circles Framelits Dies.
  The image panel is attached to the card front using dimensionals.
To decorate the inside of the card, I stamped the leaf and flower image across the bottom of Whisper White card using the same inks. By stamping once and then lifting and moving the Stamparatus window one notch and stamping again you get the images spaced perfectly and in a perfect line. You do need to be careful that you are not moving the card you are stamping on, because it won’t line up properly if you do (as you can see by these images).
The second card is created in the same manner but uses Sweet Sugarplum, Perfect Plum and Emerald Green inks. It has a card base of Emerald Envy and uses Emerald Envy 5/8″ Crinkled Seam Binding.
Can you tell, I am loving using the Stamparatus.
Bye for now,
Kris
Product Used:


Black Ice and Copper

This card once more uses the Black Ice technique but this time I have used Copper Foil. I dragged the Basic Black Archival ink over the Copper Foil and then stamped the image from the Butterfly Basics stamp set using the same ink. The panel is covered with Versamark ink and Clear Embossing Powder which is heat set. I wrapped the panel with the Copper Trim and tied a knot before attaching the Copper Foil to Basic Black card. The panel is attached to Thick Whisper White card. I stamped the greeting from the Butterfly Basics stamp set onto Whisper White card using Memento Tuxedo Black ink and cut it out using one of the Layering Ovals Framelits Dies.
  The greeting is attached to a Basic Black scalloped oval cut using the same dies and attached to the card front using dimensionals.
To decorate the inside of the card, I stamped part of the floral image onto the lower left hand corner using Memento Tuxedo Black ink.
So simple but really pretty.
Bye for now,
Kris
Product Used:


Retiring Lists
Yesterday Stampin’ Up! released the list of what is retiring from the Annual Catalogue and also from the Occasions Catalogue. Some of these products will be already marked as low inventory. Sooo, please check out the lists and make sure that you place your orders as soon as you can to ensure that you do not miss out on something you want/need.
Download the retiring list for the 2017-2018 Annual Catalogue here.
Download the retiring list for the Occasions Catalogue here.
Happy Shopping
Bye for now,
Kris
Beautiful Black Ice

I wanted to make a card using the Black Ice technique but I didn’t want the whole card to feel dark and heavy. I stamped the the greeting from the Beautiful You stamp set lower right hand corner of Whisper White card using Memento Tuxedo Black ink. I embossed the stamped card using the Softly Falling Embossing Folder and attached it to scored and folded Peekaboo Peach card.  I punched two strips of Peekaboo Peach card using the Decorative Ribbon Border Punch and attached them to each side of a piece of Painted Autumn Designer Series paper (retired). The panel is attached to the left hand side of the embossed card. I attached each piece of punched card with a different edge showing and now that I look at the photo, I think I should have had the decorative edge showing on the left hand side. I cut a piece of Silver Foil card and following the technique instructions, dragged the Basic Black Archival Ink over the card. I stamped the image from Beautiful You using the same ink and used the Heat tool to set the ink. I ran the Versamark ink down the card and sprinkled with Clear Embossing Powder before heat setting.
 The image panel is attached to Basic Black card and then the card front using dimensionals.
To decorate the inside of the card, I punched a strip of Peekaboo Peach card using the Decorative Ribbon Border Punch. The punched strip is attached behind one long edge of the same Painted Autumn Designer Series Paper before being attached to the bottom of Whisper White card.
I love how this image looks with the Peekaboo Peach and Whisper White card don’t you.
Bye for now,
Kris
Product Used:


