Brusho Kits

Remember this card I shared with you recently, well this is one that we made at my Beachmere Classes and once more I had a few kits left over, which I wanted to use up. This time I did some experimenting with Brusho which I am falling in love with. The first card uses exactly the same layout as before except I embossed the background using the Stripes Embossing Folder. The Daffodil Delight card is once more punched using the Decorative Ribbon Border Punch and all the panels are attached in the same way.  I stamped the greeting from the Beautiful Day stamp set onto the banner using Pumpkin Pie ink and sponged the edges lightly using the same ink. I inked the flower from the You’ve Got This stamp set using Versamark and then Basic Black Archival ink and stamped onto Shimmer Paper. I sprinkled the image with Clear Embossing Powder and heat set. To colour the image I didn’t want to just sprinkle Brusho crystals over the image, so I sprinkled a small amount of Yellow Brusho onto a clear block and used the Aqua Painter to mix the crystals, then I picked up the colour on the Aqua Painter and painted the flower all over. I cleaned the block, added some Gambouge Brusho crystals and painted them onto the image. Lastly I did the same thing with Brilliant Red Brusho, but I didn’t use a lot of crystal and made the colour very light. This method let me control where the colour went and how finished flower looked.
  The leaves were coloured in the same way using Moss Green Brusho. I cut out the flower and also the extra leaves, which I attached behind the base of the flower. The image is attached to the card front using dimensionals. To decorate the inside of the card, I punched Daffodil Delight card using the Decorative Ribbon Border Punch. The punched piece is attached behind one long edge of Whisper White card embossed using the Stripes Embossing Folder. The panel is attached to the bottom of Whisper White card.
This card is bright and cheerful and the orange tones of the flower co-ordinate perfectly with the Daffodil Delight card, don’t you think. I have one more card using up these kits, I will share with you next time.
Bye for now,
Kris
Product Used:


It’s finally here
My Stamparatus arrived on Monday and I was so excited to be able to try it out. I had a bit of fun creating a simple card, which I had seen on the net somewhere. It also gave me a chance to use the Epic Celebration stamp set which unfortunately is no longer available. I am sorry I didn’t share these earlier, but thought that you would like to see them anyway. Before I started using the Stamparatus I watched this video from Stampin’ Up!.
After watching the video I placed my card into the corner of the stamparatus and placed the “happy birthday” stamp from the Perennial Birthday stamp set onto the card and closed the lid. For the pink card I stamped the first “happy birthday” using Pink Pirouette ink. I stamped the second greeting using the same ink but this time I re-inked and stamped over the image once more. The stamparatus makes this so easy. You don’t have to worry about the stamp moving, it is always perfectly aligned.
  I stamped the third greeting using Sweet Sugarplum ink and the fourth greeting uses the same ink stamped twice. The last greeting is Melon Mambo ink. The panel is attached to scored and folded Melon Mambo card. I stamped the shoe image from the Epic Celebration stamp set onto Whisper White card using Basic Black Archival ink. I coloured the image using a Melon Mambo Stampin’ Write Marker and cut it out. The image is attached to a circle of Whisper White card cut using one of the Stitched Shapes Framelits Dies. I attached the image to a Melon Mambo scalloped oval cut using the Layering Circles Framelits Dies before attaching to the card front using dimensionals.
To decorate the inside of the card, I stamped “here’s to an epic celebration” from the Epic Celebration stamp set onto Whisper White card using Melon Mambo ink.
The blue card uses Pool Party, Marina Mist and Dapper Denim ink. The image is coloured using an Island Indigo Stampin’ Write Marker and the scalloped circle and the card base are Island Indigo card. The inside of the card is decorated in the same way as the pink card.
Oh, I know this is going to be so useful in my crafting. Of course, it would be extra-fantastic if you are stamping multiples of the same image. I will spend a little more time getting to know this Stamparatus and share some more ideas with you soon.
Bye for now,
Kris
Product Used:


Cousins

This is another of the photos that my Mum and Dad gave me to start documenting our family history. It’s a photo of myself with my sisters and my cousins. We are standing in front of our grandparents Holden station wagon. Unfortunately I don’t know exactly when this was taken but judging by my youngest sister, I would estimate that I am around 8 years old in this photo. To decorate the Whisper White 12″ x 12″ card, I used one of the Sweet Soiree Decorative Masks and Shimmery White Embossing Paste to decorate across the top of the page.  I attached two 3″ x 4″ cards from the Sweet Soiree Memories and More card pack to the left hand side of the page. I also attached two of the 6″ x 4″ cards from the same Memories and More card pack to the right hand side of the page. This Sweet Soiree Memories and More Card pack will not be available after today (Sale-A-Bration ends today). I attached my photo to Sahara Sand card and then placed it over the Memories and More cards. I cut the title from Sahara Sand card using the Timeless Type Alphabet Dies (retired) and attached the letters below the 6″ x 4″ cards. I wrote my journalling onto the top 6″ x 4″ Memories and More card. I don’t think you can see it in the photos but the embossing paste is so sparkly and really adds to the dimension on the page.
Bye for now,
Kris
Product Used:


Happy Birthday Ava

My youngest granddaughter is celebrating her 8th birthday tomorrow. I wanted to create something a little different for her so I used the instructions at Splitcoaststampers to create this Screen Divider card. I love the gorgeous Picture Perfect Designer Series paper so of course I had to use it on this special card.  I cut Thick Whisper White card following the directions and then used the heart border from the Mini Treat Bag Thinlits Dies to cut all the way across the top of the card.
  I used the Every Day Label Punch to punch along the bottom of the card, to create the feet for the Screen Divider card. Then I embossed the whole of the card using the Softly Falling Embossing Folder. I cut four different pieces of the Picture Perfect Designer Series Paper and attached them to Basic Black card and then one to each panel. I cut Melon Mambo card using the Happy Birthday Thinlit die and trimmed away the “birthday’. I attached the “Happy” to the first panel. I stamped “birthday” from the Perennial Birthday stamp set onto Whisper White card using Melon mambo ink.
  I punched one short end using the Triple Banner Punch and lightly sponged around the edges using Melon mambo ink before attaching to the first panel. I stamped the Panda with the balloons from the Party Pandas stamp set onto Whisper White card using Memento Tuxedo Black ink and cut it out.
  I coloured the balloon with a Melon Mambo Stampin’ Write Marker and attached the panda to the second panel. I stamped the panda with the party hat onto Whisper White card using Memento Tuxedo Black ink and cut it out. I coloured the party hat using a Melon mambo Stampin’ Write Marker, cut out the panda and attached the panda to the third panel. For the last panel I stamped the Panda with the small heart using the same ink and coloured the heart using the same Stampin’ Write Marker.
  This image is cut out and attached to the fourth panel. I created two panels for the back of the card, one which is Whisper White card attached to Basic Black card for me to write on. For the second panel I stamped the images from the Number of Years stampset. I inked the “happy, “th” and “birthday” using Memento Tuxedo Black ink. The “8” is coloured using a Melon Mambo Stampin’ Write Marker.
I love how this card turned out and I hope that Ava did too.
Tomorrow is the last day that you can place a qualifying order to earn a free gift. There are some fabulous products on offer including this Party Pandas stamp set. I hope you don’t miss out on what you “need”.
Bye for now,
Kris
Product Used:


Happy Anniversary

My youngest daughter and son-in-law recently celebrated their Wedding Anniversary and this is the card I made for them. I attached a piece of the Painted with Love Specialty Designer Series paper across the bottom of Whisper White card. I coloured the Whisper White 1/4″ Organza Ribbon using the darkest Rich Razzleberry Stampin’ Blend.  When the ribbon had dried (which doesn’t take long) I tied a knot in the ends and then attached it across the top of the Designer Series paper. I stamped “happy anniversary” from the Best Birds stamp set onto the right hand side of the card front above the ribbon using Rich Razzleberry ink. The stamped card is attached to scored and folded Rich Razzleberry card. I cut the large heart from Gold Foil using the Bloomin’ Love Thinlits Dies.
  I attached the die to the left hand side of the card front. I stamped two large and three small flowers from the Bloomin’ Love stamp set onto Whisper White card using Rich Razzleberry in and cut them out using the matching Bloomin’ Love Thinlit Die. The stamped flowers are attached to the die cut heart using Mini Glue Dots. I coloured some large and medium Basic Pearls using the Dark Rich Razzleberry Stampin’ Blend and attached them to the die cut heart.
To decorate the inside of the card, I stamped the banner image three times across the bottom of Whisper White card using Rich Razzleberry ink. Oh, how much easier this would have been if only my Stamparatus was here when I created this card. I have a confession to make, I was a little late getting this card in the mail but my daughter forgave me.
Bye for now,
Kris
Product Used:


Notecard Pandas

I’m still working on that pile of pre-cut pieces from last month’s class and today uses up a few more pieces. This time I am decorating the Whisper White Narrow Note Cards and Envelopes. I already had the pieces of Painted with Love Specialty Designer Series paper cut to the right size so I attached them to Basic Black card and then the front of three of the Narrow Note Cards. I stamped each of the three Pandas from the Party Pandas stamp set onto Whisper White card using Basic Black ink. I cut each of the Pandas out and coloured the balloon, the party hat and the small heart using a Melon Mambo Stampin’ Write Marker.
 I attached one of the Pandas to each Note Card – don’t they look cute? This is one stamp set that I didn’t think I needed and now I will be so sorry to see it go at the end of the month. I hope you have placed your order to earn this stamp set for free before Sale-A-Bration ends. I cut the same Designer Series paper patterns with one of the Layering Circle Framelit Dies to decorate the inside flap of the envelopes. I also stamped the Pandas onto each envelope front as well, just because I could and because it looks so darn cute when they match.
Bye for now,
Kris
Product Used:


Stampin’ Blends
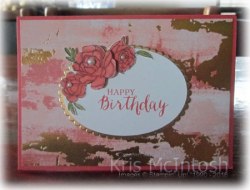
I am a little late advising this but apparently you me and everyone else loves the Stampin’ Blends so much that the supplier has been unable to keep up with the orders. Because supplies are limited and backorders are increasing, Stampin’ Up! has made the difficult decision to turn off the Stampin’ Blends until supplies can be guaranteed. They are not going away and if you have them, then use them. They will return.  I wasn’t going to share these cards with you because they all use Stampin’ Blends, but I decided that they were just too lovely not to share. These are three more cards I created using up bits and pieces from last month’s classes. Each card uses the Painted with Love Specialty Designer Series papers and the Blossoming Basket stamp set.
 I hope you have placed your order and secured this fantastic bundle because although the Basket Weave Embossing Folder will be carrying over to the new Annual Catalogue, the Blossoming Basket stamp set will not. It will no longer be available after the end of March – so don’t miss out. The first card uses Calypso Coral and Old Olive Stampin’ Blends, and the other two cards use Rich Razzleberry and Old Olive Stampin’ Blends as well as Crumb Cake Stampin’ Blends.
  I have used Calypso Coral and Rich Razzleberry card bases and the two scalloped ovals were cut from Gold Foil. For the cards with the ovals, I trimmed away the basket and just used the flowers to accent my greetings – “happy birthday” from the Rose Wonder stamp set and “sending wishes you way” from the Butterfly Basics stamp set. The last card uses the full image. For some extra dimension, I stamped, coloured and cut one additional large flower for each card which is attached with a dimensional.
  To finish the cards I added Basic Pearls to the centres of all of the flowers. The “for you” greeting is from the Thoughtful Branches stamp set (no longer available). To decorate the inside of each of the cards, I stamped, coloured and cut out the three flowers and a few leaves and attached them to Whisper White card.
So while Stampin’ Blends are not available for purchase at this time, they are not going away. I am sure that the problems will be fixed very soon and you will be able to order them once more. Hopefully, we might even get a few more colours in the 2018 Annual catalogue when it is released on 1 June (we can only hope).
Bye for now,
Kris
Product Used:


Old Mates

Ron and I have just returned from a fantastic week in Dubbo. Every year the NSW Retired Police meet for a week in March to rekindle old friendships and make new ones. We lived in Dubbo for four years and both our girls were born there and we were amazed at how much the town has grown. We also got to catch up with Ron’s Aunt and cousins which was really lovely. It’s the first time since we have been going that it was held away from the coast and as it turned out we had our biggest turn out. Anyway onto my page!  This photo shows 10 of the men who attended who had been stationed at Dubbo during their careers. Turns out all but two actually served together! I started by cutting squares of Whisper White and Night of Navy card using one of the squares from the Stitched Shapes Framelits Dies and attached them to Whisper White card. The photo is attached to the centre of this panel which is attached to 12″ x 12″ Night of Navy card. I cut the letters from Whisper White card using the Large Letters Framelits Dies and printed my journalling onto Whisper White card. I also sponged around the edges of the journalling using Night of Navy ink.
I hope that you are enjoying seeing some of my Memory Keeping. I will try and post something each week if I can.
Bye for now,
Kris
Product Used:


More recycling

Yesterday I shared a card I made using up left over kits from last months classes and today’s card uses up some more. This is a quick and simple card but one that would be great for an anniversary or even a wedding. I attached a piece of the Painted with Love Specialty Designer Series Paper to Basic Black card.  This time I elected not to use the side with the gold embossing. The panel is attached to scored and folded Thick Whisper White A4 card.
  I cut the heart from Rich Razzleberry card using the Sunshine Wishes Thinlits Dies and attached it to the left hand side of the card front. The “congrats” is cut from Gold Foil using the same dies and attached across the right hand side of the card.
To decorate the inside of the card, I attached a narrow strip of Basic Black card behind one long edge of the same Designer Series paper used for the front of the card.
Like I said simple and quick but I love how that pile of pre-cut pieces is disappearing!
Bye for now,
Kris
Product Used:

Lavender Love
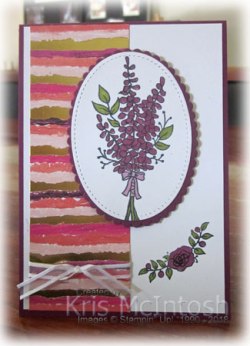
Today I decided to clean up some bits and pieces I had left over from last month’s class (which were still sitting on my tables) and create a card or maybe a few cards to share. I wrapped the bottom of a piece of the Painted with Love Specialty Designer Series Paper with Whisper White 1/4″ Organza Ribbon and tied a knot. The Designer Series paper is attached to the left hand side of Whisper White card.  I stamped the image from the Lots of Lavender stampset onto the right hand corner of the Whisper White card using Memento Tuxedo Black ink. I coloured the image using the Dark Old Olive and the Dark Rich Razzleberry Stampin’ Blends. The panel is attached to scored and folded Rich Razzleberry card.
 I stamped the large floral bouquet from the Lots of Lavender stamp set onto Whisper White card. The images is coloured using the Dark and Light Rich Razzleberry Stampin’ Blends and the dark Old Olive Stampin’ Blend. I cut out the image using the largest oval from the Stitched Shapes Framelits Dies and attached it to a scalloped oval cut from Rich Razzleberry card using the Layering Ovals Framelits Dies. The image panel is attached to the card front using dimensionals. To decorate the inside of the card, I stamped the small floral image onto the top and also the bottom of Whisper White card using Memento Tuxedo Black ink. The images are coloured using the Dark Rich Razzleberry and Dark Old Olive Stampin’ Blends. This is a relatively simple card but I love how the gold in the Designer Series Paper adds a touch of elegance, don’t you? I hope you have placed your order and earned this gorgeous stamp set before it disappears on the 31st of this month.
Bye for now,
Kris
Product Used:


