Stampin’ Blends
I am a little late advising this but apparently you me and everyone else loves the Stampin’ Blends so much that the supplier has been unable to keep up with the orders. Because supplies are limited and backorders are increasing, Stampin’ Up! has made the difficult decision to turn off the Stampin’ Blends until supplies can be guaranteed. They are not going away and if you have them, then use them. They will return.  I wasn’t going to share these cards with you because they all use Stampin’ Blends, but I decided that they were just too lovely not to share. These are three more cards I created using up bits and pieces from last month’s classes. Each card uses the Painted with Love Specialty Designer Series papers and the Blossoming Basket stamp set.
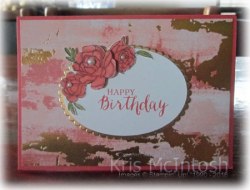
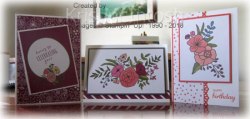
 I hope you have placed your order and secured this fantastic bundle because although the Basket Weave Embossing Folder will be carrying over to the new Annual Catalogue, the Blossoming Basket stamp set will not. It will no longer be available after the end of March – so don’t miss out. The first card uses Calypso Coral and Old Olive Stampin’ Blends, and the other two cards use Rich Razzleberry and Old Olive Stampin’ Blends as well as Crumb Cake Stampin’ Blends.
  I have used Calypso Coral and Rich Razzleberry card bases and the two scalloped ovals were cut from Gold Foil. For the cards with the ovals, I trimmed away the basket and just used the flowers to accent my greetings – “happy birthday” from the Rose Wonder stamp set and “sending wishes you way” from the Butterfly Basics stamp set. The last card uses the full image. For some extra dimension, I stamped, coloured and cut one additional large flower for each card which is attached with a dimensional.
  To finish the cards I added Basic Pearls to the centres of all of the flowers. The “for you” greeting is from the Thoughtful Branches stamp set (no longer available). To decorate the inside of each of the cards, I stamped, coloured and cut out the three flowers and a few leaves and attached them to Whisper White card.
So while Stampin’ Blends are not available for purchase at this time, they are not going away. I am sure that the problems will be fixed very soon and you will be able to order them once more. Hopefully, we might even get a few more colours in the 2018 Annual catalogue when it is released on 1 June (we can only hope).
Bye for now,
Kris
Product Used:


Old Mates

Ron and I have just returned from a fantastic week in Dubbo. Every year the NSW Retired Police meet for a week in March to rekindle old friendships and make new ones. We lived in Dubbo for four years and both our girls were born there and we were amazed at how much the town has grown. We also got to catch up with Ron’s Aunt and cousins which was really lovely. It’s the first time since we have been going that it was held away from the coast and as it turned out we had our biggest turn out. Anyway onto my page!  This photo shows 10 of the men who attended who had been stationed at Dubbo during their careers. Turns out all but two actually served together! I started by cutting squares of Whisper White and Night of Navy card using one of the squares from the Stitched Shapes Framelits Dies and attached them to Whisper White card. The photo is attached to the centre of this panel which is attached to 12″ x 12″ Night of Navy card. I cut the letters from Whisper White card using the Large Letters Framelits Dies and printed my journalling onto Whisper White card. I also sponged around the edges of the journalling using Night of Navy ink.
I hope that you are enjoying seeing some of my Memory Keeping. I will try and post something each week if I can.
Bye for now,
Kris
Product Used:


More recycling

Yesterday I shared a card I made using up left over kits from last months classes and today’s card uses up some more. This is a quick and simple card but one that would be great for an anniversary or even a wedding. I attached a piece of the Painted with Love Specialty Designer Series Paper to Basic Black card.  This time I elected not to use the side with the gold embossing. The panel is attached to scored and folded Thick Whisper White A4 card.
  I cut the heart from Rich Razzleberry card using the Sunshine Wishes Thinlits Dies and attached it to the left hand side of the card front. The “congrats” is cut from Gold Foil using the same dies and attached across the right hand side of the card.
To decorate the inside of the card, I attached a narrow strip of Basic Black card behind one long edge of the same Designer Series paper used for the front of the card.
Like I said simple and quick but I love how that pile of pre-cut pieces is disappearing!
Bye for now,
Kris
Product Used:


Lavender Love
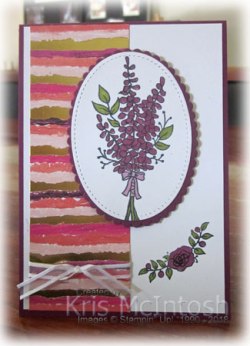
Today I decided to clean up some bits and pieces I had left over from last month’s class (which were still sitting on my tables) and create a card or maybe a few cards to share. I wrapped the bottom of a piece of the Painted with Love Specialty Designer Series Paper with Whisper White 1/4″ Organza Ribbon and tied a knot. The Designer Series paper is attached to the left hand side of Whisper White card.  I stamped the image from the Lots of Lavender stampset onto the right hand corner of the Whisper White card using Memento Tuxedo Black ink. I coloured the image using the Dark Old Olive and the Dark Rich Razzleberry Stampin’ Blends. The panel is attached to scored and folded Rich Razzleberry card.
 I stamped the large floral bouquet from the Lots of Lavender stamp set onto Whisper White card. The images is coloured using the Dark and Light Rich Razzleberry Stampin’ Blends and the dark Old Olive Stampin’ Blend. I cut out the image using the largest oval from the Stitched Shapes Framelits Dies and attached it to a scalloped oval cut from Rich Razzleberry card using the Layering Ovals Framelits Dies. The image panel is attached to the card front using dimensionals. To decorate the inside of the card, I stamped the small floral image onto the top and also the bottom of Whisper White card using Memento Tuxedo Black ink. The images are coloured using the Dark Rich Razzleberry and Dark Old Olive Stampin’ Blends. This is a relatively simple card but I love how the gold in the Designer Series Paper adds a touch of elegance, don’t you? I hope you have placed your order and earned this gorgeous stamp set before it disappears on the 31st of this month.
Bye for now,
Kris
Product Used:


Happy Birthday Sean
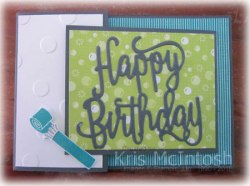
My Son-in law celebrated his birthday on Sunday and although he had to work, I hope he had a great day. I created a Joy Fold card for him following the tutorial I found at Splitcoaststampers. The tutorial is easy to follow and you can adjust the size of the panels to suit the images you are using. I cut my card bases from Basic Gray card and adhered the blue striped designer series paper from the Bubble and Fizz Designer Series paper (available free while Sale-a-bration lasts) to the inside of the card. I embossed a piece of Whisper White card using the Basic Polka Dot Embossing Folder and attached it to the small panel on the left of the card front. I attached another piece of the Bubble and Fizz Designer Series paper to the flap that folds on the right hand side. I cut Basic Gray card using the Happy Birthday Thinlit Die and attached it over the designer series paper. I stamped the party whistle from the Picture Perfect Birthday stamp set onto Whisper White card using Bermuda Bay and Basic Gray ink and the images and cut it out.
  The whistle is attached to the Whisper White panel using a mini dimensional on each end. This whistle is what holds the card closed. Inside the card, I added a Whisper White card panel so that I could write a message and on the small left hand flap I created a pocket to hold some money for Sean to spend on whatever he wants. This is a fun fold to make and really very easy. I recommend you give it a try.
Bye for now,
Kris
Product Used:


Freshly Made 328
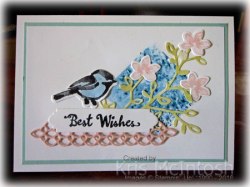
I found time to play along with the sketch challenge at Freshly Made this week which gave me the opportunity to work with Brusho. I cut a mask in a piece of scrap copy paper using one of the Layering Squares Framelits Dies. I laid the mask over a piece of Whisper White card and sprinkled the opening with a little of the Prussian Blue Brusho and spritzed it with water. I set the piece aside to dry. I cut the leaves from Whisper White card using the Petals and More Thinlits dies. I stamped the bird from the Petal Palette stamp set onto Whisper White card using Basic Black Archival ink. I also stamped three of the flowers from the Petal Palette stamp set onto Whisper White card using Powder Pink ink. The bird and the flowers were cut out using the matching Petals and More Thinlits dies. I sprinkled some Moss Green Brusho onto a clear block and used my Aqua Painter to add water, mix the crystals and then colour the die cut leaves.  I cleaned the block and sprinkled a little of the Prussian Blue Brusho onto the block, once more using the Aqua Painter to add water, mix the crystals and then colour the bird. Once the leaves had dried I attached them over the brusho background and attached the flowers to the leaves using Mini Glue Dots. The Whisper White card is attached to Pool Party card and then scored and folded Thick A4 Whisper White card. I stamped the greeting from the Petal Palette stamp set onto Whisper White card using Basic Black Archival ink and cut out the greeting using the die from the Petals and More Thinlits Dies. I also used the detailed banner die from the same set to cut Powder Pink card. I attached the Powder Pink banner behind the greeting banner and then attached it to the card front.
  Lastly I added the bird image so that it sits on the greeting banner.
To decorate the inside of the card, I mixed some Moss Green Brusho and used the Aqua Painter to add the colour to the leaf image from the Petal Palette stamp set. The image is stamped onto the lower left corner of the inside of the card. I am loving how versatile these Brusho crystals are and I am hoping that we get a few more colours when the new catalogue launches in June this year. It was fun to use the Brusho like and ink and you can get lighter and darker shades by modifying the amount of water you use to mix the crystals. If you are unsure about this great product, just do a You Tube search and check out all the great ideas being shared. Love to know what you think.
Bye for now,
Kris
Product Used:


Mum and Dad’s Wedding

I’m still working on the family photos my Mum and Dad are sharing with me and today’s layout showcases my Mum and Dad’s Wedding. I attached two pieces of the Petal Passion Designer Series paper to a Whisper White 12″ x 12″ page. I coloured the flower on one of the Petal Passion Memories and More 6″ x 4″ cards using the Cherry Cobbler and Old Olive Stampin’ Blends before printing directly onto the card. Once I attached the card to the page, I cut “love” from Powder Pink card using the Sunshine Wishes Thinlits Dies and attached it to the Memories and More card.  I attached both of the photos to Basic Black card before attaching to the card front. I cut Powder Pink card using the Petal and More Thinlits Dies and attached one onto the lower corners of each photo. I stamped the images from the Petal Palette stamp set onto Whisper White card using Memento Tuxedo Black ink and coloured the images using the Cherry Cobbler and Old Olive Stampin’ Blends. The images were die cut or hand cut if there was no matching Petals and More Thinlit Dies and attached to the page below the photos using mini dimensionals.
  I printed the journalling about the group photo onto Whisper White card, cut it into strips and attached it to Basic Black card. The last decoration was to add large Basic Rhinestones to the centres of the flowers. I may have gone a little over the top with the decoration but I love how this page has turned out. For your information, I scanned the original photos using my brother printer and simply printed them out at 6″ x 4″. I used photoshop to enhance the colour a little but that’s all, so I am really happy with the quality of the prints. The same church where Mum and Dad was married was also where I was christened and where my husband and I also celebrated out marriage. I love the continuity of family history, don’t you?
bye for now,
Kris
Product Used:


Sweet Soiree Memories and More
You know that I love the Memories and More card packs which Stampin’ Up! have for Memory Keeping, but did you know that the card packs make a great starting place for greeting cards too. Today I will share three cards I made using the Sweet Soiree Memories and More card pack which is one of the items available for free during Sale-A-Bration.
For the first card, I cut down a 4″ x 6″ card and attached it to scored and folded Thick A4 Whisper White card. I stamped the greeting from the Perennial Birthday stamp set onto one of the 3″ x 4″ cards using Rich Razzleberry ink and attached it to Whisper White card, before attaching to the card front.  For the second card, I cut a narrow strip from one of the 6″ x 4″ cards and attached it across the front of scored and folded Thick A4 Whisper White card. I attached the 4″ x 3″ card to Basic Gray card and then the card front using dimensionals.
  For the last card, I cut a narrow strip from one of the 4″ x 6″ cards and attached a narrow strip of Calypso Coral card to the right hand edge. I punched Calypso Coral card using the Decorative Ribbon Border Punch and attached it behind the right hand edge before attaching to scored and folded Thick A4 Whisper White card. I stamped the greeting from the Best Birds stamp set onto the lower right hand corner using Calypso Coral ink. I attached the 3″ x 4″ card to Calypso Coral card and then the card front using dimensionals. These cards are so pretty and they were so easy to make. I think I might have to get out some of my other Memories and More card packs and see what I can create.
Bye for now,
Kris
Product Used:


New Sale-A-Bration items
From today Stampin’ Up! has made available a number of current catalogue products to be selected Free with a qualifying order until the end of Sale-a-bration on the 31st March, so don’t delay in placing your order and selecting your free items. Please note that in order to receive the product free, you need to use the Sale-a-bration item number which you can view here or your can download the brochure here.
Take a look at the awesome new items you can earn for free.

Don’t forget to use the item number from the flyer to receive the product for free.
Happy Shopping!
Bye for now,
Kris
Last Brusho for a while
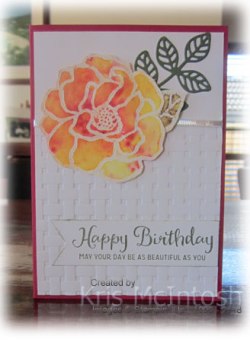
Here is another card we will be making at my March classes. For this card, I embossed the lower two-thirds of Whisper White card using the Basket Weave Embossing Folder (boy is this folder gorgeous and it’s free with a qualifying order during Sale-A-Bration). I wrapped the top of the embossing with Silver 1/8″ Ribbon and attached the embossed panel to scored and folded Real Red card. I stamped the greeting from the Beautiful Day stamp set onto Whisper White card using Always Artichoke ink , punched one short end with the Triple Banner Punch , sponged the edges with Always Artichoke ink and attached the greeting to the card front. I cut Always Artichoke card using one of the dies from the Flourish Thinlits Dies. I attached the Always Artichoke leaf to the top right hand corner of the card front. I stamped the flower from the Beautiful Day stamp set onto Shimmery White card using Versamark ink, sprinkled it with White Embossing Powder and heat set it. I used my Aqua Painter to add water to the inside of the embossing.  It pools and you need to leave plenty of water inside the embossed lines. Then I sprinkled Yellow Brusho, trying to cover most of the flower. I sprinkled Gamboge Brusho into the central parts of the flower and lastly add Brilliant Red Brusho to the very middle of the flower. You need to let the flower dry completely before cutting out. I tried to hurry the first flower with the Heat Gun and it kind of made everything look very flat, so this time I waited.
  I stamped the leaf part of the flower once more onto Shimmery White card using Versamark ink, sprinkled it with White Embossing Powder and heat set it. Once more I used my Aqua Painter to pool water inside the embossed lines of the leaf. I sprinkled the leaf with Moss Green Brusho and once more left it to dry before cutting out. Once the leaf and the flower were cut out I attached the leaf to the back of the flower and then to the card front using dimensionals.
To decorate the inside of the card, I embossed a narrow strip of Whisper White card using the Basked Weave Embossing Folder. I attached a narrow strip of Real Red card behind one long edge and attached it to the bottom of Whisper White card.
I really do love playing with Brusho, however, I must warn you, it is very messy. The crystals are very fine and go everywhere, so make sure you cover anything you don’t want sprinkled!
Bye for now,
Kris
Product Used:


