Waterfront Retirement

Today’s card uses the Waterfront stamp set and once more we are following the Jackie Bolhuis’ video with the quick watercolour technique. This card follows a similar layout to yesterday’s card but this time each of the stamps is applied and then an Aqua Painter is used to colour each image within the outlines of the stamp. So the mountains are stamped in Soft Suede onto Shimmer White card and then the Aqua Painter is used to move the colour around within the outline of the stamp. The mountains are stamped again but this time stamped off onto scrap paper first to give a slightly lighter colour. The grass is stamped using Garden Green ink and there is also some ground stamped using Crumb Cake ink.  The water is stamped using Marina Mist ink. The water is over stamped using Dapper Denim ink and the dotted image is stamped over the water using Dapper Denim ink.
  This time I cut the image down to fit across the card front before attaching to Soft Suede card. I stamped the greeting from the Wild About Flowers stamp set onto the upper left hand corner of Whisper White card using Soft Suede ink. I attached the image panel and then stamped “retirement”, from the Wild About Flowers stamp set below the panel using Soft Suede ink. The whole piece is attached to scored and folded Soft Suede card.
To decorate the inside I stamped the greeting from the Wild About Flowers stamp set onto Whisper White card using Soft Suede ink.
So once more another look using the same stamps, inks and basic layout. Are you beginning to see how versatile this stamp set is? I hope so.
Bye for now,
Kris
Product Used:


Waterfront Sympathy

Here is another card I made using the Waterfront stamp set. This time I have stamped onto Shimmer White card, still using the same colour combination of ink. The mountains are stamped in Soft Suede ink and then stamped again without re-inking using the same ink. I stamped the ground using Garden Green ink and the shoreline using Crumb Cake ink. The water is stamped using Marina Mist ink and overstamped using Dapper Denim ink.  The dotted image is also stamped using Dapper Denim ink. The trees are stamped using Tranquil Tide ink and the sun is stamped using Crushed Curry ink.
  I trimmed down the stamped card and added the sentiment from the Flourishing Phrases stamp set using Soft Suede ink. The image panel is attached to Soft Suede card and then scored and folded Thick Whisper White card.
To decorate the inside of the card I stamped the greeting which is also from the Flourishing Phrases stamp set using Soft Suede ink.
I am loving how versatile this stamp set is. So many different uses from this one stamp set just by adding different sentiments. I love that each time you use this stamp set you get an individual piece. What about you? Have I inspired you yet to try this stamp set? I have a couple more cards to share, so stay tuned.
Bye for now,
Kris
Product Used:


Waterfront note

My card today uses the Waterfront stamp set and the same inks as the card I shared yesterday. To create today’s card I watched a video by Jaquie Bolhuis to create a more watercoloured look to my card. I stamped the mountain image twice onto Watercolour Paper using Garden Green ink. After the images were stamped, I used an Aqua painter to move the ink around inside the outline of each image. I stamped the mountain image a couple more times behind the first images using Garden Green ink which I had stamped off onto scrap paper first. I used the Aqua Painter to once more move the ink around inside the outline of each image. I stamped the ground using Crumb Cake ink, the sand using Crushed Curry ink and the sea using Marina Mist ink. After each image was stamped I used the Aqua Painter to move the ink around inside the outline of each image.
  I stamped the image over the sea using Dapper Denim ink and then added the dotted image using the same ink. The palm trees were stamped using Soft Suede ink and Tranquil Tide ink and once more used the Aqua Painter to soften the images. The watercolour paper really works well with this technique.
I stamped the greeting from the Flourishing Phrases stamp set onto the lower right hand corner of scored and folded Thick Whisper White card using Dapper Denim ink. The image panel was trimmed and attached to Dapper Denim card before attaching to the card front.
I simply stamped the greeting from the You’ve Got This stamp set onto the inside of the card using Dapper Denim ink.
I might have gone a bit overboard with the Aqua Painter but I am happy with the finished look. As with the card yesterday, I stamped onto a larger piece of card and trimmed it down to get the size I wanted. I hope you will take a look at Jackie’s video and try out this technique yourself.
Bye for now,
Kris
Product Used:


Waterfront Birthday
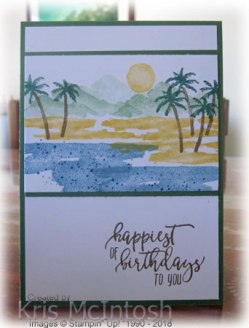
I loved the Waterfront stamp set when I first saw it in the Occasions Catalogue. It is so simple to create wonderful scenes to use on all kinds of cards. Today I am going to share with you the first card I made of several using this stamp set and the same colours but different techniques to achieve lots of different finishes. For this card I stamped “happiest of birthdays to you” from the Picture Perfect Birthday stamp set onto the lower right hand corner of Whisper White card using Soft Suede ink. The stamped card is attached to scored and folded Garden Green card. I stamped the “mountain” image twice onto Whisper White card using Garden Green ink.  I stamped the same image again, but this time stamping off onto scrap paper first. I stamped the “sand” using Crushed Curry ink and the “water” using the same image and Marina Mist ink.
  I stamped the dotted image over the water using Dapper Denim ink. I stamped the palm tree stems using Soft Suede ink and the leaves using Tranquil Tide ink. I also stamped the sun using Crushed Curry ink. The panel is attached to Garden Green card and then the card front. I found that the easiest way to create the image panel was to stamp onto a larger piece of card than I wanted and then cut it down to suit the card.
To decorate the inside of the card, I stamped the sand using Crushed Curry ink onto the lower left hand corner of Whisper White card. I also stamped the palm tree stem and leaves using the Soft Suede and Tranquil Tide ink.
A simple card but I think kind of cute. Tomorrow I will share a card made using the same stamps and colours but with a completely different look.
Bye for now,
Kris
Product Used:


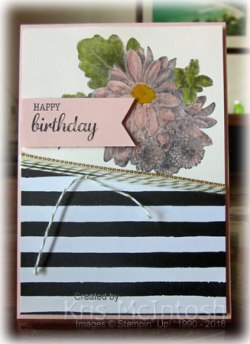
Freshly Made Sketch 319
I saw the sketch challenge at Freshly Made but unfortunately not in time to submit my entry. However, I think it is a pretty card, which I thought you would like to see. I stamped the background stamp from the You’ve Got This stamp set onto scored and folded Smoky Slate card using Smoky Slate ink. I embossed Whisper White card using the Layered Leaves Embossing Folder, attached it to Rich Razzleberry card and then the card front. I stamped the flower from the You’ve Got This stamp set onto Whisper White card using Memento Tuxedo Black ink. The image is coloured using the Rich Razzleberry, Old Olive and Daffodil Delight Stampin’ Blends.  I cut out the flower and leaves and attached it to the embossed card. I stamped “happy birthday” from the Picture Perfect Birthday stamp set onto Whisper White card using Rich Razzleberry ink. I punched out the greeting using the Classic Label Punch.
  I attached the punched greeting to a narrow strip of Rich Razzleberry card and trimmed the left hand end to made the punch. The greeting is attached to the card front and the right hand edge is trimmed to match the edge of the card.
To decorate the inside of the card, I stamped the flower from the You’ve Got This stamp set onto scrap Whisper White card using Memento Tuxedo Black ink. I coloured the image using the same Stampin’ Blends and this time cut out the flower only. The image is attached to the top left hand corner of Whisper White card.
This flower has to be one of my favourites (at the moment!). It is so pretty and the blends give it so much depth. What do you think?
Bye for now,
Kris
Product Used:


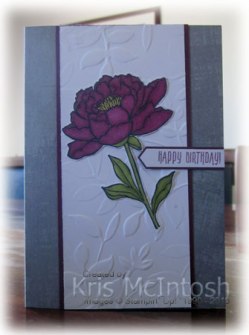
Another Happy Birthday
Last weekend my friend celebrated her birthday and I thought I would share with you the card that I made for her. I actually cased this card from the Stampin’ Success magazine that demonstrators receive every three months. I thought the card was very pretty but I changed up the greeting to suit the occasion. I stamped the beautiful floral image from the Heartfelt Blooms stamp set onto Shimmer White card using Basic Black Archival ink. I used an Aqua Painter to colour the image using Powder Pink, Old Olive and Crushed Curry inks. I attached a length of Gold 3/8″ Metallic-Edge Ribbon behind one short edge of a piece of Petal Passion Designer Series Paper before attaching the panel across the bottom half of the stamped card.  I wrapped the top of the Designer Series Paper with Old Olive Bakers Twine and tied a knot. The whole piece is attached to scored and folded Powder Pink card using dimensionals. I stamped the greeting from the Best Birds stamp set onto Powder Pink card using Basic Black Archival ink. I trimmed one end and attached it to the card front using more dimensionals.
 To decorate the inside of the card I stamped the floral image onto the lower left hand corner of Shimmer White card using Basic Black Archival ink. The image is once more coloured using an Aqua Painter and Powder Pink, Old Olive and Crushed Curry inks.
Can you tell, I love this gorgeous stamp? The stamp has a special name and is pending patent as a Distinctive stamp. I certainly hope we get more images like this one. As you have seen on previous cards I have shared, just using one colour with this stamp gives the most detailed effect but adding a little colour takes it to another level. Don’t forget that this stamp set is available in the Sale-A-Bration catalogue, but only until the end of March. You can earn this stamp set for free by placing a qualifying order. So don’t delay, make sure you have this gorgeous stamp set on hand to create beautiful cards very easily for your family and friends.
Bye for now,
Kris
Product used:


Happy Birthday Sarah
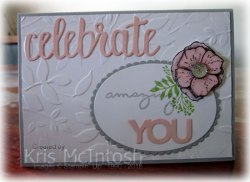
My daughter Sarah is celebrating her birthday today and this is the card I made for her. I broke out some new stamps and a new (to me) embossing folder for this card. I embossed Whisper White card using the Layered Leaves Embossing Folder and attached it to scored and folded Smoky Slate card. I stamped the floral image from the Amazing You stamp set (which is also free during Sale-A-Bration) onto Whisper White card using Wild Wasabi ink. I cut the image panel using one of the ovals from the Layering Ovals Framelits Dies so that the leafy part of the image was located on the upper right hand corner. I stamped “amazing” from the Amazing You stamp set onto the oval using Smoky Slate ink.  The image panel is attached to a Smoky Slate scalloped oval also cut using the Layering Ovals Framelis Dies and then the lower right hand corner of the card front. I stamped the floral image onto scrap Whisper White card twice using Memento Tuxedo Black ink and coloured the images using the Pink Pirouette and dark Daffodil Delight Stampin’ Blends. I cut the central part of the flower from one image and the whole flower from the second image. The flowers are attached using a dimensional. I attached the flower over the stamped image using Tombow Multipurpose Glue and also a dimensional under the outer part of the flower. I cut “celebrate” and “you” from Pink Pirouette card using the Celebrate You Thinlits Dies which you can earn for free during Sale-A-Bration.
  The “Celebrate” is attached to the top left hand corner of the card front and the “you” is attached to the stamped oval.
To decorate the inside of the card I stamped the greeting from the Perennial Birthday stamp set using Memento Tuxedo Black ink. I also stamped the floral image from the Amazing You stamp set once more using Wild Wasabi ink. I stamped and coloured two more flowers to match the front before attaching over the stamped flower.
I think this is going to be a fun co-ordinating set to use over the coming months. So don’t forget to place a qualifying order before the end of March to collect both the stamp set and the dies free. An added bonus is that the dies, unlike everything else in the Sale-A-Bration catalogue will be carrying over into the 2018-2019 Annual Catalogue.
Once more Happy Birthday to Sarah, hope she has a lovely day.
Bye for now,
Kris
Product Used:


Another Catalogue Case

Yesterday I shared a card with you which was CASED (copy and share everything) from the Occasions Catalogue. I loved the card so much, I couldn’t stop with one, so here is another card which I have CASED from the Occasions Catalogue. I stamped Whisper White card using the “Happy Birthday” from the Perennial Birthday stamp set onto Whisper White card using Soft Sky ink. I used my Stamp-a-ma-jig to ensure placement because it was stamped several times to create a background. I used my Aqua Painter to add some Lemon Lime Twist ink to the Whisper White card before stamping the dotted background image from the Perrenial Birthday stamp set using Basic Black Archival ink.  I also stamped the large floral image using the same ink. The Whisper White card is attached to scored and folded Lemon Lime Twist card. I stamped the large floral image, the large single flower and the small single flower onto scrap Whisper White card using Basic Black Archival ink and coloured the images using an Aqua Painter, Berry Burst, Lemon Lime Twist and Soft Sky ink. All three images were fussy cut and attached to the card front before stamping the second greeting from the stamp set using Basic Black Archival ink.
 Since I have been playing with this stamp set for a couple of days now, I had several images which I had already stamped laying on my desk. The images were coloured using an Aqua Painter and Berry Burst, Lemon Lime Twist and Soft Sky ink. I cut out the single flower and attached it to the lower left hand corner of Whisper White card. I stamped the leaf image onto the flower using Basic Black Archival ink and coloured the leaves using an Aqua Painter and Lemon Lime Twist ink. I cut out the second flower with the leaves and attached it to the Whisper White card, partially covering the Soft Sky flower.
This card is super pretty but maybe I am biased because I love this stamp set so much. I hope you aren’t sick of it yet.
Bye for now,
Kris
Product Used:


Case The Catalogue
Today I am going to share with you another card made using the Perennial Birthday stamp set, this time I am casing the Occasions Catalogue. This stamp set is featured on Page 17 of the Occasions catalogue and there are three cards showcased using the stamp set. This card is one of them. I stamped the large floral image from the Perennial Birthday stamp set onto Berry Burst card using Berry Burst ink. I wrapped the left hand side using the Berry Burst 3/8″ Mettalic Edge Ribbon and attached it to scored and folded Thick Whisper White card. I stamped lots of the images from the stamp set onto Whisper White card using Basic Black Archival ink.  I coloured the images using Berry Burst, Lemon Lime Twist and Soft Sky ink and an Aqua Painter. The stamped panel is attached to Soft Sky card and then the card front using dimensionals. I stamped the greeting onto Whisper White card using the Basic Black Archival ink and attached it to the stamped panel using dimensionals.
  I stamped the large floral image onto scrap Whisper White card using Basic Black Archival ink and coloured it with Soft Sky and Lemon Lime Twist ink using an Aqua Painter. The flower and leaves were fussy cut and attached to the greeting panel. I tied a bow using the Berry Burst 3/8″ Mettalic Edge Ribbon and attached it to the card front using a Glue Dot.
To decorate the inside of the card, I stamped the large floral image and coloured it using Berry Burst and Lemon Lime Twist ink and an Aqua painter.
I did add an extra layer to this card but I love how it turned out. Do you case the catalogue when you want to get your creative juices flowing?
Bye for now,
Kris
Product Used:


Perennial Birthday
 In my last post I mentioned how much I love the Watercolour Christmas Kit in the Holiday Catalogue. Well, I purchased several of these for my end of year classes and somehow managed to order one kit too many.
  So I still had a few of these cards left but I don’t need Christmas Cards, so I thought I would share how I used the new Perennial Birthday stamp set to turn the Christmas cards into birthday cards. For each of the cards, I used the same layouts and embellishments but used the Perennial Birthday stamp set to add flowers, leaves and sentiments for the focal images.
 I am so happy with the way the cards have turned out. I coloured the images using Real Red, Emerald Envy and Daffodil Delight Stampin’ Write Markers. The images were all stamped using Black Archival ink so that they wouldn’t run when I coloured them with the Stampin’ Write Markers. I also added sentiments from the Perennial Birthday stamp set to the inside of the cards too. The flowers all have Basic Rhinestones added to the centres, gotta have some bling.
I think I may have to try this with another stamp set or two to finish using up the Watercolour Christmas Kit cards I have on hand.
Bye for now,
Kris
Product Used:


