Chocolate Pizza Boxes

I love the Mini Pizza Boxes in the Holiday Catalogue and was so excited to know that they will be carrying over. They are a great size for holding 3″ x 3″ cards (and by the way the 3″ x 3″ envelopes are carrying over too) but they are also food safe so you can add your favourite chocolate to make an edible gift as well. I used these Mini Pizza Boxes to hold some Rum Balls that I made for the ladies who attended my Christmas celebration and they all loved them – the boxes I mean, not sure about the Rum Balls.  To decorate the top of the box I attached a piece of the Merry Littel ChristmasDesigner Series paper. I trimmed a length of the 7/8″ Striped Ribbon and attached it onto the Designer Series paper. I stamped the greeting from the Merry Little labels stamp set and punched it out using the 2″ Circle Punch. I layered it onto Cherry Cobbler card which I punched using the Starburst Punch. I stamped the holly and leaf image from the Half Full Stamp set onto Whisper White card using Memento Tuxedo Black ink and coloured the leaves using the Light Old Olive Stampin’ Blend and the berries using the Dark Cherry Cobbler Stampin’ Blend.
  I cut out the leaves and berries and attached them over the top of the stamped holly and leaves. They are a slightly different size but you can successfully cover the stamped image without losing the greeting. The greeting panel is attached to the top of the box using Mini Dimensionals. I added four mini cupcake liners to the inside of the box to hold four Rum Balls. I cut greaseproof paper using the largest scalloped Layering Square Framelit Die. I printed the ingredients for the Rum Balls onto Whisper White card and punched them out using the 2″ circle punch before attaching to the greaseproof paper. The greaseproof paper is placed on top of the Rum Balls before closing the box. I love how pretty and professional looking this is, don’t you. I hope I have inspired you to add your favourite Christmas treats to one of these boxes to share with your friends and family.
Bye for now,
Kris
Product Used:


Christmas Party

Today I am sharing with you the gift bags that I made for the ladies who attended my Christmas Party. I decorated four large White bags for my downline and the other attendees got a decorated Kraft Bag. Each of the bags is decorated in a similar fashion. I embossed a piece of Whisper White card using the Woodland Embossing Folder. This is a great folder to use when you want to emboss a wide piece of card because you don’t have to match anything up, you can simply emboss the width of the folder and then move the card beyond the embossing and emboss again. So each.  I punched Silver Glimmer Paper with the Decorative Ribbon Border Punch and attached a piece behind the upper and lower edges of the embossed card before attaching to the front of the bag. I stamped Peace on Earth from the Carols of Christmas stamp set onto Whisper White card using Early Espresso ink. I cut the image using the largest Stitched Shapes Framelits Dies and attached the greeting to a Early Espresso scalloped circle cut using the Layering Circles Framelits Dies. The greeting is attached to the left hand side of the embossed Whisper White panel. I cut the tree images from Always Artichoke card using the Card Front Builders Thinlits Dies and attached them to the right hand side of the embossed Whisper White card.
  The White gift bags have two sets of the double trees and the Kraft Gift Bags only have one set. I cut the star from Silver Glimmer Paper using one of the Starlight Thinlits Dies and attached the star above the trees.
I stamped the tags onto Whisper White card using Early Espresso, Real Red and Always Artichoke Stampin’ Write Markers to ink up the For/From image from the Merry Little Labels stamp set. I punched the top of the Whisper White card using the Scalloped Tag Topper Punch and used the Real Red 1/8″ Solid Ribbon to attach the tags to the bag handles.
I love how pretty these look and so did the ladies. I’ll show you what’s in the bag in upcoming posts.
Bye for now,
Kris
Product Used:


iv>
Freshly Made Sketch Challenge 316
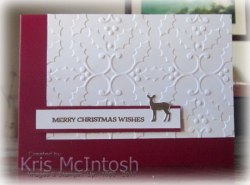
Today I am sharing with you a quick and easy card that I created for the Freshly Made Sketch challenge this week. This card is super simple if you need a few cards in a hurry. I embossed Whisper White card using the Holly Berry Embossing Folder and attached it to the top right hand corner of scored and folded Cherry Cobbler card. I stamped the greeting from the Santa’s Sleigh stamp set onto Whisper White card using Soft Suede ink.  I attached the greeting to Cherry Cobbler card and then the card front using Mini Dimensionals. I stamped the reindeer image from the Carols of Christmas stamp set onto Whisper White card using Soft Suede ink and cut it out using the matching Card Front Builder Thinlits Dies. The reindeer is attached to the greeting banner.
To decorate the inside of the card I attached Cherry Cobler card behind one long edge of Whisper White card embossed using the Holly Berry Embossing Folder. The panel is attached to the bottom of Whisper White card.
Hope this inspires you to finish making the cards you need to send out this year. Thanks also to Freshly Made Sketches for another great challenge.
Bye for now,
Kris
Product Used:


Graduation
 Last night was my eldest grandson Ethan’s graduation from Primary School. He also did a solo performance singing and playing his guitar. Ron and I are so proud of him. Anyway, enough of the Nanna stuff. I thought I would share the card I made for him. I started by punching lots of balloons from Whisper White card using the Balloon Bouquet Punch. I attached them to Whisper White card using Tombow Multipurpose Glue. I attached the Whisper White card to Daffodil Delight card and then scored and folded Night of Navy card.
  I cut a square from Night of Navy card using one of the Layering Squares Framelits Dies. I lightly scored the square on the diagonal and attached a Gold Mini Tassel using a Mini Glue dot. The square is attached to the card front on a slight diagonal.
  I attached a medium Gold Faceted Gem to the top of the Gold Mini Tassel. I stamped congratulations from the Flourishing Phrases stamp set onto Whisper White card using Night of Navy ink. The greeting is attached to Night of Navy card and then the card front.
To decorate the inside of the card I once more punched small balloons from Whisper White card and attached them down the left hand side of Whisper White card.
I love this card, simple but bright and happy. It’s also in the school’s colours of navy and yellow. Congratulations once more to Ethan and Narangba Valley State School for a wonderful night.
Bye for now,
Kris
Product Used:


Stamparatus reservation
 The second reservation period for the Stamparatus opened today. Unlike the last reservation period, Stampin’ Up! will keep it open until the 31st December and they will start shipping on the 19th March and will continue until all the orders are filled. So don’t delay, the sooner you reserve this great tool, the sooner it will be delivered. I just reserved mine so hopefully it will arrive in Mid to late March and I can start playing, I mean working with it, and sharing how wonderful it is with all of you.
Bye for now,
Kris
Early Christmas presents

Today was my last class at Beachmere for this year and I like to give the ladies a little something from me to say Merry Christmas. This little treat box was shared by Bronwyn Eastley and I thought it was a great idea. I’ve changed up the colours but love her idea. I scored and folded Soft Sky card, cut a circle from one panel using the Layering Circles Framelits Dies and then embossed the card using the Woodland Embossing Folder. Once you fold the card and attach the panel you are left with a little pocket on the inside which is where you place your treat. In this case a small round chocolate.  The front panel is decorated by cutting a circle from Whisper White card which is then cut using the Hometown Greetings Thinlits Dies. The Whisper White card is attached to a Night of Navy cirlce, then a Soft Sky circle and then a Whisper White scalloped circle.
  All these pieces were cut using the Layering Circles Framelits Dies. Before attaching the panel to the card front, I wrapped the chocolate holder with the Night of Navy 1/2″ Gingham Ribbon. Once the panel was secure I tied the ribbon into a bow. Lastly I stamped the greeting from the Hearts Come Home stamp set onto a narrow strip of Whisper White card using Night of Navy in. The greeting panel is attached using a glue dot on each end.
I love how this packaging really dresses up the very small gift the ladies are receiving.
Bye for now,
Kris
Product Used:

Hearts Come Home Clear-Mount Bundle


Year End Sales Event
It’s almost the end of the year and the end of another fantastic Holiday Catalogue. To wind down to Christmas Stampin’ Up! is holding a Year End Sales Event.

If you head on over to my store, you will see what is discounted and what’s on the retiring list. All products will be on a While Stocks Last basis so if there is something there you want, don’t hesitate, place your order ASAP to ensure you don’t miss out. The sale ends on 2nd January and nothing that is on sale will be available for purchase after that date.
Bye for now,
Kris
Christmas Wreath
 Today I am sharing with you my version of an idea I have seen used a lot on Pinterest. The idea is to use the Leaf Punch that co-ordinates with the Painted Harvest stamp set to create a wreath for your card or 3d item but in my case a card for my lovely hairdresser Lauren and her family. I started by stamping the solid leaf image from the Painted Harvest stamp set onto Whisper White card using Always Artichoke. I punched out the images using the co-ordinating Leaf Punch – I really don’t know how many but it was a lot. I cut a circle from Whisper White card using the largest circle and a slightly smaller circle from the Layering Circle Framelits dies.
 I used Tombow Glue applied to the circle and layered on the leaves until I covered almost all of it. Lastly I stamped six leaves using Cherry Cobbler ink and punched them out. I layered the leaves together to create a flower and added it to the wreath. I embossed Cherry Cobbler card using the Pinewood Plank Embossing Folder and attached it to Always Artichoke card and then scored and folded Thick Whisper White card. I attached the wreath to the embossed Cherry Cobbler card. I sponged some Always Artichoke ink onto Whisper White card and punched a 1/2″ circle which I added to the flower centre. I coloured a Clear Faceted Gem using the Dark Cherry Cobbler Stampin’ Blend and added it to the centre of the wreath.
 To decorate the inside of the card I simply stamped the greeting from the Watercolour Christmas stamp set using Cherry Cobbler ink.
I really love how gorgeous this wreath looks. I did use my bone folder to add some dimension to the leaves, but forgot to do it before I started adding them to the circle, which was a little difficult. I do recommend that you curl your leaves a little using a bone folder BEFORE you attach them to your circle.
I hope I have inspired you to try one of these.
Bye for now,
Kris
Product Used:


Framed Art

This is another project which we made at our All Day Class at Beachmere a couple of weeks ago. Every year I try to come up with a piece of what I call Framed Art to display over the Christmas season. This year, because I love working with uniform sizes, I was inspired by the sizing of our Memories and More cards. So four of the panels for this piece are 3″ x 4″ and the remaining two panels are 3″ square.  The central piece of designer series paper was added to close in the open space in the middle of the page. I am not going to go into too much detail because I am including a Free Tutorial for this project here and also on my Free Tutorials page so you can create this Framed Art for yourself. The panels are attached to Crumb Cake card and the whole thing fits into an A4 or document frame (that’s how it is sold in Australia). All of the stamp sets, dies and accessories are current, except for the Merry Patterns stamp set which of course was a limited release stamp set. However, it would be easy to use another set on this panel if you didn’t get this one while it was available. I’ll include all of the product used in the information below this post.
The ladies look forward to creating their Framed Art each year and this year was no exception. I believe several of the ladies will be gifting their projects to family members. I myself will be gifting a couple of these as well.

Click here to download your Free Tutorial
Bye for now,
Kris
Product Used:


;
Blue Christmas

Some of the pieces for this card have been floating around my desk for a while, it’s about time they made it onto an actual project. I embossed Whisper White card using the Holly Embossing Folder before attaching it to scored and folded Night of Navy card.  The greeting from the Carols of Christmas stamp set is stamped onto Whisper White card using Night of Navy ink and then cut out using one of the circles from the Stitched Shapes Framelits Dies. The greeting is attached to a Night of Navy scalloped circle cut using the Layering Circles Framelits Dies before being attached to the card front.
  The trees are cut from Night of Navy card using the Card Front Builder Dies and attached to the card front using mini dimensionals. The deer is cut from Silver Glimmer paper and also attached to the card front using mini dimensionals.
To decorate the inside of the card a narrow strip of Night of Navy card is attached behind one long edge of Whisper White card which is embossed using the Holly Embossing Folder. The embossed panel is attached to the bottom of Whisper White card.
This is so pretty don’t you think? I really love Navy and White for Christmas.
Bye for now,
Kris
Product Used:


