Global Design Project 118
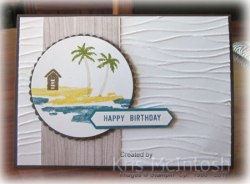
Today I am sharing with you some more new product which I used to complete the sketch challenge at Global Design Project this week. This card uses a great new photopolymer stamp set called Waterfront. I embossed Whisper White card using the Seaside Embossing Folder and attached it to scored and folded Early Espresso card. I attached a strip of Wood Textures Designer Series Paper to the left hand side of the embossed card. The stamped piece was one that I had been playing with to get the feel for this stamp set. I stamped the sand using Daffodil Delight ink and the sea using Island Indigo ink.  I stamped the house using Soft Suede ink and the stems of the palm trees using Crumb Cake ink. The palm leaves are stamped with Old Olive ink. The image is cut using the Layering Circle Framelits Dies and attached to an Early Espresso scalloped circle cut using the same dies. The image panel is attached to the card front over the designer series paper using dimensionals. I stamped “happy birthday” from the Thoughtful Banners stamp set onto Whisper White card using Island Indigo ink. I punched the greeting using the Classic Label Punch.
 The greeting is attached to Island Indigo card which I trimmed to match the shape of the punch before attaching to the card front using dimensionals.
To decorate the inside of the card, I stamped the sand using Daffodil Delight ink onto the lower left hand corner of Whisper White card. The palm tree stems are stamped using Crumb Cake card and the palm leaves using Old Olive ink.
I think this is going to be such a fun and versatile stamp set, keep your eye out I am sure you will see this used many times.
Bye for now,
Kris
Product Used:


Sneak Peak Birthday Card
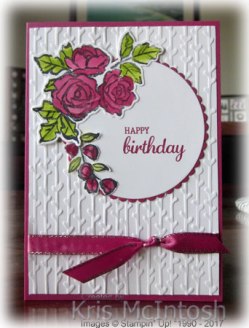
I have had some of the product from the soon to be released Occasions Catalogue sitting in a box on the floor of my craft room neglected while I finished my Christmas projects. I have finally got them out of the box and have started to play with them. One of the first sets I wanted to use was the Petal Palette stamp set. I decided that the best way to see what was in each stamp set was to stamp them onto Whisper White card. This stamp set has a co-ordinating set of dies – the Petals and More Thinlits Dies, so I cut them out and attached them to the stamped page. Now I have a visual record of what is in these sets which I find makes it easier to begin creating with them.  Anyway while doing this I stamped a number of the flower images onto some scrap Whisper White card and started trying a few different colouring techniques. This card features two of the images which are stamped onto Whisper White card using Memento Tuxedo Black ink and coloured using Berry Burst and Lemon Lime Twist ink and an Aqua Painter. The images are so pretty and I love that I have been able to achieve some depth of colour in the images. They also have a co-ordinating die to cut them out – Woohoo. Soooo….. I stamped the greeting from the Best Birds stamp set onto Whisper White card and cut it out using one of the Layering Circle Framelits Dies.
  The greeting is attached to a Berry Burst scalloped circle cut using the same dies. I attached the two images to the Whisper White circle around the greeting. I embossed Whisper White card using one of the Petal Pair Embossing Folders. These embossing folders come as a set of two, so they are the smaller dies but this one was easy enough to line up and cover the whole of the Whisper White card. I wrapped the bottom of the card using Berry Burst 3/8″ Metallic Edge Ribbon and tied a knot (a new ribbon in the Occasions Catalogue). The embossed card is attached to scored and folded Berry Burst card before I attached the image panel. To decorate the inside of the card, I attached another of the stamped images, which I had coloured in the same manner, to the lower left hand corner of Whisper White card.
This card is destined for a friend, whose birthday was a couple of days ago. A little late but hopefully she will like it enough to forgive my lateness.
Bye for now,
Kris
Product Used:


Christmas Memory Keeping Page

I haven’t shared with you the 12″ x 12″ page we made at our last Memory Keeping Class. This page has 12″ x 12″ Cherry Cobbler card as its base. I cut one piece of Be Merry Designer Series Paper and attached it down the left hand side of the page. I attached a piece of the black Merry Music Specialty Designer Series Paper across the centre of the page. I punched a long narrow strip of Gold Foil card using the Decorative Ribbon Border Punch and attached it across the bottom of the Merry Music Specialty Designer Series Paper. I cut a tree from Gold Foil card using the Santa’s Sleigh Thinlits Dies and attached it to the top left hand corner. I cut two pieces of Basic Black card 4-1/4″ x 6-1/4″ to create mats for my photos. These are attached across the centre of the page with the one on the left raised on dimensionals.  I cut the sleigh from Basic Black card and the detailed sleigh from Gold Foil card using the Santa’s Sleigh Thinlits Dies. These are attached to each other and then to the bottom left hand corner of the page. I cut the reindeer from Gold Foil card and the wreath from Basic Black card using the same dies. They are attached in front of the sleigh. I coloured three medium Basic Pearls using the Dark Red Cherry Cobbler Stampin’ Blend and attached them to the wreath. My title is cut from Whisper White card using the Timeless Type Alphabet Dies (retired) and attached above the photo on the right. I printed my journalling onto Whisper White card and cut it into strips before attaching to the lower right hand corner of the page. This page forms part of my attempt to complete my memory keeping for 2016. I am hoping to finish these pages over the Christmas period and make a start on 2017.
Bye for now,
Kris
Product Used:


Another Tri-Shutter
This time for my Mum and Dad. I followed the same directions at Splitcoaststampers as I did for the cards I made for my daughters. This time the card base is cut from Thick Whisper White card. I decorated the two end panels with a piece of the Be Merry Designer Series Paper which is attached to Cherry Cobbler card. The long panels in the top and bottom sections of the card are also decorated with Be Merry Designer Series paper, however this time, the designer series paper is attached to Garden Green card. The four small panels are decorated with the Merry Music Specialty Designer Series Paper which is attached to Basic Black card. The image panel on the front of the card has a piece of Whisper White card embossed with the Softly Falling Embossing Folder which is attached to Garden Green card.  I stamped the greeting which is from the now retired Merry Patterns stamp set onto Whisper White card using Memento Tuxedo Black ink. I stamped the fill for the word season using Cherry Cobbler ink. The greeting is cut out using a Layering Oval Framelit Die and is attached to a Cherry Cobbler scalloped oval which is cut using the same dies before being attached to the embossed panel. I stamped “to be jolly” from the same stamp set onto Whisper White card using Memento Tuxedo Black ink before attaching to Cherry Cobbler card and the central panel. For the panel on the right I once more embossed Whisper White card using the Softly Falling Embossing Folder which is attached to Garden Green card. I stamped the candle image from the Merry Patterns stamp set onto Whisper White card using Memento Tuxedo Black ink. The fill images for the candles are stamped in Cherry Cobbler and the candle flames are stamped using Crushed Curry ink. I masked the stamped candle image and stamped the leaf image using Garden Green ink.
  The image is cut out using the Layering Ovals Framelits Dies and attached to a Cherry Cobbler scalloped oval cut using the same dies. I cut two reindeer from Gold Foil card using the Card Front Builder Thinlit Dies and attached them to the top right and lower left small panels. I cut two stars from Gold Foil card using the Starlight Thinlits Dies and attached them to the upper left and lower right small panels.
I love the bright, happy colours in the Be Merry Designer Series Paper and think it works well on this card. What about you?
Bye for now,
Kris
Product used:


Christmas Tri-Shutter

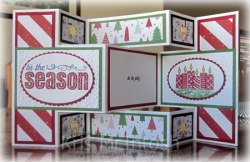
I thought I would share with you today the cards that I made for my daughters and sons-in-law. I followed the directions at Splitcoaststampers, so check it out if you would like to make one. I embossed Whisper White card using the Softly Falling Embossing Folder and attached the pieces to Gold Foil card before attaching to the Cherry Cobbler card base.  I stamped “tis the season” from the Merry Patterns stamp set (sorry this one is now unavailable) onto Whisper White card using Versamark ink. I embossed the image using Gold Embossing powder and then stamped “season” inside the embossed greeting using Cherry Cobbler ink. The greeting is cut out using one of the Layering Oval Framelits Dies and attached to a Cherry Cobbler scalloped oval before attaching to the card base. The greeting is attached to the left hand central panel of the card. I stamped “to be jolly” from the same stamp set onto Whisper White card using Versamark ink and once more heat set it with Gold Embossing Powder. The stamped Whisper White card is once more attached to Gold Foil card and then to the middle panel of the card.
 I stamped the candle image using Versamark ink onto Whisper White card. The image is embossed using Gold Embossing Powder. I stamped the fill images for the candles using Cherry Cobbler ink and the candle flames using Crushed Curry ink. I covered the candle image with a post-it-note mask and stamped the leaf around the bottom of the candles using Garden Green ink. The image is cut out using the Layering Ovals Framelits Dies and attached to a Cherry Cobbler scalloped oval cut using the same dies.
  The image panel is attached to the right hand central panel of the card. I cut two reindeer from Gold Foil card using the Card Builder Framelits Dies and attached them to the small panels on the top right and bottom left of the card. I cut two stars from Gold Foil card using the Starlight Thinlits Dies and attached them to the small panels at top left and bottom right of the card.
I wasn’t sure if this card would be a little plain but I think the Gold Foil card and the Gold Embossing looks fantastic with the Whisper White and Cherry Cobbler, don’t you? I’d love to hear what you think.
Bye for now,
Kris
Product Used:


Happy Birthday Abigail
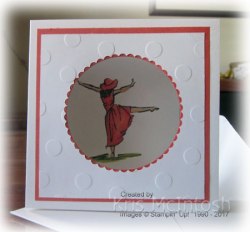
I can’t believe my eldest granddaughter is turning 13 today. It only seems like yesterday, I was rushing to the hospital to have my first cuddle and now she is a teenager! I might add she is a lovely young lady and both Ron and myself are blessed to have her in our lives. So a special birthday calls for a little extra effort on my part to create her card. I layered Calypso Coral card onto scored and folded Thick Whisper White card using temporary adhesive and cut a circle from the centre using the Layering Circle Framelits Dies.  I removed the Calypso Coral card and layered a piece of Whisper White card. I used a pencil to mark the circle in the Calypso Coral card onto the Whisper White card and cut a scalloped circle using the same dies, making sure to centre the circle inside the scalloped circle. I removed the Whisper White card and embossed it using the Basic Polka Dot Embossing Folder.
  The pieces were all attached back together. I attached a folded piece of Whisper White card onto the inside of the Thick Whisper White card with the fold on the right hand side. I stamped the image from the Beautiful You stamp set onto Whisper White card using Memento Tuxedo Black ink and coloured the image using the Calypso Coral, Old Olive and Ivory and Bronze Stampin’ Blends. The Whisper White card is layered onto Calypso Coral card and then the front of the inside panel so that the image shows through the circle in the front of the card.
  I cut the Happy Birthday thinlit die from Calypso Coral card twice, so that I could cut the Happy and Birthday apart. I used some retired dies to cut the numbers and letters for 13th, also from Calypso Coral card. There are layered onto the central panel of the card. This is a 5″ x 5″ card, so I created an envelope from Whisper White card using the Envelope Punch Board. Since it is such a special birthday her gift is jewellery and I created a matching box to hold the gift for her.
I love that this is so bright and pretty and also a little grown up. Once more Happy Birthday Abigail.
Bye for now,
Kris
Product Used:


For My Grandsons

Have you seen all the wonderful bridge cards on demonstrator blogs and on Pinterest? Aren’t they just adorable? Such a fun fold. Well, I decided to make one for each of my Grandsons for Christmas this year. I created my card bases from Thick Whisper White card and then cut Whisper White pieces to layer onto each of the panels. The panel pieces were embossed using the Woodlands Embossing Folder. After they were embossed I used my Crumb Cake stamp pad to rub over the top and accentuate the trees.  Once the panels were attached, I stamped three trees for each card using the image from the Santa’s Sleigh stamp set and coloured them using the Old Olive Stampin’ Blends. The images are cut out using the matching Santa’s Sleigh Thinlits Dies. I attached two of the trees to the middle panel. The third tree is attached to Window Sheet and a small bridge that fits across the central part of the card. The sleigh image and the reindeer image from the Santa’s Sleigh stamp set are stamped onto Whisper White card and coloured using the Crumb Cake Stampin’ Blends.
  I marked a spot about 5cm from the bottom of the card and cut between the images using my Stampin’ Trimmer. I then trimmed around the outline of each of the images and attached the panel across the front of the card, with the outside edges of the image panel and the card base matching. I stamped Merry Christmas Wishes from the Santa’s Sleigh stamp set onto Whisper White card using Early Espresso ink, attached it to Crumb Cake card and then across the card beneath the stamped images. I love how gorgeous these cards look and I know my grandsons will love that they fold into the envelope and then pop open when they pull them out.
Have you tried one of these yet? If not, I recommend that you do. Right at this minute I can’t find the link to the video that I watched to create this card, but I am sure if you google it, you will find any number of tutorials and videos to help you create one of these card.
Bye for now,
Kris
Product Used:


For my Granddaughters

I had a lot of fun making these Christmas cards for my granddaughters. I found a link to a You Tube video by Georgai Giguere to create a night background.  I had to improvise with the colours as the video used Blackberry Bliss a long retired Stampin’ Up! colour for which I substitued Berry Burst. I started by creating my card base from Thick A4 Whisper White card. I cut my layers from Whisper White card and stamped across them using the single tree from the Lovely as a Tree stamp set and Stazon Jet Black ink. I created a mask for the largest panel by punching post-it-notes using the 1-3/4″ Circle punch.
  I sponged across the card firstly using Smoky Slate, then Berry Bliss across the majority of the card with a little Old Olive across the bottom of the card and lastly Night of Navy over the whole of the card and then sponged around the edges to give the depth. I removed the post-it-note mask and stamped the greeting from the Merry Patterns stamp set (no longer available) using Memento Tuxedo Black ink.
  I created a little starry look to the sky by adding small drops of Fine Tip Glue to the sky and then sprinkled over Dazzling Diamonds. I had to leave it dry for a while before I could attach the sponged pieces to the card base – I love how the background turned out. After I attached all the background pieces and the small z-fold panel across the bottom of the card, I cut the solid sleigh from Silver Foil using the Santa’s Sleigh Thinlits Dies. The detailed image and the reindeer are cut from Dazzling Details Glimmer Paper. This is so pretty, so thank you Georgai Giguere for the fabulous video.
I just know my granddaughters are going to love these cards.
Bye for now,
Kris
Product Used:


3″ x 3″ cards
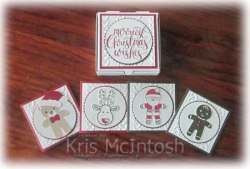
Yesterday I shared with you the Mini Pizza Boxes I gave as gifts at my Christmas celebration. Today I am sharing the set of four 3″ x 3″ cards and decorated Mini Pizza Box we created at our last class at Beachmere. To decorate the top of the box, we embossed Whisper White card using the Cable Knit Embossing Folder. The embossed card is attached to the Cherry Cobbler card and then the top of the box. We stamped “Merriest Christmas wishes” from the Watercolour Christmas stamp set onto Whisper White card using Cherry Cobbler ink. The greeting is cut using the largest Layering Circle Framelit Die and attached to a Early Espresso scalloped circle cut using the same dies.  The greeting panel is attached to the box lid using Tombow Multipurpose Glue. We decorated two cards with Cherry Cobbler card bases and two cards with Early Espresso card bases. Each of the cards has a Whisper White square of card which is embossed using the Cable Knit Embossing Folder before being attached to the card front. They also have a Whisper White circle and either a Cherry Cobbler or Early Espresso scalloped circle all cut using the Layering Circle Framelites Dies. The first card has the bear image from the Cookie Cutter Christmas stamp set stamped onto Whisper White card using Crumb Cake ink.
  The face is stamped in Early Espresso and the the hat is created using Cherry Cobbler and Whisper White card and the retired Santa Hat Punch. The bow is punched from Cherry Cobbler card using the Cookie Cutter Punch. All of the pieces are attached to each other and layered onto the centre of the Whisper White circle on a Cherry Cobbler card. The second card uses the Gingerbreadman image from the Cookie Cutter Christmas stamp set. The image is stamped onto Whisper White card using Early Espresso ink and punched out using the Cookie Cutter Punch.
  Two small Basic Pearls were coloured using the Dark Cherry Cobbler Stampin’ Blend to create buttons. The image is layered onto the Whisper White circle on an Early Espresso card base. For the third card, the Reindeer image was stamped onto Whisper White card using Early Espresso ink and punched out using the Cookie Cutter Punch. A second image was stamped in Cherry Cobbler ink on Whisper White card and the nose only was cut out and attached over the stamped Early Espresso nose. The image is attached the Whisper White circle on a Cherry Cobbler card base.
  The last card has the Santa image from the Cookie Cutter Christmas stamp set stamped onto Whisper White card using Memento Tuxedo Black ink. The image is coloured with the Cherry Cobbler, Dark Smoky Slate and Light Skin Tone Stampin’ Blends. The image pieces are layered onto the Whisper White circle on an Early Espresso card base. For each of the cards, the inside Whisper White was stamped using the For/From image from the Merry Little Labels. The image is coloured using Early Espresso, Cherry Cobbler and Garden Green Stampin’ Write Markers.
I love this set, it is so cute and would make a perfect small gift or stocking filler for friends or family this Christmas. If you would like to create this project, then please download your free tutorial. You can also download this tutorial on the Free Tutorials page.
Bye for now,
Kris
Product Used:


Chocolate Pizza Boxes

I love the Mini Pizza Boxes in the Holiday Catalogue and was so excited to know that they will be carrying over. They are a great size for holding 3″ x 3″ cards (and by the way the 3″ x 3″ envelopes are carrying over too) but they are also food safe so you can add your favourite chocolate to make an edible gift as well. I used these Mini Pizza Boxes to hold some Rum Balls that I made for the ladies who attended my Christmas celebration and they all loved them – the boxes I mean, not sure about the Rum Balls.  To decorate the top of the box I attached a piece of the Merry Littel ChristmasDesigner Series paper. I trimmed a length of the 7/8″ Striped Ribbon and attached it onto the Designer Series paper. I stamped the greeting from the Merry Little labels stamp set and punched it out using the 2″ Circle Punch. I layered it onto Cherry Cobbler card which I punched using the Starburst Punch. I stamped the holly and leaf image from the Half Full Stamp set onto Whisper White card using Memento Tuxedo Black ink and coloured the leaves using the Light Old Olive Stampin’ Blend and the berries using the Dark Cherry Cobbler Stampin’ Blend.
  I cut out the leaves and berries and attached them over the top of the stamped holly and leaves. They are a slightly different size but you can successfully cover the stamped image without losing the greeting. The greeting panel is attached to the top of the box using Mini Dimensionals. I added four mini cupcake liners to the inside of the box to hold four Rum Balls. I cut greaseproof paper using the largest scalloped Layering Square Framelit Die. I printed the ingredients for the Rum Balls onto Whisper White card and punched them out using the 2″ circle punch before attaching to the greaseproof paper. The greaseproof paper is placed on top of the Rum Balls before closing the box. I love how pretty and professional looking this is, don’t you. I hope I have inspired you to add your favourite Christmas treats to one of these boxes to share with your friends and family.
Bye for now,
Kris
Product Used:


