Happy New Year

It’s that time of the year to reset your thinking and reach for the things you want. My first goal is to share my love of Stampin’ Up! with you as much as I can. I will continue to try and post 5 times a week and share different ideas and sometimes a link to a video or tutorial. I am also a Weight Watcher lifetime member and so maintaining my goal weight and a completing my 10,000 steps every day are also goals I wish to pursue. My husband and I love caravanning so fitting in more time to spend travelling around this fantastic country is also a goal for me for this year. My wish for you is to have a happy, healthy and prosperous New Year and to spend as much time as you can doing the things you love with the people you love.
I created this card to share with you and celebrate the beginning of 2018. The background uses an image from the Amazing You Sale-A-Bration stamp set which is stamped onto Whisper White card using Real Red, Daffodil Delight and Tempting Turquoise ink. I cut the “happy” from Pacific Point card using the Birthday Thinlit Die and removing the “birthday”. The numbers are cut from Pacific Point card using the Large Numbers Dies. Both the “happy” and the numbers are attached to the stamped Whisper White card. The panel is attached to Pacific Point card and then scored and folded Thick Whisper White card.
The inside of the card is decorated with the same image as the front of the card using the same inks.
So once more, Happy New Year to everyone.
Bye for now,
Kris
Product Used:


Simple Heartfelt Blooms

Today I am going to share with you a set of three cards I made using the Heartfelt Blooms stamp set. This is one of the stamp sets you will be able to earn for free next week (3rd January) when the Sale-A-Bration catalogue is launched.  If you place an order for $90.00 worth of product from any current catalogue – Annual or Occasions Catalogue – you can select this stamp set FREE. Woohoo, who doesn’t love free, especially when you can get such a gorgeous and versatile stamp set. The set contains one large floral stamp and three greetings stamps. So this set of card is super quick and simple to make. I started by cutting Whisper White 13.3cm x 9cm and stamping onto the top left hand corner using the floral stamp and Calypso Coral, Bermuda Bay and Smoky Slate ink.
  Then on each one I used my stamp-a-ma-jig to line up one of the greetings from the stamp set which is stamped in Memento Tuxedo Black ink. Each of the stamped panels is attached to co-ordinating cardstock 13.8cm x 9.5cm. The stamped panels are then attached to scored and folded Thick A4 Whisper White card. To decorate the inside of the cards, I stamped the floral image onto the lower left hand corner of the inside of the card using the co-ordinating ink.
Like I said, these are super simple and super quick to make but don’t they pack a lot of punch. The floral stamp is so detailed. I for one am falling in love with this stamp, what about you? I bet you have seen quite a few examples on the net and Pinterest and you will most likely see more!
If you don’t have copies of the upcoming Occasions and Sale-a-bration catalogues and you live in Australia, then please contact me so that I can arrange to have them sent to you. If you live locally, call in and pick them up.
Don’t forget that you must place your final order from the Holiday catalogue by the 2nd January or you will miss out completely on something you must have.
Bye for now,
Kris
Product Used:


Merry Little Christmas Memories and More

Since Stampin’ Up! released their first project life kit I have created a December Daily (sort of) scrapbook to record what happens in December. In Australia, December marks the end of a school year as well as Christmas and the beginning of a New Year. So there is always lots happening along with the usual Christmas things, there are end of school presentations and graduations. So today I thought I would share some of the pages I have created so far (I am always a little behind!).  The first two pages were inspired by a video I watched but unfortunately I can’t find now, so if you recognise your work, thank you for the inspiration. I am not an every day scrapper, I am more of an event scrapper, so I only scrap for those occasions which arose during the month. Today I will share the pages I made for the 1st of December which is the day my grandchildren come over and decorate the tree and put up all the decorations around the house. This year was the first year that Emma’s children couldn’t be here as they have moved further away and can’t just pop in after school. So the job fell to Sarah’s children. I love watching them get out the decorations and remembering where they came from or when we made then. Although it may not be as pretty as some, my tree is filled with lots of love and memories.
Page 3

Page 4

Page 5

The best thing about recording these memories is the happy times we have sitting around looking through the albums and remembering. One photo can bring so many memories to mind. I know that you all take lots of photos but how often do you sit at the computer and look at them, having them printed and in a book makes it so easy to enjoy the memories. I was lucky enough to get a Picturemate home printer some years ago and it lets me sit with the pages and print exactly what I want in the size I want, which makes it a lot easier for me. I love the Merry Little Christmas Memories and More Card Collection and I am sure you do too. Don’t forget that you can use this collection to create some very gorgeous and very quick Christmas Cards. The Merry Little Christmas Card Collection will disappear on the 2nd January, so if you haven’t ordered your collection yet, don’t delay.
Bye for now,
Kris
Product Used:


Freshly Made #318

Today I am sharing a card I created using the sketch challenge at Freshly Made this week. I have used mostly current product with a peak at something new. I embossed Whisper White card using the soon to be released Simple Stripes Embossing Folder. This is a 6″ x 6″ folder, so it is very versatile. The embossed card is wrapped with Emerald Envy 5/8″ Crinkled Seam Binding Ribbon and attached to scored and folded Sweet Sugarplum card. I stamped the three stem image from the Tranquil Tulips Hostess stamp set onto Whisper White card using Emerald Envy ink. I added a few leaves around the base also using Emerald Envy ink using one of the leaves from the same stamp set.  I stamped two small and one large flower onto Whisper White card using Sweet Sugarplum ink. These flowers are two-step but stamped in the same colour. I love how much shading you get on these flowers with so little effort. I stamped the flower stamens using Early Espresso ink before cutting out the flowers and attaching them to the top of the flower stems. The Whisper White card is attached to Sweet Sugarplum card and then the card front using dimensionals.
 To decorate the inside I stamped the same three stem image from the Tranquil Tulips stamp set onto the lower left hand corner of Whisper White card using Emerald Envy ink. I added a few leaves around the base of the stems also using Emerald Envy ink. I stamped the flower (also a two step stamp) onto the flower stems using Sweet Sugarplum ink. I decided not to add a greeting to this card because I think it could be used for a few different occasions.
I find that I always love the sketches from Freshly Made, so thanks for another great challenge. What about you? Do you love participating in sketch challenges? What’s your favourite.
Bye for now,
Kris
Product Used:


Cozy Cottage…..
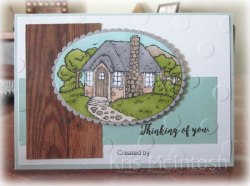
…is a new Hostess stamp set in the 2018 Occasions Catalogue. As part of my pre-order I was able to earn this stamp set and I have been having a lovely time colouring in this gorgeous cottage. This is the first actual card I have created using this stamp set. I stamped the greeting from Colourful Seasons onto Pool Party card using Early Espresso ink and attached it to Whisper White card. I embossed the Whisper White/Pool Party card using the Basic Polka Dot Embossing Folder.  I cut a piece of Wood Textures Designer Series Paper and attached it to the left hand side of the embossed card before attaching to scored and folded Pool Party card. I stamped the cottage image from the Cozy Cottage stamp set onto Whisper White card using Memento Tuxedo Black ink and coloured in the image using Old Olive, Crumb Cake, Ivory, Bronze, Smoky Slate and Pool Party Stampin’ Blends. I cut out the image using one of the Layering Oval Framelits Dies and attached it to a Smoky Slate scalloped oval cut using the same Dies.
  The image is attached to the card front using dimensionals.
To decorate the inside of the card, I stamped the chair image from the Cozy Cottage stamp set onto the lower left hand corner of Whisper White card using Memento Tuxedo Black ink. I coloured the image using Crumb Cake and Old Olive Stampin’ Blends.
I love this card, so peaceful and serene, don’t you think? Of course I also love the Stampin’ Blends, they make it so easy to create a beautifully coloured scene to add to our cards or for that matter anything we might be creating with paper.
I’d love to hear what you think.
Bye for now,
Kris
Product Used:


Last Christmas Share

I hope you have all had a wonderful Christmas and a restful Boxing Day. I was going to share this project with you yesterday but I spent the day relaxing instead, so I thought I would pop in today with my last Christmas share. I wanted to use up some of the Be Merry ornaments that I had left and found this cute little idea which was shared on a demonstrator only page. You can learn how to create the cutlery holder by watching this video by a UK Demonstrator Angelina from Intertwine Designs.  I created the basic holder using Whisper White card. I decorated half using Old Olive card and the other half using Real Red card and created belly bands to match. Once I had created the ornaments, I simply attached them to the belly bands. Angeline uses a corner rounder to round the top corners of the cutlery holder which we do not stock any more, however you can use the corner rounder on the Envelope Punch Board instead. You could, of course, omit the ornaments and add any embellishment you wish including just adding a guest name.
If you would like to purchase these gorgeous ornaments which are really quite simple to make and look absolutely stunning, don’t delay in placing your order, they are available until the 2nd January on a while stocks last basis.
Bye for now,
Kris
Product Used:


Merry Christmas

Thought I would pop in early and wish each and every one of you a very Merry Christmas and a wonderful New Year. This photo of Abi, Ethan and Elyssa was taken last night before we went to look at Christmas lights. You can tell you have a teenager in the family when Abi says but Nan my hair isn’t done!
I am lucky enough to be spending the day with my eldest daughter, her husband and these three beautiful children, as well as my Mum and Dad. My sister, niece and great nephew will also be there. My youngest daughter and her family will be visiting with her husband’s family, which is lovely but I will miss having them here. I hope your day is filled with all the things that make your life happy.
Bye for now,
Kris
Global Design Project 118
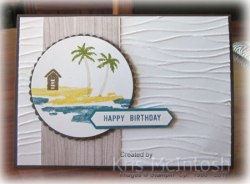
Today I am sharing with you some more new product which I used to complete the sketch challenge at Global Design Project this week. This card uses a great new photopolymer stamp set called Waterfront. I embossed Whisper White card using the Seaside Embossing Folder and attached it to scored and folded Early Espresso card. I attached a strip of Wood Textures Designer Series Paper to the left hand side of the embossed card. The stamped piece was one that I had been playing with to get the feel for this stamp set. I stamped the sand using Daffodil Delight ink and the sea using Island Indigo ink.  I stamped the house using Soft Suede ink and the stems of the palm trees using Crumb Cake ink. The palm leaves are stamped with Old Olive ink. The image is cut using the Layering Circle Framelits Dies and attached to an Early Espresso scalloped circle cut using the same dies. The image panel is attached to the card front over the designer series paper using dimensionals. I stamped “happy birthday” from the Thoughtful Banners stamp set onto Whisper White card using Island Indigo ink. I punched the greeting using the Classic Label Punch.
 The greeting is attached to Island Indigo card which I trimmed to match the shape of the punch before attaching to the card front using dimensionals.
To decorate the inside of the card, I stamped the sand using Daffodil Delight ink onto the lower left hand corner of Whisper White card. The palm tree stems are stamped using Crumb Cake card and the palm leaves using Old Olive ink.
I think this is going to be such a fun and versatile stamp set, keep your eye out I am sure you will see this used many times.
Bye for now,
Kris
Product Used:


Sneak Peak Birthday Card
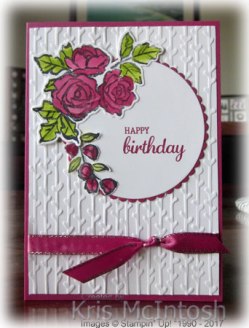
I have had some of the product from the soon to be released Occasions Catalogue sitting in a box on the floor of my craft room neglected while I finished my Christmas projects. I have finally got them out of the box and have started to play with them. One of the first sets I wanted to use was the Petal Palette stamp set. I decided that the best way to see what was in each stamp set was to stamp them onto Whisper White card. This stamp set has a co-ordinating set of dies – the Petals and More Thinlits Dies, so I cut them out and attached them to the stamped page. Now I have a visual record of what is in these sets which I find makes it easier to begin creating with them.  Anyway while doing this I stamped a number of the flower images onto some scrap Whisper White card and started trying a few different colouring techniques. This card features two of the images which are stamped onto Whisper White card using Memento Tuxedo Black ink and coloured using Berry Burst and Lemon Lime Twist ink and an Aqua Painter. The images are so pretty and I love that I have been able to achieve some depth of colour in the images. They also have a co-ordinating die to cut them out – Woohoo. Soooo….. I stamped the greeting from the Best Birds stamp set onto Whisper White card and cut it out using one of the Layering Circle Framelits Dies.
  The greeting is attached to a Berry Burst scalloped circle cut using the same dies. I attached the two images to the Whisper White circle around the greeting. I embossed Whisper White card using one of the Petal Pair Embossing Folders. These embossing folders come as a set of two, so they are the smaller dies but this one was easy enough to line up and cover the whole of the Whisper White card. I wrapped the bottom of the card using Berry Burst 3/8″ Metallic Edge Ribbon and tied a knot (a new ribbon in the Occasions Catalogue). The embossed card is attached to scored and folded Berry Burst card before I attached the image panel. To decorate the inside of the card, I attached another of the stamped images, which I had coloured in the same manner, to the lower left hand corner of Whisper White card.
This card is destined for a friend, whose birthday was a couple of days ago. A little late but hopefully she will like it enough to forgive my lateness.
Bye for now,
Kris
Product Used:


Christmas Memory Keeping Page

I haven’t shared with you the 12″ x 12″ page we made at our last Memory Keeping Class. This page has 12″ x 12″ Cherry Cobbler card as its base. I cut one piece of Be Merry Designer Series Paper and attached it down the left hand side of the page. I attached a piece of the black Merry Music Specialty Designer Series Paper across the centre of the page. I punched a long narrow strip of Gold Foil card using the Decorative Ribbon Border Punch and attached it across the bottom of the Merry Music Specialty Designer Series Paper. I cut a tree from Gold Foil card using the Santa’s Sleigh Thinlits Dies and attached it to the top left hand corner. I cut two pieces of Basic Black card 4-1/4″ x 6-1/4″ to create mats for my photos. These are attached across the centre of the page with the one on the left raised on dimensionals.  I cut the sleigh from Basic Black card and the detailed sleigh from Gold Foil card using the Santa’s Sleigh Thinlits Dies. These are attached to each other and then to the bottom left hand corner of the page. I cut the reindeer from Gold Foil card and the wreath from Basic Black card using the same dies. They are attached in front of the sleigh. I coloured three medium Basic Pearls using the Dark Red Cherry Cobbler Stampin’ Blend and attached them to the wreath. My title is cut from Whisper White card using the Timeless Type Alphabet Dies (retired) and attached above the photo on the right. I printed my journalling onto Whisper White card and cut it into strips before attaching to the lower right hand corner of the page. This page forms part of my attempt to complete my memory keeping for 2016. I am hoping to finish these pages over the Christmas period and make a start on 2017.
Bye for now,
Kris
Product Used:


