Happy Birthday Sarah
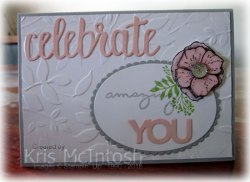
My daughter Sarah is celebrating her birthday today and this is the card I made for her. I broke out some new stamps and a new (to me) embossing folder for this card. I embossed Whisper White card using the Layered Leaves Embossing Folder and attached it to scored and folded Smoky Slate card. I stamped the floral image from the Amazing You stamp set (which is also free during Sale-A-Bration) onto Whisper White card using Wild Wasabi ink. I cut the image panel using one of the ovals from the Layering Ovals Framelits Dies so that the leafy part of the image was located on the upper right hand corner. I stamped “amazing” from the Amazing You stamp set onto the oval using Smoky Slate ink.  The image panel is attached to a Smoky Slate scalloped oval also cut using the Layering Ovals Framelis Dies and then the lower right hand corner of the card front. I stamped the floral image onto scrap Whisper White card twice using Memento Tuxedo Black ink and coloured the images using the Pink Pirouette and dark Daffodil Delight Stampin’ Blends. I cut the central part of the flower from one image and the whole flower from the second image. The flowers are attached using a dimensional. I attached the flower over the stamped image using Tombow Multipurpose Glue and also a dimensional under the outer part of the flower. I cut “celebrate” and “you” from Pink Pirouette card using the Celebrate You Thinlits Dies which you can earn for free during Sale-A-Bration.
  The “Celebrate” is attached to the top left hand corner of the card front and the “you” is attached to the stamped oval.
To decorate the inside of the card I stamped the greeting from the Perennial Birthday stamp set using Memento Tuxedo Black ink. I also stamped the floral image from the Amazing You stamp set once more using Wild Wasabi ink. I stamped and coloured two more flowers to match the front before attaching over the stamped flower.
I think this is going to be a fun co-ordinating set to use over the coming months. So don’t forget to place a qualifying order before the end of March to collect both the stamp set and the dies free. An added bonus is that the dies, unlike everything else in the Sale-A-Bration catalogue will be carrying over into the 2018-2019 Annual Catalogue.
Once more Happy Birthday to Sarah, hope she has a lovely day.
Bye for now,
Kris
Product Used:


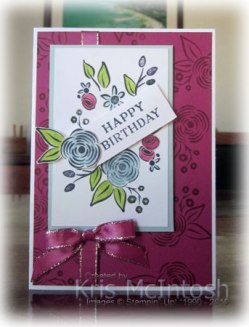
Another Catalogue Case

Yesterday I shared a card with you which was CASED (copy and share everything) from the Occasions Catalogue. I loved the card so much, I couldn’t stop with one, so here is another card which I have CASED from the Occasions Catalogue. I stamped Whisper White card using the “Happy Birthday” from the Perennial Birthday stamp set onto Whisper White card using Soft Sky ink. I used my Stamp-a-ma-jig to ensure placement because it was stamped several times to create a background. I used my Aqua Painter to add some Lemon Lime Twist ink to the Whisper White card before stamping the dotted background image from the Perrenial Birthday stamp set using Basic Black Archival ink.  I also stamped the large floral image using the same ink. The Whisper White card is attached to scored and folded Lemon Lime Twist card. I stamped the large floral image, the large single flower and the small single flower onto scrap Whisper White card using Basic Black Archival ink and coloured the images using an Aqua Painter, Berry Burst, Lemon Lime Twist and Soft Sky ink. All three images were fussy cut and attached to the card front before stamping the second greeting from the stamp set using Basic Black Archival ink.
 Since I have been playing with this stamp set for a couple of days now, I had several images which I had already stamped laying on my desk. The images were coloured using an Aqua Painter and Berry Burst, Lemon Lime Twist and Soft Sky ink. I cut out the single flower and attached it to the lower left hand corner of Whisper White card. I stamped the leaf image onto the flower using Basic Black Archival ink and coloured the leaves using an Aqua Painter and Lemon Lime Twist ink. I cut out the second flower with the leaves and attached it to the Whisper White card, partially covering the Soft Sky flower.
This card is super pretty but maybe I am biased because I love this stamp set so much. I hope you aren’t sick of it yet.
Bye for now,
Kris
Product Used:


Case The Catalogue
Today I am going to share with you another card made using the Perennial Birthday stamp set, this time I am casing the Occasions Catalogue. This stamp set is featured on Page 17 of the Occasions catalogue and there are three cards showcased using the stamp set. This card is one of them. I stamped the large floral image from the Perennial Birthday stamp set onto Berry Burst card using Berry Burst ink. I wrapped the left hand side using the Berry Burst 3/8″ Mettalic Edge Ribbon and attached it to scored and folded Thick Whisper White card. I stamped lots of the images from the stamp set onto Whisper White card using Basic Black Archival ink.  I coloured the images using Berry Burst, Lemon Lime Twist and Soft Sky ink and an Aqua Painter. The stamped panel is attached to Soft Sky card and then the card front using dimensionals. I stamped the greeting onto Whisper White card using the Basic Black Archival ink and attached it to the stamped panel using dimensionals.
  I stamped the large floral image onto scrap Whisper White card using Basic Black Archival ink and coloured it with Soft Sky and Lemon Lime Twist ink using an Aqua Painter. The flower and leaves were fussy cut and attached to the greeting panel. I tied a bow using the Berry Burst 3/8″ Mettalic Edge Ribbon and attached it to the card front using a Glue Dot.
To decorate the inside of the card, I stamped the large floral image and coloured it using Berry Burst and Lemon Lime Twist ink and an Aqua painter.
I did add an extra layer to this card but I love how it turned out. Do you case the catalogue when you want to get your creative juices flowing?
Bye for now,
Kris
Product Used:


Perennial Birthday
 In my last post I mentioned how much I love the Watercolour Christmas Kit in the Holiday Catalogue. Well, I purchased several of these for my end of year classes and somehow managed to order one kit too many.
  So I still had a few of these cards left but I don’t need Christmas Cards, so I thought I would share how I used the new Perennial Birthday stamp set to turn the Christmas cards into birthday cards. For each of the cards, I used the same layouts and embellishments but used the Perennial Birthday stamp set to add flowers, leaves and sentiments for the focal images.
 I am so happy with the way the cards have turned out. I coloured the images using Real Red, Emerald Envy and Daffodil Delight Stampin’ Write Markers. The images were all stamped using Black Archival ink so that they wouldn’t run when I coloured them with the Stampin’ Write Markers. I also added sentiments from the Perennial Birthday stamp set to the inside of the cards too. The flowers all have Basic Rhinestones added to the centres, gotta have some bling.
I think I may have to try this with another stamp set or two to finish using up the Watercolour Christmas Kit cards I have on hand.
Bye for now,
Kris
Product Used:


Perenniel Birthday Project Kit
 The Perenniel Birthday Project Kit is on page 16 of the Occasions Catalogue and boy what a fantastic project it is. I have been impressed with the project kits released in the last couple of catalogues. I especially loved the Watercolour Christmas Project Kit from the Holiday Catalogue. So when I placed my pre-order this kit was high on my priority list.
  The kit contains a very beautiful box, dividers for each month and enough product to make four each of four different cards, and let me say that are very pretty. The kit comes with stickers for each month which you attach to the tabbed cards.
  The cards have the days of the month, so you can add the occasions you need cards for and then you can add the cards to the box, so you are all ready when the event comes up.
  The kit contains a beautiful Gold Satin Ribbon and some Dapper Denim Bakers Twine to add the embellishments to your cards. You do need to purchase the Perennial Birthday stamp set as an extra to complete the kit, you could probably use something you already have in your crafting stash if you wish.
  However, just let me say this is a beautiful stamp set and I just know that I am going to use it lots. The images are small and easy to line up using your stamp-a-ma-jig but I know that I will love using it with the Stamparatus when mine is delivered.
  You will also need Old Olive, Dapper Denim and Flirty Flamingo ink, some Glue Dots and dimensionals to assemble your cards. This Project Kit would make an awesome gift for somebody, filled with some extra cards (if you are like me you already have enough cards to fill a dozen of these boxes). So take another look at this kit, I am sure you will be impressed.
Bye for now,
Kris
Product Used:


Heartfelt Blooms

Today I am going to share with you three cards I made using the Heartfelt Blooms stamp set from the Sale-A-Bration catalogue. From January 3rd till 31st March, you can earn product from the Sale-A-Bration catalogue based on what you spend in one order.  So for a spend of $90.00 you have a wide selection of seven stamp sets, designer series paper, thinlits dies, card bases, a card kit, ribbon pack and a Memories and More card pack. Two of these items are only available when your sales reach $180.00 – the Happy Wishes stamp set and the Celebrate You Thinlits Dies.
  However, the Celebrate You Thinlits Dies, unlike the other items in the Sale-A-Bration catalogue, will also be available in the next Annual Catalogue, so this is a great item to have in your stash ready to go with the new items in the next Annual Catalogue and it’s free.
Anyway, onto my cards – for the first card I embossed the top two-thirds of Whisper White card using the Softly Falling Embossing Folder. I stamped the greeting from the Heartfelt Blooms stamp set onto the lower right hand corner of the embossed card using Bermuda Bay ink. I wrapped the card just below the embossing using the Bermuda Bay ribbon from the Shimmer Ribbon Pack (available in the Sale-A-Bration catalogue) and tied a knot. The embossed card is attached to scored and folded Bermuda Bay card. The floral image from the Heartfelt Blooms stamp set stamped onto Whisper White card using Bermuda Bay ink. The image panel is attached to Bermuda Bay card and then the card front using dimensionals. To decorate the inside of the card, I attached a narrow strip of Bermuda Bay card behind one long edge of Whisper White card which is embossed using the Softly Falling Embossing Folder. The panel is attached to the bottom of Whisper White card.
 For the second card, I once more embossed the top two-thirds of Whisper White card using the Softly Falling Embossing Folder. The card is stamped with another of the greetings from the Heartfelt Blooms stamp set using Smoky Slate ink. The card is wrapped with the Smoky Slate ribbon from the Shimmer Ribbon Pack and tied in a knot. The embossed card is attached to scored and folded Smoky Slate card. The floral image is stamped in Smoky Slate ink, attached to Smoky Slate card and then to the card front with the bottom of the image panel tucked underneath the ribbon. The inside is decorated in the same manner as the first card, but his time, I attached Smoky Slate card behind the embossed panel.
 The third card has, once again, the top two-thirds of Whisper White card embossed using the Softly Falling Embossing Folder. I stamped the third greeting from the Heartfelt Blooms stamp set below the embossing using Calypso Coral ink. The card is wrapped with the Calypso Coral ribbon from the Shimmer Ribbon Pack and tied in a knot. The embossed card is attached to scored and folded Calypso Coral card. The image is stamped in Calypso Coral ink onto Whisper White card, attached to Calypso Coral card and then the card front using dimensionals. The inside is decorated in the same manner as the other two cards using Calypso Coral card behind the embossed panel.
I love how detailed this stamped image is just using one colour. I think I am going to have to play with this one a little more to realize its full potential.
Bye for now,
Kris
Product Used:


Petal Passion – Take 3

This is the last of the cards I created using the 6″ x6″ piece of Petal Passion Designer Series Paper I coloured using my Stampin’ Blends. For this card I embossed the right hand side of the Whisper White card using one of the Petal Pair Embossing Folders before attaching it to scored and folded Whisper White card. I punched a long strip of Pink Pirouette card using the Decorative Ribbon Border Punch and attached it behind one long edge of the coloured designer series paper before attaching it to the left hand side of the embossed Whisper White card.  I stamped the greeting from the Picture Perfect stamp set onto Whisper White card using Old Olive ink and cut it out using the second largest circle from the Stitched Shapes Framelits Dies. I attached the greeting to a Pink Pirouette scalloped circle cut using the Layering Circles Framelits Dies. The image panel is attached to the card front using dimensionals.
  I stamped the image from the Petal Palette stamp set onto Whisper White card using Memento Tuxedo Black ink. The image is coloured using Pink Pirouette and Old Olive Stampin’ Blends. I cut out the image and attached it to the greeting panel.
To decorate the inside of the card, I stamped the leaf image from the Petal Palette stamp set onto the lower left hand corner of Whisper White card using Old Olive ink.
I think this card is very pretty, I think I like it the best of the three using this Designer Series Paper. I love the softness of the Pink Pirouette with the coloured designer series paper. What about you, which card do you like the best?
Bye for now,
Kris
Product Used:


Petal Passion – Take 2

This card is made using the 2nd piece of Petal Passion Designer Series paper from the 6″ x 6″ piece I coloured in using my Stampin’ Blends. For this piece I also coloured the background around the flowers using the Dark Smoky Slate Stampin’ Blend. I punched a strip of Gold Glimmer paper using the Decorative Ribbon Border Punch and attached it behind the edge of the designer series paper. The panel is attached to Whisper White card which is embossed using the Petal Burst Embossing Folder. The Whisper White card is attached to Gold Glimmer paper and then scored and folded Cherry Cobbler card. I stamped “happy birthday” from the Best Birds stamp set onto Whisper White card using Cherry Cobbler ink and cut it out using the largest oval from the Stitched Shapes Ovals Dies. The greeting is attached to a scalloped oval cut from Gold Glimmer paper using the Layering Ovals Framelits Dies. The panel is attached to the card front using dimensionals. I stamped the image from the Petal Passion stamp set onto Whisper White card using Memento Tuxedo Black ink and cut it out using the matching Petals and More Thinlits Dies. The image is coloured using Cherry Cobbler and Old Olive Stampin’ Blends and then attached to the greeting panel.
 To decorate the inside of the card, I punched a long strip of Gold Glimmer paper using the Decorative Ribbon Border Punch and attached it behind one long edge of Whisper White card embossed using the Petal Burst Embossing Folder. The panel is attached down the left hand edge of Whisper White. I stamped the bird image from the Petal Passion stamp set onto Whisper White card using Memento Tuxedo Black ink and cut it out using the matching Petals and More Thinlits Dies. The bird is coloured using Cherry Cobbler and Pool Party Stampin’ Blends before being attached over the lower edge of the embossed card.
I am a little bit on the fence with this card, I think it may be a little too over the top. What do you think? A little bit overdone?
Bye for now,
Kris
Product Used:


Happy Birthday Mum
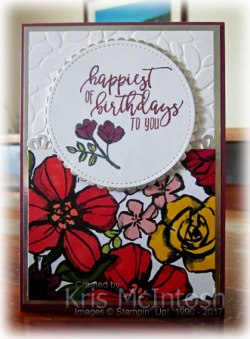
On Tuesday I shared the card I made for my Dad for his birthday, but I didn’t tell you that Tuesday was also my Mum’s 81st birthday and I thought I would share the card I made for her with you. It uses some gorgeous new product from the Occasions Catalogue from which you can begin purchasing now. I started by cutting a 6″ square from the Petal Passion Designer Series paper. This paper is black and white and is designed so that you can colour it in. I used my Stampin’ Blends – Cherry Cobbler, Rich Razzleberry, Calypso Coral, Daffodil Delight, Pink Pirouette and Old Olive to colour in my piece. I used some light colours and some dark colours but I didn’t blend the colours together. Once the panel was coloured I cut it into three pieces and this is the first piece that I am using. To begin I embossed Whisper White card using the Petal Burst Embossing Folder and attached it to Silver Foil paper and then scored and folded Rich Razzleberry card.  I punched a long strip of Silver Foil using the Decorative Ribbon Border Punch and attached it behind the coloured Petal Passion Designer Series Paper. The designer series paper is attached to the bottom of the Whisper White card. I stamped “happiest of birthdays to you” from the Picture Perfect stamp set onto Whisper White card using Rich Razzleberry ink. I cut the greeting out using the largest circle from the Stitched Shapes Framelits Dies. I stamped the image from the Petal Palette stamp set below the greeting using Memento Tuxedo Black ink and coloured the image using Rich Razzleberry and Old Olive Stampin’ Blends. The greeting is attached to a scalloped circle of Silver Foil cut using the Layering Circle Framelits Dies.
  The image panel is attached to the card front using dimensionals.
To decorate the inside of the card, I stamped the same image from the Petal Palette stamp set onto the lower left hand corner of Whisper White card using Memento Tuxedo Black ink and coloured it in using the Rich Razzleberry and Old Olive Stampin’ Blends. I punched another strip of Silver Foil using the Decorative Ribbon Border Punch and attached it behind one long edge of Whisper White card embossed using the Petal Burst Embossing Folder. The embossed panel is attached to the stamped Whisper White card.
I’m not sure how much of the Silver you can see in the photos but this card really does shimmer and shine. I will let you in on a little secret, the scalloped circle of Silver Foil was cut from the layer behind the Whisper White card, you can’t see where it was cut and saves on card.
Bye for now,
Kris
Product Used:


Happy Birthday Dad

My Dad is celebrating his 86th birthday today and I thought I would share the card I made for him with you. He still loves to play golf and I wanted to give the feel of a golf course so I used the Waterfront stamp set to build up my picture. This is a really fun set to use. You can stamp and over-stamp as much as you like to get the finish you desire. I started by stamping the hill image in Pear Pizzazz and below that I stamped the “golf course” in Wild Wasabi. This stamp has been over-stamped many times to give the finish I wanted.  Below that I used the large image to stamp the water using Pool Party ink. Again this image has been over-stamped several times to create the finished look. Lastly I used the same image to add the sky using Soft Sky ink. I stamped the little flag from the Swirly Bird stamp set using Night of Navy ink. I used my Basic Black Stampin’ Write Marker to draw the line for the flag pole and the small circle.
  Once the image was stamped, I attached it to Pear Pizzazz card. I stamped the greeting from the Best Birds stamp set onto the lower right hand corner of Whisper White card using Pear Pizzazz ink. I embossed the stamped card using the Seaside Embossing Folder. I wrapped the embossed card using the 5/8″ Burlap Ribbon before attaching to scored and folded Pear Pizzazz card. Lastly I added the image panel using dimensionals.
To decorate the inside of the card, I stamped the same image as the front of the card to create some grass onto the lower left hand corner of Whisper White using Wild Wasabi ink. I stamped the trees over the top using Pear Pizzazz ink.
The Waterfront stamp set and all the other wonderful goodies in the Occasions Catalogue can be ordered beginning tomorrow. You can also start to earn your Free stamp sets tomorrow. So think about what you want to order and make sure that you reach $90.00 that way you can earn something for FREE. Yay! Today also marks the last day that you can order from the Holiday Catalogue, so don’t miss out.
You might have noticed but this is the same sketch from the challenge at Freshly Made Sketches that I used in the Tranquil Tulips card I shared with you the other day. This card has a completely different feel but I really love the finished result.
Bye for now,
Kris
Product Used:


