GDP 78
So here I am with another challenge card this time for the Global Design Project. I love sketch challenges and this is a fun sketch to play with. In fact I liked it so much I created three different cards using the same sketch.
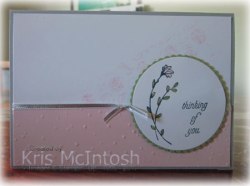
This card also adds a challenge to use the bubble wrap technique. I had never done this, so I got out some bubble wrap and used my Sponge Brayer to add Pink Pirouette ink to the wrap. I placed it onto Whisper White card and transferred the design to the card using only slight pressure.  I was surprised at just how much the design transferred, especially as I was using such a light coloured ink. I embossed a piece of Pink Pirouette card using the Softly Falling Embossing Folder and attached it to the stamped Whisper White card. I wrapped the join with some 1/8″ Silver Ribbon and attached it to scored and folded Smokey Slate card. I stamped the flower image from the That’s The Tag stamp set onto Whisper White card using Memento Tuxedo Black ink. I cut the image using one of the Layering Circle Framelit Dies and then stamped the greeting from the same stamp set using the same black ink. I added a little colour to the flower using Pink Pirouette and Pear Pizzazz Stampin’ Write Markers. I cut a scollaped circle from Pear Pizzazz card using the Layerng Circle Framelit Dies and attached it behind the image circle.
  The whole piece is attached to the card front using dimensionals. Once the image panel was in place, I tied a small length of the same Silver Ribbon to the left of the stamped panel.
To decorate the inside of the card, I stamped the same flower image from the That’s The Tag stamp set onto the lower left hand corner of Whisper White card using Memento Tuxedo Black ink and added some colour using the Pink Pirouette and Pear Pizzazz Stampin’ Write Markers.
I am happy with the card and also happy to have finally inked this stamp set. I’d love to hear what you think.
Bye for now,
Kris

Use this code when placing an order online during the month of March and receive a gift from me.
Product Used:


Match the Sketch
My upline, the lovely Stephanie Pike, posted a list of challenge blogs for our team to use when we lacked inspiration. I decided to play along with the sketch challenge at Match the Sketch this week. I also liked the idea of the Paper Players challenge to use green (any green) and white. Even though I didn’t get my card posted in time for the Match the Sketch challenge, it still meets the criteria for both challenges.
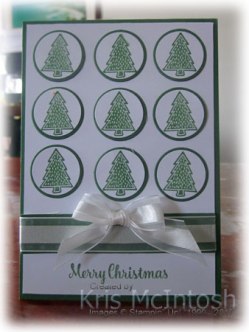
I knew that the Every Occasion stamp set would work perfectly for this sketch and settled on the tree image. I stamped it nine times onto Whisper White card using Garden Green ink.  I punched out the images using the 1″ circle punch. I attached the images to Garden Green circles cut using the smallest Layering Circle Framelit Die and attached them to Whisper White card.
  I wrapped a length of Garden Green card with the Whisper White 5/8″ Organza Ribbon and attached it below the trees. I stamped the greeting from the Star of Light stamp set below the ribbon using Garden Green ink. I tied a bow in another length of Whisper White Organza Ribbon and attached it to the card front using a Glue Dot.
The whole panel is attached to scored and folded Garden Green card.
Inside the card I stamped another of the greetings from the Star of Light stamp set, once more using Garden Green ink.
Well, what do you think? I know its early but you can never have enough Christmas cards.
Bye for now,
Kris

Use this Hostess Code when you place an order online during March and receive a gift from me.
Product Used:


Fab Friday 107
Today I am playing along with this week’s challenge at Fab Friday. I had a card laying on my desk which used the Wetlands stamp set and I thought it would be perfect for the layout.
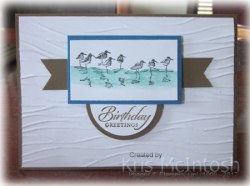
I embossed Whisper White card using the Seaside Embossing Folder and attached it to scored and folded Soft Suede card. I punched both ends of a narrow strip of Soft Suede card using the Triple Banner Punch and attached it to the card front.  I stamped the birds from the Wetlands stamp set onto Whisper White card using Memento Tuxedo Black ink and used the Pacific Point Watercolour Pencil and a Blender Pen to add some colour. I attached the stamped card to Pacific Point card. I stamped the greeting from the Wetlands stamp set onto Whisper White card using Soft Suede ink and punched it out using the 1-3/4″ circle punch.
  I attached it to a 2″ circle punched from Soft Suede card. I attached the greeting to the bottom of the bird panel and then to the card front using dimensionals.
To decorate the inside of the card I stamped the birds once more and added a little colour with the Pacific Point Watercolour Pencil and a blender pen.
A simple card but that is my favourite kind.
Bye for now,
Kris

Use this code when you place an online order during March and receive a gift from me.
Product Used:


Freshly Made sketch 277
I had a chance to create a card using the sketch challenge at Freshly Made Sketches recently. Unfortunately I forgot to post in time so missed the cut off for the challenge. However, using the sketch gave me an opportunity to try out a new stamp set – High Tide. I have had this set for a while but this is my first creation.
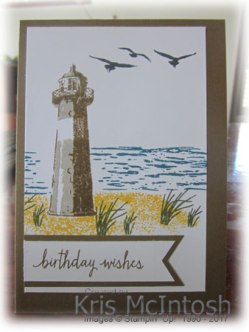
I stamped the first image for the lighthouse from the High Tide stamp set onto Whisper White card using Sahara Sand ink and stamped the second image over the top using Soft Suede ink. I stamped the sand image using Crushed Curry ink and added the water image using Island Indigo ink.  I stamped the grass image using Always Artichoke ink and added the birds using Memento Tuxedo Black ink. I attached the stamped panel to scored and folded Soft Suede card. I stamped the greeting from the Build a Birthday stamp set onto Whisper White card using Soft Suede ink.
  I punched one end using the Triple Banner Punch. I attached the greeting to a banner created using Soft Suede card before attaching to the card front.
To decorate the inside of the card I stamped the sand image using Crushed Curry ink and stamped the sea bird image over the top using Soft Suede ink. You have to play a little with the sand image, because it has a cut out space designed to fit around the bottom of the lighthouse, but by stamping one end first and flipping the stamp upside down, I managed to fill across the width of the card.
I can see that I am going to have to get this stamp set out a bit more and experiment. The great thing is that you can create your scene however you wish – use all the stamps for a detailed scene or pick and choose to create a completely different look.
What do you think? Do you love this stamp set too.
Bye for now,
Kris

Use this Hostess Code when placing an online order during March and receive a gift from me.
Product Used:


Happy Anniversary
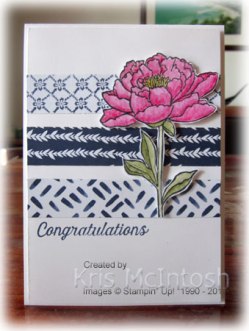
My youngest daughter Emma and her husband Jason are celebrating their wedding anniversary today. Congratulations to you both.
You are probably getting sick of hearing my say this but I used the same idea that was shared by Jessica Taylor to create this card as well. This time I added three strips of Floral Boutique Designer Series paper across Whisper White card. I added the greeting from the Flourishing Phrases stamp set using Night of Navy ink. I attached the stamped Whisper White card to scored and folded Thick A4 Whisper White card.  I stamped the flower from the You’ve Got This stamp set onto Whisper White card using Memento Tuxedo Black ink. I coloured the flower using Melon Mambo, Daffodil Delight and Old Olive Watercolour Pencils and a Blender Pen. I cut out the flower and attached it over the designer series paper using dimensionals.
 To decorate the inside I added a strip of Floral Boutique Designer Series Paper to the bottom of Whisper White card. I stamped the flower once more using Memento Tuxedo Black ink and coloured it the same as I did the flower on the front of the card. This time I only cut out the flower and attached over the designer series paper. The panel is then attached to the inside of the card.
I am unable to be with my daughter to celebrate but I hope they have a lovely day doing something they love.
I think I have shared all the cards I have made using this layout for now.
Bye for now,
Kris

Use this Hostess Code when placing an online order during March and receive a gift from me.
Product Used:


Same sketch Take 2

Here I am using the same card sketch that I used yesterday but today’s card has a completely different feel. This time I added three strips of the Urban Underground Specialty Designer Series Paper across Very Vanilla card. I stamped the greeting from the Urban District stamp set using Memento Tuxedo Black ink. I attached the Very Vanilla card to Basic Gray card and then scored and folded Basic Black card. I stamped the screwdriver and the spanner images from the Nailed It stamp set onto Very Vanilla card using Memento Tuxedo Black ink.  I coloured the images using Basic Gray, Basic Black and Old Olive Watercolour Pencils and a Blender Pen. I cut the image out using the matching Build It Framelits Dies. The screwdriver and the spanner are attached to the card front over the designer series panels.
 To decorate the inside I attached a narrow strip of Basic Black card behind one long edge of the Designer Series paper before attaching to the bottom of Very Vanilla card.
So there you go, the same layout but this time to create a very male card. I am kind of chuffed about that because male cards are not my strong point.
Anyway, I’d love to hear what you think.
Bye for now,
Kris

Use this Hostess Code when placing an online order during March and receive a gift from me.
Product Used:


Almost a Case

I receive newsletters from an American Demonstrator, Jessica Taylor. In the newsletter that I received recently she shared a card using the Glimmer Paper which is available Free with a qualifying order during Sale-a-bration. I loved the idea and used the layout to create my card today. I added a strip of each of the three colours of Glimmer Paper in the pack, Mint Macaron, Sweet Sugarplum and Bermuda Bay to Whisper White card. I stamped the greeting from the Lift Me Up stamp set across the bottom of the card using Memento Tuxedo Black ink. I cut the large detailed balloon from Whisper White card using the Up and Away Thinlits Dies and attached it over the Glimmer Paper.
To decorate the inside I added another three strips of the Glimmer Paper (cut thinner this time). I stamped the small balloon from the Lift Me Up stamp set onto Whisper White card using Bermuda Bay ink and cut it out using the matching Up and Away Thinlits Die. The balloon is attached over the strips of Glimmer Paper. (Sale-a-bration is coming to an end and these products are while stocks last, so don’t wait too long to place your order, I wouldn’t want you to miss out on your favourite product.)
 I don’t know about you but when I use intricate dies like the detailed balloon die on the front of this card I find it a little difficult to attach them without getting glue all over the front of my card. Well I came across a couple of ideas on the internet and I am sorry to say I do not know where I saw them now but thank you to a couple of ladies. The first idea was to add strips of double sided tape to the back of the card that you are going to die cut and once you have cut out the image, you remove the backing paper and it is ready to glue down. Another idea was to use tape runner all over the back of the card, cover it with the strips of paper that you have left over when you have used your Glue Dots and run it through the machine. Once again, the image is ready to adhere once your remove the backing paper. Such clever people. Anyway I used the double sided tape idea. It does make your image a little thicker going through the Big Shot but it is so worth not having to add dabs of glue everwhere when you want to adhere your die cut.
I think this is a perfect way to show of this gorgeous paper. Thank you Jessica for the idea.
Bye for now,
Kris
Product Used:


Up and Away Birthday

This card was inspired by one that was shared in an email by the Crafty Person. Debbie and Amy are both Stampin’ Up! demonstrators and have some awesome ideas.
I started by adding a layer of the Carried Away Designer Series Paper (you can have this designer series paper for free with a qualifying order during Sale-A-Bration) to scored and folded Thick A4 Whisper White card. I stamped the greeting from the Birthday Bright stamp set onto a strip of Whisper White card using Night of Navy ink and attached it to Night of Navy card.  The greeting panel is attached across the lower part of the Designer Series Paper. I stamped the large balloon onto Whisper White card using Night of Navy ink, the smaller balloon onto Whisper White card using Peekaboo Peach ink and the clouds onto Whisper White card using Mint Macaron ink. These images are all from the Lift Me Up stampset.
  I cut out all of the images out using the matching Up and Away Framelits Dies. I attached the images to the card front using Snail and dimensionals to add a little depth to the card.
To decorate the inside of the card I stamped the balloon images and the clouds once more using the same inks as the images on the front of the card.
I love the way this card turned out and thank Amy and Debbie for the inspiration. What do you think? I’d love to hear.
Bye for now,
Kris

Use this Hostess code when you place an online order during March and receive a gift from me.
Product Used:


Elyssa’s Birthday card

My gorgeous granddaughter Elyssa turns 9 today. She is growing into a lovely young lady. We have a lot in common – she loves to cook and is always helping me in the kitchen when she is here. We also share our love of memory keeping and she has album full of her memories already! We had a lovely day out together to buy her birthday present, although we did have to take Pop with us which slowed us down a little. We also enjoyed lunch together to finish off our morning. Today I am sharing with you the card I made for her.
I cut a square of Whisper White card using one of the Layering Squares Framelits Dies and used Old Olive and Bermuda Bay Watercolour Pencils to add some light colour to the card. I used my Aqua Painter to move the colour and create a background.  I attached the Whisper White square to a Bermuda Bay scalloped square cut using the same dies and attached it to scored and folded Thick A4 Whisper White card. I stamped the greeting onto the card front using Memento Tuxedo Black ink. I stamped the image from the Beautiful You stamp set onto Whisper White card using Memento Tuxedo Black ink and coloured the image using Bermuda Bay and Calypso Coral Watercolour Pencils and a Blender Pen. I cut the image and attached it to the card front.
To decorate the inside I used one of the images that can be used to colour the dresses of the images in the Beautiful You stamp set to create a background for my greeting. The image is stamped onto whisper White card using Bermuda Bay ink which I have stamped once onto scrap paper first to give a lighter image. I stamped the greeting from the Beautiful You stamp set over the top using Memento Tuxedo Black ink. I attached the stamped card to Bermuda Bay card before attaching the panel to the inside of the card.
I especially love this particular image from this stamp set as it creates such a happy, carefree feeling. It also fits perfectly with Elyssa’s wish to grow up to be a dancing fairy princess. I hope she always lives her life with passion and fulfils her dreams.
I’d love to know what you think of this card.
Bye for now,
Kris

Use this Hostess Code when you place an online order during March and receive a gift from me.
Product Used:


Medallion Video
Today I thought I would share with you a video from Stampin’ Up! highlighting all the fabulous things you can do with the Make a Medallion stamp set. Yesterday I shared a card with you using this stamp set but Carrie from the training team can share so many more ideas with you. Remember Sale-A-Bration ends on the 31st of this month. So if you want any or all of these stamps you need to place your qualifying orders before the end of the month.
Carrie shares some fantastic ideas in the video, don’t you think. Bet you really need this stamp set now.
Bye for now,
Kris

Use this code when placing an online order during March and receive a gift from me.


