An Urban Twist

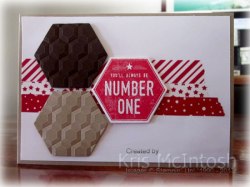
Remember this card I created because my upline Stephanie challenged us to use colours other than those in the associated product suite. Well, I decided to re-create that card using the Urban District stamp set and co-ordinating products. This time I added six rows of the Urban Underground Washi Tape across Very Vanilla card before attaching to scored and folded Basic Gray card.  I cut two pieces of the Urban District Specialty Designer Series paper using the hexagon die from the Build it Framelits Dies and attached them to the card front using dimensionals. I stamped the greeting from the Urban District stamp set onto Very Vanilla card using Delightful Dijon ink and cut it out using the hexagon framelit die. The greeting is also attached to the card front using dimensionals.
 Inside the card I added one row each of the Urban Underground Washi Tape to the bottom of Very Vanilla card.
So, what do you think? I am pretty sure that I like this card better than the previous one, but it might just be that I think it works well together. The reason I guess is that co-ordinated products are put together by Stampin’ Up! to give, well, let’s face it, a co-ordinated feel, to our creations.
Which one do you prefer? I’d love you to leave me a comment and let me know.
Bye for now,
Kris

Use this Hostess Code when you place an online order during February and receive a gift from me.
Product Used:


Welcome Shirley
My friend and former downline has re-signed to be a Stampin’ Up! Demonstrator – Woohoo. She is a great friend and has been missed by my other team members over the past couple of years. Now she is back we look forward to seeing more of her wonderful work. I will let you know when she restarts her blog.
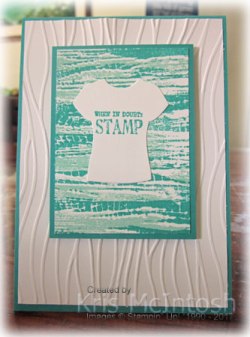
Anyway, I thought that I would make her a card to welcome her back to the team. I embossed Whisper White card using the Seaside Embossing Folder and attached to the scored and folded Bermuda Bay card. I broke out my Tie Dyed stamp set for its first official use. The background that I used is sort of a two step.  You can stamp one image in one colour and then the second image in another colour to give it some more dimension. So I stamped one image with Pool Party ink and the second image with Bermuda Bay ink. I trimmed the image down slightly and attached it to Bermuda Bay card and then the card front using dimensionals.
  I cut the t-shirt from Whisper White card using the T-Shirt Builder Framelit Dies and stamped the greeting from the Designer Tee stamp set using Bermuda Bay ink. This stamp set is one of the free stamp set you can earn from the Sale-a-Bration catalogue. It says “when in doubt: Stamp” perfect for a Stampin’ Up! Demonstrator. I stamped the saying use Bermuda Bay ink and then attached the T-shirt to the card front. To decorate the inside of the card I stamped the “hooray” from the Confetti Celebration stamp set.
I am so glad to welcome Shirley back as a demonstrator, and, you know what, she got a great deal because she signed up during Sale-A-Bration. She could order her own personalised starter kit with $235.00 worth of product for $169.00 and as a Sale-A-Bration bonus she could add two extra stamps sets of any value to her order for FREE. How amazing is that. If you have ever thought about being a Stampin’ Up! Demonstrator, now is the time to sign up. If you need more information then please contact me.
What do you think, isn’t it cute? I am going to have to spend some more time with this set.
Bye for now,
Kris
Use this Hostess Code when ordering online during February and get a gift from me.
Product Used:


Hats Off

I loved the sketch last weekend from Stampin’ Gals Gone wild and couldn’t get it out of my head, so I created this card which has a much more masculine feel.
I embossed Tempting Turquoise card using the Softly Falling Embossing Folder and attached it to scored and folded Basic Black card. I attached a narrow strip of card behind the diagonal edge of the Basic Black Designer Series Paper from the Neutrals Designer Series Paper Stack.  I stamped the “hats” from the Guy Greetings stamp set onto Whisper White card using Memento Tuxedo Black ink and cut it out using an oval from the Stitched Shapes Framelits Dies (I think I am addicted to these framelits but who can blame me they are so gorgeous). I attached the image to a Basic Black scalloped oval cut using one of the Layering Oval Framelits Dies (can’t have the Stitched Shapes Framelits without the Layering Framelits to match!).
  The image panel is attached to the card front using dimensionals.
I kept it simple inside the card by attaching a strip of Basic Black card behind a narrow piece of Tempting Turquoise card which I embossed, once more using the Softly Falling Embossing Folder.
At first I wasn’t sure that the colours in this card worked, but the longer it sits on my desk the more I like it. So much so, that this one will be part of my class this week at Beachmere.
I’d love to know what you think.
Bye for now,
Kris
Use this Hostess Code when placing an order in February and receive a gift from me.
Product Used:


Change it Up
My upline, the very lovely Stephanie Pike, issued a challenge to our team to create a card using one of the product suites from the Occasions Catalogue, but to use a different colour scheme.
I decided to use the Urban District stamp set. In the catalogue this product suite uses a colour scheme consisting of Basic Black, Basic Gray, Delightful Dijon, Silver and Very Vanilla.
To create my card I started by adding Candy Cane Lane Designer Washi Tape (retired) across the centre of Whisper White card and attached it to scored and folded Crumb Cake card. I cut Early Espresso and Crumb card using the hexagon die from the Build It Framelits Dies and embossed each one using the Hexagon Embossing Folder. I stamped the greeting from the Urban District stamp set onto Whisper White card using Real Red ink and cut it out using the same hexagon Framelit Die. I attached each of the hexagons to the card front using dimensionals.
To decorate the inside I added two strips of the Candy Cane Lane Designer Washi Tape across the bottom of Whisper White card.
To be honest, I am not sure about this card at all. I like the layout but not sure if the colours work. What do you think?
Anyway, sometimes it is nice to be challenged to think outside the box when creating.
Bye for now,
Kris
Product Used:


A tip for you
I know that I can speak for all of us when I say we Loooove our Big Shots. I use mine heaps and I have a lot of trouble keeping my cutting plates flat. Today I am going to share with you a video created by Sizzix to help us get the most from our cutting places.
I try to do this all the time at home and it really does work. So here you go.
Hope that helps you keep your cutting plates flatter.
Bye for now,
Kris
Stampin’ Gals Gone Wild, Challenge 88
I meant to get this card posted yesterday but my husband and I went to the local vegetable market. I got lots of tomatoes, so I spent a considerable amount of time in the kitchen cooking up a storm. By the time I had finished, between being tired from standing on my feet for a long time and the terrible heat, I spent the rest of the day resting.
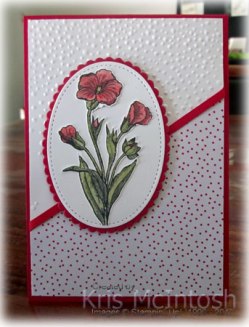
The sketch at Stampin’ Gals Gone Wild for the past weekend was really a lovely one and one that I am sure will get a lot of use. I started by embossing Whisper White card using the Softly Falling Embossing Folder.  I attached a piece of Sending Love designer series paper which I cut in half diagonally. My trick for this was to cut a full sized piece for the front of my card and then place it back into the paper trimmer so that the top left hand edge sat on the 3cm mark and the bottom right hand corner sat on the opposite 3cm mark. By cutting this way you get two cards from one piece of dsp. I wrapped the top of the Designer Series Paper with a length of the Real Red ribbon from the Sending Love Ribbon Combo Pack before attaching to scored and folded Real Red card.
 I had created my flower previously by stamping the image from the Butterfly Basics stamp set onto Whisper White card using Memento Tuxedo Black ink and colouring using a Real Red and Old Olive Watercolour Pencils and a Blender Pen. I hand cut the flower and placed it onto an oval of Whisper White card cut using the Stitched Shapes Framelits Dies. The image is attached to a Real Red scalloped oval cut using the Layering Ovals Framelits Dies before attaching to the card front using dimensionals.
To decorate the inside of the card I attached a strip of Sending Love Designer Series Paper to the to the bottom of Whisper White card. I wrapped the top of the Designer Series Paper with a piece of the Real Red ribbon from the Sending Love Ribbon Combo Pack to the top of the Designer Series Paper.
I love this card, it is so bright and happy. What do you think? I would like to send a big thank you to Connie for this weeks sketch challenge.
Bye for now,
Kris

Use this code when placing an order during February and receive a gift from me.
Product Used:


Window Box Birthday

Hello everyone, how are you all coping with this heat? I have been living like a hermit, not daring to leave the air conditioning to go outside. One good thing about using the air conditioning is that I get a lot more crafting done than usual. So today I am going to share with a quick and easy card I made using the Window Box Bundle.
I used my Watercolour Pencils to add Pacific Point, Bermuda Bay, Daffodil Delight, Old Olive and Melon Mambo strips of colour on Whisper White card. Once I had added the colour I used my Aqua Painter to spread the colour across the card and slightly blend into each other. I used the Window Box Thinlit Dies to cut the hexagon shape from the coloured card.  I used the Window Box Thinlit Dies to cut the hexagon shape from Whisper White card and I also used the decorative die to cut the floral pattern in the hexagon shape.
  Sounds complicated doesn’t it, but so simple to do. I trimmed both the coloured card and the Whisper White card to match each other and then added a mat of Melon Mambo card. I used my Paper Trimmer to match the shapes. The panel is attached to Whisper White card using dimensionals. I stamped the greeting from the Window Shopping stamp set onto the bottom of the Whisper White card using Melon Mambo ink. I love the way this greeting looks, very cute with the solid colour at the top and the striped colour at the bottom. Almost an ombre look without the work. The panel is attached to scored and folded Melon Mambo card. To decorate the inside I simply stamped “make a wish” from the Window Shopping stamp set using Melon Mambo ink.
So there it is quick and simple today. Hopefully I will stay on track with my posting from now on.
Bye for now,
Kris
Use this Hostess Code to place an online order during February and receive a gift from me.
Product Used:


Flirty Flamingo Thank You
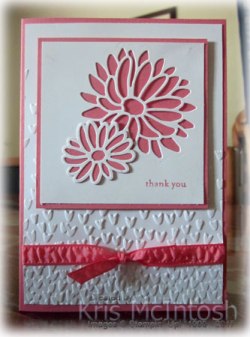
I thought I would share with you the Thank You cards I sent out to my customers for placing orders during the month of January. I embossed Whisper White card using the Falling Petals Embossing Folder. I wrapped the bottom of the card with Flirty Flamingo Ruched Ribbon and tied a knot before attaching to scored and folded Flirty Flamingo card. I cut the large flower from Whisper White card using the Stylish Stems Thinlits Dies and attached the piece to Flirty Flamingo card. I cut a small solid flower from Flirty Flamingo card and the small detailed flower from Whisper White card using the Stylish Stems Thinlits Dies. I attached the detailed flower to the solid flower and then to the image panel. I stamped “thank you” from the Teeny Tiny Sentiments stamp set onto the lower right hand corner using Flirty Flamingo ink. The image panel was attached to the card front using dimensionals.
To decorate the inside of the card I cut the large detailed flower from the lower left hand corner of Whisper White card. Once it is attached to the inside of the card, the flower shows through the detailed cut out and adds a real “pop” to the inside of the card.
Some of these customers placing orders had used my monthly Hostess Code and therefore qualified to receive a gift from me. I wanted to create co-ordinating the wrapping for the present with the card.  I simply used brown paper bags and wrapped the top with the Gold Metallic Ribbon available in the Sale-A-Bration Catalogue. I created a tag to decorate the front of the bag by using the Banner Framelits Dies to cut Flirty Flamingo card and also Whisper White card.
  I cut the small detailed flower from the Whisper White banner and attached it to the Flirty Flamingo Banner. I stamped “for you” from the Thoughtful Branches stamp set (retired) onto Whisper White card using Flirty Flamingo ink. I punched the greeting using the 1-3/8″ Circle Punch and attached it to a Flirty Flamingo circle cut using the Layering Circles Framelits Dies. I attached the greeting to the banner below the cut out flower. I cut another detailed flower from a scrap of Whisper White and attached it to the full flower cut from Flirty Flamingo card. I attached this flower to the banner using dimensionals.
I love being able to create co-ordinating cards and gift wrapping so easily. Stampin’ Up! take all the hard work out by creating so many co-ordinating products and accessories. What do you think? Does Stampin’ Up! make your crafting easier?
Bye for now,
Kris
Product Used:


A Blue Carousel
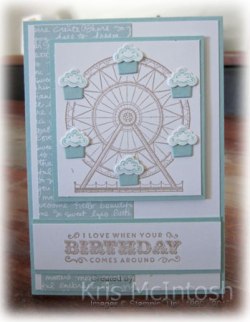
Here is another card using the Carousel Birthday stamp set. This one is also created for my Beachmere Classes as I had a request for a boy birthday card.
I attached a strip of Pool Party Designer Series Paper from the Subtles Designer Series Paper Stack to the left hand side of Whisper White card. I attached the panel to scored and folded Pool Party card. I stamped the carousel image from the Carousel Birthday stamp set onto Whisper White card using Crumb Cake ink. I attached the image panel to the card front using dimensionals.  An interesting thing about this particular image is that the “cup cakes” can be cut out using the Up and Away Thinlits Dies. So I stamped the image once more onto Whisper White card using Pool Party ink. I used the matching Up and Away Thinlit Die to cut out the icing.
  I cut the cupcake bases from Pool Party card and then attached the pieces over the Crumb Cake image using Glue Dots. I think it is such a cute image, don’t you?
I stamped the greeting from the Carousel Birthday stamp set onto Whisper White card, attached it to Pool Party card and then across the bottom of the card front.
To decorate the inside of the card I stamped the tent image from the Carousel Birthday stamp set onto the lower left hand corner of Whisper White card using Pool Party ink.
So what do you think? Are you liking this stamp set? I think it is going to be a fun set that will get a lot of use.
Bye for now,
Kris
Use this code when you place an online order during February and receive a gift from me.
Product Used:


Butterflies and Roses updated

Way, Way back in May 2013 I created this card using products which were current at the time. Surprisingly this has been one of my most pinned cards and is a featured card at the All Free Papercrafts. I have just been notified that this card is part of a free e-book which has recently been updated. So, it set me to thinking, what if I re-created this card using current Stampin’ Up! products.
This time I embossed Whisper White card using the Softly Falling Embossing Folder. I attached a piece of Blooms and Bliss Designer Series paper across the bottom of the embossed card and wrapped the join using the Sweet Sugarplum 3/8″ Ruched Ribbon.  I stamped the large and the small butterfly from the Papillon Potpourri stamp set onto Whisper White card using Sweet Sugarplum ink. I punched the butterflies using the matching Elegant Butterfly and Bitty Butterfly Punches. I used my bone folder to add some shape to the wings and attached the small butterflies to the centre of the large butterflies using Mini Glue Dots.
  The butterflies are attached to Whisper White card again using Mini Glue Dots. I added three Basic Pearls to the centre of each of the butterflies. The Whisper White card is attached to Mint Macaron card and then the card front using dimensionals. The greeting from the Teeny Tiny Sentiments stamp set is stamped onto Whisper White card using Sweet Sugarplum ink. I trimmed one end of the stamped card using the Triple Banner Punch, attached it to Mint Macaron card, also trimmed using the same punch, and then the card front.
To decorate the inside I stamped the large butterflies along the left hand edge of Whisper White card using Sweet Sugarplum ink.
I didn’t change a thing on the card, just updated it with current product and I love this new version just as much. What about you, which one do you prefer?
Bye for now,
Kris
Use this Hostess code to place an order online during February and receive a gift from me.
Product Used:


