They’re Back

It’s so exciting, the Stitched Shapes Framelits Dies are once again available for order. These dies were so popular that two shipments sold out almost straight away and the item number had to be turned off till new stock could be brought in. I’m happy to say that today is the day you can start ordering this product once more – well actually it was yesterday but the system had a glitch and I didn’t want you to be disappointed that you couldn’t place your order, so I waited till today to let you all know.
To show how truly gorgeous they are I put together this card for you. I started by attaching Crumb Cake card to Whisper White card and then embossing using the Hexagon Embossing Folder.  I attached the embossed card to scored and folded Real Red card. I cut Real Red, Daffodil Delight, Old Olive and Bermuda Bay card using each of the circles available in the Stitched Shapes Framelits Dies. Once they were attached to the card front, I added the small flower image from the Sitting Here stamp set. I had stamped this piece, coloured it and cut it using a circle from the Stitched Shapes Framelits Dies some time ago. The image was stamped onto Shimmery White card using Memento Tuxedo Black ink and coloured using the Watercolour Pencils and a Blender Pen.
  I attached the image to the card front using dimensionals.
To decorate the inside of the card I embossed Crumb Cake card using the Hexagon Embossing Folder and attached it to Whisper White. The hand cut sleeping dog image from the Sitting Here stamp set was also coloured some time ago using the Memento Tuxedo Black ink, Watercolour Pencils and a Blender Pen. This image is attached to the left hand side of the Whisper White card, slightly over the embossed Crumb Cake card. I stamped the greeting from the Sitting Here stamp set using Memento Tuxedo Black ink.
I just love how much more dimension you achieve when you use the Stitched Shapes Framelit Dies. The circles wouldn’t have the same effect if I had simply cut them without the stitched edge. If you need more convincing, just let Brandy show you all about them in this video by Stampin’ Up!
Ok, so what do you think? Stitched Shapes Framelits Dies or plain cut shapes. I think I have to agree with Brandy that the Stitched Shapes Framelit Dies just add so much to your finished creations.
Bye for now,
Kris

Use this Hostess Code during January and receive a gift from me.
Product Used:


A Dragonfly Challenge

Today I decided to play along with a sketch challenge at Fab Friday. It gave me a chance to use the Dragonfly Dreams stamp set. I also used the colour challenge at Global Design Project to kick start my colour palette.
I embossed Silver Foil card using the Hexagon Embossing Folder and attached it to scored and folded Delightful Dijon card. I attached squares of Delightful Dijon and Cucumber Crush card to the card front. I stamped the “dotted” image from the Dragonfly Dreams stamp set across the bottom of a square of Very Vanilla card using Cucumber Crush ink.  I stamped the greeting from the same stamp set onto the top left hand corner using Delightful Dijon ink before attaching to the card front. You will notice that each of the pieces of card on the front are layered at angles to each other, so when I stamped the greeting, I stamped it so that it lined up with the straight edge on the card base. I stamped the dragonfly wings from the Dragonfly Dreams stamp set onto Very Vanilla card using Delightful Dijon ink. I added the body using the same ink. I cut this image out using the outline from the Detailed Dragonfly Thinlits Dies. I also cut a detailed image from Silver Foil card using the same Thinlit Dies.
  I added a little dimension to the wings of each of the dragonfiles before attaching the Silver image over the Delightful Dijon image using a Glue Dot. The dragonfly is attached to the stamped Very Vanilla card using glue dots.
to decorate the inside of the card, I stamped the dotted image across the bottom of Very Vanilla card using Cucumber Crush ink.
This is the first time I have used this stamp set to create a card and I think that I am going to love this stamp set and matching dies very much. I know you have heard me say this about every stamp set I have used from the new Occasions Catalogue but it’s true, each one I use just makes me realise how special this catalogue is.
I’d love to hear what you think.
Bye for now,
Kris
Use this Hostess Code to place an order during January and you will receive a free gift from me.
Product Used:


Happy Birthday Sarah
 My daugher Sarah is celebrating her birthday today. Of course, I had to make a special card for her and as I had been working on class cards for January using the So Detailed Thinlit Dies, it was an easy choice as to what to use. I had seen this die used on card samples on Pinterest where the die fit across the 10.5cm width of a standard card, so I had a play. What I found is that the die is very easy to cut down to create a small focal floral image. So I cut two of the dies from Whisper White card and cut them down.
 I centred them onto Real Red card so that the edge strips overlapped and wrapped them with the Whisper White 5/8″ Organza Ribbon.
  I stamped “happy birthday” from the Butterfly Basics stamp set onto Whisper White card and cut out the greeting using an oval from the Layering Ovals Framelit Dies. I attached the greeting to a Real Red scalloped oval cut using the same dies before attaching it to the card front using dimensionals. To decorate the inside, I cut the So Detailed Thinlit Die once more from Real Red card and attached a portion to the Whisper White card.
This is a pretty simple card to make but I think it packs a big Wow, don’t you? Luckily my daughter loved it.
Bye for now,
Kris
Use this hostess code when you place an order during January and receive a gift from me.
Product Used:


Another Avant Garden Case

Well the new catalogue has launched and we are all excited checking out the gorgeous new product and imagining all our new creations. As a demonstrator we were able to pre-order from the Occasions Catalogue and at the same time we could earn the Free items from the Sale-A-Bration Catalogue. Avant Garden is one of my Free items and I think it might just become my favourite. This is another CASE of one of the cards shown in the Sale-A-Bration catalogue.
I masked a piece of Whisper White card with a 3cm wide strip of copy paper. Then I stamped the flowers using Tip Top Taupe and Peekaboo Peach ink. I stamped the leaves using Pear Pizzazz ink. The solid leaf is stamped onto scrap paper first to give a lighter image.  The detailed leaf is also stamped using Pear Pizzazz but this time it isn’t stamped off first. I stamped the centre of the flowers using Early Espresso ink. The mask was removed once I finished stamping and I attached a piece of Whisper White card where the copy paper had been. I stamped the greeting from the Avant Garden stamp set onto Tip Top Taupe card using Tip Top Taupe ink. I wrapped the greeting panel with Whisper White Baker’s Twine and tied a knot before attaching it to the centre of the strip of Whisper White card using dimensionals.
 I attached the stamped panel to Tip Top Taupe card and then to scored and folded Peekaboo Peach card.
Inside I stamped the flowers and leaf images onto the lower left hand corner of Whisper White card.
I love this and I know you will too. If you haven’t received your copy of these catalogues, live in Australia and don’t already have a demonstrator, then contact me to arrange to receive your copy. I know you will love them and there will be lots of stamps you will need to add to your stash.
Why don’t you let me know if you think my card is a match for the one in the catalogue.
Bye for now,
Kris
Use the Hostess Code when you place an order this month and you will receive a gift from me.
Product Used:


Gift of Love
Since I started using the Delicate Details stamp set I have been trying out a few more techniques for adding it to my cards.
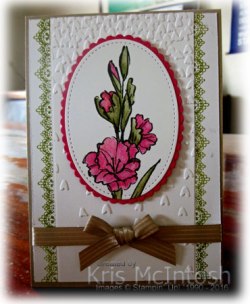
For this card I cut a piece of copy paper and attached it to Whisper White card. I stamped the lace image from the Delicate Details stamp set so that it just touched the edges of the copy paper using Old Olive ink. Once I removed the copy paper I had a lovely border and a place to attach the Whisper White card I embossed using the Falling Petals Embossing Folder.  I wrapped the lower part of the card using Crumb Cake 3/8″ Satin Ribbon (retired) and attached the panel to scored and folded Crumb Cake card. I stamped the image from the Gift of Love stamp set (hostess) onto Whisper White card using Memento Tuxedo Black ink. The image is coloured using the Melon Mambo and Old Olive Watercolour Pencils and an Blender Pen.
  I cut the image using the largest oval in the Stitched Shapes Framelits Dies and attached it to a Melon Mambo scalloped oval cut using the Layering Ovals Framelits Dies. Lastly I tied a bow using the Crumb Cake 3/8″ Satin Ribbon (retired) and attached it using a Glue Dot.
To decorate the inside I attached a piece of copy paper to the bottom Whisper White card. Stamped the lace border image from the Delicate Details stamp set using Old Olive ink. After removing the copy paper I attached a piece of Whisper White card embossed using the Falling Petals Embossing Paper where the copy paper had been.
I love how the lace border adds so much dimension to the card, don’t you?
Bye for now,
Kris
You can use the Hostess Code to place your order and earn a free gift from me.
Product Used:


Another Beautiful You
Here is the last card I will share for a while (maybe) using the Beautiful You stamp set. This one uses the Mediterranean Moments stamp set as well.
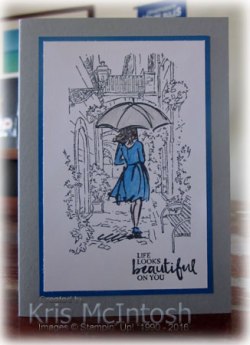
I stamped the image from the Beautiful You stamp set onto Whisper White card using Momento Tuxedo Black ink. I also stamped the image onto a Post-it-Note and cut it out. I covered the stamped image with the Post-it-Note image and then stamped the large image from the Mediterranean Moments stamp set over the top using the same ink. When you remove the mask, it looks like the lady is walking through the lane in the Meditarranean Moments image. I love it. I coloured the Beautiful You image using Pacific Point and Basic Gray Watercolour Pencils and a Blender Pen.  I stamped the greeting from the Beautiful You stamp set onto the lower right hand corner of the Whisper White card using Memento Tuxedo Black ink. The image panel is attached to Pacific Point card and then scored and folded Smokey Slate card.
To decorate the inside I simply stamped another of the fabulous greetings from the Beautiful You stamp set.
By now you are all probably aware that I do love the Beautiful You stamp set and that I am falling in love with the Watercolour Pencils. I hope that I have inspired you to look at your stash and take out a long forgotten stamp (or perhaps purchase the Beautiful You stamp set) and use the Watercolour Pencils to bring it to life in a completely new way.
Bye for now,
Kris
Use this Hostess Code during January to place your order and qualify for a free gift from me.
Product Used:


Beautiful You – Card 3
 This is the last card I made using the pieces I created when practicing my colouring.. This time I used Watercolour Paper to create the panel for the left hand side. I washed water from the Aqua Painter across the Watercolour Paper and then added ink from the Calypso Coral and Smokey Slate ink pads. Once the piece was dry I attached it to the left hand side of Whisper White card, wrapping the edge of the Watercolour Paper with Silver 5/8″ Satin Ribbon. I stamped the greeting from the Beautiful You stamp set onto the lower right hand side of the Whisper White card using Calypso Coral ink.
  I stamped the dancing lady image from the Beautiful You stamp set onto Whisper White card using Memento Tuxedo Black ink. This time the image is coloured using the Calypso Coral, Pacific Point and Basic Gray Watercolour Pencils and a Blender Pen. The image panel is attached to Pacific Point card and then the card front using dimensionals.
To decorate the inside, I added a narrow piece of the Watercolour Paper to Whisper White card and covered the top of the Watercolour Paper using the Silver Satin Ribbon.
All three cards used the same layout and the same stamp set but I think you will agree they are all very different cards. It’s kind of nice to know that one stamp set can have so many different feels and of course the addition of a different technique or different product can make such a difference.  I would really love you to comment and tell me which one you like and why you think it is the “best”. In case you can’t remember them all, here is a photo of the three cards all together.
Bye for now,
Kris
Use this Hostess Code to place an order this month and receive a gift from me.
Product Used:


Beautiful You – Card Two

This is the second card I created using the images from my practice colouring. This time I used copy paper to mask the left hand side of Whisper White card and stamped the lace image from the Delicate Details (Sale-a-bration) stamp set onto the Whisper White card using Rich Razzleberry ink so that the image sat on the edge of the copy paper. I removed the copy paper and added a piece of the very beautiful Falling in Love Designer Series Paper. I stamped the greeting from the Beautiful You stamp set onto the lower right hand corner of the Whisper White card using Rich Razzleberry ink.  The stamped panel is attached to scored and folded Rich Razzleberry card. I stamped the image onto Whisper White card using Memento Tuxedo Black ink and coloured the image using the Rich Razzleberry Watercolour Pencil and a Blender Pen. The image is attached to Rich Razzleberry card and then the card front using dimensionals.
To decorate the inside of the card, I attached a piece of copy paper to the bottom edge of Whisper White card and once more stamped the lace image from the Delicate Details (Sale-a-bration) stamp set using Rich Razzleberry ink. Once I removed the copy paper I attached a piece of the same Designer Series Paper.
You will notice that this card uses the same layout as the card yesterday but it has a completely different feel. Don’t you agree?
Bye for now,
Kris
Use this Hostess Code to place your order and receive a gift from me.
Product Used:


Beautiful You
After watching the video I shared with you yesterday I had time to sit down and do some colouring. I coloured several images and, of course, I needed to create cards to use them.
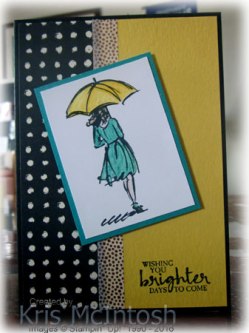
For this card I stamped the greeting from the Beautiful You stamp set onto Daffodil Delight card using Memento Tuxedo Black ink. I attached a piece of the Playful Palette Designer Series Paper down the left hand side and added a piece of the Affectionately Yours Washi Tape over the edge of the Designer Series Paper. The Daffodil Delight card is attached to scored and folded Basic Black card. I stamped the lady with the umbrella image from the Beautiful You stamp set onto Whisper White card using Memento Tuxedo Black ink. The image is coloured using Bermuda Bay, Daffodil Delight, Calypso Coral and Early Espresso Watercolour Pencils and a Blender Pen. I attached the stamped image to Bermuda Bay card and then the card front using dimensionals.
To decorate the inside of the card I attached a piece of the same Designer Series Paper to the lower edge of Whisper White card and added the same Washi Tape over the top edge.
I find the colours in this card are really striking and it has a happy feel despite the Basic Black. I will be back tomorrow with another card made using my practice pieces.
Bye for now,
Kris
Use this Hostess Code to place your order and receive a gift from me.
Product Used:


Watercolour Pencils
The addition of a new colouring option in the Occasions Catalogue on page 24 has me very excited. This will allow each and every one of us to take another look at those stamps in all our catalogues which cry out to be coloured in. I have always steered clear of colouring, but I kind of started to get the taste when we had the Blendibilities and I am really excited to be using the Watercolour Pencils. They can be used on all sorts of mediums and with all sorts of tools. You can just colour in if that’s what you like. You can colour and then use a Blender Pen to move the colour around and even up your pencils strokes. You can use them with an Aqua Painter and also with Watercolour Paper, but how about we look at this great video Stampin’ Up! have released and let Shannon West show us all about them.
Now you have seen the video I bet you are all as excited as I am by this fabulous new product and can’t wait to get your hands on them. I’ll be following up this video with some more watercolour pencil samples of my own over the next few days.
Don’t forget to use the Hostess Code for January – 23TQTAT6 – and you will also qualify to receive a gift from me.
Bye for now,
Kris


