For My Sister
 My sister celebrated her birthday in April and I just realised I haven’t shared this card with you. I was inspired by this sketch on Pinterest to create this card.
I started by adding a piece of Designer Series Paper from the It’s My Party Designer Series Paper Stack (retired) to scored and folded Basic Black card. I don’t know about you but I buy Designer Series Paper and then don’t use it, for whatever reason and suddenly we are looking at a new catalogue and I have mountains of Designer Series Paper to use up. So this is a start. I stamped the leaf image from the Wild About You stamp set onto Whisper White card using Mint Macaron ink.  I added the flowers using Crushed Curry ink. This stamp set is photopolymer and it makes it so easy to do two-step stamping. I added the image panel to Mint Macaron card which has one short end cut using the Scalloped Square Framelit Die (retired but you could use the Layering Squares Framelit Dies). I wrapped the panel with Basic Black 1/8″ Taffeta Ribbon (retired) and tied a knot before attaching it to the card front using dimensionals.
  I stamped the greeting from the Petite Pairs stamp set (again retired) onto Whisper White card using Memento Tuxedo Black ink and punched it out using the Large Oval Punch (retired but you could use the new Layered Ovals Framelit Dies). The greeting is attached to a Basic Black Scallop Oval (retired but again you could use the Layering Ovals Framelit Dies) and then the card front using a dimensional under the right hand side so that it could partially sit over the image panel.
Inside the card I stamped the leaf and flower images to the lower left hand corner of Whisper White card using the same Mint Macaron and Crushed Curry inks.
Oh, my goodness, I didn’t realise how many of my favourite things have retired with the launch of the 2016-2017 Annual Catalogue. However, you can see how gorgeous this stamp set is and how easily you could recreate this card using new product.
Bye for now,
Kris
Product used:


Love and Affection
I have to admit that when I first saw this in the Catalogue way back at Onstage Local I was smitten by the Love and Affection stamp set and co-ordinating products. The stamp set is gorgeous and the Designer Series paper is absolutely stunning. I haven’t lost that feeling. This card is one that I designed for my June Card Class. I started by adding a strip of the Affectionately Yours Designer Series Paper to the left hand side of Whisper White card which is then attached to scored and folded Crumb Cake card. This particular piece of Designer Series Paper has copper embossing to highlight the detail of the flowers.  I embossed a piece of Cucumber Crush card using one of the Floral Affection Embossing Folders. (This is a set of two small embossing folders both of which are beautiful.) The embossed card is attached across the bottom of the card front. I cut a piece of Whisper White card using one of the Layering Square Framelit Dies and stamped the greeting from the Love and Affection stamp set onto the right hand side using Night of Navy ink.
  I cut a Crumb Cake card with a slightly larger scalloped square from from the Layering Square Framelit Dies and attached the stamped card. Using Versamark ink I stamped the large flower onto Daffodil Delight card, the small flower onto Watermelon Wonder card and the leaves onto Cucumber Crush card. The images are embossed using the Copper Embossing Powder and then cut out by hand. I layered them onto the stamped Wisper White panel, added Basic Pearls to the centre of the flowers and attached the square panel to the card front using dimensionals. I tried to mimic the embossing folder layout with the flowers and leaves. Not sure if I succeeded but I think so. To decorate the inside of the card, I simply embossed a piece of Cucumber Crush card and attached it to the bottom of Whisper White card.
I am rather pleased with this card. What do you think? I’d love to hear.
Bye for now,
Kris
Product Used:


A Shaker Card

I had a request from one of the ladies who comes to my Beachmere class for some boy birthday cards and remembered the card we made at Onstage Local earlier this year, I thought it would be perfect. I started by stamping the greeting from the Confetti Celebration stamp set onto the bottom right hand corner of Whisper White card using Memento Tuxedo Black ink and attached it to scored and folded Tempting Turquoise card. I stamped the banner image from the same stamp set across the top of a square of Whisper White card using Daffodil Delight ink. I stamped the star image onto the centre of the card using the same ink and stamped happy birthday over the top using Memento Tuxedo Black ink. I used the fabulous new Foam Adhesive Strips around the edge of the stamped square and used my Embossing Buddy along the inside edges to remove any “sticky” on the sides.  I punched Daffodil Delight and Pacific Point card using the Sprinkles Punch and placed onto the stamped card inside the adhesive strips. I also added a sprinkle of gold stars which I had punched previously for a project using the Confetti Stars Border Punch. (I put all the little punched out pieces in old brad or button containers and save them for just this purpose.) I cut the centre from a slightly larger square of Pacific Point card and stamped around the frame with the star image from the Confetti Celebration stamp set using Pacific Point ink.
  I attached a piece of Window Sheet behind the stamped frame and rubbed all over the Window Sheet using my Embossing Buddy to remove the static. The next step is a little tricky, I took off the covering strips on the Foam Adhesive Strips and attached the Pacific Point frame over the top – take your time to line it up perfect. (Of course if all else fails, you can trim away any edges that are showing.) To finish off I attached the shaker frame to the card front. To decorate the inside of the card, I once again stamped the banner image across the top of Whisper White card using Daffodil Delight ink. The balloons are stamped onto the lower left hand corner using Pacific Point ink.
I think this turned out well, so thanks Stampin’ Up! for the inspiration – I was happy and so was my customer.
Bye for now,
Kris
Product Used:


Happy Anniversary

My parents celebrated their 62 Wedding Anniversary last weekend. Can you imagine that? 62 years and still going strong. They are amazing! My Floral Phases stamp set and co-ordinating products were on my desk and I just had to case the card in the catalogue on page 76. I used A4 Thick Whisper White for the card base and then cut Whisper White card using the Detailed Floral Thinlit dies. You place one die with the straight edge at the top edge of the card and one with the straight edge at the bottom of the card. This leaves a plain border between the two die cut areas. These dies are almost the width of a traditional metric card, so you only get a very thin border around the outside edge, the photos in  the catalogue would be on standard American sized (inches) card bases so a wider border – Didn’t spoil the affect though. I stamped the greeting from the Floral Phases stamp set onto the die cut card using Night of Navy ink and wrapped it with the Night of Navy Thick Bakers Twine and tied a bow (exactly like the one in the catalogue).
  The die cut card is attached to the card base using Tombow Multipurpose Adhesive. (If you use this adhesive, you really have to be quite sparing, tiny dots around the panel and leave it for a second or two to almost dry before attaching, works really well and you don’t get glue all over everything!) I added three Basic Pearls to each side of the greeting. Inside the card I stamped the border image across the bottom of the card and then stamped the floral image above it using Night of Navy ink. I also added more of the Basic Pearls between the images. It truly is gorgeous in real life, I can’t wait to use this product suite some more.
What do you think? Can you see this in your craft room stash? Bet you can.
Bye for now,
Kris
Product Used:


Birthday Tag
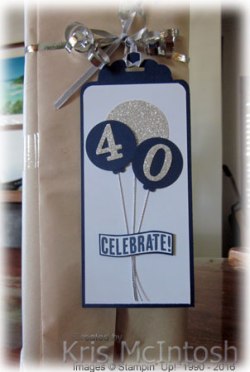
We attended a 40th birthday celebration for one of my husband’s mates a while ago. His present was a bottle of something special he likes to drink and I wanted to add a tag for the gift. I punched the top of a piece of Night of Navy card using the Scallop Tag Topper Punch. The card is wider than the tag punches but you can push the card in to punch the tag topper and then hand trim the extra card from the sides. Once trimmed, I used the Project Life Corner Rounder Punch to trim the corners. I punched the corners of a length of Whisper White card using the Project Life Corner Rounder Punch and attached it to the Night of Navy card.  I punched a scrap of Silver Glimmer Paper using the 1-3/4″ circle punch added length of Silver Cord (retired) to the back and attached it to the top of the Whisper White card. I punched two circles from Night of Navy card using the 1-3/8″ circle punch. I punched Night of Navy card using the Heart Border Punch (retired) and attached an upside down heart to the back of each of the Night of Navy circles. I attached a length of Silver Cord (retired) to the back of each of the Night of Navy circles and attached them to the Whisper White card over the Silver Glimmer Paper circle. I cut the numbers from scraps of Silver Glimmer Paper using the Timeless Type Alphabet (retired) and attached a number to each of the Night of Navy Balloons. I stamped “celebrate” from the Celebrate Today stamp set onto Whisper White card using Night of Navy ink. I fussy cut the word, attached it to Night of Navy card and fussy cut again to give a narrow border. The greeting is attached to the Whisper White card over the “balloon strings” using dimensionals. I used a length of 1/8″ Silver Ribbon to attached the tag to the gift box.
Simple but works perfectly for the occasion.
Bye for now,
Kris
Product Used:


Another Birthday Card

My youngest daughter celebrated her birthday on Friday. Doesn’t time fly, it seems like only yesterday I brought her home from hospital, and now she is a grown woman with three children of her own!
Of course I had to make her a card and I was inspired by this card on Pinterest by Vicki Burdick at It’s a Stamp Thing. I stamped the greeting from the Build A Birthday Photopolymer stamp set onto Whisper White card using Stazon Jet Black ink before attaching the panel to Flirty Flamingo card and then scored and folded A4 Thick Whisper White card (I am so loving this, just the perfect weight for a card base).  I cut the large swirl from the Swirly Scribble Thinlits Dies from Pool Party card and attach it to the card front using Tombow Multipurpose Glue. I stamped the image from the Hostess Set Gift of Love Photopolymer stamp set onto Shimmery White card using Stazon Jet Black ink. I used my Aqua Painter, Flirty Flamingo ink and Old Olive ink to colour in the image. (I am so late to the party! It is so easy to water colour using the Shimmery White card. Not much bleeding and the card doesn’t get as wet as normal Whisper White card, so you don’t get that “rubbed” look.
  Anyway, just love it. You can bet I will be using this more often.) Once coloured, I cut out the flower and attached it to the card front using dimensionals. The butterfly from the Papillon Potpourri stamp set is stamped onto Whisper White card using Daffodil Delight ink and punched out using the Bitty Butterfly Punch. I attached it to the card front using a Glue Dot in the centre and a 1/4 dimensional under each wing. The Basic Pearls just finish it off. To decorate the inside of the card, I stamped the swirly image from the Swirly Birds photopolymer stamp set and added another butterfly, this time without the dimensionals and the Basic Pearls.
I absolutely adore this card and can’t thank Vicki enough for the inspiration, although I did have to add a couple of extra layers.
Hope you enjoyed this card and find some inspiration for your own card making.
Bye for now,
Kris
Product Used:


Birthday Card

My grandson Ethan celebrated his 10th birthday yesterday and was not overly impressed that he had to spend the day at his sister’s netball carnival. My husband and I took Ethan and my other grandson and spent some of the day at the carnival and then we took the two boys to lunch to celebrate Ethan’s birthday and belatedly celebrate Noah’s birthday from May.
So when you have new goodies just landed on your desk you definitely need to get them out and play (work) with them.  I just loved this stamp set when I saw the examples at our Onstage Local event earlier this year and was especially inspired by this one on Pinterest by Julie at the Way We Stamp. Anyway, to begin I embossed Whisper White card using the Lucky Stars Embossing Folder, attached it to Pacific Point card and then scored and folded Tempting Turquoise card. I stamped the image from Marquee Messages onto Whisper White card using Memento Tuxedo Black ink and then I stamped the same image onto Tangerine Tango, Tempting Turquoise and Pacific Point card. I cut out the various sections of the images and attached them to the image stamped on Whisper White card. Then cut out the whole image – yes I know truly a labour of love.
  I stamped the greetings, both from the Marquee Messages stamp set using Memento Tuxedo Black ink. This is attached to the card front using dimensionals. To decorate the inside I stamped the greeting which is from the Marquee Messages stamp set using Memento Tuxedo Black ink. I stamped the guitar image which is from the Skating By stamp set (retired) onto Crumb Cake card using Memento Tuxedo Black ink and then used my Early Expresso Stampin’ Write Marker to add a little extra colour. Ethan loves playing his guitar and I thought he would appreciate both the greeting and the guitar.
Have you had a chance to have a good look through the new catalogue yet? There is just so much to love. I hope I have inspired you to take another look at this fun stamp set. If you haven’t got a copy then you can check out the catalogue by clicking on the photo in the right hand column and if you don’t have a demonstrator then please contact me to get your copy of this fabulous catalogue.
Bye for now,
Kris
Product Used:


It’s arrived and I’m late
Guess what? The new catalogue launched on 1st June which makes me only a couple of days late letting you know! I held a very successful catalogue launch at my home last weekend with some of my lovely customers. We had an enjoyable afternoon browsing new product, learning a little bit, chatting and shopping. All in all good fun. If you were unable to come to the catalogue launch, I am still holding your copy of the new catalogue and will get them to you as soon as I can. Let me just say, although I think I say it every year, this is the best catalogue ever!
If you haven’t seen the catalogue yet and can’t wait for the hard copy, click on the photo below and you can download the PDF to browse on your computer.

Please contact me if I can be of any help in any way regarding the new catalogue.
To make things just a little more interesting, Stampin’ Up! are running a special promotion for those of you who host a workshop or place an individual order of $450.00. So you would normally receive 10% of your order to spend on free product but during June you can add an extra $50.00 to spend on free product. Woopeee! So if you would like any information regarding this then, contact me and we can discuss how you can qualify for this spending bonus.
 Also for the month of June, anybody who joins Stampin’ Up! to become a Demonstrator will add an extra two stamp sets to their kit. So spend just $169.00, select $235.00 worth of Stampin’ Up! product and then select another two free stamp sets. Wow what an extra incentive to sign up, especially if you have been wanting to do this for a while. Of course you will also receive all the business supplies you need to start your business as well. Stampin’ Up! is a great company to work for, they allow you to run you business any way you wish within their guidelines. So you can do as much or as little as you desire. Of course the added benefits of making friends all over the world and attending some fantastic Stampin’ Up! events is just the icing on the cake. Want more information then please contact me so that we can discuss how you can take advantage of this great offer.
 Hope you enjoy the gorgeous new catalogue and that you can take advantage of these fantastic offers.
Bye for now,
Kris
Hexagon Card
 The Six Sided Sampler stamp set and Hexagon Punch are both retiring at the end of this month (actually a few days now) and I have wanted to make a version of the card on page 105 of the current Annual Catalogue since it was released. I was inspired to create my version after seeing this card on Pinterest.
I stamped the dotted image from Gorgeous Grunge (not retiring) onto Whisper White card using Sahara Sand ink. The stamped panel is attached to Crumb Cake card and then scored and folded Crumb Cake card.  I stamped three of the images from the Six Sided Sampler stamp set onto Whisper White card using Sahara Sand ink and punched them out using the Hexagon Punch. I stamped two more of the images from the Six Sided Sampler stamp set onto Whisper White card using Real Red ink and punched them out using the same punch. The three hexagons across the centre of the card are attached using dimensionals and the other two are attached flat to the Whisper White card.
  I added strip of Dazzling Details Glimmer Paper across the raised hexagons. The butterfly from the Papillon Potpourri stamp set (not retiring) is stamped onto Whisper White card using Real Red ink and punched out using the Bitty Butterfly punch. The butterfly is attached to the card front using a Glue Dot in the centre and a 1/4 of a dimensional under each wing. Inside I kept the card simple by stamping the butterfly, masking it and stamping the dotted image over the top using the same colours as the card front.
It’s taken me a while to get around to this card but I must say that I love the card. Seems a pity that I waited so long!
Bye for now,
Kris
Product Used:


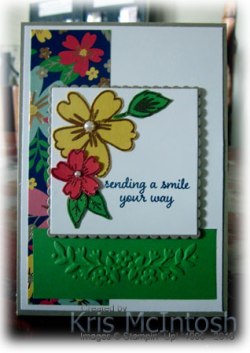
Sending A Smile
 I needed to make a card to send a card to cheer up a relative who is having some ongoing health issues and since I had out my pre-order, it made sense to use it!
I embossed Whisper White card using the floral folder from the Floral Affection Embossing Folder duo. This is a small folder so I embossed each end of the card separately.  I attached the embossed card to scored and folded Crumb Cake card. I added a larger oval of Crumb Cake card, created a banner from a piece of the beautiful Affectionately Yours Specialty Designer Series Paper using the Triple Banner Punch and layered it on top.
  I cut a smaller oval from Watermelon Wonder card and embossed it using the other folder from the Floral Affection Embossing Folder duo. The embossed oval is layered over the designer series paper banner and the Crumb Cake oval using dimensionals. I used the Triple Banner Punch once more to create another banner from Whisper White card. I stamped the greeting from the Love and Affection stamp set onto the banner using Watermelon Wonder ink and attached it to the centre of the Watermelon Wonder card.
To decorate the inside of the card, I once again used the floral embossing folder from the Floral Affection Embossing Folder duo on the lower corner of Whisper White card.
This is a really a beautiful product suite and one I am going to love using over and over again.
Bye for now,
Kris
Product Used:
No images of the new product suite until June.


