Project Life Scrapbook page
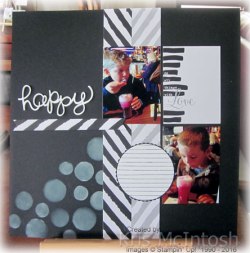
This coming Friday night is my Memory Keeping Class. This is so much fun, especially for me. I get to play while everyone else makes their own pages or even creates some cards. Everyone who attends will get the product to create this scrapbook page or they can use the pieces any way they wish. This page makes me smile, because it reminds me of the fun we had with Ethan and Noah when we celebrated their birthday’s with a special lunch. The looks on their faces while they are enjoying their drink says it all.
I used a couple of cards from the Project Life Love Story Card Collection (retired) to create this page and followed a scrapbook layout I found on Pinterest. I cut two 6 x 4″ cards to create the central panel and used a left over piece to create the banner underneath the title. I cut the word “happy” four times from Whisper White card using the Hello You Thinlits Dies and glued them one on top of the other to create a thick embellishment. I think it makes the title really pop on the page, don’t you? The 3″ x 4″ filler card is also from the Love Story Card Collection (retired). To create the background, I punched Window Sheet using the 3/4″, 1″ and 1-1/4″ Circle Punches and then used this to add White Craft ink to the Basic Black 12″ x 12″ page. The journal panel was created by stamping Whisper White card with the Writing Notes Background stamp using Memento Tuxedo Black ink. I used the Layering Circle Framelits to cut the circle as well as the Basic Black Scalloped layer. I will add my journalling on Friday night.
You can get more details regarding this class on my Workshop and Classes page.
Bye for now,
Kris
Product Used:


sp;
Flourishing Christmas

I have been working on cards for my September Class which will feature the Flourishing Phrases product bundle and I had a little play with the large flourish image to create a Christmas card. I stamped the greeting from the Teeny Tiny Sentiments stamp set onto the bottom right hand corner of Whisper White card and attached it to scored and folded Crumb Cake card. I embossed a piece of Old Olive card using the Holly Embossing Folder and attached it to the left hand side of the card front.  I stamped the large flourish from the Flourishing Phrases stamp set onto Whisper White card using Memento Tuxedo Black ink and then used Real Red and Old Olive Stampin’ Write Markers to colour the image.
  I attached the stamped panel to Real Red card and then the card front using dimensionals. Lastly I added medium Basic Rhinestones to the image.
Inside the card I added a piece of Old Olive card once again embossed using the Holly Embossing Folder and added a greeting from the Peaceful Pines stamp set using Real Red ink.
I am really impressed with just how versatile this particular stamp set and matching Flourish Thinlit Dies really are. If you haven’t been inspired previously to purchase these products, perhaps this card might be the one to convince you of its worth.
Bye for now,
Kris
Product Used:


Happy Day

Here is a quick and easy card for any man in your life. This is one I created for my class this week at Beachmere. I stamped the greeting from the Perfectly Wrapped stamp set using Early Express onto the bottom right hand corner of Very Vanilla card. I attached a strip of Early Expresso Designer Series Paper from the Neutrals Designer Series Paper Stack to the left hand side before attaching to scored and folded Early Expresso Card.  I stamped the boots from the Country Livin’ stamp set onto Crumb Cake card using Early Expresso ink and sponged around the edges uses Crumb Cake ink. The image panel is attached to Early Expresso card and then the card front using dimensionals.
 To decorate the inside panel, I stamped the image from the Timeless Textures stamp set across the bottom of Very Vanilla card using Crumb Cake ink. The boot image is stamped onto the left hand corner using Early Expresso ink.
All in all a really simple card. I have to admit that this is one stamp set that I was drawn to immediately when I saw the new catalogue. It has three images – the boots, a guitar and a gorgeous old truck – perfect to represent our beautiful outback Queensland. Of course, I also thought of my grandson and husband who are both pretty good guitar players! I can see these images featuring in my project life pages, especially the ones about our travels in outback Queensland.
What do you think of this stamp set? Will it make it onto your wish list or have you already purchased it? I’d love to know.
Bye for now,
Kris
Product Used:


Funky Birthday

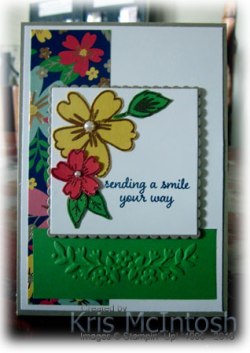
I created this card after seeing a card sketch somewhere on the internet. I liked the general idea and although I did change it up a bit, I love the final result, fun and a little bit off beat! I layered Whisper White card onto scored and folded Crumb Cake card. I wrapped a square of Old Olive card with Whisper White Thick Baker’s Twine to represent a “present”.  I stamped the greeting from the Suite Sayings stamp set onto a small piece of Whisper White card using Memento Tuxedo Black ink. I added another piece of Whisper White card and assembled the three pieces onto Crumb Cake Card, the “present” is on dimensionals.
  I punched small balloons from Old Olive, Tangerine Tango and Daffodil Delight card using the Balloon Boutique Punch and attached them to the Whisper White card. I stamped the greeting from the Confetti Celebrations stamp set onto Whisper White card using Tangerine Tango ink and cut it out using one of the Stars Framelits Dies. The starry greeting is added to the card front using dimensionals.
To decorate the inside of the card, I stamped another greeting from the Confetti Celebrations stamp set onto Whisper White card.
I love how this turned out, a really fun card for any age.
Bye for now,
Kris
Product Used:


First Christmas Card
It’s that time of year when I start adding one Christmas card to my Beachmere Class each week. By the end of the year, we all have quite a stash, more than enough to cover our needs.
I also wanted to showcase the beautiful Thoughtful Branches stamp set and matching Beautiful Banches Thinlits Dies which will be available for purchase on the 2nd August. This is a limited time stamp set 2-31st August but only while stocks last, so don’t delay in placing your order if you want this gorgeous stamp set and matching thinlits.
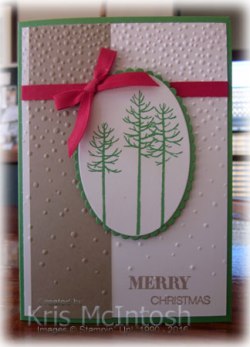
I stamped the greeting from the Holly Jolly Greetings stamp set onto the lower right hand corner of Whisper White card using Crumb Cake ink. A strip of Crumb Cake card is attached to the left hand side of the stamped card and then the whole piece is embossed using the Softly Falling Embossing Folder.  I wrapped the top of the embossed card using some retired Real Red Cotton Ribbon and attached the panel to scored and folded Cucumber Crush card. I stamped the trees from the Thoughtful Branches stamp set onto Whisper White card using Cucumber Crush ink, cut them out using a Layered Oval Die and attached them to a Cucumber Crush Scalloped Layered Oval card. The panel is attached to the card front using dimensionals. I tied a bow in another piece of the Real Red Cotton Ribbon and attached it to the card front using a glue dot. To decorate the inside of the card, I stamped the trees once more on the lower left hand corner of Whisper White card.
I absolutely adore this Thoughtful Branches stamp set and Beautiful Branches Thinlits Dies. It is so versatile and if you love Pinterest, you can see a million uses for this set – really has to be a million. I’d love to know what you think.
Bye for now,
Kris
Product Used:


Playful Balloons

This is another card which will feature in my August Classes. I have seen many cards like this on Pinterest and decided to create one of my own.
I added Playful Palette Designer Washi Tape diagonally to a narrow strip of Whisper White card and attached it to scored and folded A4 Thick Whisper White card. I stamped the greeting from the Painter’s Palette stamp set onto the bottom of a strip of Whisper White card using Memento Tuxedo Black ink.  The stamped strip and another strip of Whisper White card have narrow strips of Basic Black attached behind one long edge and are then attached to the card front using dimensionals. The Whisper White pieces of card, cover the edges of the Washi Tape panel – very clever. I used the Balloon Builders Punch on Basic Black card, Emerald Envy card and Peekaboo Peach card.
  I embossed each balloon using the Boho Chic Embossing Folder (Basic Black), the Elegant Dots Embossing Folder (Emerald Envy) and Lucky Stars Embossing Folder (Peekaboo Peach). I attached a length of Linen Thread to the back of each balloon before attaching to the card front. The Basic Black and Emerald Envy balloons are attached using Glue Dots and the Peekaboo Peach balloon using dimensionals. I tied another length of Linen Thread around the balloon strings and added a Glue Dot to the back of the bow to hold it in place. To decorate the inside of the card I simply added three rows of the Playful Palette Designer Washi Tape. I love this card, what about you. You can find more details about the August Class on my Classes and Workshop page.
Remember if you want to attend this class then please let me know as soon as possible so that I can reserve your place.
Bye for now,
Kris
Product Used


An Expression of Love
I was working on cards for my classes next month which feature the Painter’s Palette product suite and thought I would share this card with you.
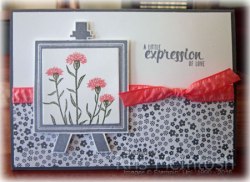
I added a piece of Basic Gray Designer Series Paper from the Neutrals Designer Series Paper Stack to the lower half of Whisper White card, wrapped the join with Flirty Flamingo 3/8″ Ruched Ribbon and tied a knot.  I stamped the greeting which is from the Painter’s Palette stamp set using Basic Gray ink onto the top right hand corner and then added the whole piece to scored and folded Basic Gray card. I stamped the easel image onto scrap Whisper White card using Basic Gray ink, cut it out and attached it to the card front using dimensionals.
 I stamped the stem image from the Wild About Flowers stamp set onto scrap Whisper White card using Always Artichoke ink and added the flowers using Flirty Flamingo ink. I cut the flowers using a Layering Squares Framelits Die to fit into the centre of the easel image.
Inside the card I added a narrow piece of Flirty Flamingo card behind more of the Basic Gray Designer Series Paper before attaching it to Whisper White card.
I love how soft and pretty this card is – so feminine. What do you think?
Bye for now,
Kris
Product Used:


Road Trip

My husband and I had the most amazing holiday with our eldest and youngest granddaughters. We took a road trip with our caravan all the way from Brisbane to Charters Towers. All up we did a little more than 3,500klms! We had a couple of long days travelling but the girls were really good. We made up “Find it Charts” before we left and the girls would search for whatever was on the list.  We had a lot of fun and built up some really amazing memories. I loved seeing some of the places that Ron and I had already been through the girl’s eyes.
Anyway one of the things that we did to keep their enthusiasm was create journalling blocks 4″ x 6″ on which they could write what they had done that day. I used MDS to create them.  Abi is nearly 12 so she has created point form journalling and even documented what we ate, Ava is only 6 so hers is a little less detailed but covers the major points. When we came home we spent a couple of days printing photos ( I have an Epson PictureMate which makes this so easy) and creating their Project Life pages (I still have to do mine!). Those of you who come to my classes already know that Abi is a keen Project Life scrapbooker, so she has an album already. Ava hasn’t got the “bug” yet so her album is a series of 4×6″ pockets which we have clipped together. I think she will need an album because she was quite excited to get her photos printed to show her Mum and Dad.
I haven’t taken any photos of Ava’s album yet but thought you might like to see some of Abi’s pages.
Bye for now,
Kris
Product Used:

For My Sister
 My sister celebrated her birthday in April and I just realised I haven’t shared this card with you. I was inspired by this sketch on Pinterest to create this card.
I started by adding a piece of Designer Series Paper from the It’s My Party Designer Series Paper Stack (retired) to scored and folded Basic Black card. I don’t know about you but I buy Designer Series Paper and then don’t use it, for whatever reason and suddenly we are looking at a new catalogue and I have mountains of Designer Series Paper to use up. So this is a start. I stamped the leaf image from the Wild About You stamp set onto Whisper White card using Mint Macaron ink.  I added the flowers using Crushed Curry ink. This stamp set is photopolymer and it makes it so easy to do two-step stamping. I added the image panel to Mint Macaron card which has one short end cut using the Scalloped Square Framelit Die (retired but you could use the Layering Squares Framelit Dies). I wrapped the panel with Basic Black 1/8″ Taffeta Ribbon (retired) and tied a knot before attaching it to the card front using dimensionals.
  I stamped the greeting from the Petite Pairs stamp set (again retired) onto Whisper White card using Memento Tuxedo Black ink and punched it out using the Large Oval Punch (retired but you could use the new Layered Ovals Framelit Dies). The greeting is attached to a Basic Black Scallop Oval (retired but again you could use the Layering Ovals Framelit Dies) and then the card front using a dimensional under the right hand side so that it could partially sit over the image panel.
Inside the card I stamped the leaf and flower images to the lower left hand corner of Whisper White card using the same Mint Macaron and Crushed Curry inks.
Oh, my goodness, I didn’t realise how many of my favourite things have retired with the launch of the 2016-2017 Annual Catalogue. However, you can see how gorgeous this stamp set is and how easily you could recreate this card using new product.
Bye for now,
Kris
Product used:


Love and Affection
I have to admit that when I first saw this in the Catalogue way back at Onstage Local I was smitten by the Love and Affection stamp set and co-ordinating products. The stamp set is gorgeous and the Designer Series paper is absolutely stunning. I haven’t lost that feeling. This card is one that I designed for my June Card Class. I started by adding a strip of the Affectionately Yours Designer Series Paper to the left hand side of Whisper White card which is then attached to scored and folded Crumb Cake card. This particular piece of Designer Series Paper has copper embossing to highlight the detail of the flowers.  I embossed a piece of Cucumber Crush card using one of the Floral Affection Embossing Folders. (This is a set of two small embossing folders both of which are beautiful.) The embossed card is attached across the bottom of the card front. I cut a piece of Whisper White card using one of the Layering Square Framelit Dies and stamped the greeting from the Love and Affection stamp set onto the right hand side using Night of Navy ink.
  I cut a Crumb Cake card with a slightly larger scalloped square from from the Layering Square Framelit Dies and attached the stamped card. Using Versamark ink I stamped the large flower onto Daffodil Delight card, the small flower onto Watermelon Wonder card and the leaves onto Cucumber Crush card. The images are embossed using the Copper Embossing Powder and then cut out by hand. I layered them onto the stamped Wisper White panel, added Basic Pearls to the centre of the flowers and attached the square panel to the card front using dimensionals. I tried to mimic the embossing folder layout with the flowers and leaves. Not sure if I succeeded but I think so. To decorate the inside of the card, I simply embossed a piece of Cucumber Crush card and attached it to the bottom of Whisper White card.
I am rather pleased with this card. What do you think? I’d love to hear.
Bye for now,
Kris
Product Used:


