Weekly Deals
Each week Stampin’ Up! has some great bargains in their Weekly Deals. I don’t always remember to remind you about these but will try to do better. These Deals offer you a great way to stock up on some great product and save lots of dollars at the same time. Woohoo!
Here are this weeks fabulous Weekly Deals.
 Boys Will Be Boys Clear-Mount Stamp Set
Item No. 134138
Price: $30.95 $23.21
 Dazzling Diamonds Glimmer Paper
Item No. 135315
Price: $8.95 $6.71
 Fine Print Coupons Swatchbook – Digital Download
Item No. 132565
Price: $13.95 $8.36
 Fun Frames Textured Impressions Embossing Folder
Item No. 133727
Price: $15.95 $11.96
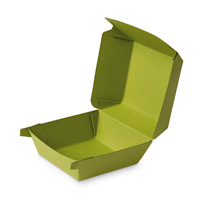 Hamburger Box Bigz Xl Die
Item No. 133724
Price: $69.95 $52.46
 Hearts Border Punch
Item No. 133784
Price: $27.95 $20.96
 Stampin’ Blendabilities™ Markers Wisteria Wonder Assortment
Item No. 131002
Price: $20.95 $15.71
 Tag A Bag Accessory Kit
Item No. 133629
Price: $13.95 $10.46
Remember these deals are only available until the end of the day next Tuesday 10th February. In case I don’t remember to share the Weekly Deals with you, you can always check them out by visiting my store and clicking on the Weekly Deals at the top of the left hand column.
Bye for now,
Kris
More Party Time
I had the most wonderful day on Saturday at the Brisbane Party Time Stampin’ Up! event. I got to hang out with a lovely lady Rebecca O’Gorman, which certainly made my day more enjoyable. The Party Time event was run by Kim Gavarra and Bec Ross and they did an amazing job. We had some fabulous presentations by demonstrators including Rebecca, who did an awesome job.

We had a small resource centre and I was quite honoured to share my knowledge about the new Chalkboard Paper and Chalkboard inks with the other demonstrators there. I created four cards to demonstrate these wonderful products and thought you might like to see them.
 Rebecca kindly took my photo at the end of the event, just to prove I really did it. I also want to say hello to Jenny, who recognised my name badge from my blog and said hello. It’s lovely to meet a blog follower in person.
I’ll pop back, maybe tomorrow and share the projects we made during the day.
Bye for now,
Kris
Party Time
Tomorrow we are having a live Stampin’ Up! event at the Brisbane Convention Centre. I can’t wait to see all the fabulous presentations, learn all the latest news and catch up with all the other demonstrators. We are not being provided with name tags for this event, we have to make our own, so I thought I would share mine with you tonight.
 I am totally in love with the Butterfly Basics stamp set and the matching Butterflies Thinlet Dies and just had to use it on my name tag. I cut Whisper White card using the next to largest Oval Framelit Die and stamped the leaf image three times using Old Olive ink (without re-inking). I stamped the honeycomb image over the top using Crushed Curry in, so that the whole of the Whisper White card was covered. I also sponged around the edge of the oval using Crushed Curry ink. I stamped the flower image onto scrap Whisper White card using Memento Tuxedo Black ink and coloured it using Coastal Cabana, Old Olive and Daffodil Delight Blendibilities. Once coloured I cut the flower out and attached it over the stamped images. I cut Early Expresso card using one of the Butterflies Thinlet Dies and attached it over the flower image. I stamped the butterfly image using Crushed Curry ink, cut it out with the matching Butterflies Thinlet Die and attached it over the Early Expresso butterfly. I added a row of Basic Pearls to the centre of the butterfly images. I cut the letters for my name from Crushed Curry card using the Little Letters Thinlet Dies. I cut the large Scalloped Oval from the Oval Framelits Collection from Early Expresso card and attached the decorated oval to the front. I used Tombow glue to add a brooch finding to the back.
Attending these events is one of the things I love about being a Stampin’ Up! Demonstrator. If you would like to learn more about how you can attend these fabulous functions contact me so I can give you the details. If you are already a demonstrator attending the Brisbane Party Time event tomorrow, don’t forget to say hello.
Bye for now,
Kris
Product Used:


February Class
I have finally updated my Classes and Workshops page to give you the dates and times for my February and March Classes.
 My first class for this year will concentrate on the gorgeous Butterfly Basics stamp set and matching Butterflies Thinlets Dies. We are going to create five cards using this stamp set and also a “surprise” project. Cost for this class is $30.00 and as space is limited don’t delay if you would like to attend. If you have any questions, feel free to contact me to discuss.
I hope to see many of you over the coming months.
Bye for now,
Kris
Products:

Cased Butterflies
 I saw this card on Pinterest and decided to make my own version. I stamped the honeycomb image from the Butterfly Basics stamp set twice onto the centre Whisper White card using Sahara Sand ink. I stamped the leaf image twice using Pear Pizazz ink and then embossed the stamped card using the Decorative Dots Embossing Folder. I wrapped the left hand side with Pear Pizazz 1/4″ Cotton Ribbon and tied a knot. The stamped card is attached to Pear Pizazz card and then to scored and folded Whisper White card.
 I stamped the butterfly from the Butterfly Basics stamp set onto Whisper White card using Wisteria Wonder ink and cut them out using the matching Butterfly Thinlets Die. The butterflies are attached to the card front using a Glue Dot in the centre and 1/2″ dimensional under each wing. I also added a large Basic Pearl to the centre of the butterfly.
 To decorate the inside the card, I stamped the honeycomb image twice using Sahara Sand ink onto the bottom left hand corner of Whisper White card. The leaf is stamped over the top using Pear Pizazz ink. I stamped the butterfly onto scrap card using Wisteria Wonder ink and cut it out using the matching Butterfly Thinlets Die and attached it over the bottom of the leaf image.
All I all I love this card, so much so that it will be part of my class schedule in January.
I love how the addition of the Pear Pizazz layer really makes the card front “pop”. Don’t you agree? I’m sure you are going to love this stamp set as much as I do.
Bye for now,
Kris
Product Used:


New Goodies
 One of the things I love most about being a Stampin’ Up! Demonstrator is that I get to see new product before everyone else. I even get to order it and “play” with it before the catalogue actually goes live. Image that! So much fun!
Anyway my goodies actually arrived a couple of weeks ago but I was really busy making gifts and cooking for my Christmas Party, so I didn’t actually unpack the box for about a week. I knew that once that box was unpacked I would want to create and nothing else would get done.
So I will share with you this card I made using one of the Sale-A-Bration stamp sets and a sketch that was one of the Technostamper challenges recently. I created this card for a friend of mine who recently moved into a new home and couldn’t share until I had given her the card.
I embossed Whisper White card using the Tiny Triangles Embossing Folder and attached it to scored and folded Mellow Moss card. I wrapped Whisper White card with the Mossy Meadow 1/2″ Stitched Satin Ribbon and tied a bow before attaching to Mossy Meadow card which has one long edge punched using the Scallop Border Punch.  This panel is attached to the card front. I stamped the little house image from the You Brighten My Day stamp set onto Whisper White card using Always Artichoke ink and used the What’s Up Punch to cut it out. The house is attached to the Whisper White panel using dimensionals.
I attached Whisper White card which is embossed using the same folder to Mellow Moss card which has one long edge punched using the Scallop Border Punch. This piece is attached to Whisper White card and then inside the Mellow Moss card.
I love it! So simple and sweet.
Both the Sale-A-Bration and the new Occasions Catalogues went live on the 6th January, so you can get this great little stamp set for Free.
Bye for now,
Kris
Product Used:
Unfortunately I cannot show you an image of the new stamp set but it won’t be long and you can get this stamp set FREE. Yipee!


Happy Birthday Sarah
 My daughter celebrates her birthday today and I used the sketch for this week’s challenge at the Sketch Frenzy Friday Blog to create her card.
I embossed Whisper White card using the Perfect Polka Dots Embossing Folder and attached it to scored and folded Wisteria Wonder card. I cut a piece of the gorgeous Irresistibly Yours Designer Series Paper which is Free in the Sale-A-Bration catalogue and brayered over it with Soft Sky ink. This DSP is already embossed with a design and you can add any colour you wish to match anything you are creating. Just beautiful!  Anyway, I attached the brayered paper to the centre of the card front. I cut a circle from Wisteria Wonder card using one of the Circle Framelit Dies and attached it to the centre of Designer Series Paper. I cut a strip of Sahara Sand card, cut a “v” in each end and attached it over the Wisteria Wonder circle.
 I stamped the image from the Bloom With Hope stamp set onto Whisper White card using Memento Tuxedo Black ink and coloured it using Wisteria Wonder and Old Olive Blendibilities. I punched the image using the 2″ Circle Punch and attached it to the card front using dimensionals.
Inside the card I simply stamped and coloured the same image from the Bloom With Hope stamp set that I used on the front of the card. I also added the greeting from the same stamp set using Memento Tuxedo Black ink.
We are celebrating with a family get together for lunch at one of my favourite eating venues – the Beachmere Tavern. The food is always lovely and they have a great playground for the grandchildren.
Bye for now,
Kris
Product Used:


You’re Sweet
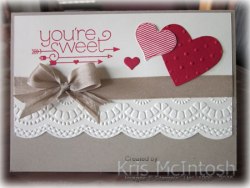
I am finally getting my class schedule organised, and thought I would share this card which we will be making at my first class for the year at Beachmere Retirement Resort. I cut one long edge of Very Vanilla card using the Large Scallop Edgelit Die and then embossed with the matching Delicate Design Embossing Folder. I wrapped the card with Crumb Cake 1/2″ Seam Binding so that you couldn’t see the top of the embossing. I stamped the greeting from the You Plus Me stamp set onto the left hand corner of the embossed card using Real Red.  The image panel is attached to scored and folded Crumb Cake card. I cut Real Red card using the second smallest die from the Hearts Framelits Dies and embossed it using the Perfect Polka Dot Embossing Folder. I stamped the striped heart from the Hello Life stamp set onto scrap Whisper White card using Real Red ink and cut it out. I cut Real Red card using the heart border image from the Mini Treat Bag Thinlets Die. The stamped heart is attached over the embossed heart on the right hand side of the card front.
  I attached one of the small hearts from the border using a Glue Dot. I tied a bow using Crumb Cake 1/2″ Seam Binding and attached it to the left hand side of the card front using a Glue Dot.
Inside the card I created the same border along the bottom of Very Vanilla card as I created on the card front. I stamped the dotted heart image from the Hello Life stamp set, cut it out and attached over the ribbon.
I think this card is really quite cute and makes the perfect Valentines Day card. What do you think?
Bye for now,
Kris
Product Used:


Butterfly Basics

This card uses a new stamp set from the Occasions Catalogue. I love that there are a number of images, so that you can create a collage if you wish. The large butterfly in this set also matches one of the Butterfly Thinlets Dies which you can purchase as a bundle with the Butterfly Basics stamp set. The small one matches the Bitty Butterfly Punch.
I stamped the greeting from the Butterfly Basics stamp set onto the top right hand corner of Whisper White card using Memento Tuxedo Black ink and then embossed the Whisper White card using the Perfect Polka Dots Embossing Folder. I stamped the border image from the Butterfly Basics stamp set onto Whisper White card using Melon Mambo ink, cut it out and attached it to the lower right hand side of the embossed card. I stamped the floral stem image onto Whisper White card using Memento Tuxedo Black ink. I coloured the image using Melon Mambo, Old Olive and Daffodil Delight Blendibilities. Once the image was coloured I cut it out using one of the Oval Framelit Dies. I attached the image panel to a slightly larger Melon Mambo oval and then the card front using dimensionals.
 Inside the card I stamped the border across Whisper White card using Melon Mambo ink. The border doesn’t quite make it across the length of the card, so I just stamped it twice, being photopolymer it lines up pretty easily. I stamped the leaf image on the left hand side using Old Olive ink. I stamped the butterfly onto scrap Whisper White card using Daffodil Delight ink and cut it out using the matching Butterfly Thinlets Die.
This is a really pretty stamp set and I am sure you will me using it quite a lot over the coming months.
Bye for now,
Kris
Product Used:


Another Magazine Case
Today I am sharing with you some old and some new product in a card which I cased from the magazine Stampin’ Up! publishes for demonstrators. I made this card to showcase some product that is new to the market. In fact it was released yesterday! Sorry I didn’t make it on here to show you then. So check out the link on my blog to the new Occasions Catalogue and also the gorgeous Sale-A-Bration catalogue. If you don’t have a demonstrator, then feel free to contact me for a copy of these publications.
 Anyway onto my card! I stamped the large dotted image from the Gorgeous Grunge stamp set onto Whisper White card using Coastal Cabana ink. I stamped the balloons from the Sketched Birthday stamp set onto the Whisper White card using two new ink pads from the Occasions Catalogue. These are Rose Coral and Yellow Citris ColorBox Chalk ink. I also stamped the balloons onto Blushing Bride card using the Rose Coral ColorBox Chalk ink and onto So Saffron card using the Yelllow Citris ColorBox Chalk ink, cut them out and attached the cut images over the stamped images using dimensionals. I then used a Banner Framelit Die to cut the new Chalkboard Paper – yes Chalkboard paper. How exciting!
  The greeting comes from a Sale-A-Bration stamp set called Big Day (FREE with a qualifying order) and is stamped onto the Chalkboard Paper banner using Aquamarine ColorBox Chalk ink. I stamped my image using the Stamp-a-ma-Jig to position it and without removing the “T” piece stamped it again to give it a little more depth of colour.
Once the banner was attached to the card front I wrapped it with Basic Black 1/8″ Tafetta Ribbon and tied a bow. The image panel is attached to scored and folded Coastal Cabana card. I also added four Basic Rhinestones to the card front just for fun.
To decorate the inside of the card, I stamped the balloon images once again using Rose Coral and Yellow Citris ColorBox inks. I masked the balloons and then stamped the dotted image from the Gorgeous Grunge stamp set over the top using Coastal Cabana ink.
Thanks, once again, to Stampin’ Up! for all the inspiration and don’t forget to check out the new catalogue for all the fantastic new product. As always the catalogues are loaded with inspiration.
Bye for now,
Kris
Product Used:


