Happy Birthday Emma
My youngest daughter, Emma, celebrated her birthday on Monday – Happy Birthday. This is the card I made for her.

Its a card I found on Pinterest by Shana Gaff. Basically I inked the Hello Doily stamp using Daffodil Delight and then used a sponge dauber to add Tangerine Tango ink around the edges before stamping onto Whisper White card. I stamped the flower image from the Just Believe stamp set using Stazon Jet Black ink twice. I stamped “Just For You” from the same stamp set again using Stazon Jet Black ink. I wrapped the panel with Daffodil Delight 1/4″ Stitched Grosgain Ribbon and tied a knot before attaching to Basic Black card and then scored and folded Tangerine Tango card.
 To decorate the inside of the card I again inked the Hello Doily stamp with Daffodil Delight and Tangerine Tango ink and overstamped with the flower using Stazon Jet Black. The Whisper White card is attached to Basic Black card before attaching to the inside of the card.
I love the way this has turned out and thank Shana for her inspiration.
Bye for now, Kris.
Sunny Challenges meets Dapper Dad
I created this card for my class at Beachmere and realised that it fits the current Sunny Challenge perfectly, so perhaps I can inspire a few more of you to enter the challenge this week.
 I embossed Very Vanilla card using the Houndstooth Embossing Folder. I attached a piece of Parkers Patterns Designer Series Paper to Not Quite Navy card and attached it to the left hand side of the embossed Very Vanilla card. I pierced three holes in the Very Vanilla card, added Crumb Cake Brads before attaching it to scored and folded Early Expresso card. I stamped the watch from the Dapper Dad stamp set onto Very Vanilla card using Cajun Craze ink and cut it out using the second smallest Oval Framelits Die. I cut Cajun Craze card using the next largest Oval Framelits Die and pierced a row of holes around the edge. I attached the image oval to the Cajun Craze oval and then to the card front using dimensionals.
To decorate the inside I stamped “happy Father’s day” from the Delightful Dozen stamp set onto Very Vanilla card using Not Quite Navy ink.  I punched one long edge of a narrow strip of Not Quite Navy card using the Scallop Border Punch and attached it behind a strip of Parkers Patterns Designer Series Paper. I attached the designer series paper strip to the bottom edge of the Very Vanilla card before attaching it to the inside of the card.
I am pretty chuffed at how cute this card is. Maybe it will be the one I give to my Dad on Father’s Day.
Don’t forget to visit Sunny Challenges and add your card to Mr. Linky once you have completed it. You still have plenty of time to play along.
Bye for now, Kris.
Ethan’s Birthday
My grandson Ethan turned 7 yesterday and we celebrated by having an afternoon tea. My Mum and Dad, my two daughters and the six grandchildren had a lovely afternoon, enjoying a cuppa and piece or cake.
 I had some kits left over from one of my classes and decided to use it to make Ethan’s birthday card. I embossed Whisper White card using the Houndstooth Embossing Folder and attached it to scored and folded Basic Black card. The Pacific Point Striped Designer Series Paper and the Real Red Striped Designer Series Paper are attached to Basic Black card and then the card front. I inked the wheel section of the digger using a Basic Black Stampin’ Write Marker and the lower half of the cabin using a Pacific Point Stampin’ Write Marker and stamped onto the Whisper White card. I stamped the wheels onto scrap Whisper White card using Jet Black Stazon ink and cut them out. I pierced holes in the centres of the rollers of the wheels, inserted Mini Silver Brads and then attached it over the stamped wheels using Dimenionals. I stamped the top section of the cabin and the arms of the digger onto scrap Whisper White card four times using Real Red ink. I cut each part out separately, pierced holes and inserted Mini Silver Brads so the arm of the digger can be moved. I attached the top half of the cabin over the stamped image using dimensionals.
Inside the card I attached Pumpkin Pie Striped Designer Series Paper to Basic Black card and then to the lower edge of Whisper White card. I inked the presents using Real Red, Pacific Point and Old Olive Stampin’ Write Markers and stamped onto scrap card, repeating until I had five images. I cut them out and attached them to the card above the Designer Series Paper. I stamped the greeting from the Bring on the Cake stamp set using Stazon Jet Black ink and coloured the “7” using a Pacific Point Stampin’ Write Marker.
My grandson loved the card and got really excited when he realised the arm of the digger moved. It is so nice to know that your handiwork is appreciated.
Bye for now, Kris.
A Promotion or Two
The first promotion I want to remind you about is Sent With Love which is ending on the 15th June, so you only have a few days to take advantage of this fantastic offer. The stamp set itself comes in Clear Mount only and sells for $33.95. The beautiful co-ordinating designer series paper sells for $18.95, but you can buy the bundle which includes the stamp set, designer paper and as a bonus Calypso Coral Bakers Twine for $46.25 which is 20% off retail value. So you had better be quick or you will miss out. You can find more details about this at my online store or your can email me to place an order.

Also ending on the 15th June is the 25% of digital downloads. So for all of you who are loving My Digital Studio this is a fantastic way to save on some great downloads. If you want to know more about this programme, why not take advantage of the 30 day free trial. You can find more information regarding this on my website and online store. You can also visit the My Digital Studio website where you can find some great beginner (and not so beginner) video tutorials. This site is free to join and open to demonstrators and customers.

If you feel a little unsure and would like to learn more about this programme, then please contact me and we can organise a one on one class so you can see what all the fuss is about.
Please don’t forget to check out the Best Of stamp set releases which started on the 1st June. Stampin’ Up! will be releasing some of their favourite stamps of the last 25 years each month. These stamp sets will only be available until April 2014.

And while on the subject of new stamps. Stampin’ Up! has also released five stamps which you can purchase individually. These stamps will only be sold as clear mount and will come packaged in cellophane bags, not the little boxes we are use to. These single stamps will only be available until 31st August and then they will be gone.
 WOW. I think that is all that I need to let you know about. There are some fantastic deals on offer at the moment, so please take a look and then take advantage. You can always contact me if you want more information.
Bye for now, Kris.
Sunny Challenge 81/13
 This week’s Sunny Challenge has been set by Gwen and all we need to do is make a card, scrap page or 3d item using something from the Seasonal Catalogue. Well I decided to use the very gorgeous Artisan Embellishments Kit (don’t tell anyone but it’s the first time I have used it). If you love this kit then you still have plenty of time to purchase one before the catalogue retires at the end of August.
I embossed Primrose Petals card using the hearts Adorning Accents Embossing Folder. It takes a little bit of work to use this to emboss the whole piece of card but it is certainly worth the extra effort. I attached the embossed card to Very Vanilla card and wrapped it with the gorgeous large oval lace from the Embellishment Kit and then attached it to scored and folded Crumb Cake card. I wound the stems of three of the flowers together and tied at bow using cotton lace from the Embellishment Kit.  I attached the flowers to one of the designer tags using Glue Dots. The tags are double sided so you can choose to use the Whisper White side or the Crumb Cake side. I added one of the metal buttons on top of the bow and added one of the ticket stubs using dimensionals, to over the stems of the flowers.
Inside I attached a piece of embossed Primrose Petals card to Very Vanilla card and wrapped the join using the cotton lace. I added the large metal button using Glue Dots and stamped the “happy I do day” from the Word Play stampset using Primrose Petals ink. I added a small Basic Rhinestone to the greeting for a little bling.
 I’m a bit sorry I didn’t use this kit sooner, it contains some really gorgeous elements, maybe I better get another one!
For more inspiration pop on over to Sunny Challenges and Creations and see what the other members of the design team have created. Once you have your card, scrap page or 3d item ready then add it to Mr. Linky. We love seeing all your creations and don’t forget the challenge now runs for two weeks.
Bye for now, Kris.
My New Bag
 I had seen this gorgeous bag on Pinterest by Debbie Naylor and really wanted to make one for myself. I wanted to have lots of pockets to hold all those useful (and not so useful things) we carry around. I made an outside bag which I decorated with rows of the gorgeous Pink Pirouette/Rose Red 1-1/4″ Two-Tone Ribbon. I also made a liner to go inside bag which has all the pockets that I needed. Once I had attached the liner to the bag I hand sewed Flower Trim to cover the top edge of the ribbon, making sure that I didn’t stitch through any of the pockets.
I love how gorgeous and useful this bag is. I got lots of compliments at convention too.
Bye for now, Kris.
My Downline Gift
 One of the great things about going to a Stampin’ Up! Convention is giving a gift to your room mates or your downline. I was lucky enough to attend Convention with one of my downline, the very talented Shirley McAvoy. I’ve already shared with you the gorgeous bag of goodies that Shirley gave to me. I was really stumped about what sort of gift to get her when I saw a fabulous notebook holder on the Stamp Academy website. You already know that I am a member of this site and that I have organised to be an affiliate so that you can do these classes online at any time of the day or night that suits you. The tutorial for this great little project also happens to be one that you can access on the Free Video link. This gives you an idea of the quality of the projects before you decided to sign up for classes. I used the gorgeous This and That Designer Series Paper which will be in the new Stampin’ Up! catalogue and is actually available to you at the moment.
The notebook holder is held closed by concealing the magnets in the front covers, so that it snaps shut. You also have several pockets to collect business cards or other little notes and it will keep your pen handy too.
You can click on the link in my sidebar to take you to the information page about this great site. To see the tutorial for the Magnetic Notepad, just click on the Free Videos button and take a look. Not only do you get the video but a great PDF to download too. You can join specific sessions or take the Gold Membership and get the whole lot.
I’d love to hear what you think of this really cute little project.
Bye for now, Kris.
A second card for SC 80/13
 This is actually the first card I made using Vicky’s great sketch for the current Sunny Challenge. However, I decided to post the card using the Dress Framelits instead.
I embossed Cherry Cobbler card using the Fancy Fan Embossing Folder. I actually placed the card inside the folder so that the fans run across the card and this left the lower section un-embossed. I added a piece of the beautiful Delicate Details Lace Tape across the card to cover the end of the embossing. The embossed card was then attached to scored and folded Crumb Cake card. I inked the flower from the Serene Silhouettes stamp set using Cherry Cobbler and Old Olive Stampin’ Write Markers. You will notice that one of the flowers is a little lighter – this is because I actually stamped the image onto scrap paper and then only re-inked the other two flowers and the stems before stamping onto Whisper White card.  The image panel is attached to Crumb Cake card and then to the card front using dimensionals.
I thought this was a little plain at first but it is really growing on me. What do you think?
You still have plenty of time to play along, the challenge won’t close until late on Friday so get crafting and then pop over to Sunny Challenges and Creations and add your card, scrap page or 3d item to Mr. Linky.
Bye for now, Kris.
Best Of Stamp Sets
As part of the Stampin’ Up! 25-year anniversary celebration, they are bringing back some of their favourite stamp images from the last quarter century and combining them into five sets, which will release-one set per month-until October. Even better, along with some great classic images, each “Best of” set will also include a never-before-seen image! Each of these sets will be available for purchase until April 2014. What a fantastic idea.

This beautiful Best Of Flowers stamp set is available from today until April 2014 at a fabulous price of $25.95. The next set will be released on the 1st July, so keep a look out. You will be able to find all the Best Of stamp sets at my online store, just click on the Special Offers button and then the Best of 25 years or just contact me to place an order.
Bye for now, Kris.
Retired Lists
As a demonstrator the release of the Retired List is always a kind of love/hate moment. I hate seeing some of my favourite things being retired BUT this is the day that I also get to pre-order from the New Catalogue. So on the one hand I am very sad to see the 2011-2103 in colours retire, but I have already ordered the new in-colours and I know they are going to be just as fabulous.
 You can view all the retiring products at my online store or click on the link on the right hand side of this page.
Remember that if you really want something on the retiring list, then you need to order it straight away, because once they sell out, they will no longer be available. If you don’t like the idea of ordering online, then just contact me to order your supplies.
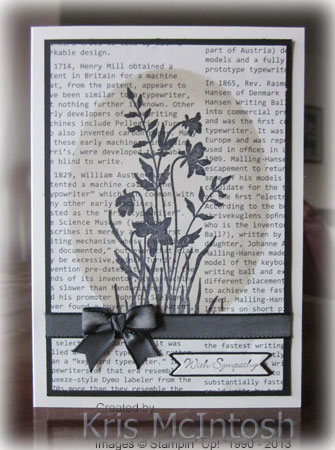
The Just Believe stamp set is one of those sets that I really am going to miss. This is a card that I found on Pinterest by Cindee Wilkinson and one that we made at a recent class. It truly is a fabulous set, so don’t wait if you really want it. The card also features the Newsprint Designer Series Paper (retiring) and Basic Black 3/8″ Taffeta Ribbon (also retiring).
Happy Shopping and bye for now, Kris.


