Sunny Challenges and Creations
Well after a long break over Christmas Sunny Challenges and Creations is again up and running. This year we are going to trial running each of our challenges for two weeks. We are hoping that this will give you more time to enter. We know how busy everyone is and how difficult it can be to get challenges completed on time. Anyway our first challenge is an easy one. All you have to do is create a card, scrap page or 3d item with a birthday theme. Here is my card for the challenge.
 I added Whisper White card to scored and folded Basic Black card. I attached Real Red Striped Designer Series Paper from the Brights Designer Series Paper Stack to Basic Black card and attached it to the left hand side of the card front. I embossed Pacific Point card using the Chevron Embossing Folder, attached it to Basic Black card and attached it to the right hand side of the card front. I inked the truck stamp from the I Dig You stamp set using Real Red, Pacific Point and Basic Black Stampin’ Write Markers and stamped onto Whisper White card. I stamped the truck onto scrap Whisper White card using Real Red ink and cut out the cabin. I stamped the truck onto scrap Whisper White card using Pacific Point ink and cut out the trailer. I stamped the truck again onto scrap Whisper White card using Basic Black ink and cut out the tyres. The cut out pieces were adhered over the stamped images, just to give the truck more dimension. I attached the image panel to Basic Black card. The parcel images were stamped using Real Red ink and again using Pacific Point ink onto scrap Whisper White card and cut out.
 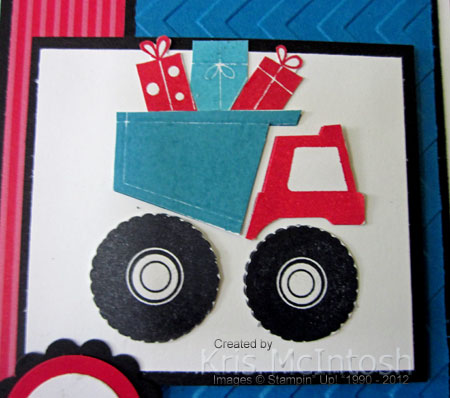 The parcel images were attached to the image panel over the back of the trailer. The truck panel is attached to the card front using dimensionals. I stamped “wish big” from the Pennant Parade stamp set onto Whisper White card using Pacific Point ink and punched it using the 3/4″ Circle Punch. The greeting is attached to a Real Red 1″ Circle and then to a Basic Black 1-1/4″ Scallop Circle. The greeting is attached to the card front using dimensionals.
Ok so now for some more inspiration pop on over to Sunny Challenges and see what the Designers and Guest Designers have created. Once you have created your card, scrap page or 3d item, add it to Mr. Linky. I am really looking forward to seeing what you create for this challenge and don’t forget you now have two weeks to play along.
Bye for now, Kris.
Burlap Valentine Decor
This gorgeous project is the latest in the January Edition of Craft Project Central and was created by the very talented Carrie Rhoades,

The look of burlap has become quite popular for home décor. Here are two fun Valentine projects that will bring the shabby chic look of burlap to your décor. Each pennant on the “sweet love” banner is burlap with designer paper stitched on top. Accents of glittered hearts, dyed ribbon and paper flowers finish off the banner. The framed Amore art piece really pops with rolled paper roses. These two coordinating décor pieces would really show someone how special they are to you or would be a great addition to your own décor this Valentine’s Day.
So if you want to make this delightful duo, then pop over the Craft Project Central and subscribe to the January edition – $10.00 for 10 step by step photo tutorials.
Bye for now, kris.
I’m Feeling Sentimental
When I first saw the Sale-A-Bration catalogue, I fell in love with this stamp set and knew it would look gorgeous with the Early Expresso Core’dination card.
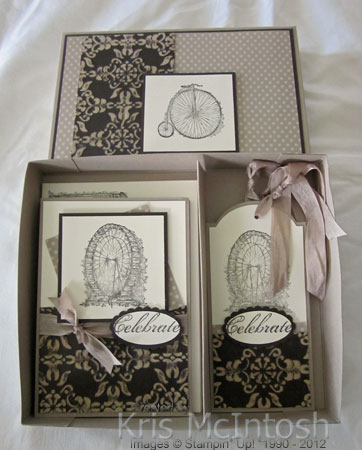
I created three cards and three tags using the images in this set with a real vintage feel. I am posting this now because I want you to have time to order your Early Expresso Core’dination card while it is still current. When the current Holiday mini ends on the 31st January you will no longer be able to purchase the core’dination card in this colour. Contact your Stampin’ Up! demonstrator to make your purchase – don’t have a Stampin’ Up! demonstrator, then contact me.
The tutorial contains step by step photo instructions to create the box, cards and tags and costs $2.50. Just visit my Tutorials for Sale page to make your purchase.
Bye for now, Kris.
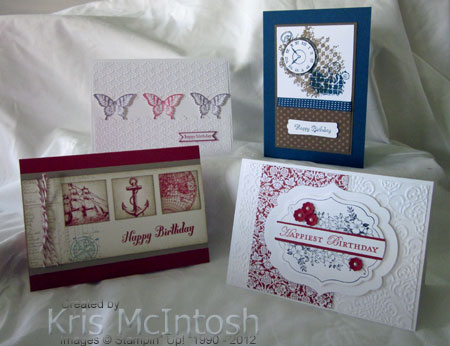
Creating Pretty Cards Sketch 19
I love completing challenges when I get the time, and entering the one at Craft Project Central offers the chance of winning a free subscription. The sketch challenges are created by Kris Kilkenny a very talented paper crafter, just visit her blog for some more inspiration.
 I embossed Very Vanilla card using the Fancy Fan Embossing Folder and attached it to the front of scored and folded Cherry Cobbler card. I cut a piece of Cherry Cobbler Polka Dot Designer Series Paper from the Regals Designer Series Paper Stack, cut a flag shape into one end and attached it to the left hand side of the card front. I stamped the greeting from the Your Amazing stamp set using Cherry Cobbler ink onto Very Vanilla card. The greeting is attached to Cherry Cobbler card and then to the card front. The flower is created using the Fancy Flower Punch using a technique that Shannon Moncreiff demonstrated at the Brisbane Regionals.
  My flower is punched from Very Vanilla card and the edges are sponged using Cherry Cobbler ink. After my flower was completed I sprayed it with a mix of Isopril and Champagne Mist Shimmer Paint. This gives the flower lots of sparkle and just to add a little more I added one of the new Large Rhinestone Basic Jewels to the centre. I cut Always Artichoke card using the Little Leaves Sizzlet and attached it to the card front. The flower is attached to the card front over the leaves using Mini Glue Dots.
I love the finished card and especially love that I got to use a new stamp set!
Bye for now, Kris.
Winner – Free Subscription
It is my great pleasure to announce that Erica is the winner of a one month free subscription to Craft Project Central. To win this subscription all Erica had to do was leave a comment on the post about my tutorial for the January Edition of Craft Project Central. So thank you to Erica and all of you who take the time to leave a comment on my blog. I truly appreciate it. I hope that Erica enjoys her subscription to Craft Project Central as much as I do.
Bye for now, Kris.
Valentine Box of Chocolates and Cards
This the latest project in the January Edition of Craft Project Central. This gorgeous box which holds chocolate and a set of heart shaped cards was designed by Heidi King. I love the way it showcases more of the beautiful products in the Seasonal Catalogue (available in Australia on 1st February). Please visit Heidi’s blog to see more of her lovely work and don’t forget to leave a comment.
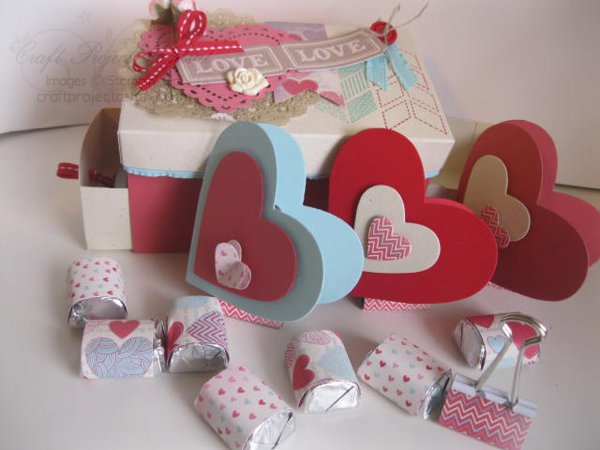
With Valentine’s day just around the corner this would make a fantastic gift or even a class project. To get the tutorial or you have to do is subscribe to the January Edition of Craft Project Central – $10.00 for 10 tutorials.
Bye for now, Kris.
Happy Birthday Sarah
 My eldest daughter celebrates her birthday today and I thought I would share the gift and card that I made for her.
You will recognise this little cage as being one of the tutorial at Craft Project Central this month. I changed up the colours of the butterflies but otherwise followed the tutorial. It was a fun and fairly easy project to put together. I wanted to give my daughter some money to put towards camera equipment (you will remember that she is a great photographer and trying to get her business up and running). I made this little tag to hang inside the cage and hold some money (I hope you can see it in the photo). I cut the top if a strip of Crumb Cake card using one of the new Hearts a Flutter Framelits (available 1st February in Australia). 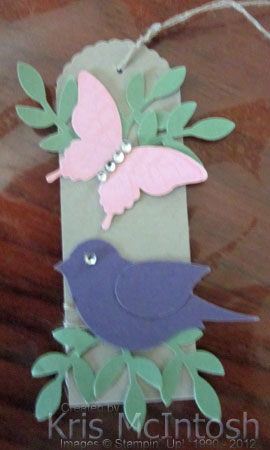 I scored about an 1″ from the bottom of the card and turned it up. I wrapped it with Linen Thread and tied a knot. I punched some leaves using the Bird Builder Punch and added a bird over the top. Another butterfly near the top of the tag and some extra leaves just to fill it out (I stamped one of the images from the Papillon Potpourri stampset and they are punched using the Elegant Butterfly Punch). I punched a hole in the top and tied some Linen Thread through the top. I tied the tag onto the thread which holds the top of the cage closed.
I made a card by adding some Perfect Plum Paper from the Subtles Designer Series Paper Stack to Very Vanilla card. I cut Very Vanilla card using the Paper Doily Sizzlits L, cut it in half and attached half to the right hand side of the Designer Paper. I cut one long edge of a strip of Very Vanilla card using the Large Scallop Framelit and embossed it using the Delicate Designs Embossing Folder. This piece is attached to the left hand side of the card front over the Paper Doily. I wrapped the edge of the Very Vanilla embossed card using Victoria 5/8″ Crochet Trim and attached the whole piece to scored and folded Perfect Plum card.  I stamped three flowers from the Bloomin’ Marvelous stamp set (Free to qualifying orders during Sale-A-Bration) three times onto scrap paper using Perfect Plum ink and cut them out. I stamped the leaves from the same stamp set onto scrap Very Vanilla card three times and cut them out. I also stamped the butterfly from the same set onto scrap Very Vanilla card using Perfect Plum ink and cut it out. I attached the flowers and leaves over the embossed card on the left hand side of the card from and the butterfly to the right hand side. I added medium Basic Pearls to the centre of the flowers and two small Basic Pearls to the butterfly. I stamped happy birthday from the Create-A-Cupcake stamp set onto Very Vanilla card using Perfect Plum ink and cut it using the Word Window Punch.
  I attached it to a Perfect Plum Modern Label and then to the card front. Lastly I tied a bow using the Victoria 5/8″ Crochet Trim and attached it using Mini Glue Dots.
I love the way both the card and the bird cage turned out. What do you think?
Bye for now, Kris.
Updated Classes
I have updated my Classes and Workshops page with a couple of classes I have lined up for the New Year. My first class is scheduled on Saturday 19th January at 2pm. During this class we will be making a desktop notecard holder and a DVD case organiser, so you can keep organised on the go.

The next scheduled class is a Stamp-A-Stack on Saturday 2nd February at 2pm. We are going to make 2 each of the pictured designs. I have to say that a couple of these cards are CASES of some that I have seen on Pinterest. I am going to run a midweek class as well but I need to confirm the day that I am committed to working at my grandchildren’s school. So look for this date after the 29th January.
The third class I have scheduled is a Scrapbooking class on Saturday 16th February. I am trialling this one to see the interest, so if you can’t make the first class or have a request for a specific time, then please let me know so that I know whether to keep running this class. We are going to complete two double page spreads in these classes and I am going to design the pages as much as possible around the standard 4″ x 6″ photo size.

So check out my Classes and Workshops page for more information and let me know which classes you would like to attend. Space is limited so please get in early to reserve your place.
Bye for now, Kris.
Valentine Heart Box and Card
Look at this gorgeous heart shaped box and matching card. Don’t they look sensational. I can just imagine giving that box to someone special filled with chocolates for Valentines Day or perhaps holding a special gift for a special anniversary. This gorgeous project was designed for Craft Project Central by Christy Fulk, To see more of her work take a visit to her blog and leave a comment letting her know how much you love it.
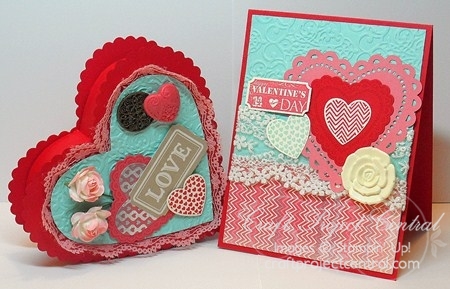
We are really lucky in Australia because our Seasonal Catalogue doesn’t begin until 1st February and we can start our shopping list early. This project showcases some fantastic things from the new catalogue, especially the Artisans Embellishment Kit, More Amore Specialty Designer Series paper and Hearts A Flutter Bundle. So sign up now and get all the tutorials so you can start creating as soon as your order arrives – just visit Craft Project Central. Remember is only costs $10.00 for 10 step by step (with photos) tutorials – amazing value.
Bye for now, Kris.
A Birthday Gift
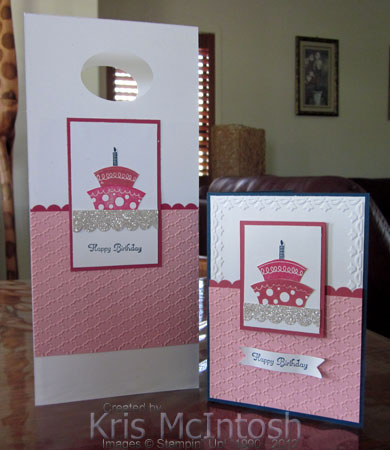 I attended the first birthday of a friends little girl today and needed to make a card and a matching gift bag. I used the Topsy Turvy Celebration Stampset.
The bag is made using an envelope. I cut the length down a little and scored at 1″ on each side and across the bottom. Once you open the score lines and fold over the triangle at the bottom you have a really roomy bag. I cut Whisper White card and punched an Extra Large Oval at one end through both pieces before attaching them to the front and back of the bag. I embossed Pretty in Pink card using the Fancy Fan Embossing Folder and attached a narrow strip of Rose Red card to the top edge. The Rose Red card has one long edge punched using the Scallop Border Punch. I stamped the cake layers onto Whisper White card using Primrose Petals ink and Rose Red ink and cut them out. I stamped the candle image onto Whisper White card using Midnight Muse ink and cut it out. I stamped happy birthday onto the Whisper White card using Midnight Muse ink. I attached a narrow piece of Silver Glimmer Paper which has one long edge punched using the Scallop Border Punch above the stamped image. I attached the cake layers and the candle above the Silver Glimmer Paper. The image panel is attached to Rose Red card and then the bag front.
To make the card I embossed the top two-thirds of Whisper White card using the Framed Tulips Embossing Folder and attached it to scored and folded Midnight Muse card. I embossed the Pretty in Pink card using the Fancy Fan Embossing Folder. I punched one long edge of Rose Red card using the Scallop Border Punch and attached it behind the top edge of the embossed Pretty in Pink card before attaching it to the card front. The image panel is created in a similar manner to the one on the bag. I stamped happy birthday from the Create-A-Cupcake stamp set onto Whisper White card using Midnight Muse ink and cut it using the largest framelit from the Bitty Frames Framelits. I attached the greeting to the card front with a dimensional in the centre and a Mini Glue Dot at each end.
I think this is a cute duo and that I need to use this stamp set more often, what do you think?
Bye for now, Kris.


